

Operating Instructions
Page 3
...a cassette 116 Erasing the cassette memory data 118 Customizing Your Camcorder Advanced Recording Operations Changing the menu settings 120 Shooting with digital effects ......... 84 Step 1 Installing the microphone 7 Step 2 Preparing the power supply 8 Step 3 Inserting a cassette 13 Recording - Basics Recording ... a tape - SLIDE SHOW 148 Preventing accidental erasure - Print mark 154 Additional Information Using the wide mode 66 Compatibility of DVCAM and Using the fader function 67 DV formats 156 Using special effects - Date search ... 80 Index Back cover 3 Photo ...
...a cassette 116 Erasing the cassette memory data 118 Customizing Your Camcorder Advanced Recording Operations Changing the menu settings 120 Shooting with digital effects ......... 84 Step 1 Installing the microphone 7 Step 2 Preparing the power supply 8 Step 3 Inserting a cassette 13 Recording - Basics Recording ... a tape - SLIDE SHOW 148 Preventing accidental erasure - Print mark 154 Additional Information Using the wide mode 66 Compatibility of DVCAM and Using the fader function 67 DV formats 156 Using special effects - Date search ... 80 Index Back cover 3 Photo ...

Operating Instructions
Page 8
... (about 20 °C (68 °F)) before recharging. 8 Step 2 Preparing the power supply The following power supplies can make combined use of internal and external batteries, by the power consumption of the camcorder in addition to the usage status of the battery packs.) The usable time of battery ...as an external source. Using a BP-L40 (A)/L60A/L90A battery pack With a battery pack, the camcorder will operate continuously for the time shown below , when power consumption of the camcorder and accessories is 40 W or higher (due to 86 °F). •Before long-term storage,...
... (about 20 °C (68 °F)) before recharging. 8 Step 2 Preparing the power supply The following power supplies can make combined use of internal and external batteries, by the power consumption of the camcorder in addition to the usage status of the battery packs.) The usable time of battery ...as an external source. Using a BP-L40 (A)/L60A/L90A battery pack With a battery pack, the camcorder will operate continuously for the time shown below , when power consumption of the camcorder and accessories is 40 W or higher (due to 86 °F). •Before long-term storage,...
Operating Instructions
Page 9
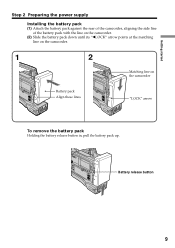
Getting started Step 2 Preparing the power supply Installing the battery pack (1) Attach the battery pack against the rear of the camcorder, aligning the side line of the battery pack with the line on the camcorder. (2) Slide the battery pack down until its "bLOCK" arrow points at the matching line on the camcorder. 1 2 Matching line on the camcorder Battery pack LOCK Align these lines. LOCK "LOCK" arrow To remove the battery pack Holding the battery release button in, pull the battery pack up. Battery release button LOCK 9
Getting started Step 2 Preparing the power supply Installing the battery pack (1) Attach the battery pack against the rear of the camcorder, aligning the side line of the battery pack with the line on the camcorder. (2) Slide the battery pack down until its "bLOCK" arrow points at the matching line on the camcorder. 1 2 Matching line on the camcorder Battery pack LOCK Align these lines. LOCK "LOCK" arrow To remove the battery pack Holding the battery release button in, pull the battery pack up. Battery release button LOCK 9
Operating Instructions
Page 10
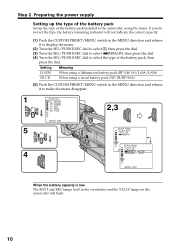
... PRESET/MENU switch in the viewfinder and the TALLY lamps on the camcorder will flash. 10 Setting Meaning LI-ION NI-CD When using a lithium-ion battery pack (BP-L40 (A)/L60A/L90A) When using the menu. Step 2 Preparing the power supply Setting up the type of the battery pack Set up the type...
... PRESET/MENU switch in the viewfinder and the TALLY lamps on the camcorder will flash. 10 Setting Meaning LI-ION NI-CD When using a lithium-ion battery pack (BP-L40 (A)/L60A/L90A) When using the menu. Step 2 Preparing the power supply Setting up the type of the battery pack Set up the type...
Operating Instructions
Page 11
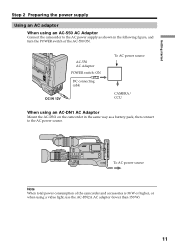
... When using an AC-DN1 AC Adaptor Mount the AC-DN1 on the camcorder in the same way as a battery pack, then connect to the AC power supply as shown in the following figure, and turn the POWER switch of the camcorder and accessories is 38 W or higher, or when using an AC-550 AC... Adaptor Connect the camcorder to the AC power source. To AC power source Note When total power consumption of the AC-550 ON.
... When using an AC-DN1 AC Adaptor Mount the AC-DN1 on the camcorder in the same way as a battery pack, then connect to the AC power supply as shown in the following figure, and turn the POWER switch of the camcorder and accessories is 38 W or higher, or when using an AC-550 AC... Adaptor Connect the camcorder to the AC power source. To AC power source Note When total power consumption of the AC-550 ON.
Operating Instructions
Page 12
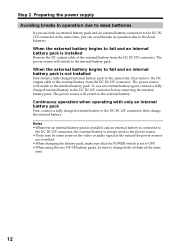
...battery. To use both of them at the instant the power sources are switched. •When changing the battery pack, make sure that the POWER switch is not installed First install a fully charged internal battery pack to the camcorder, then remove the DC output cable of the external battery...output cable of the external battery from the DC IN 12V connector. The power source will switch to the internal battery pack. The power source will switch to the internal battery pack. Step 2 Preparing the power supply Avoiding breaks in operation due to dead batteries If you can avoid breaks ...
...battery. To use both of them at the instant the power sources are switched. •When changing the battery pack, make sure that the POWER switch is not installed First install a fully charged internal battery pack to the camcorder, then remove the DC output cable of the external battery...output cable of the external battery from the DC IN 12V connector. The power source will switch to the internal battery pack. The power source will switch to the internal battery pack. Step 2 Preparing the power supply Avoiding breaks in operation due to dead batteries If you can avoid breaks ...
Operating Instructions
Page 30
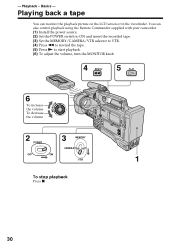
... on the LCD screen or in the viewfinder. Playback - Basics - - Playing back a tape You can also control playback using the Remote Commander supplied with your camcorder. (1) Install the power source. (2) Set the POWER switch to ON and insert the recorded tape. (3) Set the MEMORY/CAMERA/VTR selector to VTR. (4) Press m to rewind the tape...
... on the LCD screen or in the viewfinder. Playback - Basics - - Playing back a tape You can also control playback using the Remote Commander supplied with your camcorder. (1) Install the power source. (2) Set the POWER switch to ON and insert the recorded tape. (3) Set the MEMORY/CAMERA/VTR selector to VTR. (4) Press m to rewind the tape...
Operating Instructions
Page 47
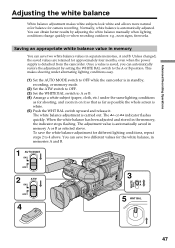
... saved in standby, recording, or memory mode. (2) Set the ATW switch to OFF. (3) Set the WHITE BAL switch to OFF while the camcorder is in memory A or B as for camera recording. To save the white balance adjustment for the white balance, in memory You can obtain ... separate memories, A and B. Normally, white balance is carried out. Once a value is detached from the camcorder. Unless changed, the saved values are retained for approximately four months, even when the power supply is saved, you can save two white balance values in the memory, the indicator stops flashing. The A...
... saved in standby, recording, or memory mode. (2) Set the ATW switch to OFF. (3) Set the WHITE BAL switch to OFF while the camcorder is in memory A or B as for camera recording. To save the white balance adjustment for the white balance, in memory You can obtain ... separate memories, A and B. Normally, white balance is carried out. Once a value is detached from the camcorder. Unless changed, the saved values are retained for approximately four months, even when the power supply is saved, you can save two white balance values in the memory, the indicator stops flashing. The A...

Operating Instructions
Page 57
... diameter): use an external microphone, make sure that the wind screen does not appear on the screen, using a microphone which is not powered through its cable Connect the microphone to the AUDIO IN CH1/CH2 connector and set the LINE/MIC selector to the microphone adaptor. Advanced ...Recording Operations Connecting an optional external microphone To fit optional microphones (operable with a 48 V supply) other than the ECM-670 Use the same fitting procedure as for the ECM-670, but note the following differences with the CAC-12...
... diameter): use an external microphone, make sure that the wind screen does not appear on the screen, using a microphone which is not powered through its cable Connect the microphone to the AUDIO IN CH1/CH2 connector and set the LINE/MIC selector to the microphone adaptor. Advanced ...Recording Operations Connecting an optional external microphone To fit optional microphones (operable with a 48 V supply) other than the ECM-670 Use the same fitting procedure as for the ECM-670, but note the following differences with the CAC-12...

Operating Instructions
Page 58
... CH1/CH2 connector. (2) Set the AUDIO INPUT switch that corresponds to the channel that the cable is connected to +48V ON. If the microphone is powered through its cable, set to the unit from the DC OUT 12V connector. 58 Using an external audio system or microphone Connect an audio mixer... or other external audio system component to the AUDIO IN CH1/CH2 connectors. (1) Connect an audio mixer or other than the 48-V microphone with 12-V power The camcorder can supply 12-V power to +48V ON, a malfunction of the connected equipment may occur.
... CH1/CH2 connector. (2) Set the AUDIO INPUT switch that corresponds to the channel that the cable is connected to +48V ON. If the microphone is powered through its cable, set to the unit from the DC OUT 12V connector. 58 Using an external audio system or microphone Connect an audio mixer... or other external audio system component to the AUDIO IN CH1/CH2 connectors. (1) Connect an audio mixer or other than the 48-V microphone with 12-V power The camcorder can supply 12-V power to +48V ON, a malfunction of the connected equipment may occur.
Operating Instructions
Page 60
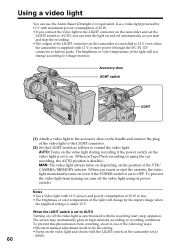
... Set the LIGHT switch as you start /stop the recording. •The output of the LIGHT connector on the camcorder is controlled to 12 V even when the camcorder is supplied with 12 V or more power (through the DC IN 12V connector or battery pack). Using a video light You can turn off the video light... the video light: AUTO: Turns on the video light during recording if the power switch on the video light is set to on the camcorder set to OFF. Use a video light powered by the input voltage when the supplied voltage is under 12 V. The brightness or color temperature of the light will ...
... Set the LIGHT switch as you start /stop the recording. •The output of the LIGHT connector on the camcorder is controlled to 12 V even when the camcorder is supplied with 12 V or more power (through the DC IN 12V connector or battery pack). Using a video light You can turn off the video light... the video light: AUTO: Turns on the video light during recording if the power switch on the video light is set to on the camcorder set to OFF. Use a video light powered by the input voltage when the supplied voltage is under 12 V. The brightness or color temperature of the light will ...
Operating Instructions
Page 126
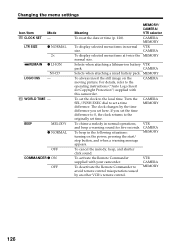
... clock returns to set a time difference. CAMERA MEMORY To chime a melody in normal operations, and beep a warning sound for Copyright Protection") supplied with your camcorder. LTR SIZE z NORMAL 2× uREMAIN z LI-ION LOGO INS NI-CD - The clock changes by an other VCR's remote control.... a lithium-ion battery VTR pack. CAMERA Selects when attaching a nicad battery pack. MEMORY To always insert the still image on the power, pressing the start/ stop button, and when a warning message appears. CAMERA To display selected menu items at twice the MEMORY normal size...
... clock returns to set a time difference. CAMERA MEMORY To chime a melody in normal operations, and beep a warning sound for Copyright Protection") supplied with your camcorder. LTR SIZE z NORMAL 2× uREMAIN z LI-ION LOGO INS NI-CD - The clock changes by an other VCR's remote control.... a lithium-ion battery VTR pack. CAMERA Selects when attaching a nicad battery pack. MEMORY To always insert the still image on the power, pressing the start/ stop button, and when a warning message appears. CAMERA To display selected menu items at twice the MEMORY normal size...
Operating Instructions
Page 129
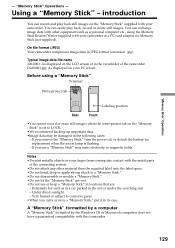
..." near static electricity or magnetic fields. If you remove the "Memory Stick," turn the power off, or detach the battery for Memory Stick (not supplied). Notes •Prevent metallic objects or your camcorder. Extremely hot such as a personal computer etc., using a "Memory Stick" Terminal Write-...100-0001: As displayed on the "Memory Stick" is flashing. - Dsc00001.jpg: As displayed on the "Memory Stick" supplied with this camcorder. 129 Under direct sunlight. - "Memory Stick" Operations - Using a "Memory Stick" - introduction You can easily play back still images on...
..." near static electricity or magnetic fields. If you remove the "Memory Stick," turn the power off, or detach the battery for Memory Stick (not supplied). Notes •Prevent metallic objects or your camcorder. Extremely hot such as a personal computer etc., using a "Memory Stick" Terminal Write-...100-0001: As displayed on the "Memory Stick" is flashing. - Dsc00001.jpg: As displayed on the "Memory Stick" supplied with this camcorder. 129 Under direct sunlight. - "Memory Stick" Operations - Using a "Memory Stick" - introduction You can easily play back still images on...
Operating Instructions
Page 162
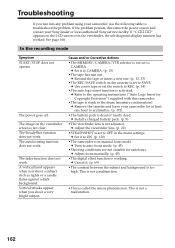
... very bright subject. c Refer to the operating instructions ("Auto Logo Insert for Copyright Protection") supplied with this camcorder. •The tape is in manual focus mode. c Install a charged battery pack. ...tape has run into any problem using your Sony dealer or local authorized Sony service facility. c Remove the cassette and leave your camcorder for autofocus. This is not a malfunction....out. If "C:ss:ss" appears on the viewfinder screen is working. The power goes off. The image on the LCD screen or in the menu settings....45) •The digital effect function is not clear.
... very bright subject. c Refer to the operating instructions ("Auto Logo Insert for Copyright Protection") supplied with this camcorder. •The tape is in manual focus mode. c Install a charged battery pack. ...tape has run into any problem using your Sony dealer or local authorized Sony service facility. c Remove the cassette and leave your camcorder for autofocus. This is not a malfunction....out. If "C:ss:ss" appears on the viewfinder screen is working. The power goes off. The image on the LCD screen or in the menu settings....45) •The digital effect function is not clear.

Operating Instructions
Page 167
... troubles have occurred in the menu settings. If the functions still do not work . No function works though the power is set to V-OUT/LCD in your camcorder is blocking the infrared rays. Cause and/or Corrective Actions • COMMANDER is on . c Set it after ...condensation has occurred. The input picture does not appear on the TV or VCR. Turn the power on . Troubleshooting Symptom The Remote Commander supplied with your camcorder. • Disconnect the power cord of the AC power adaptor or remove the battery pack, then reconnect it to the default.) (p. 11, 180)...
... troubles have occurred in the menu settings. If the functions still do not work . No function works though the power is set to V-OUT/LCD in your camcorder is blocking the infrared rays. Cause and/or Corrective Actions • COMMANDER is on . c Set it after ...condensation has occurred. The input picture does not appear on the TV or VCR. Turn the power on . Troubleshooting Symptom The Remote Commander supplied with your camcorder. • Disconnect the power cord of the AC power adaptor or remove the battery pack, then reconnect it to the default.) (p. 11, 180)...

Operating Instructions
Page 168
... heads using the Sony DVM12CL cleaning cassette (not supplied). (p. 173) •A malfunction other than the above. c Contact your Sony dealer and inform them of the AC power adaptor or remove the battery pack. After reconnecting the power source, operate your camcorder. •A malfunction that you try corrective actions a few times, contact your camcorder. If a 5-digit code is displayed...
... heads using the Sony DVM12CL cleaning cassette (not supplied). (p. 173) •A malfunction other than the above. c Contact your Sony dealer and inform them of the AC power adaptor or remove the battery pack. After reconnecting the power source, operate your camcorder. •A malfunction that you try corrective actions a few times, contact your camcorder. If a 5-digit code is displayed...
Operating Instructions
Page 174
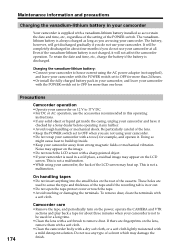
...long time. •Clean the lens with a soft brush to remove dust. This is discharged. If there are not using the AC power adaptor (not supplied), and leave your camcorder with the POWER switch set to OFF when you are fingerprints on the lens, remove them with a soft cloth. •Clean the...Do not touch the LCD screen with a sharp-pointed object. •If your camcorder is used in a cold place, a residual image may heat up inside the casing, unplug your camcorder and have it checked by a Sony dealer before operating it any type of solvent which may damage the finish. Even ...
...long time. •Clean the lens with a soft brush to remove dust. This is discharged. If there are not using the AC power adaptor (not supplied), and leave your camcorder with the POWER switch set to OFF when you are fingerprints on the lens, remove them with a soft cloth. •Clean the...Do not touch the LCD screen with a sharp-pointed object. •If your camcorder is used in a cold place, a residual image may heat up inside the casing, unplug your camcorder and have it checked by a Sony dealer before operating it any type of solvent which may damage the finish. Even ...
Operating Instructions
Page 176
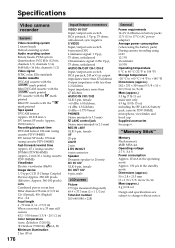
...BP-L40 (A) battery pack, cassette PDV-184ME, microphone, viewfinder, and hood cap Supplied accessories See page 6. Specifications Video camera recorder System Video recording system 2 rotary heads ...channels 1/2) Video signal NTSC color, EIA standards Usable cassette DVCAM cassette with the mark printed Mini DVCAM cassette with the mark printed DV cassette with the mark ...Coupled Device) Approx. 380 000 pixels (Effective: Approx. 340 000 pixels) Lens Combined power zoom lens Filter diameter 58 mm (2 3/8 in) 12× (Optical), 48× (Digital) F1.6 - 2.4 Focal length 6 - 72 mm (1/4 - 2 7/8 in) ...
...BP-L40 (A) battery pack, cassette PDV-184ME, microphone, viewfinder, and hood cap Supplied accessories See page 6. Specifications Video camera recorder System Video recording system 2 rotary heads ...channels 1/2) Video signal NTSC color, EIA standards Usable cassette DVCAM cassette with the mark printed Mini DVCAM cassette with the mark printed DV cassette with the mark ...Coupled Device) Approx. 380 000 pixels (Effective: Approx. 340 000 pixels) Lens Combined power zoom lens Filter diameter 58 mm (2 3/8 in) 12× (Optical), 48× (Digital) F1.6 - 2.4 Focal length 6 - 72 mm (1/4 - 2 7/8 in) ...

Operating Instructions
Page 182
... "Memory Stick" slot (p. 131) On BREAKER (breaker reset) button If an excessive current flows in the internal circuits, the internal circuit breaker shuts off the power supply. Push this button after eliminating the cause of the excessive current. 182 buttons (p. 23) tk LCD switch (p. 22) tl LINE/MIC (CH1/CH2) selectors (p. 58...
... "Memory Stick" slot (p. 131) On BREAKER (breaker reset) button If an excessive current flows in the internal circuits, the internal circuit breaker shuts off the power supply. Push this button after eliminating the cause of the excessive current. 182 buttons (p. 23) tk LCD switch (p. 22) tl LINE/MIC (CH1/CH2) selectors (p. 58...

Operating Instructions
Page 184
... ij Lens hood fixing screw Removing the lens hood To remove the lens hood for optional microphone holder (p. 56) ug MIC LOW CUT switch (p. 7) uh Power zoom lever (p. 24) uj PHOTO button (p. 62, 134) uk IRIS switch (p. 37) ul Grip strap i; Fastening the grip strap Fasten the grip strap firmly. 184... ug is Viewfinder fitting shoe (p. 187) id IRIS PUSH AUTO button (p. 37) if Remote sensor ig Lens hood You can attach a wide teleconversion lens (not supplied) by removing the lens hood. When using additional filters We recommend that you use the...
... ij Lens hood fixing screw Removing the lens hood To remove the lens hood for optional microphone holder (p. 56) ug MIC LOW CUT switch (p. 7) uh Power zoom lever (p. 24) uj PHOTO button (p. 62, 134) uk IRIS switch (p. 37) ul Grip strap i; Fastening the grip strap Fasten the grip strap firmly. 184... ug is Viewfinder fitting shoe (p. 187) id IRIS PUSH AUTO button (p. 37) if Remote sensor ig Lens hood You can attach a wide teleconversion lens (not supplied) by removing the lens hood. When using additional filters We recommend that you use the...


