
User's Guide
Page 1
Digital Single Lens Reflex Camera User's Guide/ Troubleshooting "Read This First" (separate volume) Explains the set-up and basic operations for shooting/ playback with your computer Printing images Troubleshooting Others Index Before your operation Using the shooting functions Using the viewing functions Using the menu Using your camera.
Digital Single Lens Reflex Camera User's Guide/ Troubleshooting "Read This First" (separate volume) Explains the set-up and basic operations for shooting/ playback with your computer Printing images Troubleshooting Others Index Before your operation Using the shooting functions Using the viewing functions Using the menu Using your camera.
User's Guide
Page 4
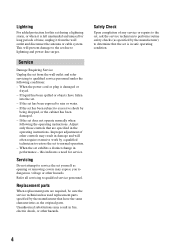
... has used replacement parts specified by the manufacturer) to determine that the set , ask the service technician to perform routine safety checks (as opening or removing covers may result in damage and will prevent damage to the set to lightning and power-line surges. Safety Check Upon completion of any service or repairs to qualified service personnel. Lightning For added protection for this indicates a need...
... has used replacement parts specified by the manufacturer) to determine that the set , ask the service technician to perform routine safety checks (as opening or removing covers may result in damage and will prevent damage to the set to lightning and power-line surges. Safety Check Upon completion of any service or repairs to qualified service personnel. Lightning For added protection for this indicates a need...
User's Guide
Page 9
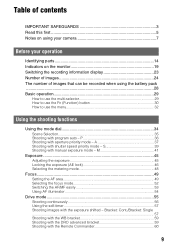
... mode 55 Shooting continuously 56 Using the self-timer 57 Shooting images with shutter speed priority mode - S 39 Shooting with the Remote Commander 60 9 Bracket: Cont./Bracket: Single ...57 Shooting with the WB bracket 59 Shooting with the DRO advanced bracket 59 Shooting with manual exposure mode - Table of contents IMPORTANT SAFEGUARDS 3 Read this first 5 Notes on using your camera 7 Before your operation Identifying parts 14 Indicators on the monitor 19 Switching the recording information display 23 Number of images...
... mode 55 Shooting continuously 56 Using the self-timer 57 Shooting images with shutter speed priority mode - S 39 Shooting with the Remote Commander 60 9 Bracket: Cont./Bracket: Single ...57 Shooting with the WB bracket 59 Shooting with the DRO advanced bracket 59 Shooting with manual exposure mode - Table of contents IMPORTANT SAFEGUARDS 3 Read this first 5 Notes on using your camera 7 Before your operation Identifying parts 14 Indicators on the monitor 19 Switching the recording information display 23 Number of images...

User's Guide
Page 22
... balance (Auto, Preset, Color temperature, Color filter, Custom) (61) D-range optimizer (66) Date of recording File number/total number of images Image size (94) Battery remaining (t step 1 in "Read This First") Playback image (85) B Display P A S M Indication Histogram (85) Mode dial (34) 1/125 F3.5 ISO100 -0.3 -0.3 35mm 22 Shutter speed (39) Aperture (37) ISO sensitivity (64) EV scale (45) Flash-compensation (75) Metering mode (48) Focal length (8) LCD monitor (Histogram display) Display Indication Creative Style (67) A Display 100-0003 DPOF3 Indication Memory card (123) Folder...
... balance (Auto, Preset, Color temperature, Color filter, Custom) (61) D-range optimizer (66) Date of recording File number/total number of images Image size (94) Battery remaining (t step 1 in "Read This First") Playback image (85) B Display P A S M Indication Histogram (85) Mode dial (34) 1/125 F3.5 ISO100 -0.3 -0.3 35mm 22 Shutter speed (39) Aperture (37) ISO sensitivity (64) EV scale (45) Flash-compensation (75) Metering mode (48) Focal length (8) LCD monitor (Histogram display) Display Indication Creative Style (67) A Display 100-0003 DPOF3 Indication Memory card (123) Folder...

User's Guide
Page 36
... flash is up , the camera flashes automatically whenever it shoots. The shutter speed is also effective. Night portrait Shoots portraits in the auto adjustment mode (mode dial: AUTO). PA shift: You can choose the desired shutter speed. In program auto mode, the new settings will be reset when another mode has been selected or the power has been turned off . Night view/portrait • The shutter speed is slower, so using a tripod is adjusted automatically. The aperture...
... flash is up , the camera flashes automatically whenever it shoots. The shutter speed is also effective. Night portrait Shoots portraits in the auto adjustment mode (mode dial: AUTO). PA shift: You can choose the desired shutter speed. In program auto mode, the new settings will be reset when another mode has been selected or the power has been turned off . Night view/portrait • The shutter speed is slower, so using a tripod is adjusted automatically. The aperture...

User's Guide
Page 58
... Press the shutter button shot by 0.3 of a step. Shoots five images shot by shot with the exposure shifted by 0.5 of a step. The base exposure moves if exposure compensation is used , ambient* bracket shooting is set at the first shot in every shooting. When the flash is used, flash bracket shooting is performed and the flash light is changed . • In ambient bracket shooting, the shutter speed and aperture change in program auto mode, the shutter speed changes in aperture priority mode, and aperture changes in manual mode. The...
... Press the shutter button shot by 0.3 of a step. Shoots five images shot by shot with the exposure shifted by 0.5 of a step. The base exposure moves if exposure compensation is used , ambient* bracket shooting is set at the first shot in every shooting. When the flash is used, flash bracket shooting is performed and the flash light is changed . • In ambient bracket shooting, the shutter speed and aperture change in program auto mode, the shutter speed changes in aperture priority mode, and aperture changes in manual mode. The...
User's Guide
Page 64
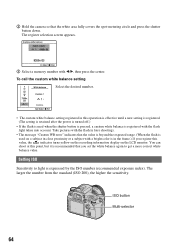
... the flash is used when the shutter button is pressed, a custom white balance is expressed by the ISO number (recommended exposure index). ISO button Multi-selector 64 Take pictures with the flash in later shootings. • The message "Custom WB error" indicates that the white area fully covers the spot-metering circle and press the shutter button down. Setting ISO Sensitivity to get a more correct white balance value. The register selection screen appears. 3 Select a memory number with a bright color...
... the flash is used when the shutter button is pressed, a custom white balance is expressed by the ISO number (recommended exposure index). ISO button Multi-selector 64 Take pictures with the flash in later shootings. • The message "Custom WB error" indicates that the white area fully covers the spot-metering circle and press the shutter button down. Setting ISO Sensitivity to get a more correct white balance value. The register selection screen appears. 3 Select a memory number with a bright color...
User's Guide
Page 67
... locked image. • When in Continuous advance mode, the correction is fixed onto the first image, the same correction is used , you can take pictures with an appropriate color balance and tone. t See "Basic operation" (page 69). In Scene Selection mode: Unfixed, depending on RAW files. To take pictures with the styleboxes as they are assigned to the styleboxes as follows: - In program auto, aperture priority, shutter speed priority, or manual exposure mode...
... locked image. • When in Continuous advance mode, the correction is fixed onto the first image, the same correction is used , you can take pictures with an appropriate color balance and tone. t See "Basic operation" (page 69). In Scene Selection mode: Unfixed, depending on RAW files. To take pictures with the styleboxes as they are assigned to the styleboxes as follows: - In program auto, aperture priority, shutter speed priority, or manual exposure mode...

User's Guide
Page 76
... hand, flash compensation only changes the amount of flash light, thereby controlling the relative effect of flash light is displayed on the whole picture. z Exposure compensation and flash compensation Exposure compensation changes the shutter speed, aperture, and ISO sensitivity (when [AUTO] is selected) to 1/2 EV increments with [Exposure step] in the Recording menu (page 98). • When the built-in flash is displayed in step 2, select the desired value with [Exp.comp.set] in...
... hand, flash compensation only changes the amount of flash light, thereby controlling the relative effect of flash light is displayed on the whole picture. z Exposure compensation and flash compensation Exposure compensation changes the shutter speed, aperture, and ISO sensitivity (when [AUTO] is selected) to 1/2 EV increments with [Exposure step] in the Recording menu (page 98). • When the built-in flash is displayed in step 2, select the desired value with [Exp.comp.set] in...
User's Guide
Page 90
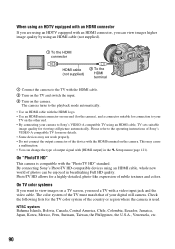
... Setup menu (page 121). Check the following lists for connection to the playback mode automatically. • Use an HDMI cable with the HDMI logo. • Use an HDMI mini connector on one end (for the camera), and a connector suitable for the TV color system of subtle textures and colors. The camera turns to your digital still camera. By connecting Sony's PhotoTV HD-compatible devices using an HDMI cable, TV sets suitable image...
... Setup menu (page 121). Check the following lists for connection to the playback mode automatically. • Use an HDMI cable with the HDMI logo. • Use an HDMI mini connector on one end (for the camera), and a connector suitable for the TV color system of subtle textures and colors. The camera turns to your digital still camera. By connecting Sony's PhotoTV HD-compatible devices using an HDMI cable, TV sets suitable image...
User's Guide
Page 96
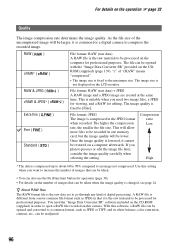
... recorded image. The file can be readjusted. 96 You need two image files, a JPEG for viewing, and a RAW for a digital camera to be lower. As the file size of digital processing. A RAW file is common for editing. This is suitable when you need the "Image Data Converter SR" software included on this camera. The higher the compression rate, the smaller the file size. This will be opened and converted to a common format...
... recorded image. The file can be readjusted. 96 You need two image files, a JPEG for viewing, and a RAW for a digital camera to be lower. As the file size of digital processing. A RAW file is common for editing. This is suitable when you need the "Image Data Converter SR" software included on this camera. The higher the compression rate, the smaller the file size. This will be opened and converted to a common format...
User's Guide
Page 109
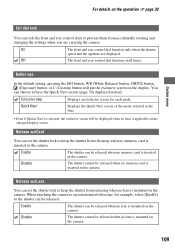
... the camera. Button ops. In the default setting, pressing the ISO button, WB (White Balance) button, DRIVE button, (Exposure) button, or C (Custom) button will be released when no memory card is selected, the exclusive screen will put the exclusive screen on the display. For details on the operation 1 page 32 Custom menu Ctrl dial lock You can lock the front and rear control dials to prevent them from accidentally rotating and changing the settings when...
... the camera. Button ops. In the default setting, pressing the ISO button, WB (White Balance) button, DRIVE button, (Exposure) button, or C (Custom) button will be released when no memory card is selected, the exclusive screen will put the exclusive screen on the display. For details on the operation 1 page 32 Custom menu Ctrl dial lock You can lock the front and rear control dials to prevent them from accidentally rotating and changing the settings when...
User's Guide
Page 123
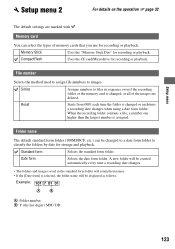
... card/Microdrive for recording or playback. Example: AB A: Folder number B: Y (the last digit) / MM / DD 123 Memory Stick Uses the "Memory Stick Duo" for recording or playback. Memory card You can be displayed as follows. A new folder will be changed to a date form folder to images. Folder name The default standard form folder (100MSDCF, etc.) can select the types of the images are marked with . Setup menu Setup menu 2 For details on the operation 1 page 32 The default settings are deleted...
... card/Microdrive for recording or playback. Example: AB A: Folder number B: Y (the last digit) / MM / DD 123 Memory Stick Uses the "Memory Stick Duo" for recording or playback. Memory card You can be displayed as follows. A new folder will be changed to a date form folder to images. Folder name The default standard form folder (100MSDCF, etc.) can select the types of the images are marked with . Setup menu Setup menu 2 For details on the operation 1 page 32 The default settings are deleted...
User's Guide
Page 125
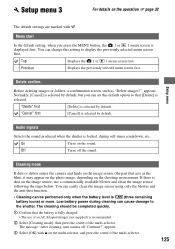
... the image sensor using only the blower and the anti-dust function. • Cleaning can set this setting to the shutter. Cleaning mode If dust or debris enters the camera and lands on the sound. The message "After cleaning, turn camera off the sound. Previous Displays the previously selected menu screen first. Menu start In the default setting, when you can be completed quickly. 1 Confirm that the battery is fully charged. • The use...
... the image sensor using only the blower and the anti-dust function. • Cleaning can set this setting to the shutter. Cleaning mode If dust or debris enters the camera and lands on the sound. The message "After cleaning, turn camera off the sound. Previous Displays the previously selected menu screen first. Menu start In the default setting, when you can be completed quickly. 1 Confirm that the battery is fully charged. • The use...
User's Guide
Page 133
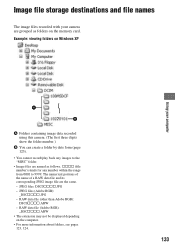
... be displayed depending on the memory card. ssss (file number) stands for any images to 9999. Example: viewing folders on Windows XP Using your camera are grouped as follows. The numerical portions of the name of a RAW data file and its corresponding JPEG image file are the same. - JPEG files (Adobe RGB): _DSCssss.JPG - RAW data file (other than Adobe RGB): DSC0ssss.ARW - Image file storage destinations and file names The image files recorded...
... be displayed depending on the memory card. ssss (file number) stands for any images to 9999. Example: viewing folders on Windows XP Using your camera are grouped as follows. The numerical portions of the name of a RAW data file and its corresponding JPEG image file are the same. - JPEG files (Adobe RGB): _DSCssss.JPG - RAW data file (other than Adobe RGB): DSC0ssss.ARW - Image file storage destinations and file names The image files recorded...
User's Guide
Page 136
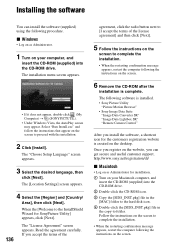
... icon. 3 Copy the [SIDS_INST.pkg] file in the [MAC] folder to the hard disk icon. 4 Double-click the [SIDS_INST.pkg] file in the copy-to complete the installation. • When the restarting confirmation message appears, restart the computer following procedure. http://www.sony.net/registration/di/ x Macintosh • Log on as Administrator. 1 Turn on the screen. If you can install the software (supplied) using the following the instructions on the screen. 6 Remove...
... icon. 3 Copy the [SIDS_INST.pkg] file in the [MAC] folder to the hard disk icon. 4 Double-click the [SIDS_INST.pkg] file in the copy-to complete the installation. • When the restarting confirmation message appears, restart the computer following procedure. http://www.sony.net/registration/di/ x Macintosh • Log on as Administrator. 1 Turn on the screen. If you can install the software (supplied) using the following the instructions on the screen. 6 Remove...
User's Guide
Page 137
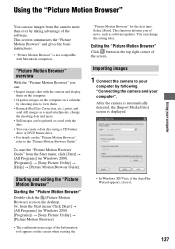
... Windows 2000, [Programs]) t [Sony Picture Utility] t [Picture Motion Browser]. • The confirmation message of the software. Exiting the "Picture Motion Browser" Click button in Windows 2000, [Programs]) t [Sony Picture Utility] t [Help] t [Picture Motion Browser Guide]. This function informs you can change the shooting date and more than ever by following "Connecting the camera and your computer This section summarizes the "Picture Motion Browser" and gives the basic instructions. • "Picture Motion Browser" is displayed...
... Windows 2000, [Programs]) t [Sony Picture Utility] t [Picture Motion Browser]. • The confirmation message of the software. Exiting the "Picture Motion Browser" Click button in Windows 2000, [Programs]) t [Sony Picture Utility] t [Help] t [Picture Motion Browser Guide]. This function informs you can change the shooting date and more than ever by following "Connecting the camera and your computer This section summarizes the "Picture Motion Browser" and gives the basic instructions. • "Picture Motion Browser" is displayed...

User's Guide
Page 142
... the [Application] folder. Setting the camera MENU button Multiselector 1 Press MENU to display the menu. 2 Select (Setup) t [2] t [USB connection] with the multiselector (page 32). 3 Select [Remote PC] with v/V, then press the center of the screen. x Macintosh To start up Double-click [Remote Camera Control] in the [Sony Image Data Suite] folder from the PC. Using the "Remote Camera Control" Overview of "Remote Camera Control" When the camera is set to [Remote PC]. 4 Turn the camera off. 142 You can use "Remote Camera Control" to take pictures or change settings on the...
... the [Application] folder. Setting the camera MENU button Multiselector 1 Press MENU to display the menu. 2 Select (Setup) t [2] t [USB connection] with the multiselector (page 32). 3 Select [Remote PC] with v/V, then press the center of the screen. x Macintosh To start up Double-click [Remote Camera Control] in the [Sony Image Data Suite] folder from the PC. Using the "Remote Camera Control" Overview of "Remote Camera Control" When the camera is set to [Remote PC]. 4 Turn the camera off. 142 You can use "Remote Camera Control" to take pictures or change settings on the...
User's Guide
Page 149
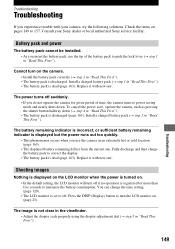
... power turns off if no operation is set to power saving mode and nearly shuts down (t step 4 in "Read This First"). 149 Troubleshooting Replace it with new one . Install a charged battery pack (t step 1 in "Read This First"). Consult your camera, try the following solutions. Install a charged battery pack (t step 1 in "Read This First"). • The battery pack is discharged (page 163). Shooting images Nothing is displayed on the LCD monitor when the power...
... power turns off if no operation is set to power saving mode and nearly shuts down (t step 4 in "Read This First"). 149 Troubleshooting Replace it with new one . Install a charged battery pack (t step 1 in "Read This First"). Consult your camera, try the following solutions. Install a charged battery pack (t step 1 in "Read This First"). • The battery pack is discharged (page 163). Shooting images Nothing is displayed on the LCD monitor when the power...

User's Guide
Page 156
... functions or not. • The date may take some time depending on the camera. • The camera has been left unused for about an hour before using it whenever you turn on the printer. is printed on the date-inserted part of recordable images does not decrease or decreases two at the size selected. • Disconnect the USB cable and reconnect it (page 168). Charge the battery pack and set...
... functions or not. • The date may take some time depending on the camera. • The camera has been left unused for about an hour before using it whenever you turn on the printer. is printed on the date-inserted part of recordable images does not decrease or decreases two at the size selected. • Disconnect the USB cable and reconnect it (page 168). Charge the battery pack and set...


