

Operating Instructions
Page 4
... to the dealer where you accept all the terms and conditions of this printer .......... 6 Identifying the parts 8 Preparations 1 Checking the contents of the package 10 2 Preparing the printing pack 11 Sizes of print paper 11 Optional printing packs 11 3 Loading the print cartridge 12 4 Inserting the...design data such as sample pictures provided in this software cannot be governed by right holders. 4 GB Before you begin What you can do not accept these terms and conditions, please return this disk envelope unopened, along with this agreement. Sony Corporation reserves the right to ...
... to the dealer where you accept all the terms and conditions of this printer .......... 6 Identifying the parts 8 Preparations 1 Checking the contents of the package 10 2 Preparing the printing pack 11 Sizes of print paper 11 Optional printing packs 11 3 Loading the print cartridge 12 4 Inserting the...design data such as sample pictures provided in this software cannot be governed by right holders. 4 GB Before you begin What you can do not accept these terms and conditions, please return this disk envelope unopened, along with this agreement. Sony Corporation reserves the right to ...
Operating Instructions
Page 5
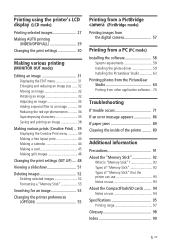
...from a PictBridge camera (PictBridge mode) Printing images from the digital camera 57 Printing from a PC (PC mode) Installing the software 58 System requirements 58 Installing the printer driver 59 Installing the PictureGear Studio 62 Printing photos from the PictureGear Studio 64 Printing from other application software ..... message appears 86 If paper jams 89 Cleaning the inside of the printer ......... 89 Additional information Precautions 91 About the "Memory Stick 92 What is "Memory Stick 92 Types of "Memory Stick 92 Types of "Memory Stick" that the printer can use 93 Notes ...
...from a PictBridge camera (PictBridge mode) Printing images from the digital camera 57 Printing from a PC (PC mode) Installing the software 58 System requirements 58 Installing the printer driver 59 Installing the PictureGear Studio 62 Printing photos from the PictureGear Studio 64 Printing from other application software ..... message appears 86 If paper jams 89 Cleaning the inside of the printer ......... 89 Additional information Precautions 91 About the "Memory Stick 92 What is "Memory Stick 92 Types of "Memory Stick 92 Types of "Memory Stick" that the printer can use 93 Notes ...
Operating Instructions
Page 7
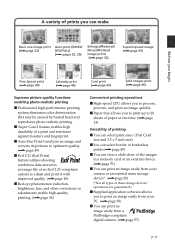
... can print an image easily from a PictBridge-compliant digital camera. (.page 57) 7 GB x Auto Fine Print 3 analyses an image and corrects its pictures to optimum quality. (.page 49) x Exif 2.21...a print and resistance against moisture and fingerprint. x Super Coat 2 feature enables high durability of paper at one -image print (.page 22) Auto print (INDEX/ DPOF/ALL) (.pages 25, 29...print (.page 45) Split images print (.page 46) Supreme picture quality functions enabling photo-realistic printing x Professional high-performance printing system eliminates color deterioration that may ...
... can print an image easily from a PictBridge-compliant digital camera. (.page 57) 7 GB x Auto Fine Print 3 analyses an image and corrects its pictures to optimum quality. (.page 49) x Exif 2.21...a print and resistance against moisture and fingerprint. x Super Coat 2 feature enables high durability of paper at one -image print (.page 22) Auto print (INDEX/ DPOF/ALL) (.pages 25, 29...print (.page 45) Split images print (.page 46) Supreme picture quality functions enabling photo-realistic printing x Professional high-performance printing system eliminates color deterioration that may ...
Operating Instructions
Page 8
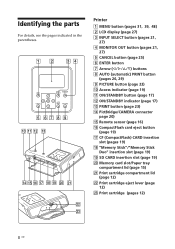
Memory card slot/Paper tray compartment lid (page 15) wa Print cartridge compartment lid (page 12) ws Print cartridge eject lever (page 12) wd Print cartridge (pages 12) 8 GB Printer 1 MENU button (pages 31, 39, 48) 2 LCD display (page 27) 3 INPUT SELECT button (pages 21, 27) 4 MONITOR OUT... button (pages 21, 27) 5 CANCEL button (page 25) 6 ENTER button 7 Arrow (g/G/f/F) buttons 8 AUTO (automatic) PRINT button (pages 26, 29) 9 PICTURE button (page 23) 0 ...
Memory card slot/Paper tray compartment lid (page 15) wa Print cartridge compartment lid (page 12) ws Print cartridge eject lever (page 12) wd Print cartridge (pages 12) 8 GB Printer 1 MENU button (pages 31, 39, 48) 2 LCD display (page 27) 3 INPUT SELECT button (pages 21, 27) 4 MONITOR OUT... button (pages 21, 27) 5 CANCEL button (page 25) 6 ENTER button 7 Arrow (g/G/f/F) buttons 8 AUTO (automatic) PRINT button (pages 26, 29) 9 PICTURE button (page 23) 0 ...
Operating Instructions
Page 9
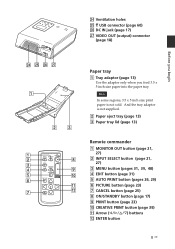
... regions, 3.5 x 5 inch size print paper is not supplied. 2 Paper eject tray (page 13) 3 Paper tray lid (page 13) Remote commander 1 MONITOR OUT button (page 21, 27) 2 INPUT SELECT button (page 21, 27) 3 MENU button (pages 31, 39, 48) 4 EDIT button (page 31) 5 AUTO PRINT button (pages 26, 29) 6 PICTURE button (page 23) 7 CANCEL button... sold. Before you begin wf Ventilation holes wg USB connector (page 60) wh DC IN jack (page 17) wj VIDEO OUT (output) connector (page 18) Paper tray 1 Tray adaptor (page 13) Use the adaptor only when you feed 3.5 x 5 inch size...
... regions, 3.5 x 5 inch size print paper is not supplied. 2 Paper eject tray (page 13) 3 Paper tray lid (page 13) Remote commander 1 MONITOR OUT button (page 21, 27) 2 INPUT SELECT button (page 21, 27) 3 MENU button (pages 31, 39, 48) 4 EDIT button (page 31) 5 AUTO PRINT button (pages 26, 29) 6 PICTURE button (page 23) 7 CANCEL button... sold. Before you begin wf Ventilation holes wg USB connector (page 60) wh DC IN jack (page 17) wj VIDEO OUT (output) connector (page 18) Paper tray 1 Tray adaptor (page 13) Use the adaptor only when you feed 3.5 x 5 inch size...
Operating Instructions
Page 10
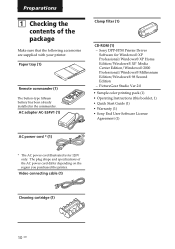
... cord differ depending on the region you purchased the printer. Paper tray (1) Remote commander (1) The button-type lithium battery has been already installed in the commander. The plug shape and specifications of the package Make sure that the following accessories are supplied with your printer. Sony DPP-FP50 Printer Driver Software for 120V only. Video connecting cable...
... cord differ depending on the region you purchased the printer. Paper tray (1) Remote commander (1) The button-type lithium battery has been already installed in the commander. The plug shape and specifications of the package Make sure that the following accessories are supplied with your printer. Sony DPP-FP50 Printer Driver Software for 120V only. Video connecting cable...
Operating Instructions
Page 11
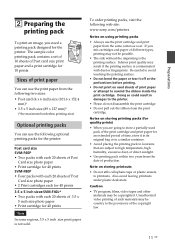
... dust, or direct sunlight. • Use printing pack within two years from the print cartridge. To order printing packs, visit the following web site: www.sony.com/printers Notes on using printing packs • Always use the following two sizes: • Post card (4 x 6 inch) size (101.6 x 152.4 mm...; Print cartridge for 40 prints SVM-F80P • Four packs with each 20 sheets of Post Card size photo paper • 2 Print cartridges each for the printer. Inferior print quality may not be copyrighted. The sample color printing pack contains a set . Unauthorized video printing of ...
... dust, or direct sunlight. • Use printing pack within two years from the print cartridge. To order printing packs, visit the following web site: www.sony.com/printers Notes on using printing packs • Always use the following two sizes: • Post card (4 x 6 inch) size (101.6 x 152.4 mm...; Print cartridge for 40 prints SVM-F80P • Four packs with each 20 sheets of Post Card size photo paper • 2 Print cartridges each for the printer. Inferior print quality may not be copyrighted. The sample color printing pack contains a set . Unauthorized video printing of ...
Operating Instructions
Page 12
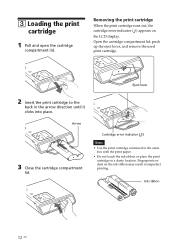
... imperfect printing. Arrow 3 Close the cartridge compartment lid. Cartridge error indicator ( ) Notes • Use the print cartridge contained in the same box with the print paper. • Do not touch the ink ribbon or place the print cartridge in the arrow direction until it clicks into place. Fingerprints or dust on...
... imperfect printing. Arrow 3 Close the cartridge compartment lid. Cartridge error indicator ( ) Notes • Use the print cartridge contained in the same box with the print paper. • Do not touch the ink ribbon or place the print cartridge in the arrow direction until it clicks into place. Fingerprints or dust on...
Operating Instructions
Page 13
... wind the ink ribbon in the direction of the arrow to remove the slack. 2 Slide the paper tray lid in its original bag. 3 Set the tray adaptor according to the print paper size you are going to store a partially-used cartridge, store it in the opposite direction to the... paper feeding direction (1) and then lift open it . The thermal head reaches high temperatures, especially after repeated printing. 4 Inserting the print paper 1 Open the eject paper tray. • Do not rewind the ink ribbon and use . Note ...
... wind the ink ribbon in the direction of the arrow to remove the slack. 2 Slide the paper tray lid in its original bag. 3 Set the tray adaptor according to the print paper size you are going to store a partially-used cartridge, store it in the opposite direction to the... paper feeding direction (1) and then lift open it . The thermal head reaches high temperatures, especially after repeated printing. 4 Inserting the print paper 1 Open the eject paper tray. • Do not rewind the ink ribbon and use . Note ...

Operating Instructions
Page 14
... stamp marker (Post Card size) or arrow imprint (3.5 x 5 inch size) toward feeding direction. x To use Post Card (4 x 6 inch) size print paper Press the tray and the back of the tray adaptor to 20 sheets of the adaptor (1), and remove and lift the tray adaptor from the ...Fingerprints on the printing surface may result in imperfect printing. 5 Remove the protective sheet. Tray adaptor 14 GB x To use 3.5 x 5 inch size print paper Keep the tray adaptor installed. Riffle the print paper. Insert the protective sheet together with no imprint) facing up. • To set the Post Card size print...
... stamp marker (Post Card size) or arrow imprint (3.5 x 5 inch size) toward feeding direction. x To use Post Card (4 x 6 inch) size print paper Press the tray and the back of the tray adaptor to 20 sheets of the adaptor (1), and remove and lift the tray adaptor from the ...Fingerprints on the printing surface may result in imperfect printing. 5 Remove the protective sheet. Tray adaptor 14 GB x To use 3.5 x 5 inch size print paper Keep the tray adaptor installed. Riffle the print paper. Insert the protective sheet together with no imprint) facing up. • To set the Post Card size print...
Operating Instructions
Page 15
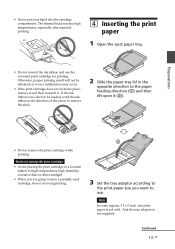
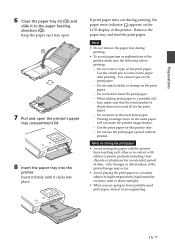
.... • When you are going to write on the print paper. - Do not attach sticker or stamps on the print paper. When adding print paper to the paper feeding direction (2). Keep the paper eject tray open. 7 Pull and open the printer's paper tray compartment lid. 8 Insert the paper tray into place. Do not write or type on the...
.... • When you are going to write on the print paper. - Do not attach sticker or stamps on the print paper. When adding print paper to the paper feeding direction (2). Keep the paper eject tray open. 7 Pull and open the printer's paper tray compartment lid. 8 Insert the paper tray into place. Do not write or type on the...
Operating Instructions
Page 17
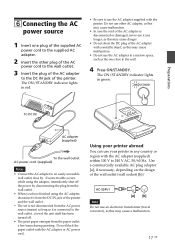
...wall socket) [b]/ AC-S24V1 Note Do not use the AC adapter supplied with the AC adapter or AC power cord. Do not block the paper outlet with the printer. The ON/STANDBY indicator lights in a narrow space, such as this may cause malfunction. • Do not use other plug of the ... to the wall. 4 Press ON/STANDBY. Use a commercially available AC plug adaptor [a], if necessary, depending on the design of the printer. Using your printer abroad You can use your printer in red. • Be sure to use an electronic transformer (travel converter), as it from the DC IN jack of the...
...wall socket) [b]/ AC-S24V1 Note Do not use the AC adapter supplied with the AC adapter or AC power cord. Do not block the paper outlet with the printer. The ON/STANDBY indicator lights in a narrow space, such as this may cause malfunction. • Do not use other plug of the ... to the wall. 4 Press ON/STANDBY. Use a commercially available AC plug adaptor [a], if necessary, depending on the design of the printer. Using your printer abroad You can use your printer in red. • Be sure to use an electronic transformer (travel converter), as it from the DC IN jack of the...
Operating Instructions
Page 18
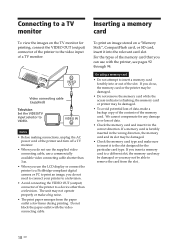
... to or loss of data. • Check the memory card and insert it into or out of the printer to a device other than 3 m. • When you use the LCD display or connect the printer to a PictBridge-compliant digital camera or PC to print an image, you do not need to connect your... printer to a television. • Avoid connecting the VIDEO OUT (output) connector of the slot. Do not block the paper outlet with the printer, see pages 92 through 94. ...
... to or loss of data. • Check the memory card and insert it into or out of the printer to a device other than 3 m. • When you use the LCD display or connect the printer to a PictBridge-compliant digital camera or PC to print an image, you do not need to connect your... printer to a television. • Avoid connecting the VIDEO OUT (output) connector of the slot. Do not block the paper outlet with the printer, see pages 92 through 94. ...
Operating Instructions
Page 23
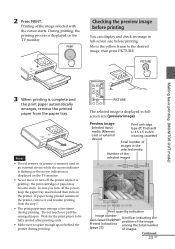
... emerge a few times during printing. Wait for the print paper to be fully ejected after printing ends. • Make sure to the desired image, then press PICTURE. Continued 23 GB Move the yellow frame to spare enough space behind the printer during printing. Preview image Selected input media (Memory card or external device...
... emerge a few times during printing. Wait for the print paper to be fully ejected after printing ends. • Make sure to the desired image, then press PICTURE. Continued 23 GB Move the yellow frame to spare enough space behind the printer during printing. Preview image Selected input media (Memory card or external device...
Operating Instructions
Page 25
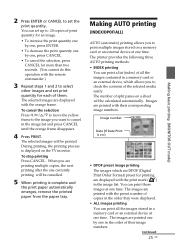
... emerges, remove the printed paper from the paper tray. The number of split panes on a memory card or an external device at one in the order of their corresponding image numbers. You can print all the images contained in a memory card or an external device, which are DPOF (Digital Print Order Format) preset... for an image. • To increase the print quantity one by one, press ENTER. • To decrease the print quantity one by one time. The printer provides the following three AUTO printing methods: • INDEX printing You can set the print quantity.
... emerges, remove the printed paper from the paper tray. The number of split panes on a memory card or an external device at one in the order of their corresponding image numbers. You can print all the images contained in a memory card or an external device, which are DPOF (Digital Print Order Format) preset... for an image. • To increase the print quantity one by one, press ENTER. • To decrease the print quantity one by one time. The printer provides the following three AUTO printing methods: • INDEX printing You can set the print quantity.
Operating Instructions
Page 26
Notes • For how to preset images for printing, see the manual of your digital camera. • Some types of digital camera do not support the DPOF function, or the printer may not support some of the functions of the DPOF preset images. 2 Press PRINT. The orange frame disappears and the... you can proceed with orange frames. To resume the normal printing mode Press AUTO PRINT repeatedly until either INDEX, DPOF, or ALL disappears from the paper tray. If a message appears, follow the instructions on a TV monitor to replace the printing pack (pages 11 through 15). • When the "...
Notes • For how to preset images for printing, see the manual of your digital camera. • Some types of digital camera do not support the DPOF function, or the printer may not support some of the functions of the DPOF preset images. 2 Press PRINT. The orange frame disappears and the... you can proceed with orange frames. To resume the normal printing mode Press AUTO PRINT repeatedly until either INDEX, DPOF, or ALL disappears from the paper tray. If a message appears, follow the instructions on a TV monitor to replace the printing pack (pages 11 through 15). • When the "...
Operating Instructions
Page 28
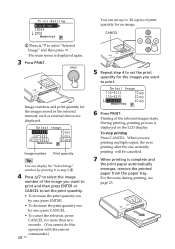
... PRINT. To stop printing Press CANCEL. Printing of print quantity for an image. During printing, printing process is complete and the print paper automatically emerges, remove the printed paper from the paper tray. When you want to select "Selected Image" and then press g. Image number Print quantity Tip You can set up to...
... PRINT. To stop printing Press CANCEL. Printing of print quantity for an image. During printing, printing process is complete and the print paper automatically emerges, remove the printed paper from the paper tray. When you want to select "Selected Image" and then press g. Image number Print quantity Tip You can set up to...
Operating Instructions
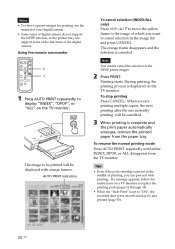
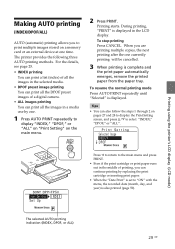
Page 29
... all the images in the LCD display. Printing starts. The selected AUTO printing indication (INDEX, DPOF, or ALL) 29 GB Printing using the printer's LCD display (LCD mode) Making AUTO printing (INDEX/DPOF/ALL) AUTO (automatic) printing allows you to print multiple images stored on pages 27...after the one time. Press g to return to the main menu and press PRINT. • Even if the print cartridge or print paper runs out in the middle of a digital camera. • ALL images printing You can continue printing by one. 1 Press AUTO PRINT repeatedly to display "INDEX," "DPOF," or...
... all the images in the LCD display. Printing starts. The selected AUTO printing indication (INDEX, DPOF, or ALL) 29 GB Printing using the printer's LCD display (LCD mode) Making AUTO printing (INDEX/DPOF/ALL) AUTO (automatic) printing allows you to print multiple images stored on pages 27...after the one time. Press g to return to the main menu and press PRINT. • Even if the print cartridge or print paper runs out in the middle of a digital camera. • ALL images printing You can continue printing by one. 1 Press AUTO PRINT repeatedly to display "INDEX," "DPOF," or...
Operating Instructions
Page 60
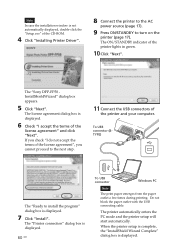
...and the printer setup will start automatically. The "Sony DPP-FP50 InstallShieldWizard" dialog box appears. 5 Click "Next". To USB connector (BTYPE) The "Ready to install the program" dialog box is displayed. 60 GB To USB connector Windows PC Note The print paper emerges from the paper outlet .... If you check "I accept the terms of the license agreement" and click "Next". Do not block the paper outlet with the USB connecting cable. The "Printer connection" dialog box is displayed. 7 Click "Install". The license agreement dialog box is not automatically displayed, double...
...and the printer setup will start automatically. The "Sony DPP-FP50 InstallShieldWizard" dialog box appears. 5 Click "Next". To USB connector (BTYPE) The "Ready to install the program" dialog box is displayed. 60 GB To USB connector Windows PC Note The print paper emerges from the paper outlet .... If you check "I accept the terms of the license agreement" and click "Next". Do not block the paper outlet with the USB connecting cable. The "Printer connection" dialog box is displayed. 7 Click "Install". The license agreement dialog box is not automatically displayed, double...
Operating Instructions
Page 63
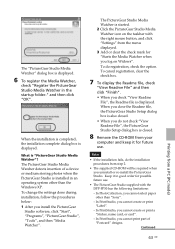
...2. • The supplied CD-ROM will be required when you log on the taskbar with the DPP-FP50 has the following limitations: - Notes • If the installation fails, do registration, check the...then click "Finish". • When you cannot print part of a device or medium storing photos when the PictureGear Studio is installed in the startup folder." Keep it for future use . &#... button, and click "Settings" from a PC (PC mode) In PrintStudio, you cannot select paper other than "Sony". - The "PictureGear Studio Media Watcher" dialog box is displayed. 6 To register the Media ...
...2. • The supplied CD-ROM will be required when you log on the taskbar with the DPP-FP50 has the following limitations: - Notes • If the installation fails, do registration, check the...then click "Finish". • When you cannot print part of a device or medium storing photos when the PictureGear Studio is installed in the startup folder." Keep it for future use . &#... button, and click "Settings" from a PC (PC mode) In PrintStudio, you cannot select paper other than "Sony". - The "PictureGear Studio Media Watcher" dialog box is displayed. 6 To register the Media ...


