

Operating Instructions
Page 4
... printing packs 11 3 Loading the print cartridge 12 4 Inserting the print paper 13 5 Preparing the remote commander .. 16 6 Connecting the AC power ...By breaking the seal of the envelope of the CDROM package, you do with the rest of this printer .......... 6 Identifying the parts 8 Preparations 1 Checking the contents of the package 10 2 Preparing the printing... agreement. Any design data such as sample pictures provided in this manual or the information contained herein at any machine readable form without notice. Sony Corporation reserves the right to make any modification...
... printing packs 11 3 Loading the print cartridge 12 4 Inserting the print paper 13 5 Preparing the remote commander .. 16 6 Connecting the AC power ...By breaking the seal of the envelope of the CDROM package, you do with the rest of this printer .......... 6 Identifying the parts 8 Preparations 1 Checking the contents of the package 10 2 Preparing the printing... agreement. Any design data such as sample pictures provided in this manual or the information contained herein at any machine readable form without notice. Sony Corporation reserves the right to make any modification...
Operating Instructions
Page 5
...from a PictBridge camera (PictBridge mode) Printing images from the digital camera 57 Printing from a PC (PC mode) Installing the software 58 System requirements 58 Installing the printer driver 59 Installing the PictureGear Studio 62 Printing photos from the PictureGear Studio 64 Printing from other application software ..... message appears 86 If paper jams 89 Cleaning the inside of the printer ......... 89 Additional information Precautions 91 About the "Memory Stick 92 What is "Memory Stick 92 Types of "Memory Stick 92 Types of "Memory Stick" that the printer can use 93 Notes ...
...from a PictBridge camera (PictBridge mode) Printing images from the digital camera 57 Printing from a PC (PC mode) Installing the software 58 System requirements 58 Installing the printer driver 59 Installing the PictureGear Studio 62 Printing photos from the PictureGear Studio 64 Printing from other application software ..... message appears 86 If paper jams 89 Cleaning the inside of the printer ......... 89 Additional information Precautions 91 About the "Memory Stick 92 What is "Memory Stick 92 Types of "Memory Stick 92 Types of "Memory Stick" that the printer can use 93 Notes ...
Operating Instructions
Page 7
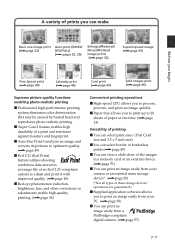
...quickly. x Super Coat 2 feature enables high durability of a print and resistance against moisture and fingerprint. x Paper tray allows you to print an image easily from a PictBridge-compliant digital camera. (.page 57) 7 GB xYou can select border or borderless prints (.page 49) x You can view... print (.page 40) Calendar print (.page 44) Card print (.page 45) Split images print (.page 46) Supreme picture quality functions enabling photo-realistic printing x Professional high-performance printing system eliminates color deterioration that may be caused by heated head and reproduces...
...quickly. x Super Coat 2 feature enables high durability of a print and resistance against moisture and fingerprint. x Paper tray allows you to print an image easily from a PictBridge-compliant digital camera. (.page 57) 7 GB xYou can select border or borderless prints (.page 49) x You can view... print (.page 40) Calendar print (.page 44) Card print (.page 45) Split images print (.page 46) Supreme picture quality functions enabling photo-realistic printing x Professional high-performance printing system eliminates color deterioration that may be caused by heated head and reproduces...
Operating Instructions
Page 8
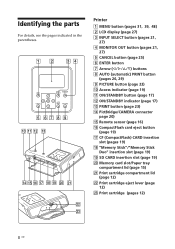
Memory card slot/Paper tray compartment lid (page 15) wa Print cartridge compartment lid (page 12) ws Print cartridge eject lever (page 12) wd Print cartridge (pages 12) 8 GB Printer 1 MENU button (pages 31, 39, 48) 2 LCD display (page 27) 3 INPUT SELECT button (pages 21, 27) 4 MONITOR OUT ...button (pages 21, 27) 5 CANCEL button (page 25) 6 ENTER button 7 Arrow (g/G/f/F) buttons 8 AUTO (automatic) PRINT button (pages 26, 29) 9 PICTURE button (page 23) 0 ...
Memory card slot/Paper tray compartment lid (page 15) wa Print cartridge compartment lid (page 12) ws Print cartridge eject lever (page 12) wd Print cartridge (pages 12) 8 GB Printer 1 MENU button (pages 31, 39, 48) 2 LCD display (page 27) 3 INPUT SELECT button (pages 21, 27) 4 MONITOR OUT ...button (pages 21, 27) 5 CANCEL button (page 25) 6 ENTER button 7 Arrow (g/G/f/F) buttons 8 AUTO (automatic) PRINT button (pages 26, 29) 9 PICTURE button (page 23) 0 ...
Operating Instructions
Page 9
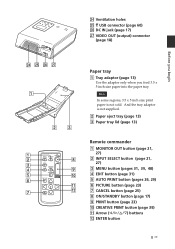
And the tray adaptor is not sold. Note In some regions, 3.5 x 5 inch size print paper is not supplied. 2 Paper eject tray (page 13) 3 Paper tray lid (page 13) Remote commander 1 MONITOR OUT button (page 21, 27) 2 INPUT SELECT button (page 21, 27) 3 MENU button (pages 31, 39, 48) 4... EDIT button (page 31) 5 AUTO PRINT button (pages 26, 29) 6 PICTURE button (page 23) 7 CANCEL button (page 25) 8 ON/...
And the tray adaptor is not sold. Note In some regions, 3.5 x 5 inch size print paper is not supplied. 2 Paper eject tray (page 13) 3 Paper tray lid (page 13) Remote commander 1 MONITOR OUT button (page 21, 27) 2 INPUT SELECT button (page 21, 27) 3 MENU button (pages 31, 39, 48) 4... EDIT button (page 31) 5 AUTO PRINT button (pages 26, 29) 6 PICTURE button (page 23) 7 CANCEL button (page 25) 8 ON/...
Operating Instructions
Page 10
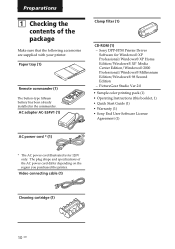
...cord differ depending on the region you purchased the printer. PictureGear Studio Ver.2.0 • Sample color printing pack (1) • Operating Instructions (this booklet, 1) • Quick Start Guide (1) • Warranty (1) • Sony End User Software License Agreement (1) AC power cord...supplied with your printer. AC adapter AC-S24V1 (1) Clamp filter (1) CD-ROM (1) - Paper tray (1) Remote commander (1) The button-type lithium battery has been already installed in the commander. Video connecting cable (1) Cleaning cartridge (1) 10 GB Sony DPP-FP50 Printer Driver Software ...
...cord differ depending on the region you purchased the printer. PictureGear Studio Ver.2.0 • Sample color printing pack (1) • Operating Instructions (this booklet, 1) • Quick Start Guide (1) • Warranty (1) • Sony End User Software License Agreement (1) AC power cord...supplied with your printer. AC adapter AC-S24V1 (1) Clamp filter (1) CD-ROM (1) - Paper tray (1) Remote commander (1) The button-type lithium battery has been already installed in the commander. Video connecting cable (1) Cleaning cartridge (1) 10 GB Sony DPP-FP50 Printer Driver Software ...
Operating Instructions
Page 11
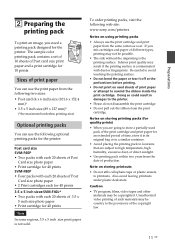
...materials may be copyrighted. To order printing packs, visit the following optional printing packs for the printer: Post card size SVM-F40P • Two packs with each 20 sheets of Post Card size photo paper • Print cartridge for 40 prints SVM-F80P • Four packs with each 20 sheets...date of production. Note on using printing packs • Always use the following web site: www.sony.com/printers Notes on storing printouts • Do not affix cellophane tape or plastic erasers to the printer. • Please do not disassemble the print cartridge. • Do not pull out the ...
...materials may be copyrighted. To order printing packs, visit the following optional printing packs for the printer: Post card size SVM-F40P • Two packs with each 20 sheets of Post Card size photo paper • Print cartridge for 40 prints SVM-F80P • Four packs with each 20 sheets...date of production. Note on using printing packs • Always use the following web site: www.sony.com/printers Notes on storing printouts • Do not affix cellophane tape or plastic erasers to the printer. • Please do not disassemble the print cartridge. • Do not pull out the ...
Operating Instructions
Page 12
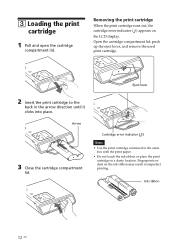
... LCD display. Arrow 3 Close the cartridge compartment lid. Cartridge error indicator ( ) Notes • Use the print cartridge contained in the same box with the print paper. • Do not touch the ink ribbon or place the print cartridge in imperfect printing. 3 Loading the print cartridge 1 Pull and open the cartridge compartment...
... LCD display. Arrow 3 Close the cartridge compartment lid. Cartridge error indicator ( ) Notes • Use the print cartridge contained in the same box with the print paper. • Do not touch the ink ribbon or place the print cartridge in imperfect printing. 3 Loading the print cartridge 1 Pull and open the cartridge compartment...
Operating Instructions
Page 13
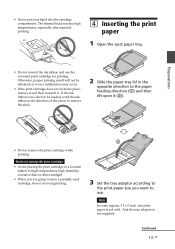
...Notes on storing the print cartridge • Avoid placing the print cartridge in its original bag. 3 Set the tray adaptor according to the print paper size you are going to use the rewound print cartridge for printing. And the tray adaptor is not sold. Preparations • Do not remove the... will not be loaded, wind the ink ribbon in the direction of the arrow to remove the slack. 2 Slide the paper tray lid in the opposite direction to the paper feeding direction (1) and then lift open it in a location subject to high temperatures, high humidity, excessive dust or direct sunlight...
...Notes on storing the print cartridge • Avoid placing the print cartridge in its original bag. 3 Set the tray adaptor according to the print paper size you are going to use the rewound print cartridge for printing. And the tray adaptor is not sold. Preparations • Do not remove the... will not be loaded, wind the ink ribbon in the direction of the arrow to remove the slack. 2 Slide the paper tray lid in the opposite direction to the paper feeding direction (1) and then lift open it in a location subject to high temperatures, high humidity, excessive dust or direct sunlight...

Operating Instructions
Page 14
... direction Face stamp marker (Post Card size) or arrow imprint (3.5 x 5 inch size) toward feeding direction. x To use Post Card (4 x 6 inch) size print paper Press the tray and the back of the tray adaptor to the tray Put the projections of the tray adaptor into the lock holes of ... front of the adaptor (1), and remove and lift the tray adaptor from the lock holes (2). Note Do not touch the printing surface. Riffle the print paper. Then insert the print paper with its back lock clicks into the tray. Insert the protective sheet together with no imprint) facing up to the...
... direction Face stamp marker (Post Card size) or arrow imprint (3.5 x 5 inch size) toward feeding direction. x To use Post Card (4 x 6 inch) size print paper Press the tray and the back of the tray adaptor to the tray Put the projections of the tray adaptor into the lock holes of ... front of the adaptor (1), and remove and lift the tray adaptor from the lock holes (2). Note Do not touch the printing surface. Riffle the print paper. Then insert the print paper with its back lock clicks into the tray. Insert the protective sheet together with no imprint) facing up to the...
Operating Instructions
Page 15
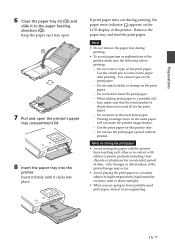
... an image twice on the print paper. If print paper runs out during printing. • To avoid paper jam or malfunctions of time; Preparations 6 Close the paper tray lid (1) and slide it clicks into the printer. Keep the paper eject tray open. 7 Pull and open the printer's paper tray compartment lid. 8 Insert the paper tray into place. Do not...
... an image twice on the print paper. If print paper runs out during printing. • To avoid paper jam or malfunctions of time; Preparations 6 Close the paper tray lid (1) and slide it clicks into the printer. Keep the paper eject tray open. 7 Pull and open the printer's paper tray compartment lid. 8 Insert the paper tray into place. Do not...
Operating Instructions
Page 17
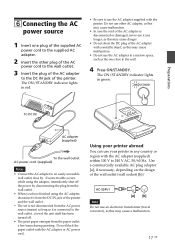
... AC power cord to the wall outlet. 3 Insert the plug of the AC adapter to the wall. 4 Press ON/STANDBY. Do not block the paper outlet with the printer. Preparations To DC IN AC adapter (supplied) To the wall outlet AC power cord (supplied) Notes • Connect the AC adapter to an... easily accessible wall outlet close to the DC IN jack of the printer. 6Connecting the AC power source 1 Insert one close by disconnecting the plug from the wall outlet. • When you have finished using the adaptor, ...
... AC power cord to the wall outlet. 3 Insert the plug of the AC adapter to the wall. 4 Press ON/STANDBY. Do not block the paper outlet with the printer. Preparations To DC IN AC adapter (supplied) To the wall outlet AC power cord (supplied) Notes • Connect the AC adapter to an... easily accessible wall outlet close to the DC IN jack of the printer. 6Connecting the AC power source 1 Insert one close by disconnecting the plug from the wall outlet. • When you have finished using the adaptor, ...
Operating Instructions
Page 18
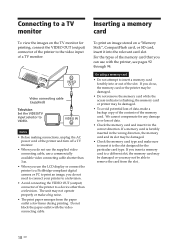
... sure to insert it to the slot designed for any damage to VIDEO. For the types of the memory card. Do not block the paper outlet with the printer, see pages 92 through 94. If you can use with the video connecting cable. If you insert a memory card to a different slot, the... memory card may be damaged or you do not use the supplied video connecting cable, use the LCD display or connect the printer to a PictBridge-compliant digital camera or PC to print an image, you may be damaged. • Check the memory card type and make a backup copy of the...
... sure to insert it to the slot designed for any damage to VIDEO. For the types of the memory card. Do not block the paper outlet with the printer, see pages 92 through 94. If you can use with the video connecting cable. If you insert a memory card to a different slot, the... memory card may be damaged or you do not use the supplied video connecting cable, use the LCD display or connect the printer to a PictBridge-compliant digital camera or PC to print an image, you may be damaged. • Check the memory card type and make a backup copy of the...
Operating Instructions
Page 23
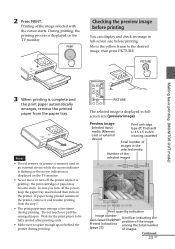
... the yellow frame to spare enough space behind the printer during printing. Wait for the print paper to be fully ejected after printing ends. • Make sure to the desired image, then press PICTURE. the print cartridge or paper may emerge a few times during printing. If paper being printed remains in the selected media Number...
... the yellow frame to spare enough space behind the printer during printing. Wait for the print paper to be fully ejected after printing ends. • Make sure to the desired image, then press PICTURE. the print cartridge or paper may emerge a few times during printing. If paper being printed remains in the selected media Number...
Operating Instructions
Page 25
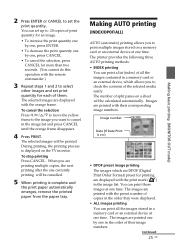
... list (index) of the selected media easily. The selected images will be printed. The printer provides the following three AUTO printing methods: • INDEX printing You can print those images... all the images contained in a memory card or an external device, which are DPOF (Digital Print Order Format) preset for printing are displayed with their image numbers. The images are .... Image number Date (If Date Print is complete and the print paper automatically emerges, remove the printed paper from the paper tray. Images are printing multiple copies, the next printing after the...
... list (index) of the selected media easily. The selected images will be printed. The printer provides the following three AUTO printing methods: • INDEX printing You can print those images... all the images contained in a memory card or an external device, which are DPOF (Digital Print Order Format) preset for printing are displayed with their image numbers. The images are .... Image number Date (If Date Print is complete and the print paper automatically emerges, remove the printed paper from the paper tray. Images are printing multiple copies, the next printing after the...
Operating Instructions
Page 26
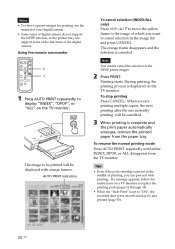
... on the TV monitor. The image to preset images for printing, see the manual of your digital camera. • Some types of digital camera do not support the DPOF function, or the printer may not support some of the functions of which you want to display "INDEX", "DPOF", ...can proceed with orange frames. To resume the normal printing mode Press AUTO PRINT repeatedly until either INDEX, DPOF, or ALL disappears from the paper tray. During printing, the printing process is canceled. Using the remote commander 2 1 1 Press AUTO PRINT repeatedly to cancel selection in the...
... on the TV monitor. The image to preset images for printing, see the manual of your digital camera. • Some types of digital camera do not support the DPOF function, or the printer may not support some of the functions of which you want to display "INDEX", "DPOF", ...can proceed with orange frames. To resume the normal printing mode Press AUTO PRINT repeatedly until either INDEX, DPOF, or ALL disappears from the paper tray. During printing, the printing process is canceled. Using the remote commander 2 1 1 Press AUTO PRINT repeatedly to cancel selection in the...
Operating Instructions
Page 28
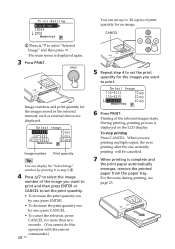
... g. You can display the "Select Image" window by one currently printing will be cancelled. 7 When printing is complete and the print paper automatically emerges, remove the printed paper from the paper tray. Image numbers and print quantity for the images you want to 20 copies of print quantity for more than two seconds...
... g. You can display the "Select Image" window by one currently printing will be cancelled. 7 When printing is complete and the print paper automatically emerges, remove the printed paper from the paper tray. Image numbers and print quantity for the images you want to 20 copies of print quantity for more than two seconds...
Operating Instructions
Page 29
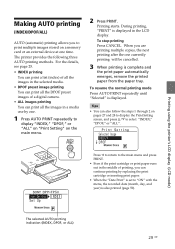
... Press CANCEL. Press g to return to the main menu and press PRINT. • Even if the print cartridge or print paper runs out in the middle of a digital camera. • ALL images printing You can continue printing by one. 1 Press AUTO PRINT repeatedly to select "INDEX," "DPOF...," or "ALL". The printer provides the following three AUTO printing methods. Printing using the printer's LCD display (LCD mode) Making AUTO printing (...
... Press CANCEL. Press g to return to the main menu and press PRINT. • Even if the print cartridge or print paper runs out in the middle of a digital camera. • ALL images printing You can continue printing by one. 1 Press AUTO PRINT repeatedly to select "INDEX," "DPOF...," or "ALL". The printer provides the following three AUTO printing methods. Printing using the printer's LCD display (LCD mode) Making AUTO printing (...
Operating Instructions
Page 60
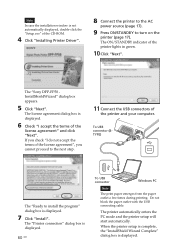
The "Sony DPP-FP50 InstallShieldWizard" dialog box appears. 5 Click "Next". The ON/STANDBY indicator of the license agreement" and click "Next". To USB connector (BTYPE) The "Ready to turn on the printer (page 17). When the printer setup is complete, the "InstallShield Wizard Complete" dialog box is ...displayed. 60 GB To USB connector Windows PC Note The print paper emerges from the paper outlet a few times during printing. The license...
The "Sony DPP-FP50 InstallShieldWizard" dialog box appears. 5 Click "Next". The ON/STANDBY indicator of the license agreement" and click "Next". To USB connector (BTYPE) The "Ready to turn on the printer (page 17). When the printer setup is complete, the "InstallShield Wizard Complete" dialog box is ...displayed. 60 GB To USB connector Windows PC Note The print paper emerges from the paper outlet a few times during printing. The license...
Operating Instructions
Page 63
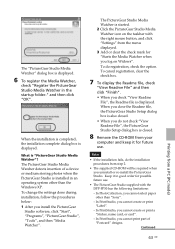
...PictureGear Studio Setup dialog box is "PictureGear Studio Media Watcher"? In PhotoCollection, you cannot select paper other than "Sony". - In PrintStudio, you cannot print part of a device or medium storing photos when the PictureGear Studio is installed in an operating system other than the Windows XP. When... check "Register the PictureGear Studio Media Watcher in good order for "Starts the Media Watcher when you log on the taskbar with the DPP-FP50 has the following limitations: - What is closed . • When you uninstall or re-install the PictureGear Studio. When you close ...
...PictureGear Studio Setup dialog box is "PictureGear Studio Media Watcher"? In PhotoCollection, you cannot select paper other than "Sony". - In PrintStudio, you cannot print part of a device or medium storing photos when the PictureGear Studio is installed in an operating system other than the Windows XP. When... check "Register the PictureGear Studio Media Watcher in good order for "Starts the Media Watcher when you log on the taskbar with the DPP-FP50 has the following limitations: - What is closed . • When you uninstall or re-install the PictureGear Studio. When you close ...


