PIXELA ImageMixer v1.5 Instruction Manual
Page 20
... Opening Capture Environment Capture window Capture Tasks Import file mode display Importing files Preferences Digital Camera Import Mode Digital camera import display Importing files from a digital camera Preferences Audio CD Recording...Camcorder Capture Mode (Win) Control panel Changing the display size Connection status DV cassette indication Capturing movie scenes Capturing still picture files Preferences ImageMixer allows you to select which existing media you want to work with ImageMixer. Click the [Capture Environment] button on the mode selected. Capture window...
... Opening Capture Environment Capture window Capture Tasks Import file mode display Importing files Preferences Digital Camera Import Mode Digital camera import display Importing files from a digital camera Preferences Audio CD Recording...Camcorder Capture Mode (Win) Control panel Changing the display size Connection status DV cassette indication Capturing movie scenes Capturing still picture files Preferences ImageMixer allows you to select which existing media you want to work with ImageMixer. Click the [Capture Environment] button on the mode selected. Capture window...
PIXELA ImageMixer v1.5 Instruction Manual
Page 21
Sound Recording Mode button Click to start digital camera import mode. All rights reserved. Digital Camera Import Mode button Click to start CD recording mode. USB Device Capture Mode button Click to start USB device capture mode. (Windows only) DV Camcorder Capture Mode button Click to start sound recording mode. CD Recording Mode button Click to start import file mode. Import File Mode button Click to start DV camcorder capture mode. (Windows only) Copyright © 2001-2002 PIXELA Corp.
Sound Recording Mode button Click to start digital camera import mode. All rights reserved. Digital Camera Import Mode button Click to start CD recording mode. USB Device Capture Mode button Click to start USB device capture mode. (Windows only) DV Camcorder Capture Mode button Click to start sound recording mode. CD Recording Mode button Click to start import file mode. Import File Mode button Click to start DV camcorder capture mode. (Windows only) Copyright © 2001-2002 PIXELA Corp.
PIXELA ImageMixer v1.5 Instruction Manual
Page 57
Control panel From the control panel, you to capture both still pictures and movie scenes a digital video cameras connected to your computer. Monitor window Displays the movie directly from a digital video camera connected to the IEEE1394 port of your PC. 2-7-1 DV Camcorder Capture Mode (Windows Only) ImageMixer enables you can play or record media from the digital video camera.
Control panel From the control panel, you to capture both still pictures and movie scenes a digital video cameras connected to your computer. Monitor window Displays the movie directly from a digital video camera connected to the IEEE1394 port of your PC. 2-7-1 DV Camcorder Capture Mode (Windows Only) ImageMixer enables you can play or record media from the digital video camera.
PIXELA ImageMixer v1.5 Instruction Manual
Page 60
Click the [small monitor] size. button or the [large monitor] button to choose: small monitor and large monitor. 2-7-2 DV Camcorder Capture Mode (Windows Only) Changing the display size When capturing files from a digital video camera (DV camcorder), there are two monitor sizes from which to change the monitor Connection status
Click the [small monitor] size. button or the [large monitor] button to choose: small monitor and large monitor. 2-7-2 DV Camcorder Capture Mode (Windows Only) Changing the display size When capturing files from a digital video camera (DV camcorder), there are two monitor sizes from which to change the monitor Connection status
PIXELA ImageMixer v1.5 Instruction Manual
Page 61
...not present, the icon is displayed. Depending on your selected task, the message in the information display panel will say "Camcorder Not Found." All rights reserved. Connect your digital video camera to the IEEE1394 port on your PC and set in the mode you would normally use to view scenes ... 'There is , your device should be displayed. If there seems to a problem with the connection between the PC and the device: A black monitor window will be set it to play mode. If there is a problem with the connection between the PC and the device is working properly: A blue monitor...
...not present, the icon is displayed. Depending on your selected task, the message in the information display panel will say "Camcorder Not Found." All rights reserved. Connect your digital video camera to the IEEE1394 port on your PC and set in the mode you would normally use to view scenes ... 'There is , your device should be displayed. If there seems to a problem with the connection between the PC and the device: A black monitor window will be set it to play mode. If there is a problem with the connection between the PC and the device is working properly: A blue monitor...
PIXELA ImageMixer v1.5 Instruction Manual
Page 62
... the captured movie file. 2. Adjust sound volume if necessary. If the 'Capture as MPEG1' box is checked in the monitor window. Click the [Play] button to hear sound. 2-7-3 DV Camcorder Capture Mode (Windows Only) Capturing movie scenes Follow the steps below will be shown. Select an album. In such cases, the volume should...
... the captured movie file. 2. Adjust sound volume if necessary. If the 'Capture as MPEG1' box is checked in the monitor window. Click the [Play] button to hear sound. 2-7-3 DV Camcorder Capture Mode (Windows Only) Capturing movie scenes Follow the steps below will be shown. Select an album. In such cases, the volume should...
PIXELA ImageMixer v1.5 Instruction Manual
Page 64
...) Sets the settings related to display the preference window described below. Destination of capture, "ABC0001", "ABC0002", "ABC0003". Preferences window Check that the DV Camcorder Capture Mode is selected, then click the "Preferences" button on the selector bar to the DV camcorder capture mode. For example, if you input "ABC," then the captured file names...
...) Sets the settings related to display the preference window described below. Destination of capture, "ABC0001", "ABC0002", "ABC0003". Preferences window Check that the DV Camcorder Capture Mode is selected, then click the "Preferences" button on the selector bar to the DV camcorder capture mode. For example, if you input "ABC," then the captured file names...
Operating Instructions
Page 7
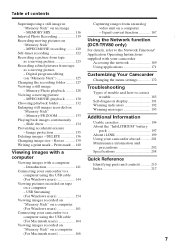
Digital program editing (on "Memory Stick" - Memory PB ZOOM 133 Playing back images continuously - Accessing the network 169 Using applications 171 Customizing Your Camcorder Changing the menu settings 172 ...Identifying parts and controls 210 Index 217 7 Introduction 141 Connecting your camcorder to a computer using the USB cable (For Windows users 144 Viewing pictures recorded on tape on "Memory Stick" - ... 167 Using the Network function (DCR-TRV80 only) For details, refer to the Network Function/ Application Operating Instructions supplied with your camcorder.
Digital program editing (on "Memory Stick" - Memory PB ZOOM 133 Playing back images continuously - Accessing the network 169 Using applications 171 Customizing Your Camcorder Changing the menu settings 172 ...Identifying parts and controls 210 Index 217 7 Introduction 141 Connecting your camcorder to a computer using the USB cable (For Windows users 144 Viewing pictures recorded on tape on "Memory Stick" - ... 167 Using the Network function (DCR-TRV80 only) For details, refer to the Network Function/ Application Operating Instructions supplied with your camcorder.
Operating Instructions
Page 8
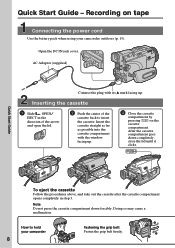
... the plug with the window facing up . How to insert the cassette. Insert the cassette straight as far as possible into the cassette compartment with its v mark facing up . 3 Close the cassette compartment by pressing on tape Connecting the power cord Use the battery pack when using your camcorder 8 Fastening the grip... the cassette compartment opens completely in the direction of the arrow and open the lid. 2 Push the center of the cassette back to hold your camcorder outdoors (p. 15). Open the DC IN jack cover. Doing so may cause a malfunction. Quick Start Guide -
... the plug with the window facing up . How to insert the cassette. Insert the cassette straight as far as possible into the cassette compartment with its v mark facing up . 3 Close the cassette compartment by pressing on tape Connecting the power cord Use the battery pack when using your camcorder 8 Fastening the grip... the cassette compartment opens completely in the direction of the arrow and open the lid. 2 Push the center of the cassette back to hold your camcorder outdoors (p. 15). Open the DC IN jack cover. Doing so may cause a malfunction. Quick Start Guide -

Operating Instructions
Page 13
...black points and/or bright points (white, red, blue or green in color) that the jack is connected in the right direction. Precautions on camcorder care Lens and LCD screen/finder (on mounted models only) •The LCD screen and the finder are manufactured using the USB cable or ... manufacturing process and do not affect the recording in the sun or under direct sunlight [b]. •Be careful when placing the camera near a window or outdoors. Pushing it forcibly may cause your camcorder get wet. These points are operational for long periods may be repaired [a]. •Never leave your...
...black points and/or bright points (white, red, blue or green in color) that the jack is connected in the right direction. Precautions on camcorder care Lens and LCD screen/finder (on mounted models only) •The LCD screen and the finder are manufactured using the USB cable or ... manufacturing process and do not affect the recording in the sun or under direct sunlight [b]. •Be careful when placing the camera near a window or outdoors. Pushing it forcibly may cause your camcorder get wet. These points are operational for long periods may be repaired [a]. •Never leave your...

Operating Instructions
Page 16
... charging the battery pack allows you to , normal charge is complete. Charging begins. The remaining battery time is indicated in minutes in the display window. Your camcorder operates only with the DC plug's v mark facing up. (3) Connect the power cord to the AC Adaptor. (4) Connect the power cord to.... (5) Set the POWER switch to OFF (CHG). To fully charge the battery pack (full charge), leave the battery pack attached for your camcorder. 16 Step 1 Preparing the power source Charging the battery pack Use the battery pack after charging it for about one hour after normal charge ...
... charging the battery pack allows you to , normal charge is complete. Charging begins. The remaining battery time is indicated in minutes in the display window. Your camcorder operates only with the DC plug's v mark facing up. (3) Connect the power cord to the AC Adaptor. (4) Connect the power cord to.... (5) Set the POWER switch to OFF (CHG). To fully charge the battery pack (full charge), leave the battery pack attached for your camcorder. 16 Step 1 Preparing the power source Charging the battery pack Use the battery pack after charging it for about one hour after normal charge ...

Operating Instructions
Page 17
.... When you repeat recording start/ stop, zooming and turning the power on/off the power. min" appears in the display window indicates the approximate recording time when recording with the LCD screen Continuous Typical* 95 55 200 115 230 135 350 205 Approximate ...low because of minutes when recording while you use a fully charged battery pack * Approximate number of the ambient temperature. Until your camcorder calculates the actual remaining battery time "---- Getting Started Step 1 Preparing the power source Note Prevent metallic objects from coming into contact...
.... When you repeat recording start/ stop, zooming and turning the power on/off the power. min" appears in the display window indicates the approximate recording time when recording with the LCD screen Continuous Typical* 95 55 200 115 230 135 350 205 Approximate ...low because of minutes when recording while you use a fully charged battery pack * Approximate number of the ambient temperature. Until your camcorder calculates the actual remaining battery time "---- Getting Started Step 1 Preparing the power source Note Prevent metallic objects from coming into contact...

Operating Instructions
Page 57
...This mode allows you to maintain atmosphere when you record a subject behind glass or a screen. 1) Your camcorder focuses only on subjects in the middle to far distance. 2) Your camcorder focuses only distant subject. 57 LANDSCAPE2) This mode is for when you record distant subjects such as in...SPORTS (sports lesson)1) This mode minimizes shake on fast-moving subjects such as mountains. Also it prevents your camcorder from focusing on glass or metal mesh in windows when you are recording sunsets, general night views, fireworks displays and neon signs. Advanced Recording Operations Using ...
...This mode allows you to maintain atmosphere when you record a subject behind glass or a screen. 1) Your camcorder focuses only on subjects in the middle to far distance. 2) Your camcorder focuses only distant subject. 57 LANDSCAPE2) This mode is for when you record distant subjects such as in...SPORTS (sports lesson)1) This mode minimizes shake on fast-moving subjects such as mountains. Also it prevents your camcorder from focusing on glass or metal mesh in windows when you are recording sunsets, general night views, fireworks displays and neon signs. Advanced Recording Operations Using ...

Operating Instructions
Page 101
... on other equipment (DCR-TRV890E/TRV900/TRV900E or DSC-D700/D770) that does not conform to the "Memory Stick." •Do not disassemble or modify the "Memory Stick." •Do not let the "Memory Stick" get wet. However, you eject the "Memory Stick" or turn off your camcorder. The use the...signals on the "MagicGate Memory Stick" You can use of speakers and TV. On handling •When you cannot play back the music protected by Windows OS or Macintosh computers does not have a guaranteed compatibility with the Design Rules for use Do not use or keep the "Memory Stick" in ...
... on other equipment (DCR-TRV890E/TRV900/TRV900E or DSC-D700/D770) that does not conform to the "Memory Stick." •Do not disassemble or modify the "Memory Stick." •Do not let the "Memory Stick" get wet. However, you eject the "Memory Stick" or turn off your camcorder. The use the...signals on the "MagicGate Memory Stick" You can use of speakers and TV. On handling •When you cannot play back the music protected by Windows OS or Macintosh computers does not have a guaranteed compatibility with the Design Rules for use Do not use or keep the "Memory Stick" in ...
Operating Instructions
Page 141
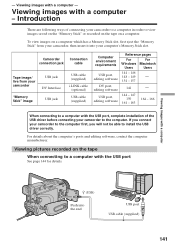
... cable (optional) USB cable (supplied) Computer environment requirements USB port, editing software DV port, editing software USB port, editing software Reference pages For For Windows Macintosh Users Users 144 - 146 148 - 149 154 - 157 142 144 - 147 150 161 - 163 164 - 166 When connecting to a computer... with a computer (USB) Push into your camcorder, then insert it into the end USB port USB cable (supplied) 141 For details about the computer's ports and editing software, contact the computer ...
... cable (optional) USB cable (supplied) Computer environment requirements USB port, editing software DV port, editing software USB port, editing software Reference pages For For Windows Macintosh Users Users 144 - 146 148 - 149 154 - 157 142 144 - 147 150 161 - 163 164 - 166 When connecting to a computer... with a computer (USB) Push into your camcorder, then insert it into the end USB port USB cable (supplied) 141 For details about the computer's ports and editing software, contact the computer ...
Operating Instructions
Page 144
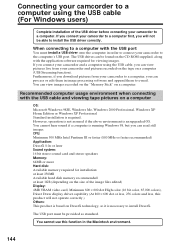
...can view pictures live from your camcorder to a computer, you can read still images. When connecting to a computer with the USB cable and viewing tape pictures on a computer OS: Microsoft Windows 98SE, Windows Me, Windows 2000 Professional, Windows XP Home Edition or Windows XP Professional Standard installation is an...you can process or edit them in image processing software and append them to e-mail. If you connect your camcorder and a computer using the USB cable (For Windows users) Complete installation of the image files edited) Display: 4MB VRAM video card, Minimum 800 × 600...
...can view pictures live from your camcorder to a computer, you can read still images. When connecting to a computer with the USB cable and viewing tape pictures on a computer OS: Microsoft Windows 98SE, Windows Me, Windows 2000 Professional, Windows XP Home Edition or Windows XP Professional Standard installation is an...you can process or edit them in image processing software and append them to e-mail. If you connect your camcorder and a computer using the USB cable (For Windows users) Complete installation of the image files edited) Display: 4MB VRAM video card, Minimum 800 × 600...
Operating Instructions
Page 145
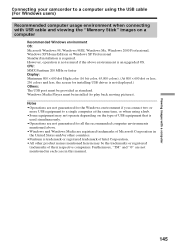
...) Recommended computer usage environment when connecting with a computer Connecting your camcorder to a computer using a hub. • Some equipment may not operate depending on a computer Recommended Windows environment OS: Microsoft Windows 98, Windows 98SE, Windows Me, Windows 2000 Professional, Windows XP Home Edition or Windows XP Professional Standard installation is required. Viewing images with USB cable and viewing the...
...) Recommended computer usage environment when connecting with a computer Connecting your camcorder to a computer using a hub. • Some equipment may not operate depending on a computer Recommended Windows environment OS: Microsoft Windows 98, Windows 98SE, Windows Me, Windows 2000 Professional, Windows XP Home Edition or Windows XP Professional Standard installation is required. Viewing images with USB cable and viewing the...
Operating Instructions
Page 146
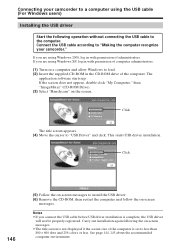
...145 about the recommended computer environment. Click 146 (5) Follow the on-screen messages to "Making the computer recognize your camcorder to a computer using the USB cable (For Windows users) Installing the USB driver Start the following the on -screen messages. If the screen does not appear, double...-click "My Computer," then "ImageMixer" (CD-ROM Drive). (3) Select "Handycam" on a computer and allow Windows to the computer. Click The title screen appears. (4) Move the cursor to less than 800 × 600 dots and 256 colors ...
...145 about the recommended computer environment. Click 146 (5) Follow the on-screen messages to "Making the computer recognize your camcorder to a computer using the USB cable (For Windows users) Installing the USB driver Start the following the on -screen messages. If the screen does not appear, double...-click "My Computer," then "ImageMixer" (CD-ROM Drive). (3) Select "Handycam" on a computer and allow Windows to the computer. Click The title screen appears. (4) Move the cursor to less than 800 × 600 dots and 256 colors ...
Operating Instructions
Page 147
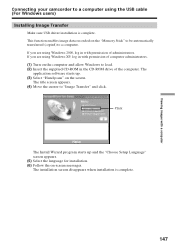
...) to "Image Transfer" and click. The installation screen disappears when installation is complete. Viewing images with a computer Connecting your camcorder to load. (2) Insert the supplied CD-ROM in the CD-ROM drive of the computer. If you are using the USB cable (For.... 147 The title screen appears. (4) Move the cursor to a computer. Click The Install Wizard program starts up . (3) Select "Handycam" on -screen messages. This function enables image data recorded on the computer and allow Windows to a computer using Windows 2000, log in with permission of administrators.
...) to "Image Transfer" and click. The installation screen disappears when installation is complete. Viewing images with a computer Connecting your camcorder to load. (2) Insert the supplied CD-ROM in the CD-ROM drive of the computer. If you are using the USB cable (For.... 147 The title screen appears. (4) Move the cursor to a computer. Click The Install Wizard program starts up . (3) Select "Handycam" on -screen messages. This function enables image data recorded on the computer and allow Windows to a computer using Windows 2000, log in with permission of administrators.
Operating Instructions
Page 148
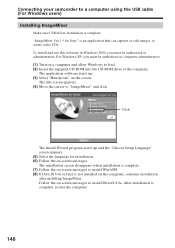
...installation is complete. Click The Install Wizard program starts up . (3) Select "Handycam" on -screen messages to "ImageMixer" and click. Connecting your camcorder to a computer using the USB cable (For Windows users) Installing ImageMixer Make sure USB driver installation is complete, restart the computer...or create video CDs. The application software starts up and the "Choose Setup Language" screen appears. (5) Select the language for Sony" is not installed on -screen messages. "ImageMixer Ver.1.5 for installation. (6) Follow the on the computer, continue installation after ...
...installation is complete. Click The Install Wizard program starts up . (3) Select "Handycam" on -screen messages to "ImageMixer" and click. Connecting your camcorder to a computer using the USB cable (For Windows users) Installing ImageMixer Make sure USB driver installation is complete, restart the computer...or create video CDs. The application software starts up and the "Choose Setup Language" screen appears. (5) Select the language for Sony" is not installed on -screen messages. "ImageMixer Ver.1.5 for installation. (6) Follow the on the computer, continue installation after ...


