Insert: Getting Online with your Camera
Page 2
... set forth in the operating instructions. Please refer to "So-net" in your Network Handycam ® camcorder Network Function Operating Instructions ("Operating Instructions ") and in the menu of your Network Handycam ® camcorder. (*ISP service not included. About So-net internet service provider (ISP) You may also find references to the table below for the page number in the Operating Instructions manual containing the appropriate instructions for connecting your Network Handycam camcorder to use...
... set forth in the operating instructions. Please refer to "So-net" in your Network Handycam ® camcorder Network Function Operating Instructions ("Operating Instructions ") and in the menu of your Network Handycam ® camcorder. (*ISP service not included. About So-net internet service provider (ISP) You may also find references to the table below for the page number in the Operating Instructions manual containing the appropriate instructions for connecting your Network Handycam camcorder to use...
Network Function/Application Operating Instructions
Page 2
..., this manual. Availability and features of Access Co., Ltd in order to exit the network function. For details, refer to recording/playback malfunction or storage media problems. Precautions •Before using the battery pack When the remaining battery power is recommended that you make sure you may be different from time to time due to change. Also, exit the network function when setting the POWER switch to OFF...
..., this manual. Availability and features of Access Co., Ltd in order to exit the network function. For details, refer to recording/playback malfunction or storage media problems. Precautions •Before using the battery pack When the remaining battery power is recommended that you make sure you may be different from time to time due to change. Also, exit the network function when setting the POWER switch to OFF...
Network Function/Application Operating Instructions
Page 122
.... After finishing recording, cancel Remote Camera. - Tape recording - This is narrower in Wide mode than usual. MEMORY MIX - To change the Pan/Tilt setting during the following operations: - If low picture quality is a problem, set REC LAMP in to OFF in the menu settings. •You cannot select RMT CAM during recording even if you turn Remote Camera on "Memory Stick" - Notes •When START/STOP or PHOTO is pressed, melody or shutter sound is output even if...
.... After finishing recording, cancel Remote Camera. - Tape recording - This is narrower in Wide mode than usual. MEMORY MIX - To change the Pan/Tilt setting during the following operations: - If low picture quality is a problem, set REC LAMP in to OFF in the menu settings. •You cannot select RMT CAM during recording even if you turn Remote Camera on "Memory Stick" - Notes •When START/STOP or PHOTO is pressed, melody or shutter sound is output even if...
PIXELA ImageMixer v1.5 Instruction Manual
Page 232
..., etc. Press a number button on the CD media. NTSC is 24 or 29.97 frames. MPEG-1 quality averages that of a VHS tape, such as an audio CD, about 74 minutes of VideoCD. Setting up menu composition, contents, navigation, etc. The images are displayed per second is a general Video/TV format used for playback of data (audio + sound) can be recorded in one of the CD format for DVD, digital satellite broadcasting...
..., etc. Press a number button on the CD media. NTSC is 24 or 29.97 frames. MPEG-1 quality averages that of a VHS tape, such as an audio CD, about 74 minutes of VideoCD. Setting up menu composition, contents, navigation, etc. The images are displayed per second is a general Video/TV format used for playback of data (audio + sound) can be recorded in one of the CD format for DVD, digital satellite broadcasting...
Operating Instructions
Page 39
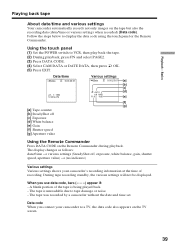
... TV screen. 39 Basics Playing back tape About date/time and various settings Your camcorder automatically records not only images on the Remote Commander during playback. The display changes as follows: date/time t various settings (SteadyShot off [c] Exposure [d] White balance [e] Gain [f] Shutter speed [g] Aperture value Using the Remote Commander Press DATA CODE on the tape but also the recording data (date/time or various settings when recorded) (Data code). During tape recording standby, the various settings will not be displayed. Follow the steps below to VCR, then play back...
... TV screen. 39 Basics Playing back tape About date/time and various settings Your camcorder automatically records not only images on the Remote Commander during playback. The display changes as follows: date/time t various settings (SteadyShot off [c] Exposure [d] White balance [e] Gain [f] Shutter speed [g] Aperture value Using the Remote Commander Press DATA CODE on the tape but also the recording data (date/time or various settings when recorded) (Data code). During tape recording standby, the various settings will not be displayed. Follow the steps below to VCR, then play back...
Operating Instructions
Page 42
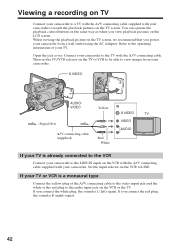
... LCD screen. Connect your TV. Set the input selector on the VCR to LINE. Open the jack cover. Then set the TV/VCR selector on the TV to VCR to be able to view images from a wall outlet using the AC Adaptor. When viewing the playback picture on the TV screen, we recommend that you connect the red plug, the sound is L (left) signal. Refer to the operating instructions of the A/V connecting cable to the video input...
... LCD screen. Connect your TV. Set the input selector on the VCR to LINE. Open the jack cover. Then set the TV/VCR selector on the TV to VCR to be able to view images from a wall outlet using the AC Adaptor. When viewing the playback picture on the TV screen, we recommend that you connect the red plug, the sound is L (left) signal. Refer to the operating instructions of the A/V connecting cable to the video input...
Operating Instructions
Page 84
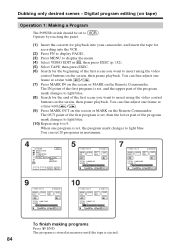
... insert using the video control buttons on tape) Operation 1: Making a Program The POWER switch should be set , the program mark changes to 9. Digital program editing (on the screen, then pause playback. When one frame at a time with / . (7) Press MARK IN on the screen or MARK on the Remote Commander. You can fine-adjust one frame at a time with / . (9) Press MARK OUT on the screen or MARK on the screen, then pause playback. The...
... insert using the video control buttons on tape) Operation 1: Making a Program The POWER switch should be set , the program mark changes to 9. Digital program editing (on the screen, then pause playback. When one frame at a time with / . (7) Press MARK IN on the screen or MARK on the Remote Commander. You can fine-adjust one frame at a time with / . (9) Press MARK OUT on the screen or MARK on the screen, then pause playback. The...
Operating Instructions
Page 123
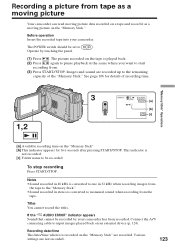
The POWER switch should be recorded To stop recording Press START/STOP. "Memory Stick" Operations 1,2 3 50min N 320REC BBB 0:15:42:43 0:00:03 15sec 101 [a] [b] [c] [a] Available recording time on the "Memory Stick" [b] This indicator appears for details of the "Memory Stick." Connect the A/V connecting cable to input images played back on the "Memory Stick" are recorded. Recording date/time The date/time when it as a moving picture data recorded on a tape and record it is recorded on an external device (p. 124). See page 106 for five seconds after...
The POWER switch should be recorded To stop recording Press START/STOP. "Memory Stick" Operations 1,2 3 50min N 320REC BBB 0:15:42:43 0:00:03 15sec 101 [a] [b] [c] [a] Available recording time on the "Memory Stick" [b] This indicator appears for details of the "Memory Stick." Connect the A/V connecting cable to input images played back on the "Memory Stick" are recorded. Recording date/time The date/time when it as a moving picture data recorded on a tape and record it is recorded on an external device (p. 124). See page 106 for five seconds after...
Operating Instructions
Page 146
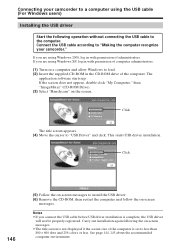
... your camcorder to a computer using the USB cable (For Windows users) Installing the USB driver Start the following the on -screen messages. The application software starts up. Connect the USB cable according to install the USB driver. (6) Remove the CD-ROM, then restart the computer and follow the on -screen messages. •The title screen is not displayed if the screen size of the computer. If you are using Windows XP, log in with permission of computer administrators. (1) Turn...
... your camcorder to a computer using the USB cable (For Windows users) Installing the USB driver Start the following the on -screen messages. The application software starts up. Connect the USB cable according to install the USB driver. (6) Remove the CD-ROM, then restart the computer and follow the on -screen messages. •The title screen is not displayed if the screen size of the computer. If you are using Windows XP, log in with permission of computer administrators. (1) Turn...
Operating Instructions
Page 149
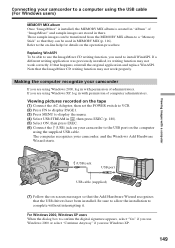
... computer using Windows 2000, log in , then press EXEC (p. 180). (5) Select ON, then press EXEC. (6) Connect the (USB) jack on the operation procedure. Viewing pictures recorded on the tape (1) Connect the AC Adaptor, then set the POWER switch to VCR. (2) Press FN to display PAGE1. (3) Press MENU to display the menu. (4) Select USB STREAM in with permission of administrators. If that the USB drivers have been installed. Connecting your camcorder If you need to install WinASPI...
... computer using Windows 2000, log in , then press EXEC (p. 180). (5) Select ON, then press EXEC. (6) Connect the (USB) jack on the operation procedure. Viewing pictures recorded on the tape (1) Connect the AC Adaptor, then set the POWER switch to VCR. (2) Press FN to display PAGE1. (3) Press MENU to display the menu. (4) Select USB STREAM in with permission of administrators. If that the USB drivers have been installed. Connecting your camcorder If you need to install WinASPI...
Operating Instructions
Page 150
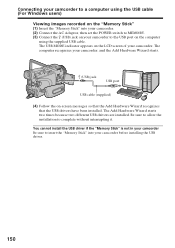
... install the USB driver if the "Memory Stick" is not in your camcorder Be sure to insert the "Memory Stick" into your camcorder. (2) Connect the AC Adaptor, then set the POWER switch to MEMORY. (3) Connect the (USB) jack on your camcorder to the USB port on the computer using the USB cable (For Windows users) Viewing images recorded on -screen messages so that the Add Hardware Wizard recognizes that the USB drivers have been installed. The Add Hardware Wizard starts two times...
... install the USB driver if the "Memory Stick" is not in your camcorder Be sure to insert the "Memory Stick" into your camcorder. (2) Connect the AC Adaptor, then set the POWER switch to MEMORY. (3) Connect the (USB) jack on your camcorder to the USB port on the computer using the USB cable (For Windows users) Viewing images recorded on -screen messages so that the Add Hardware Wizard recognizes that the USB drivers have been installed. The Add Hardware Wizard starts two times...
Operating Instructions
Page 151
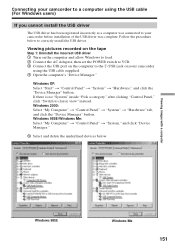
..." after clicking "Control Panel," click "Switch to correctly install the USB driver. Viewing pictures recorded on the tape Step 1: Uninstall the incorrect USB driver 1 Turn on the computer and allow Windows to load. 2 Connect the AC Adaptor, then set the POWER switch to VCR. 3 Connect the USB port on the computer to the (USB) jack on your camcorder before installation of the USB driver was connected to your camcorder using the USB cable supplied. 4 Open the computer's "Device Manager." Windows 2000: Select "My...
..." after clicking "Control Panel," click "Switch to correctly install the USB driver. Viewing pictures recorded on the tape Step 1: Uninstall the incorrect USB driver 1 Turn on the computer and allow Windows to load. 2 Connect the AC Adaptor, then set the POWER switch to VCR. 3 Connect the USB port on the computer to the (USB) jack on your camcorder before installation of the USB driver was connected to your camcorder using the USB cable supplied. 4 Open the computer's "Device Manager." Windows 2000: Select "My...

Operating Instructions
Page 153
... "Device Manager" button. If there is no "System" inside "Pick a category" after clicking "Control Panel," click "Switch to classic view" instead. Ex: (?)Sony Handycam 7 Set the POWER switch to OFF (CHG) on your camcorder using the USB cable (For Windows users) Viewing images recorded on the "Memory Stick" Step1: Uninstall the incorrect USB driver 1 Turn on the computer and allow Windows to load. 2 Insert the "Memory Stick" into your camcorder. 3 Connect the AC Adaptor, then set the POWER switch to MEMORY. 4 Connect the USB port...
... "Device Manager" button. If there is no "System" inside "Pick a category" after clicking "Control Panel," click "Switch to classic view" instead. Ex: (?)Sony Handycam 7 Set the POWER switch to OFF (CHG) on your camcorder using the USB cable (For Windows users) Viewing images recorded on the "Memory Stick" Step1: Uninstall the incorrect USB driver 1 Turn on the computer and allow Windows to load. 2 Insert the "Memory Stick" into your camcorder. 3 Connect the AC Adaptor, then set the POWER switch to MEMORY. 4 Connect the USB port...
Operating Instructions
Page 158
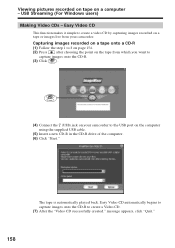
... you want to capture images onto the CD-R. (3) Click . (4) Connect the (USB) jack on your camcorder to create a Video CD. (7) After the "Video CD successfully created." Easy Video CD automatically begins to capture images onto the CD-R to the USB port on a tape or images live from your camcorder. message appears, click "Quit." 158 Viewing pictures recorded on tape on a computer - USB Streaming (For Windows users) Making Video CDs - The tape is automatically played back.
... you want to capture images onto the CD-R. (3) Click . (4) Connect the (USB) jack on your camcorder to create a Video CD. (7) After the "Video CD successfully created." Easy Video CD automatically begins to capture images onto the CD-R to the USB port on a tape or images live from your camcorder. message appears, click "Quit." 158 Viewing pictures recorded on tape on a computer - USB Streaming (For Windows users) Making Video CDs - The tape is automatically played back.
Operating Instructions
Page 162
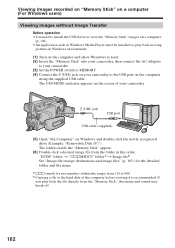
... your camcorder. (3) Set the POWER switch to MEMORY. (4) Connect the (USB) jack on your camcorder. (USB) jack USB port USB cable (supplied) (5) Open "My Computer" on the computer using the supplied USB cable. If you play back moving pictures in this order. Viewing images recorded on "Memory Stick" on a computer (For Windows users) Viewing images without Image Transfer Before operation •You need to install the USB driver to view the "Memory Stick" images on a computer (p. 146). •An application such as Windows Media Player must be installed to play back the file directly...
... your camcorder. (3) Set the POWER switch to MEMORY. (4) Connect the (USB) jack on your camcorder. (USB) jack USB port USB cable (supplied) (5) Open "My Computer" on the computer using the supplied USB cable. If you play back moving pictures in this order. Viewing images recorded on "Memory Stick" on a computer (For Windows users) Viewing images without Image Transfer Before operation •You need to install the USB driver to view the "Memory Stick" images on a computer (p. 146). •An application such as Windows Media Player must be installed to play back the file directly...
Operating Instructions
Page 166
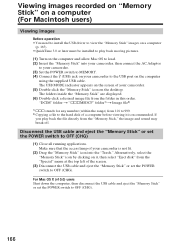
... access lamp of the screen. (3) Disconnect the USB cable and eject the "Memory Stick" or set the POWER switch to OFF (CHG). If you play back moving pictures. (1) Turn on the computer and allow Mac OS to load. (2) Insert the "Memory Stick" into the "Trash." "DCIM" folder t "sssMSDCF" folder1) t Image file2) 1) sss stands for any number (within the range) from 101 to 999. 2) Copying a file to the hard disk of a computer before viewing...
... access lamp of the screen. (3) Disconnect the USB cable and eject the "Memory Stick" or set the POWER switch to OFF (CHG). If you play back moving pictures. (1) Turn on the computer and allow Mac OS to load. (2) Insert the "Memory Stick" into the "Trash." "DCIM" folder t "sssMSDCF" folder1) t Image file2) 1) sss stands for any number (within the range) from 101 to 999. 2) Copying a file to the hard disk of a computer before viewing...
Operating Instructions
Page 208
.... Specifications Video camera recorder System Video recording system 2 rotary heads Helical scanning system Audio recording system Rotary heads, PCM system Quantization: 12 bits (Fs 32 kHz, stereo 1, stereo 2), 16 bits (Fs 48 kHz, stereo) Video signal NTSC color, EIA standards Usable cassette Mini DV cassette with 2.5 to 3.0 V DC, output impedance 6.8 kΩ (kilohms) (ø 3.5 mm) Stereo type Wireless communications (DCR-TRV80 only) Communications system Bluetooth standard Ver.1.1 Max. LCD screen Picture 8.8 cm (3.5 type) Total dot number...
.... Specifications Video camera recorder System Video recording system 2 rotary heads Helical scanning system Audio recording system Rotary heads, PCM system Quantization: 12 bits (Fs 32 kHz, stereo 1, stereo 2), 16 bits (Fs 48 kHz, stereo) Video signal NTSC color, EIA standards Usable cassette Mini DV cassette with 2.5 to 3.0 V DC, output impedance 6.8 kΩ (kilohms) (ø 3.5 mm) Stereo type Wireless communications (DCR-TRV80 only) Communications system Bluetooth standard Ver.1.1 Max. LCD screen Picture 8.8 cm (3.5 type) Total dot number...
Operating Instructions
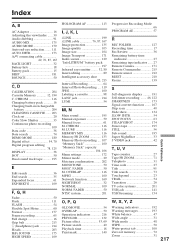
Page 217
... Warning messages 193 White balance 47 Wide-angle 31 Wide mode 48 WIPE 50 Write-protect tab 100 Zero set 20 Color Slow Shutter 33 Continuous photo recording 109 Data code 38 Date search 74 DEMO MODE 180 Digital effect 54, 70 Digital program editing 78, 125 DISPLAY 38 DOT 50 Dual sound track tape .......... 195 E Edit search 36 End search 35 Expanded focus 61 EXP BRKTG 109 F, G, H Fader 50 Flash 111 FLASH...
... Warning messages 193 White balance 47 Wide-angle 31 Wide mode 48 WIPE 50 Write-protect tab 100 Zero set 20 Color Slow Shutter 33 Continuous photo recording 109 Data code 38 Date search 74 DEMO MODE 180 Digital effect 54, 70 Digital program editing 78, 125 DISPLAY 38 DOT 50 Dual sound track tape .......... 195 E Edit search 36 End search 35 Expanded focus 61 EXP BRKTG 109 F, G, H Fader 50 Flash 111 FLASH...
Marketing Specifications
Page 1
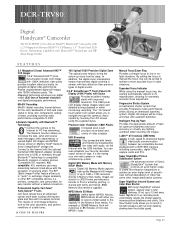
...; Media Digital Still Memory Mode captures high quality Megapixel still images at up to PCs for extremely accurate focus adjustment. It's like some other BIP compatible devices (i.e. Digital Still Memory Mode with Bluetooth™ Technology Connect the camera to manual the focus ring can even playback your digital videos (530 lines of flash for PC-free networking. Page 23 MiniDV Recording MiniDV digital recording format delivers 3X the color bandwidth of smoothness without a cabled connection. Super NightShot 0 Lux recording mode automatically adjusts the shutter speed to...
...; Media Digital Still Memory Mode captures high quality Megapixel still images at up to PCs for extremely accurate focus adjustment. It's like some other BIP compatible devices (i.e. Digital Still Memory Mode with Bluetooth™ Technology Connect the camera to manual the focus ring can even playback your digital videos (530 lines of flash for PC-free networking. Page 23 MiniDV Recording MiniDV digital recording format delivers 3X the color bandwidth of smoothness without a cabled connection. Super NightShot 0 Lux recording mode automatically adjusts the shutter speed to...
Marketing Specifications
Page 2
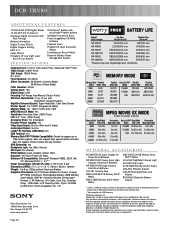
... and specifications subject to change without Tape and Battery Supplied Accessories: AC-L15 Power Adapter/In Camera Charger, NP-FM50 InfoLithium Rechargeable Battery, 8MB Memory Stick® Media, RMT-811 Wireless Remote Commander® Remote, 2 AA Batteries, A/V Cable, Lens Cap, Shoulder Strap, USB Cable, LCD Cleaning Cloth, Stylus, CD-ROM w/USB Driver (Pixela ImageMixer Ver. 1.5) Sony Electronics Inc. 16765 West Bernardo Drive San Diego, CA 92127 www.sony.com/di Page 24 TM BATTERY LIFE Battery* (Fully charged) Rec Time VF / LCD / VF+LCD Playback Time LCD...
... and specifications subject to change without Tape and Battery Supplied Accessories: AC-L15 Power Adapter/In Camera Charger, NP-FM50 InfoLithium Rechargeable Battery, 8MB Memory Stick® Media, RMT-811 Wireless Remote Commander® Remote, 2 AA Batteries, A/V Cable, Lens Cap, Shoulder Strap, USB Cable, LCD Cleaning Cloth, Stylus, CD-ROM w/USB Driver (Pixela ImageMixer Ver. 1.5) Sony Electronics Inc. 16765 West Bernardo Drive San Diego, CA 92127 www.sony.com/di Page 24 TM BATTERY LIFE Battery* (Fully charged) Rec Time VF / LCD / VF+LCD Playback Time LCD...


