PIXELA ImageMixer 1.0 Manual
Page 6
...USB capturing is not supported) Chapter 4 Movie Editing Environment Chapter 5 Layout Environment Chapter 6 Image Editor CPU Software Sound Memory Hard Disk Graphics Intel MMX ® Pentium ® 200MHz or faster. (Pentium ® III 500MHz or faster for work correctly, your computer system meets these requirements before installing ImageMixer. Direct Draw driver... to work space 4MB or more of free space recommended for capturing a movie via USB or IEEE1394. Please confirm that your computer must be displayed correctly. Pentium ® III 800MHz or faster is ...
...USB capturing is not supported) Chapter 4 Movie Editing Environment Chapter 5 Layout Environment Chapter 6 Image Editor CPU Software Sound Memory Hard Disk Graphics Intel MMX ® Pentium ® 200MHz or faster. (Pentium ® III 500MHz or faster for work correctly, your computer system meets these requirements before installing ImageMixer. Direct Draw driver... to work space 4MB or more of free space recommended for capturing a movie via USB or IEEE1394. Please confirm that your computer must be displayed correctly. Pentium ® III 800MHz or faster is ...
PIXELA ImageMixer 1.0 Manual
Page 9
... Menu screen appears automatically. Uninstalling If the Menu screen does not appear automatically, search for the [Setup Menu] icon by following the instructions. Click the 'USB Driver' button when you want to install it. 3. The same type of the steps above. Macintosh 1.
... Menu screen appears automatically. Uninstalling If the Menu screen does not appear automatically, search for the [Setup Menu] icon by following the instructions. Click the 'USB Driver' button when you want to install it. 3. The same type of the steps above. Macintosh 1.
PIXELA ImageMixer 1.0 Manual
Page 63
... point on your computer. If you to select the driver needed for Newly Captured Files ImageMixer adds a prefix to close the browser. Copyright © 2001 PIXELA Corp. USB Capture Device Setting This setting allows you experience a loss of your machine. All rights reserved. q Digital recording Digital recording is enabled by checking this setting. Destination...
... point on your computer. If you to select the driver needed for Newly Captured Files ImageMixer adds a prefix to close the browser. Copyright © 2001 PIXELA Corp. USB Capture Device Setting This setting allows you experience a loss of your machine. All rights reserved. q Digital recording Digital recording is enabled by checking this setting. Destination...

Operating Instructions (primary manual)
Page 14
... (1) (p. 26) 8 Lens hood (1) (p. 30) 9 "Memory Stick" (1) (p. 117) 0 USB cable (1) (p. 180) qa CD-ROM (SPVD-008 USB Driver) (1) (p. 179) qs Cleaning cloth (1) (p. 229) qd Stylus (1) (DCR-TRV50 only) (p. 198) Contents of the recording cannot be compensated if recording or playback is not made due to a malfunction of the camcorder, storage media, etc. 14 Checking supplied accessories Make...
... (1) (p. 26) 8 Lens hood (1) (p. 30) 9 "Memory Stick" (1) (p. 117) 0 USB cable (1) (p. 180) qa CD-ROM (SPVD-008 USB Driver) (1) (p. 179) qs Cleaning cloth (1) (p. 229) qd Stylus (1) (DCR-TRV50 only) (p. 198) Contents of the recording cannot be compensated if recording or playback is not made due to a malfunction of the camcorder, storage media, etc. 14 Checking supplied accessories Make...

Operating Instructions (primary manual)
Page 174
... Stick" or recorded on tape on a tape When connecting to install the USB driver correctly. If you connect the camcorder to the computer first, you will not be able to a computer using the USB jack For more information, see page 177. (USB) jack Push into the computer's Memory Stick slot. Viewing images recorded on your...
... Stick" or recorded on tape on a tape When connecting to install the USB driver correctly. If you connect the camcorder to the computer first, you will not be able to a computer using the USB jack For more information, see page 177. (USB) jack Push into the computer's Memory Stick slot. Viewing images recorded on your...

Operating Instructions (primary manual)
Page 177
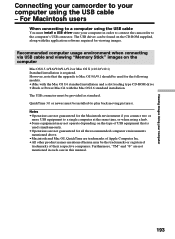
... memory required for viewing images. The USB driver can view pictures live from your camcorder to your computer, you connect the camcorder to install the USB driver correctly. If you connect your camcorder and your computer using the USB cable, you can be found on the size of the USB driver before connecting the camcorder to e-mail. You cannot use this...
... memory required for viewing images. The USB driver can view pictures live from your camcorder to your computer, you connect the camcorder to install the USB driver correctly. If you connect your camcorder and your computer using the USB cable, you can be found on the size of the USB driver before connecting the camcorder to e-mail. You cannot use this...
Operating Instructions (primary manual)
Page 179
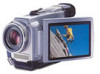
...Stick" images from a camcorder onto a computer. Note If you are using the USB cable - If you connect the USB cable before USB driver installation is ideal for details. 179 This starts USB driver installation. (4) Follow the on-screen messages to install the USB driver. (5) Remove the CD...for simply copying images from the camcorder onto your computer. Viewing Images Using your Computer Connecting your camcorder to your computer. For Windows users Installing the USB driver Start the following operation without installing the USB driver. Carry out installation again in accordance...
...Stick" images from a camcorder onto a computer. Note If you are using the USB cable - If you connect the USB cable before USB driver installation is ideal for details. 179 This starts USB driver installation. (4) Follow the on-screen messages to install the USB driver. (5) Remove the CD...for simply copying images from the camcorder onto your computer. Viewing Images Using your Computer Connecting your camcorder to your computer. For Windows users Installing the USB driver Start the following operation without installing the USB driver. Carry out installation again in accordance...
Operating Instructions (primary manual)
Page 181
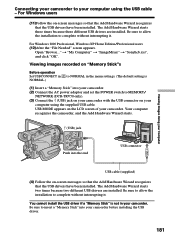
... settings. (The default setting is not in NORMAL.) to MEMORY/ NETWORK (DCR-TRV50 only). (3) Connect the (USB) jack on your camcorder with the USB connector on your Computer USB cable (supplied) (4) Follow the on "Memory Stick"s Before operation Set USBCONNECT in your camcorder before installing the USB driver. 181 The Add Hardware Wizard starts three times because three different...
... settings. (The default setting is not in NORMAL.) to MEMORY/ NETWORK (DCR-TRV50 only). (3) Connect the (USB) jack on your camcorder with the USB connector on your Computer USB cable (supplied) (4) Follow the on "Memory Stick"s Before operation Set USBCONNECT in your camcorder before installing the USB driver. 181 The Add Hardware Wizard starts three times because three different...

Operating Instructions (primary manual)
Page 182
... a category" after clicking "Control Panel", click "Switch to your camcorder before installation of the USB driver was completed. Windows XP Home Edition/Professional: Select "Start" t "Control Panel" t "System" t "Hardware", and click the "Device Manager" button. For Windows users If you cannot install the USB driver The USB driver has been registered incorrectly as your computer was connected...
... a category" after clicking "Control Panel", click "Switch to your camcorder before installation of the USB driver was completed. Windows XP Home Edition/Professional: Select "Start" t "Control Panel" t "System" t "Hardware", and click the "Device Manager" button. For Windows users If you cannot install the USB driver The USB driver has been registered incorrectly as your computer was connected...
Operating Instructions (primary manual)
Page 184
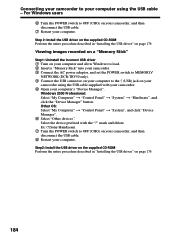
.../ NETWORK (DCR-TRV50 only). 4 Connect the USB connector on your computer to the (USB) jack on page 179. Select the device prefixed with your camcorder. 5 Open your computer's "Device Manager". Step2: Install the USB driver on the supplied CD-ROM Perform the entire procedure described in "Installing the USB driver" on your camcorder using the USB cable - Step 2: Install the USB driver on...
.../ NETWORK (DCR-TRV50 only). 4 Connect the USB connector on your computer to the (USB) jack on page 179. Select the device prefixed with your camcorder. 5 Open your computer's "Device Manager". Step2: Install the USB driver on the supplied CD-ROM Perform the entire procedure described in "Installing the USB driver" on your camcorder using the USB cable - Step 2: Install the USB driver on...
Operating Instructions (primary manual)
Page 185
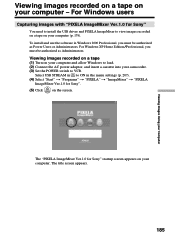
...camcorder. (3) Set the POWER switch to VCR. For Windows users Capturing images with "PIXELA ImageMixer Ver.1.0 for Sony" startup screen appears on your computer. For Windows XP Home Edition/Professional, you must be authorized as Administrators. Viewing Images Using your Computer The "PIXELA ImageMixer Ver.1.0 for Sony" You need to install the USB driver... and PIXELA ImageMixer to ON in Windows 2000 Professional, you must be authorized as Power Users or Administrators. Select USB STREAM in to view ...
...camcorder. (3) Set the POWER switch to VCR. For Windows users Capturing images with "PIXELA ImageMixer Ver.1.0 for Sony" startup screen appears on your computer. For Windows XP Home Edition/Professional, you must be authorized as Administrators. Viewing Images Using your Computer The "PIXELA ImageMixer Ver.1.0 for Sony" You need to install the USB driver... and PIXELA ImageMixer to ON in Windows 2000 Professional, you must be authorized as Power Users or Administrators. Select USB STREAM in to view ...

Operating Instructions (primary manual)
Page 189
...available where you can find the detailed operating method of "PIXELA ImageMixer Ver.1.0 for Sony". (1) Click located in the upper-right corner of "PIXELA ImageMixer Ver.1.0 for Sony" A "PIXELA ImageMixer Ver.1.0 for Sony" on page 182. Carry out the following the procedure on -line help site is...computer. If you need from Suspend, Resume, or Sleep. 189 Note on your camcorder. Disconnect the USB cable. - To close on your computer - For more information, refer to the instruction manual of the USB driver was connected to OFF (CHG) on -line help (operating instructions) of the ...
...available where you can find the detailed operating method of "PIXELA ImageMixer Ver.1.0 for Sony". (1) Click located in the upper-right corner of "PIXELA ImageMixer Ver.1.0 for Sony" A "PIXELA ImageMixer Ver.1.0 for Sony" on page 182. Carry out the following the procedure on -line help site is...computer. If you need from Suspend, Resume, or Sleep. 189 Note on your camcorder. Disconnect the USB cable. - To close on your computer - For more information, refer to the instruction manual of the USB driver was connected to OFF (CHG) on -line help (operating instructions) of the ...
Operating Instructions (primary manual)
Page 190
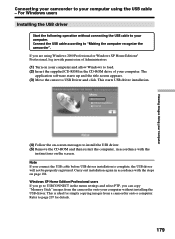
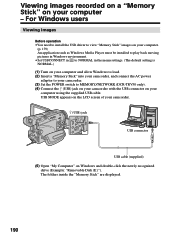
... inside the "Memory Stick" are displayed. 190 USB MODE appears on the LCD screen of your computer using the supplied USB cable. For Windows users Viewing images Before operation •You need to install the USB driver to view "Memory Stick" images on your computer...load. (2) Insert a "Memory Stick" into your camcorder, and connect the AC power adaptor to your camcorder. (3) Set the POWER switch to MEMORY/NETWORK (DCR-TRV50 only). (4) Connect the (USB) jack on your camcorder with the USB connector on your camcorder. (USB) jack USB connector USB cable (supplied) (5) Open "My Computer" on...
... inside the "Memory Stick" are displayed. 190 USB MODE appears on the LCD screen of your computer using the supplied USB cable. For Windows users Viewing images Before operation •You need to install the USB driver to view "Memory Stick" images on your computer...load. (2) Insert a "Memory Stick" into your camcorder, and connect the AC power adaptor to your camcorder. (3) Set the POWER switch to MEMORY/NETWORK (DCR-TRV50 only). (4) Connect the (USB) jack on your camcorder with the USB connector on your camcorder. (USB) jack USB connector USB cable (supplied) (5) Open "My Computer" on...
Operating Instructions (primary manual)
Page 193
... guaranteed for the Macintosh environment if you connect two or more USB equipment to the computer's USB connector. The USB driver can be found on the CD-ROM supplied, along with the Mac OS 8.6 standard installation The USB connector must be provided as standard. Furthermore, "TM" and ...drive •iBook or Power Mac G4 with the application software required for viewing images. Viewing Images Using your Computer Connecting your camcorder to Mac OS 9.0/9.1 should be used simultaneously. •Operations are not guaranteed for all the recommended computer environments mentioned above. ...
... guaranteed for the Macintosh environment if you connect two or more USB equipment to the computer's USB connector. The USB driver can be found on the CD-ROM supplied, along with the Mac OS 8.6 standard installation The USB connector must be provided as standard. Furthermore, "TM" and ...drive •iBook or Power Mac G4 with the application software required for viewing images. Viewing Images Using your Computer Connecting your camcorder to Mac OS 9.0/9.1 should be used simultaneously. •Operations are not guaranteed for all the recommended computer environments mentioned above. ...
Operating Instructions (primary manual)
Page 194
... (6) Remove the CD-ROM from the computer. (7) Restart your computer. Connecting your camcorder to your computer using the USB cable. The application software screen appears. (3) Click the "USB Driver" to open the folder containing the six files related to load. (2) Insert the supplied... your computer before installation of the USB driver is installed on your computer and allow the Mac OS to "Driver." 194 (4) Select the following two files, and drag and drop them into the System Folder. • Sony Camcorder USB Driver • Sony Camcorder USB Shim (5) When the message appears,...
... (6) Remove the CD-ROM from the computer. (7) Restart your computer. Connecting your camcorder to your computer using the USB cable. The application software screen appears. (3) Click the "USB Driver" to open the folder containing the six files related to load. (2) Insert the supplied... your computer before installation of the USB driver is installed on your computer and allow the Mac OS to "Driver." 194 (4) Select the following two files, and drag and drop them into the System Folder. • Sony Camcorder USB Driver • Sony Camcorder USB Shim (5) When the message appears,...
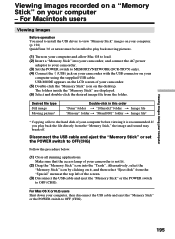
Operating Instructions (primary manual)
Page 195
... Make sure that the access lamp of your computer, then disconnect the USB cable and eject the "Memory Stick" or the POWER switch to MEMORY/NETWORK (DCR-TRV50 only). (4) Connect the (USB) jack on your camcorder with the USB connector on your computer before viewing it , and then select "Eject ...a file to load. (2) Insert a "Memory Stick" into the "Trash". For Macintosh users Viewing images Before operation You need to install the USB driver to view "Memory Stick" images on your computer. (p. 194) QuickTime 3.0 or newer must be installed to play back the file directly from the folder.
... Make sure that the access lamp of your computer, then disconnect the USB cable and eject the "Memory Stick" or the POWER switch to MEMORY/NETWORK (DCR-TRV50 only). (4) Connect the (USB) jack on your camcorder with the USB connector on your computer before viewing it , and then select "Eject ...a file to load. (2) Insert a "Memory Stick" into the "Trash". For Macintosh users Viewing images Before operation You need to install the USB driver to view "Memory Stick" images on your computer. (p. 194) QuickTime 3.0 or newer must be installed to play back the file directly from the folder.
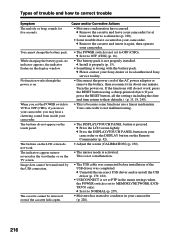
Operating Instructions (primary manual)
Page 216
...the power on the touch panel. Your camcorder is not malfunctioning. • The DISPLAY/TOUCH PANEL button is activated. c Uninstall the incorrect USB driver and re-install the USB driver (p. 179, 182). • USBCONNECT is set to PTP in your camcorder or the DISPLAY button on . The ... not properly installed. c Install it in the display window. This is wrong with the battery pack. c Please contact your Sony dealer or local authorized Sony service facility. • Disconnect the power cord of the AC power adaptor or remove the battery, then reconnect it properly ...
...the power on the touch panel. Your camcorder is not malfunctioning. • The DISPLAY/TOUCH PANEL button is activated. c Uninstall the incorrect USB driver and re-install the USB driver (p. 179, 182). • USBCONNECT is set to PTP in your camcorder or the DISPLAY button on . The ... not properly installed. c Install it in the display window. This is wrong with the battery pack. c Please contact your Sony dealer or local authorized Sony service facility. • Disconnect the power cord of the AC power adaptor or remove the battery, then reconnect it properly ...
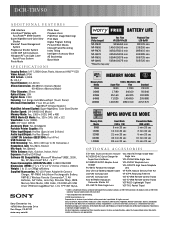
Marketing Specifications
Page 2
...8MB Memory Stick Media, USB Cable, CD-ROM with USB Driver (PIXELA ImageMixer Ver. ...-KITFM50 Handycam Camcorder Starter ...174; 98SE, 2000, Me, XP; Sony, AccuPower, Advanced HAD, Handycam, i.LINK, InfoLithium, Memory Stick, NightShot,...DCR-TRV50 ADDITIONAL FEATURES USB Interface InfoLithium® Battery with AccuPower™ Meter System Super NightShot and Color Slow Shutter Stamina® Power Management System Progressive Shutter System 14 Bit DXP A/D Conversion Hologram AF Low Light Laser Assist Focus System Photo Mode Photo Save Playback Zoom PIM (Print Image Matching) Print Mark Digital...
...8MB Memory Stick Media, USB Cable, CD-ROM with USB Driver (PIXELA ImageMixer Ver. ...-KITFM50 Handycam Camcorder Starter ...174; 98SE, 2000, Me, XP; Sony, AccuPower, Advanced HAD, Handycam, i.LINK, InfoLithium, Memory Stick, NightShot,...DCR-TRV50 ADDITIONAL FEATURES USB Interface InfoLithium® Battery with AccuPower™ Meter System Super NightShot and Color Slow Shutter Stamina® Power Management System Progressive Shutter System 14 Bit DXP A/D Conversion Hologram AF Low Light Laser Assist Focus System Photo Mode Photo Save Playback Zoom PIM (Print Image Matching) Print Mark Digital...


