Insert: Getting Online with your Camera
Page 1
...) -1- Send and receive email.** Want to send a great digital vacation photo or short MPEG movie to telephone or Ethernet connection. Surf the Web with your new Sony Network Handycam® camcorder! Expecting an important message? Or browse Web sites that makes ... Web, and more! ...directly from your Sony Network Handycam® camcorder. Your Sony Network Handycam camcorder lets you can go online to view and scroll through traditional Web pages. Only selected Handycam models are compatible with the Sony Network Handycam camcorder. **Requires compatible ISP, Bluetooth or USB ...
...) -1- Send and receive email.** Want to send a great digital vacation photo or short MPEG movie to telephone or Ethernet connection. Surf the Web with your new Sony Network Handycam® camcorder! Expecting an important message? Or browse Web sites that makes ... Web, and more! ...directly from your Sony Network Handycam® camcorder. Your Sony Network Handycam camcorder lets you can go online to view and scroll through traditional Web pages. Only selected Handycam models are compatible with the Sony Network Handycam camcorder. **Requires compatible ISP, Bluetooth or USB ...
Insert: Getting Online with your Camera
Page 2
..., Online Registration through your free WEB album on September 15, 2003. With Online Registration you can not receive email. ** Sony reserves the right to modify or cancel the Web Album on ImageStation® service in accordance with the service terms and conditions... setting (*2)Other ISP setting procedure DCR-IP7BT DCR-PC120BT DCR-TRV50, 950 DCR-IP55 Not compatible Not compatible P.37 P.39 P.23 P.28 DCR-TRV80, 70, 39 P.48 P.54 P.32 DCR-IP220 P.37 P.43 P.27 * If you use the network features of your Network Handycam® camcorder. Customer must separately acquire its...
..., Online Registration through your free WEB album on September 15, 2003. With Online Registration you can not receive email. ** Sony reserves the right to modify or cancel the Web Album on ImageStation® service in accordance with the service terms and conditions... setting (*2)Other ISP setting procedure DCR-IP7BT DCR-PC120BT DCR-TRV50, 950 DCR-IP55 Not compatible Not compatible P.37 P.39 P.23 P.28 DCR-TRV80, 70, 39 P.48 P.54 P.32 DCR-IP220 P.37 P.43 P.27 * If you use the network features of your Network Handycam® camcorder. Customer must separately acquire its...
PIXELA ImageMixer 1.0 Manual
Page 22
...digital camera Audio CD Recording Mode Control panel Caution Recording music files Troubleshooting Sound Recording Mode Control panel Recording sound files Recording sound files while previewing movie images Troubleshooting USB Device Capture Mode (Win) Control panel Connection status Capturing movie scenes Capturing still pictures DV Camcorder... button which you wish to bring in media. Open ImageMixer. 2. Capturing still shots or entire scenes from a digital movie camera is also easy with and import files from audio CDs or by double clicking the appropriate thumbnail and easily...
...digital camera Audio CD Recording Mode Control panel Caution Recording music files Troubleshooting Sound Recording Mode Control panel Recording sound files Recording sound files while previewing movie images Troubleshooting USB Device Capture Mode (Win) Control panel Connection status Capturing movie scenes Capturing still pictures DV Camcorder... button which you wish to bring in media. Open ImageMixer. 2. Capturing still shots or entire scenes from a digital movie camera is also easy with and import files from audio CDs or by double clicking the appropriate thumbnail and easily...
PIXELA ImageMixer 1.0 Manual
Page 23
...rights reserved. Sound Recording Mode button Click to start digital camera import mode. USB Device Capture Mode button Click to start USB device capture mode. (Windows only) DV Camcorder Click to start import file mode. Digital Camera Import Mode button Click to start CD recording mode.... CD Recording Mode button Click to start DV camcorder capture mode. (Windows Capture Mode button only) Copyright ©...
...rights reserved. Sound Recording Mode button Click to start digital camera import mode. USB Device Capture Mode button Click to start USB device capture mode. (Windows only) DV Camcorder Click to start import file mode. Digital Camera Import Mode button Click to start CD recording mode.... CD Recording Mode button Click to start DV camcorder capture mode. (Windows Capture Mode button only) Copyright ©...
PIXELA ImageMixer 1.0 Manual
Page 52
Monitor window Displays the movie directly from a digital video camera connected to the IEEE1394 port of your PC. 2-7-1 DV Camcorder Capture Mode (Windows Only) ImageMixer enables you can play or record media from the digital video camera. Control panel From the control panel, you to capture both still pictures and movie scenes a digital video cameras connected to your computer.
Monitor window Displays the movie directly from a digital video camera connected to the IEEE1394 port of your PC. 2-7-1 DV Camcorder Capture Mode (Windows Only) ImageMixer enables you can play or record media from the digital video camera. Control panel From the control panel, you to capture both still pictures and movie scenes a digital video cameras connected to your computer.
PIXELA ImageMixer 1.0 Manual
Page 55
button or the [large monitor] button to choose: small monitor and large monitor. Click the [small monitor] change the monitor size. 2-7-2 DV Camcorder Capture Mode (Windows Only) Changing the display size When capturing files from a digital video camera (DV camcorder), there are two monitor sizes from which to Connection status
button or the [large monitor] button to choose: small monitor and large monitor. Click the [small monitor] change the monitor size. 2-7-2 DV Camcorder Capture Mode (Windows Only) Changing the display size When capturing files from a digital video camera (DV camcorder), there are two monitor sizes from which to Connection status
PIXELA ImageMixer 1.0 Manual
Page 56
... set in the mode you would normally use to view scenes already recorded on the information display panel will read 'There is ... If the digital video camera is not properly connected to the PC, or is not set it to play mode, or if a DV cassette isn't present ...try clicking the [refresh connection] button. That is, your device should be displayed. Connect your digital video camera to the IEEE1394 port on your selected task, the message in the information display panel will say "Camcorder Not Found." When a cassette is not present, the icon is present in the destination directory,'...
... set in the mode you would normally use to view scenes already recorded on the information display panel will read 'There is ... If the digital video camera is not properly connected to the PC, or is not set it to play mode, or if a DV cassette isn't present ...try clicking the [refresh connection] button. That is, your device should be displayed. Connect your digital video camera to the IEEE1394 port on your selected task, the message in the information display panel will say "Camcorder Not Found." When a cassette is not present, the icon is present in the destination directory,'...
PIXELA ImageMixer 1.0 Manual
Page 57
... designated in step 1. button. 3. Adjust sound volume if necessary. Click the [Stop] button at the point you plan to save the captured movie file. 2. 2-7-3 DV Camcorder Capture Mode (Windows Only) Capturing movie scenes Follow the steps below will be shown. If the 'Capture as MPEG1' box is now possible. button at...
... designated in step 1. button. 3. Adjust sound volume if necessary. Click the [Stop] button at the point you plan to save the captured movie file. 2. 2-7-3 DV Camcorder Capture Mode (Windows Only) Capturing movie scenes Follow the steps below will be shown. If the 'Capture as MPEG1' box is now possible. button at...
PIXELA ImageMixer 1.0 Manual
Page 61
... the files will allow movie files to be shown while scenes from those movies are used to the USB device capture mode or the DV camcorder capture mode, both of free disk space by selecting a value from the dropdown menu or by entering a number yourself. To prevent your computer. Movie capture...
... the files will allow movie files to be shown while scenes from those movies are used to the USB device capture mode or the DV camcorder capture mode, both of free disk space by selecting a value from the dropdown menu or by entering a number yourself. To prevent your computer. Movie capture...
The Mini DV story: the definition of digital (features)
Page 1
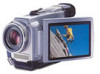
...quality loss when you can archive your option, you can even use the camcorder to the Internet. Cassette Memory Sony Mini DV Handycam® camcorders take advantage of digital. Selected DV camcorders can also transfer information from Memory Stick® media to send and ...lens "flare" in PowerPoint® presentations. • Bluetooth™ wireless networking. CD Quality Digital Sound • 16-bit two-channel sound. Every Sony Mini DV Handycam® camcorder offers Digital Still Memory Mode, which saves still images onto the supplied Memory Stick® media. •...
...quality loss when you can archive your option, you can even use the camcorder to the Internet. Cassette Memory Sony Mini DV Handycam® camcorders take advantage of digital. Selected DV camcorders can also transfer information from Memory Stick® media to send and ...lens "flare" in PowerPoint® presentations. • Bluetooth™ wireless networking. CD Quality Digital Sound • 16-bit two-channel sound. Every Sony Mini DV Handycam® camcorder offers Digital Still Memory Mode, which saves still images onto the supplied Memory Stick® media. •...

Network Function Operating Instructions
Page 2
...you make sure to memory corruption. Also, exit the NETWORK mode when setting the POWER switch to the operating instructions of the camcorder. Note on the camcorder. All other product names mentioned herein may be able to exit the NETWORK mode. 2 Also, this data may not be... the trademarks or registered trademarks of their proprietor and used by Sony Corporation under license. •NetFront by their respective companies. is recommended...
...you make sure to memory corruption. Also, exit the NETWORK mode when setting the POWER switch to the operating instructions of the camcorder. Note on the camcorder. All other product names mentioned herein may be able to exit the NETWORK mode. 2 Also, this data may not be... the trademarks or registered trademarks of their proprietor and used by Sony Corporation under license. •NetFront by their respective companies. is recommended...

Network Function Operating Instructions
Page 3
...Bluetooth device ......... 20 Using your Modem Adaptor with Bluetooth Function 20 When the registration has failed ...... 24 Displaying information on your camcorder 24 Radio wave indication 26 Selecting other Bluetooth devices from the list 26 Deleting a registered Bluetooth device from the list 26 ...Customer registration 28 DI customer registration 28 Online registration using your PC ... 28 Online registration with your camcorder 28 Registering your album on the Web ........ 31 Internet service provider 32 Registering with email 98 Trouble viewing web pages 99...
...Bluetooth device ......... 20 Using your Modem Adaptor with Bluetooth Function 20 When the registration has failed ...... 24 Displaying information on your camcorder 24 Radio wave indication 26 Selecting other Bluetooth devices from the list 26 Deleting a registered Bluetooth device from the list 26 ...Customer registration 28 DI customer registration 28 Online registration using your PC ... 28 Online registration with your camcorder 28 Registering your album on the Web ........ 31 Internet service provider 32 Registering with email 98 Trouble viewing web pages 99...

Network Function Operating Instructions
Page 4
... can view web pages, receive email, and send email with a Bluetooth device. The network function on the camcorder Congratulations on the Web", your purchase of this Sony Handycam. Customer registration allows you to the Internet through your provider using a dial-up Networking Profiles". The communication system...the "ImageStation" function. The "album on your emails You can view a web page via the Internet. Send/receive your camcorder attached. - This Handycam can access to use the "Sonet" option for setting network preferences easily, as well as an "album on your own ...
... can view web pages, receive email, and send email with a Bluetooth device. The network function on the camcorder Congratulations on the Web", your purchase of this Sony Handycam. Customer registration allows you to the Internet through your provider using a dial-up Networking Profiles". The communication system...the "ImageStation" function. The "album on your emails You can view a web page via the Internet. Send/receive your camcorder attached. - This Handycam can access to use the "Sonet" option for setting network preferences easily, as well as an "album on your own ...
Network Function Operating Instructions
Page 5
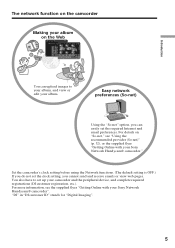
... web pages. Set the camcorder's clock setting before using the Network functions. (The default setting is OFF.) If you do not set the clock setting, you can upload images to set up your Sony Network Handycam® camcorder". "DI" in "DI customer ID" stands for "Digital Imaging". 5 The network... function on the camcorder Making your album on "So-net," see the supplied flyer "Getting Online with your ...
... web pages. Set the camcorder's clock setting before using the Network functions. (The default setting is OFF.) If you do not set the clock setting, you can upload images to set up your Sony Network Handycam® camcorder". "DI" in "DI customer ID" stands for "Digital Imaging". 5 The network... function on the camcorder Making your album on "So-net," see the supplied flyer "Getting Online with your ...

Network Function Operating Instructions
Page 6
... operating instructions. 6 For details, see "Setting network preferences" (p. 34). [d]: Exit the NETWORK mode. [e]: Upload images to your camcorder, those which are used for network operations. The actual screens may differ slightly from the illustrations in this menu before using the network ...function. For details, see "Making your camcorder. [a] [b] [c] [d] [e] [a]: Send and receive email. Basic operations in the NETWORK mode This section describes basic control ways to ...
... operating instructions. 6 For details, see "Setting network preferences" (p. 34). [d]: Exit the NETWORK mode. [e]: Upload images to your camcorder, those which are used for network operations. The actual screens may differ slightly from the illustrations in this menu before using the network ...function. For details, see "Making your camcorder. [a] [b] [c] [d] [e] [a]: Send and receive email. Basic operations in the NETWORK mode This section describes basic control ways to ...
Network Function Operating Instructions
Page 7
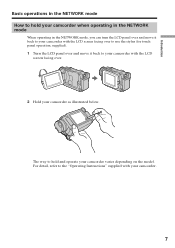
... the LCD screen facing over and move it back to your camcorder with your camcorder. 7 Introduction Basic operations in the NETWORK mode How to hold and operate your camcorder varies depending on the model. The way to hold your camcorder when operating in the NETWORK mode When operating in the NETWORK mode, you can... "Operating Instructions" supplied with the LCD screen facing over to use the stylus (for touch panel operation, supplied). 1 Turn the LCD panel over . 2 Hold your camcorder as illustrated below.
... the LCD screen facing over and move it back to your camcorder with your camcorder. 7 Introduction Basic operations in the NETWORK mode How to hold and operate your camcorder varies depending on the model. The way to hold your camcorder when operating in the NETWORK mode When operating in the NETWORK mode, you can... "Operating Instructions" supplied with the LCD screen facing over to use the stylus (for touch panel operation, supplied). 1 Turn the LCD panel over . 2 Hold your camcorder as illustrated below.

Network Function Operating Instructions
Page 8
... wet hands. •When the LCD screen gets dirty, use . 8 Operate by touching and sliding across your camcorder screen with the stylus. •Refer to the operating instructions supplied with your camcorder for operating your camcorder are displayed on a computer, by pressing the buttons on the screen with the stylus. In this manual...
... wet hands. •When the LCD screen gets dirty, use . 8 Operate by touching and sliding across your camcorder screen with the stylus. •Refer to the operating instructions supplied with your camcorder for operating your camcorder are displayed on a computer, by pressing the buttons on the screen with the stylus. In this manual...
Network Function Operating Instructions
Page 9
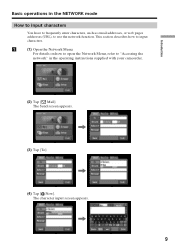
For details on how to open the Network Menu, refer to "Accessing the network" in the NETWORK mode How to input characters You have to frequently enter characters, such as email addresses, or web pages addresses (URL), to input characters. 1 (1) Open the Network Menu. Basic operations in the operating instructions supplied with your camcorder. Introduction (2) Tap [ Mail]. The Send screen appears. , (3) Tap [To]. , (4) Tap [ New]. This section describes how to use the network function. The character input screen appears. , 9
For details on how to open the Network Menu, refer to "Accessing the network" in the NETWORK mode How to input characters You have to frequently enter characters, such as email addresses, or web pages addresses (URL), to input characters. 1 (1) Open the Network Menu. Basic operations in the operating instructions supplied with your camcorder. Introduction (2) Tap [ Mail]. The Send screen appears. , (3) Tap [To]. , (4) Tap [ New]. This section describes how to use the network function. The character input screen appears. , 9
Network Function Operating Instructions
Page 14
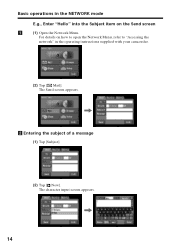
For details on how to open the Network Menu, refer to "Accessing the network" in the NETWORK mode E.g., Enter "Hello" into the Subject item on the Send screen 1 (1) Open the Network Menu. The character input screen appears. , 14 The Send screen appears. , 2 Entering the subject of a message (1) Tap [Subject]. (2) Tap [ New]. Basic operations in the operating instructions supplied with your camcorder. (2) Tap [ Mail].
For details on how to open the Network Menu, refer to "Accessing the network" in the NETWORK mode E.g., Enter "Hello" into the Subject item on the Send screen 1 (1) Open the Network Menu. The character input screen appears. , 14 The Send screen appears. , 2 Entering the subject of a message (1) Tap [Subject]. (2) Tap [ New]. Basic operations in the operating instructions supplied with your camcorder. (2) Tap [ Mail].

Network Function Operating Instructions
Page 18
..." is not necessary to use the album on the Web and So-net, you have to the following registrations and setup tasks via your Sony Network Handycam® camcorder". Access to complete the following URL: "http://www.myimagecam.com/" 18 Using the NETWORK functions There are three Network functions, namely album on the...
..." is not necessary to use the album on the Web and So-net, you have to the following registrations and setup tasks via your Sony Network Handycam® camcorder". Access to complete the following URL: "http://www.myimagecam.com/" 18 Using the NETWORK functions There are three Network functions, namely album on the...


