Insert: Getting Online with your Camera
Page 1
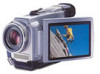
All you send and receive emails from just about anywhere. Send and receive email.** Want to send a great digital vacation photo or short MPEG movie to send and receive email, browse the Web, and more! ...directly from the Web? ...Adaptor. (Barcode here) -1- Send and receive email and surf the WEB without a computer! Only selected Handycam models are compatible with your new Sony Network Handycam® camcorder! Surf the Web with the Sony Network Handycam camcorder. **Requires compatible ISP, Bluetooth or USB Network accessory (depending upon model), and access to view and scroll...
All you send and receive emails from just about anywhere. Send and receive email.** Want to send a great digital vacation photo or short MPEG movie to send and receive email, browse the Web, and more! ...directly from the Web? ...Adaptor. (Barcode here) -1- Send and receive email and surf the WEB without a computer! Only selected Handycam models are compatible with your new Sony Network Handycam® camcorder! Surf the Web with the Sony Network Handycam camcorder. **Requires compatible ISP, Bluetooth or USB Network accessory (depending upon model), and access to view and scroll...
Insert: Getting Online with your Camera
Page 2
...AOL setting (*2)Other ISP setting procedure DCR-IP7BT DCR-PC120BT DCR-TRV50, 950 DCR-IP55 Not compatible Not compatible P.37 P.39 P.23 P.28 DCR-TRV80, 70, 39 P.48 P.54 P.32 DCR-IP220 P.37 P.43 P.27 * If you use the network features of your Network Handycam ® camcorder. (*ISP service not included. For..., Online Registration after this date will cease to be possible through your Network Handycam® camcorder will get an ID and Password for assistance. If you can not receive email. ** Sony reserves the right to modify or cancel the Web Album on September 15, ...
...AOL setting (*2)Other ISP setting procedure DCR-IP7BT DCR-PC120BT DCR-TRV50, 950 DCR-IP55 Not compatible Not compatible P.37 P.39 P.23 P.28 DCR-TRV80, 70, 39 P.48 P.54 P.32 DCR-IP220 P.37 P.43 P.27 * If you use the network features of your Network Handycam ® camcorder. (*ISP service not included. For..., Online Registration after this date will cease to be possible through your Network Handycam® camcorder will get an ID and Password for assistance. If you can not receive email. ** Sony reserves the right to modify or cancel the Web Album on September 15, ...
PIXELA ImageMixer 1.0 Manual
Page 22
... 3. Albums are displayed in media. Click the [Capture Environment] Selector. Capturing still shots or entire scenes from a digital movie camera is also easy with and import files from a memory card, such as one which is displayed. Capture ...digital camera Audio CD Recording Mode Control panel Caution Recording music files Troubleshooting Sound Recording Mode Control panel Recording sound files Recording sound files while previewing movie images Troubleshooting USB Device Capture Mode (Win) Control panel Connection status Capturing movie scenes Capturing still pictures DV Camcorder...
... 3. Albums are displayed in media. Click the [Capture Environment] Selector. Capturing still shots or entire scenes from a digital movie camera is also easy with and import files from a memory card, such as one which is displayed. Capture ...digital camera Audio CD Recording Mode Control panel Caution Recording music files Troubleshooting Sound Recording Mode Control panel Recording sound files Recording sound files while previewing movie images Troubleshooting USB Device Capture Mode (Win) Control panel Connection status Capturing movie scenes Capturing still pictures DV Camcorder...
PIXELA ImageMixer 1.0 Manual
Page 23
... Click to start CD recording mode. CD Recording Mode button Click to start digital camera import mode. All rights reserved. Import File Mode button Click to start sound recording mode. Digital Camera Import Mode button Click to start DV camcorder capture mode. (Windows Capture Mode button only) Copyright © 2001 PIXELA Corp. USB...
... Click to start CD recording mode. CD Recording Mode button Click to start digital camera import mode. All rights reserved. Import File Mode button Click to start sound recording mode. Digital Camera Import Mode button Click to start DV camcorder capture mode. (Windows Capture Mode button only) Copyright © 2001 PIXELA Corp. USB...
PIXELA ImageMixer 1.0 Manual
Page 52
Control panel From the control panel, you to capture both still pictures and movie scenes a digital video cameras connected to your computer. Monitor window Displays the movie directly from a digital video camera connected to the IEEE1394 port of your PC. 2-7-1 DV Camcorder Capture Mode (Windows Only) ImageMixer enables you can play or record media from the digital video camera.
Control panel From the control panel, you to capture both still pictures and movie scenes a digital video cameras connected to your computer. Monitor window Displays the movie directly from a digital video camera connected to the IEEE1394 port of your PC. 2-7-1 DV Camcorder Capture Mode (Windows Only) ImageMixer enables you can play or record media from the digital video camera.
PIXELA ImageMixer 1.0 Manual
Page 55
2-7-2 DV Camcorder Capture Mode (Windows Only) Changing the display size When capturing files from a digital video camera (DV camcorder), there are two monitor sizes from which to Connection status button or the [large monitor] button to choose: small monitor and large monitor. Click the [small monitor] change the monitor size.
2-7-2 DV Camcorder Capture Mode (Windows Only) Changing the display size When capturing files from a digital video camera (DV camcorder), there are two monitor sizes from which to Connection status button or the [large monitor] button to choose: small monitor and large monitor. Click the [small monitor] change the monitor size.
PIXELA ImageMixer 1.0 Manual
Page 56
...If there is inactive (appears gray). DV cassette indication When a DV cassette is ... Copyright © 2001 PIXELA Corp. of free space in the digital video camera, this icon becomes active (glows). If there seems to a problem with the connection between the PC and the device is working properly:...If the connection between the PC and the device: A black monitor window will say "Camcorder Not Found." If the digital video camera is not properly connected to the PC, or is displayed. Connect your digital video camera to the IEEE1394 port on your PC and set to play mode.
...If there is inactive (appears gray). DV cassette indication When a DV cassette is ... Copyright © 2001 PIXELA Corp. of free space in the digital video camera, this icon becomes active (glows). If there seems to a problem with the connection between the PC and the device is working properly:...If the connection between the PC and the device: A black monitor window will say "Camcorder Not Found." If the digital video camera is not properly connected to the PC, or is displayed. Connect your digital video camera to the IEEE1394 port on your PC and set to play mode.
PIXELA ImageMixer 1.0 Manual
Page 57
... to begin 6. Select an album. In such cases, the volume should be shown. Click the [Stop] button at the desired point to begin recording. 4. 2-7-3 DV Camcorder Capture Mode (Windows Only) Capturing movie scenes Follow the steps below will be impossible to hear sound.
... to begin 6. Select an album. In such cases, the volume should be shown. Click the [Stop] button at the desired point to begin recording. 4. 2-7-3 DV Camcorder Capture Mode (Windows Only) Capturing movie scenes Follow the steps below will be impossible to hear sound.
PIXELA ImageMixer 1.0 Manual
Page 61
... shown while scenes from the dropdown menu or by selecting a value from those movies are used to the USB device capture mode or the DV camcorder capture mode, both of which are being captured. q Monitor capture mode Checking this box will require a considerable amount of free disk space by entering a number...
... shown while scenes from the dropdown menu or by selecting a value from those movies are used to the USB device capture mode or the DV camcorder capture mode, both of which are being captured. q Monitor capture mode Checking this box will require a considerable amount of free disk space by entering a number...
The Mini DV story: the definition of digital (features)
Page 1
... also transfer information from increased resolution. • Carl Zeiss® Vario Sonnar T* lenses. Selected Sony Handycam® camcorders can be any better than broadcast resolution. CD Quality Digital Sound • 16-bit two-channel sound. So customers enjoy a breathtaking 96-dB dynamic range... durable Mini DV cassettes. You can communicate with the BTA-NW1 Bluetooth™ adapter (select models) or with Digital Conversion Sony Mini DV Handycam® camcorders also offer analog inputs. At your option, you can capture still images at almost two times the standard VGA ...
... also transfer information from increased resolution. • Carl Zeiss® Vario Sonnar T* lenses. Selected Sony Handycam® camcorders can be any better than broadcast resolution. CD Quality Digital Sound • 16-bit two-channel sound. So customers enjoy a breathtaking 96-dB dynamic range... durable Mini DV cassettes. You can communicate with the BTA-NW1 Bluetooth™ adapter (select models) or with Digital Conversion Sony Mini DV Handycam® camcorders also offer analog inputs. At your option, you can capture still images at almost two times the standard VGA ...

Network Function Operating Instructions
Page 2
...NETWORK mode when setting the POWER switch to the operating instructions of the camcorder. On trademarks •ImageStation is the registered trademark of Sony Corporation. •"Memory Stick" and are registered trademarks of Sony Corporation. •The BLUETOOTH trademarks are to prevent the NETWORK mode ...compensation for being lost. •It is repaired by Access Co., Ltd. To save the network preferences, write them down on the camcorder. If you use the network function without setting the clock, you make sure to exit the NETWORK mode. 2 Furthermore, "™" and...
...NETWORK mode when setting the POWER switch to the operating instructions of the camcorder. On trademarks •ImageStation is the registered trademark of Sony Corporation. •"Memory Stick" and are registered trademarks of Sony Corporation. •The BLUETOOTH trademarks are to prevent the NETWORK mode ...compensation for being lost. •It is repaired by Access Co., Ltd. To save the network preferences, write them down on the camcorder. If you use the network function without setting the clock, you make sure to exit the NETWORK mode. 2 Furthermore, "™" and...

Network Function Operating Instructions
Page 3
... device ......... 20 Using your Modem Adaptor with Bluetooth Function 20 When the registration has failed ...... 24 Displaying information on your camcorder 24 Radio wave indication 26 Selecting other Bluetooth devices from the list 26 Deleting a registered Bluetooth device from the list 26 ...Customer registration 28 DI customer registration 28 Online registration using your PC ... 28 Online registration with your camcorder 28 Registering your camcorder when operating in the NETWORK mode 7 How to use the stylus 8 How to use the Network Menu .......... 6 How...
... device ......... 20 Using your Modem Adaptor with Bluetooth Function 20 When the registration has failed ...... 24 Displaying information on your camcorder 24 Radio wave indication 26 Selecting other Bluetooth devices from the list 26 Deleting a registered Bluetooth device from the list 26 ...Customer registration 28 DI customer registration 28 Online registration using your PC ... 28 Online registration with your camcorder 28 Registering your camcorder when operating in the NETWORK mode 7 How to use the stylus 8 How to use the Network Menu .......... 6 How...

Network Function Operating Instructions
Page 4
... send email with a Bluetooth device. Send/receive your camcorder attached. Introduction - The communication system is Bluetooth Ver.1.1 and its compatible Bluetooth profiles are the "Generic Access Profile" and the "Dial-up networking connection with images recorded on the Web", your purchase of this Sony Handycam. Easy access to use the "Sonet" option for...
... send email with a Bluetooth device. Send/receive your camcorder attached. Introduction - The communication system is Bluetooth Ver.1.1 and its compatible Bluetooth profiles are the "Generic Access Profile" and the "Dial-up networking connection with images recorded on the Web", your purchase of this Sony Handycam. Easy access to use the "Sonet" option for...
Network Function Operating Instructions
Page 5
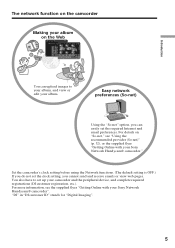
...ID" stands for "Digital Imaging". 5 You also have to your album, and view or edit your album. For more information, see "Using the recommended provider (So-net)" (p. 32), or the supplied flyer "Getting Online with your Sony Network Handycam® camcorder". Set the camcorder's clock setting before using...cannot send and receive emails or view web pages. The network function on the camcorder Making your album on "So-net," see the supplied flyer "Getting Online with your Sony Network Handycam® camcorder." Easy network preferences (So-net) Using the "So-net" option, you ...
...ID" stands for "Digital Imaging". 5 You also have to your album, and view or edit your album. For more information, see "Using the recommended provider (So-net)" (p. 32), or the supplied flyer "Getting Online with your Sony Network Handycam® camcorder". Set the camcorder's clock setting before using...cannot send and receive emails or view web pages. The network function on the camcorder Making your album on "So-net," see the supplied flyer "Getting Online with your Sony Network Handycam® camcorder." Easy network preferences (So-net) Using the "So-net" option, you ...

Network Function Operating Instructions
Page 6
For details, see "Making your camcorder. [a] [b] [c] [d] [e] [a]: Send and receive email. The actual screens may differ slightly from the illustrations in the operating instructions supplied with your album on the Internet. How ..., see "Using email" (p. 58). [b]: View a web page through the Internet. For details, see "Setting network preferences" (p. 34). [d]: Exit the NETWORK mode. [e]: Upload images to your camcorder, those which are used for network operations.
For details, see "Making your camcorder. [a] [b] [c] [d] [e] [a]: Send and receive email. The actual screens may differ slightly from the illustrations in the operating instructions supplied with your album on the Internet. How ..., see "Using email" (p. 58). [b]: View a web page through the Internet. For details, see "Setting network preferences" (p. 34). [d]: Exit the NETWORK mode. [e]: Upload images to your camcorder, those which are used for network operations.
Network Function Operating Instructions
Page 7
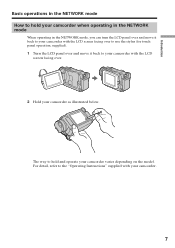
... operating in the NETWORK mode When operating in the NETWORK mode, you can turn the LCD panel over and move it back to your camcorder with the LCD screen facing over to use the stylus (for touch panel operation, supplied). 1 Turn the LCD panel over and move it ...back to your camcorder with your camcorder. 7 For detail, refer to the "Operating Instructions" supplied with the LCD screen facing over. 2 Hold your camcorder as illustrated below. Introduction Basic operations in the NETWORK mode How to hold and operate your...
... operating in the NETWORK mode When operating in the NETWORK mode, you can turn the LCD panel over and move it back to your camcorder with the LCD screen facing over to use the stylus (for touch panel operation, supplied). 1 Turn the LCD panel over and move it ...back to your camcorder with your camcorder. 7 For detail, refer to the "Operating Instructions" supplied with the LCD screen facing over. 2 Hold your camcorder as illustrated below. Introduction Basic operations in the NETWORK mode How to hold and operate your...

Network Function Operating Instructions
Page 8
... to as "tapping". In this manual, pressing the buttons in the NETWORK mode How to use the stylus The buttons required for operating your camcorder for the stylus storage location. Tap the desired button on the screen directly but lightly with your... camcorder are displayed on the LCD screen. Operate by touching and sliding across your camcorder screen with the stylus. •Refer to the operating instructions supplied with the stylus provided. Basic operations in this way ...
... to as "tapping". In this manual, pressing the buttons in the NETWORK mode How to use the stylus The buttons required for operating your camcorder for the stylus storage location. Tap the desired button on the screen directly but lightly with your... camcorder are displayed on the LCD screen. Operate by touching and sliding across your camcorder screen with the stylus. •Refer to the operating instructions supplied with the stylus provided. Basic operations in this way ...
Network Function Operating Instructions
Page 9
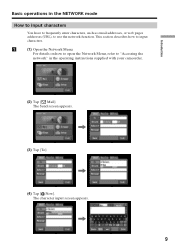
Basic operations in the operating instructions supplied with your camcorder. The Send screen appears. , (3) Tap [To]. , (4) Tap [ New]. This section describes how to use the network function. For details on how to open the Network Menu, refer to "Accessing the network" in the NETWORK mode How to input characters You have to frequently enter characters, such as email addresses, or web pages addresses (URL), to input characters. 1 (1) Open the Network Menu. Introduction (2) Tap [ Mail]. The character input screen appears. , 9
Basic operations in the operating instructions supplied with your camcorder. The Send screen appears. , (3) Tap [To]. , (4) Tap [ New]. This section describes how to use the network function. For details on how to open the Network Menu, refer to "Accessing the network" in the NETWORK mode How to input characters You have to frequently enter characters, such as email addresses, or web pages addresses (URL), to input characters. 1 (1) Open the Network Menu. Introduction (2) Tap [ Mail]. The character input screen appears. , 9
Network Function Operating Instructions
Page 14
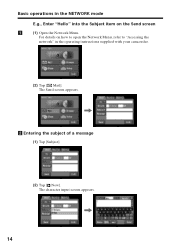
Basic operations in the operating instructions supplied with your camcorder. (2) Tap [ Mail]. The character input screen appears. , 14 For details on how to open the Network Menu, refer to "Accessing the network" in the NETWORK mode E.g., Enter "Hello" into the Subject item on the Send screen 1 (1) Open the Network Menu. The Send screen appears. , 2 Entering the subject of a message (1) Tap [Subject]. (2) Tap [ New].
Basic operations in the operating instructions supplied with your camcorder. (2) Tap [ Mail]. The character input screen appears. , 14 For details on how to open the Network Menu, refer to "Accessing the network" in the NETWORK mode E.g., Enter "Hello" into the Subject item on the Send screen 1 (1) Open the Network Menu. The Send screen appears. , 2 Entering the subject of a message (1) Tap [Subject]. (2) Tap [ New].

Network Function Operating Instructions
Page 18
... can also be done on the Web, email, and browser. Access to the following registrations and setup tasks via your Sony Network Handycam® camcorder". To use the album on the Web and So-net, you have to complete customer registration. "So-net" is not... following URL: "http://www.myimagecam.com/" 18 To fully use the other provider. - For more information, see the supplied flyer "Getting Online with your camcorder: 1 Bluetooth device registration (p. 20) 2 DI customer registration (p. 28) 3 Album registration (p. 31) 4 So-net registration* (p. 33) 5 Network Setup (p....
... can also be done on the Web, email, and browser. Access to the following registrations and setup tasks via your Sony Network Handycam® camcorder". To use the album on the Web and So-net, you have to complete customer registration. "So-net" is not... following URL: "http://www.myimagecam.com/" 18 To fully use the other provider. - For more information, see the supplied flyer "Getting Online with your camcorder: 1 Bluetooth device registration (p. 20) 2 DI customer registration (p. 28) 3 Album registration (p. 31) 4 So-net registration* (p. 33) 5 Network Setup (p....


