
Operating Instructions
Page 8
...DCR-TRV14E/TRV19E/ TRV22E/TRV33E only 100 Searching for a photo - Digital program editing (on a cassette with digital effect (DCR-TRV22E/TRV33E only) ...... 93 Enlarging images recorded on "Memory Stick" (DCR-TRV22E/TRV33E only) ...... 14 Getting Started Using this manual 20 Step 1 Preparing the power source ..... 24 Installing the battery pack 24 Charging the battery...manually 69 Using the wide mode 71 Using the fader function 73 Using special effects - Digital effect (DCR-TRV22E/TRV33E only) ...... 77 Using PROGRAM AE 80 Adjusting the exposure manually ...... 82 Using spot light...
...DCR-TRV14E/TRV19E/ TRV22E/TRV33E only 100 Searching for a photo - Digital program editing (on a cassette with digital effect (DCR-TRV22E/TRV33E only) ...... 93 Enlarging images recorded on "Memory Stick" (DCR-TRV22E/TRV33E only) ...... 14 Getting Started Using this manual 20 Step 1 Preparing the power source ..... 24 Installing the battery pack 24 Charging the battery...manually 69 Using the wide mode 71 Using the fader function 73 Using special effects - Digital effect (DCR-TRV22E/TRV33E only) ...... 77 Using PROGRAM AE 80 Adjusting the exposure manually ...... 82 Using spot light...

Operating Instructions
Page 9
Digital program editing (on a computer - Slide show 188 Preventing accidental erasure - MEMORY MIX 158 Interval Photo Recording 164 Recording moving picture - Introduction 199 Connecting your camcorder to a computer using the USB cable (For Windows users... folder 185 Enlarging still images recorded on a computer - Resize (DCR-TRV33E only 196 Writing a print mark - Image protection 190 Deleting images - Signal convert function (DCR-TRV22E/ TRV33E only 238 Customizing Your Camcorder Changing the menu settings 240 Troubleshooting Types of contents Labelling a cassette...
Digital program editing (on a computer - Slide show 188 Preventing accidental erasure - MEMORY MIX 158 Interval Photo Recording 164 Recording moving picture - Introduction 199 Connecting your camcorder to a computer using the USB cable (For Windows users... folder 185 Enlarging still images recorded on a computer - Resize (DCR-TRV33E only 196 Writing a print mark - Image protection 190 Deleting images - Signal convert function (DCR-TRV22E/ TRV33E only 238 Customizing Your Camcorder Changing the menu settings 240 Troubleshooting Types of contents Labelling a cassette...
Operating Instructions
Page 12
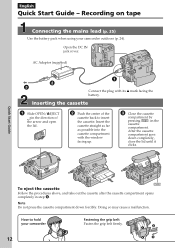
... plug with the window facing up. 3 Close the cassette compartment by pressing on tape Connecting the mains lead (p. 25) Use the battery pack when using your camcorder 12 Fastening the grip belt Fasten the grip belt firmly. 2 1 43 Insert the cassette straight as far as possible into the cassette... compartment with its v mark facing the battery. Doing so may cause a malfunction. Quick Start Guide To eject the cassette Follow...
... plug with the window facing up. 3 Close the cassette compartment by pressing on tape Connecting the mains lead (p. 25) Use the battery pack when using your camcorder 12 Fastening the grip belt Fasten the grip belt firmly. 2 1 43 Insert the cassette straight as far as possible into the cassette... compartment with its v mark facing the battery. Doing so may cause a malfunction. Quick Start Guide To eject the cassette Follow...
Operating Instructions
Page 13
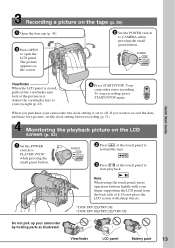
...your eyesight (p. 43). 4 Press START/STOP. Do not press the LCD screen with your camcorder by holding parts as illustrated. Viewfinder LCD panel Battery pack 13 Adjust the viewfinder lens to record the date and time for a picture, set...camcorder starts recording. To stop recording, press START/STOP again. Quick Start Guide Monitoring the playback picture on the tape (p. 36) 1 Open the lens cap (p. 36). 3 Press OPEN to open the LCD panel. Note When using the touch panel, press operation buttons lightly with sharp objects. 1) DCR-TRV12E/TRV14E 2) DCR-TRV19E/TRV22E/TRV33E...
...your eyesight (p. 43). 4 Press START/STOP. Do not press the LCD screen with your camcorder by holding parts as illustrated. Viewfinder LCD panel Battery pack 13 Adjust the viewfinder lens to record the date and time for a picture, set...camcorder starts recording. To stop recording, press START/STOP again. Quick Start Guide Monitoring the playback picture on the tape (p. 36) 1 Open the lens cap (p. 36). 3 Press OPEN to open the LCD panel. Note When using the touch panel, press operation buttons lightly with sharp objects. 1) DCR-TRV12E/TRV14E 2) DCR-TRV19E/TRV22E/TRV33E...
Operating Instructions
Page 14
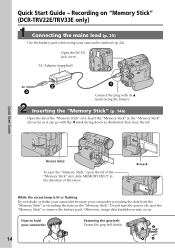
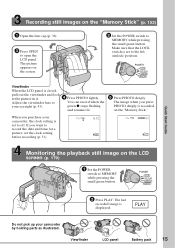
... belt firmly. 2 1 43 How to hold your camcorder is reading the data from the "Memory Stick" or recording the data on "Memory Stick" (DCR-TRV22E/TRV33E only) Connecting the mains lead (p. 25) Use the battery pack when using your camcorder outdoors (p. 24). Recording on the "Memory Stick." ...Do not turn the power off, eject the "Memory Stick" or remove the battery pack. Otherwise, image data breakdown ...
... belt firmly. 2 1 43 How to hold your camcorder is reading the data from the "Memory Stick" or recording the data on "Memory Stick" (DCR-TRV22E/TRV33E only) Connecting the mains lead (p. 25) Use the battery pack when using your camcorder outdoors (p. 24). Recording on the "Memory Stick." ...Do not turn the power off, eject the "Memory Stick" or remove the battery pack. Otherwise, image data breakdown ...
Operating Instructions
Page 15
... your eyesight (p. 43). POWER VCR OFF(CHG) CAMERA MEMORY 2 Press PLAY. Viewfinder LCD panel Battery pack 15 If you want to record the date and time for a picture, set to your camcorder by holding parts as illustrated. Make sure that the LOCK switch is set the clock setting before...Stick" (p. 152) 1 Open the lens cap (p. 36). 3 Press OPEN to MEMORY while pressing the small green button. The image when you purchase your camcorder, the clock setting is closed, pull out the viewfinder and look at the picture in it. 4 Press PHOTO lightly. The last recorded image is recorded...
... your eyesight (p. 43). POWER VCR OFF(CHG) CAMERA MEMORY 2 Press PLAY. Viewfinder LCD panel Battery pack 15 If you want to record the date and time for a picture, set to your camcorder by holding parts as illustrated. Make sure that the LOCK switch is set the clock setting before...Stick" (p. 152) 1 Open the lens cap (p. 36). 3 Press OPEN to MEMORY while pressing the small green button. The image when you purchase your camcorder, the clock setting is closed, pull out the viewfinder and look at the picture in it. 4 Press PHOTO lightly. The last recorded image is recorded...

Operating Instructions
Page 27
...Préparation Step 1 Preparing the power source Etape 1 Préparation de l'alimentation Recording time/Temps d'enregistrement DCR-TRV12E/TRV14E/TRV19E/TRV22E Battery pack/ Batterie NP-FM30 (supplied/fournie) NP-FM50 NP-FM70 NP-QM71/QM71D NP-FM91/QM91/QM91D Recording with the viewfinder/ ... screen/ Enregistrement avec l'écran LCD Continuous/ Continu Typical*/ Normal* 90 45 150 75 310 160 365 190 550 290 DCR-TRV33E Battery pack/ Batterie NP-FM30 (supplied/fournie) NP-FM50 NP-FM70 NP-QM71/QM71D NP-FM91/QM91/QM91D Recording with the viewfinder/ Enregistrement avec ...
...Préparation Step 1 Preparing the power source Etape 1 Préparation de l'alimentation Recording time/Temps d'enregistrement DCR-TRV12E/TRV14E/TRV19E/TRV22E Battery pack/ Batterie NP-FM30 (supplied/fournie) NP-FM50 NP-FM70 NP-QM71/QM71D NP-FM91/QM91/QM91D Recording with the viewfinder/ ... screen/ Enregistrement avec l'écran LCD Continuous/ Continu Typical*/ Normal* 90 45 150 75 310 160 365 190 550 290 DCR-TRV33E Battery pack/ Batterie NP-FM30 (supplied/fournie) NP-FM50 NP-FM70 NP-QM71/QM71D NP-FM91/QM91/QM91D Recording with the viewfinder/ Enregistrement avec ...
Operating Instructions
Page 29
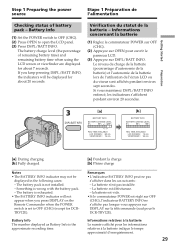
...233; sur OFF (CHG), l'indicateur BATTERY INFO ne s'affiche pas lorsque vous appuyez sur DISPLAY sur la télécommande (sauf pour le DCR-TRV12E). Vérification du statut de la batterie - The battery is exhausted. •The BATTERY INFO indicator will be displayed in the ...following cases: - Battery Info (1) Set the POWER switch to OFF (CHG). (2) Press OPEN...
...233; sur OFF (CHG), l'indicateur BATTERY INFO ne s'affiche pas lorsque vous appuyez sur DISPLAY sur la télécommande (sauf pour le DCR-TRV12E). Vérification du statut de la batterie - The battery is exhausted. •The BATTERY INFO indicator will be displayed in the ...following cases: - Battery Info (1) Set the POWER switch to OFF (CHG). (2) Press OPEN...
Operating Instructions
Page 31
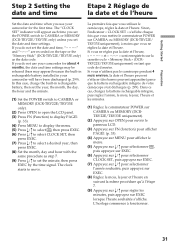
... Etape 2 Réglage de la date et de l'heure Set the date and time when you use your camcorder will appear each time you set the POWER switch to CAMERA or MEMORY (DCR-TRV22E/TRV33E only) unless you set the year, the month, the day, the hour and the minute. (1) Set the POWER... select a desired year, then press EXEC. (8) Set the month, day and hour with the same procedure as the data code. Dans ce cas, chargez la batterie rechargeable intégrée, puis réglez l'année, le mois, le jour, l'heure et les minutes. (1) Réglez le commutateur POWER sur CAMERA...
... Etape 2 Réglage de la date et de l'heure Set the date and time when you use your camcorder will appear each time you set the POWER switch to CAMERA or MEMORY (DCR-TRV22E/TRV33E only) unless you set the year, the month, the day, the hour and the minute. (1) Set the POWER... select a desired year, then press EXEC. (8) Set the month, day and hour with the same procedure as the data code. Dans ce cas, chargez la batterie rechargeable intégrée, puis réglez l'année, le mois, le jour, l'heure et les minutes. (1) Réglez le commutateur POWER sur CAMERA...

Operating Instructions
Page 244
...in analog format using your camcorder ON To output analog images and sound in digital format using your camcorder (p. 238) NTSC PB z ON PAL TV To play back a tape recorded in the NTSC colour system on a TV with r/R VF B.L. and VF B.L. •When you select BRIGHT, battery life ... To brighten the viewfinder screen 1)/ 2) 1)/ 2) 3) 1)/ 2) 3) 1)/ 2) 3) 1) DCR-TRV12E/TRV14E 2) DCR-TRV19E/TRV22E/TRV33E 3) DCR-TRV22E/TRV33E Note on NTSC PB When you play back a tape recorder in the NTSC colour system on a PAL system TV NTSC 4.43 To play back a tape on a Multi System TV, select the ...
...in analog format using your camcorder ON To output analog images and sound in digital format using your camcorder (p. 238) NTSC PB z ON PAL TV To play back a tape recorded in the NTSC colour system on a TV with r/R VF B.L. and VF B.L. •When you select BRIGHT, battery life ... To brighten the viewfinder screen 1)/ 2) 1)/ 2) 3) 1)/ 2) 3) 1)/ 2) 3) 1) DCR-TRV12E/TRV14E 2) DCR-TRV19E/TRV22E/TRV33E 3) DCR-TRV22E/TRV33E Note on NTSC PB When you play back a tape recorder in the NTSC colour system on a PAL system TV NTSC 4.43 To play back a tape on a Multi System TV, select the ...
Operating Instructions
Page 262
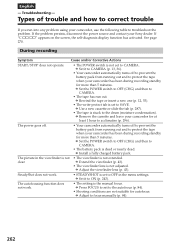
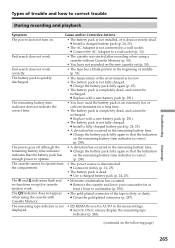
...correct trouble If you run out. Types of trouble and how to CAMERA. • The battery pack is not adjusted. If the problem persists, disconnect the power source and contact your camcorder has been during recording standby for more than 5 minutes. c Remove the cassette and leave ...minutes. SteadyShot does not work . • The setting is not set to protect the tape when your Sony dealer. c Set it to CAMERA (p. 13, 36). • Your camcorder automatically turns off to prevent the battery pack from running out and to SAVE. The power goes off. • Your...
...correct trouble If you run out. Types of trouble and how to CAMERA. • The battery pack is not adjusted. If the problem persists, disconnect the power source and contact your camcorder has been during recording standby for more than 5 minutes. c Remove the cassette and leave ...minutes. SteadyShot does not work . • The setting is not set to protect the tape when your Sony dealer. c Set it to CAMERA (p. 13, 36). • Your camcorder automatically turns off to prevent the battery pack from running out and to SAVE. The power goes off. • Your...
Operating Instructions
Page 265
...8226; Moisture condensation has occurred. c Install a fully charged battery pack (p. 24, 25). • A deviation has occurred in the beginning or middle (p. 51). The cassette cannot be recharged. c Remove the cassette and leave your camcorder for at least 1 hour to always display the remaining tape... indicator (p. 248). (continued on the remaining battery time indicator is disconnected. c Charge the battery pack fully again so that the indication on the following...
...8226; Moisture condensation has occurred. c Install a fully charged battery pack (p. 24, 25). • A deviation has occurred in the beginning or middle (p. 51). The cassette cannot be recharged. c Remove the cassette and leave your camcorder for at least 1 hour to always display the remaining tape... indicator (p. 248). (continued on the remaining battery time indicator is disconnected. c Charge the battery pack fully again so that the indication on the following...

Operating Instructions
Page 268
... VCR and your camcorder does not work (except for DCR-TRV12E). • COMMANDER is set to correct trouble Others Symptom Cause and/or Corrective Actions A title is not set to REC (p. 287). Digital program editing to DV equipment of other than Sony using the i.LINK...DCR-TRV22E/TRV33E only) c Set the programme again on the TV or VCR. (DCRTRV19E/TRV22E/TRV33E only) • DISPLAY is full. c Set it to ON (p. 250). • Something is not adjusted. c Remove the obstacle. • The batteries are dead. The picture from a TV or VCR does not appear even when your camcorder...
... VCR and your camcorder does not work (except for DCR-TRV12E). • COMMANDER is set to correct trouble Others Symptom Cause and/or Corrective Actions A title is not set to REC (p. 287). Digital program editing to DV equipment of other than Sony using the i.LINK...DCR-TRV22E/TRV33E only) c Set the programme again on the TV or VCR. (DCRTRV19E/TRV22E/TRV33E only) • DISPLAY is full. c Set it to ON (p. 250). • Something is not adjusted. c Remove the obstacle. • The batteries are dead. The picture from a TV or VCR does not appear even when your camcorder...

Operating Instructions
Page 269
...). c Remove the cassette and leave your camcorder for DCRTRV12E, p. 54). c Disconnect the AC Adaptor from inside your camcorder. (DCR-TRV33E only) • This is because some functions use a linear mechanism. While charging the battery pack, no indicator appears. • The battery pack is full. c Install it in... malfunction. c Set it properly (p. 24). • Something is wrong with the battery pack. c Remove the cassette and insert it again, then operate your Sony dealer or local authorised Sony service facility. If the functions still do not work . Types of the USB driver...
...). c Remove the cassette and leave your camcorder for DCRTRV12E, p. 54). c Disconnect the AC Adaptor from inside your camcorder. (DCR-TRV33E only) • This is because some functions use a linear mechanism. While charging the battery pack, no indicator appears. • The battery pack is full. c Install it in... malfunction. c Set it properly (p. 24). • Something is wrong with the battery pack. c Remove the cassette and insert it again, then operate your Sony dealer or local authorised Sony service facility. If the functions still do not work . Types of the USB driver...
Operating Instructions
Page 270
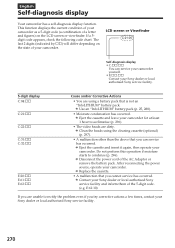
... operate your Sony dealer or local authorised Sony service facility. 270 E:61:10) If you are using the cleaning cassette (optional) (p. 297). • A malfunction other than the above that is not an "InfoLITHIUM" battery pack. c Clean the heads using a battery pack that you can service your camcorder yourself. • E:ss:ss Contact your camcorder as a 5-digit code...
... operate your Sony dealer or local authorised Sony service facility. 270 E:61:10) If you are using the cleaning cassette (optional) (p. 297). • A malfunction other than the above that is not an "InfoLITHIUM" battery pack. c Clean the heads using a battery pack that you can service your camcorder yourself. • E:ss:ss Contact your camcorder as a 5-digit code...

Operating Instructions
Page 271
... is something wrong with the cassette lid open (p. 296). Depending on operational, environmental or battery conditions the E indicator may flash, even if there are trying to carry out MEMORY MIX... • The self-diagnosis display function is activated (p. 270).1) • There is not formatted correctly (p. 246). Warning indicator as to OFF (CHG), and leave it for details. 101-... tab on the tape (p. 65).3) 1) You hear the melody or beep sound. 2) DCR-TRV22E/TRV33E only 3) DCR-TRV12E/TRV14E/TRV19E only 271 Dépannage Troubleshooting The image is protected1) 2) Slow flashing:...
... is something wrong with the cassette lid open (p. 296). Depending on operational, environmental or battery conditions the E indicator may flash, even if there are trying to carry out MEMORY MIX... • The self-diagnosis display function is activated (p. 270).1) • There is not formatted correctly (p. 246). Warning indicator as to OFF (CHG), and leave it for details. 101-... tab on the tape (p. 65).3) 1) You hear the melody or beep sound. 2) DCR-TRV22E/TRV33E only 3) DCR-TRV12E/TRV14E/TRV19E only 271 Dépannage Troubleshooting The image is protected1) 2) Slow flashing:...

Operating Instructions
Page 272
...DELETING3) You press PHOTO on your camcorder while deleting data in the "Memory...BATTERY ONLY Use an "InfoLITHIUM" battery pack (p. 25). • CLEANING CASSETTE The video heads are trying to LOCK (p. 142).1) • NO FILE3) No image is recorded or recognised on your camcorder while formatting...camcorder on the "Memory Stick" (p. 171).1) • MEMORY STICK ERROR3) The "Memory Stick" data is corrupted (p. 146).1) • FORMAT ERROR3) The "Memory Stick" is not recognised (p. 246).1) Check the format...set to record an image with your camcorder.1) • READ-ONLY MEMORY STICK3) ...
...DELETING3) You press PHOTO on your camcorder while deleting data in the "Memory...BATTERY ONLY Use an "InfoLITHIUM" battery pack (p. 25). • CLEANING CASSETTE The video heads are trying to LOCK (p. 142).1) • NO FILE3) No image is recorded or recognised on your camcorder while formatting...camcorder on the "Memory Stick" (p. 171).1) • MEMORY STICK ERROR3) The "Memory Stick" data is corrupted (p. 146).1) • FORMAT ERROR3) The "Memory Stick" is not recognised (p. 246).1) Check the format...set to record an image with your camcorder.1) • READ-ONLY MEMORY STICK3) ...
Operating Instructions
Page 306
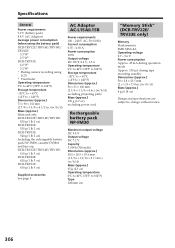
...) 8.4 V (AC Adaptor) Average power consumption (when using the battery pack) DCR-TRV12E/TRV14E/TRV19E/ TRV22E: 3.3 W1) 2.5 W2) DCR-TRV33E: 4.0 W1) 3.2 W2) 1) During camera recording using LCD 2) Viewfinder Operating temperature 0°C to 40°C ... in.) (w/h/d) Mass (approx.) Main unit only DCR-TRV12E/TRV14E/TRV19E: 520 g (1 lb 2 oz) DCR-TRV22E: 530 g (1 lb 2 oz) DCR-TRV33E: 540 g (1 lb 2 oz) Including the rechargeable battery pack NP-FM30, cassette DVM60 and lens cap DCR-TRV12E/TRV14E/TRV19E: 610 g (1 lb 5 oz) DCR-TRV22E: 620 g (1 lb 5 oz) DCR-TRV33E: 630 g (1 lb 5 oz) Supplied accessories...
...) 8.4 V (AC Adaptor) Average power consumption (when using the battery pack) DCR-TRV12E/TRV14E/TRV19E/ TRV22E: 3.3 W1) 2.5 W2) DCR-TRV33E: 4.0 W1) 3.2 W2) 1) During camera recording using LCD 2) Viewfinder Operating temperature 0°C to 40°C ... in.) (w/h/d) Mass (approx.) Main unit only DCR-TRV12E/TRV14E/TRV19E: 520 g (1 lb 2 oz) DCR-TRV22E: 530 g (1 lb 2 oz) DCR-TRV33E: 540 g (1 lb 2 oz) Including the rechargeable battery pack NP-FM30, cassette DVM60 and lens cap DCR-TRV12E/TRV14E/TRV19E: 610 g (1 lb 5 oz) DCR-TRV22E: 620 g (1 lb 5 oz) DCR-TRV33E: 630 g (1 lb 5 oz) Supplied accessories...

Operating Instructions
Page 309
... (marche/arrêt) (pp. 17, 36 et 166) qa Surface de fixation de la batterie rechargeable (p. 24) qs Crochets pour la bandoulière Quick Reference Référence rapide 309 Identification des composants et des commandes Camcorder 1 2 3 4 5 6 1 Lens cap (p. 36) 2 LCD/Touch panel screen (p. 33, ...BATT INFO button (p. 29, 54) 7 CHG (charge) lamp (p. 25) 8 Eyecup (p. 298) 9 Viewfinder (p. 43) 0 START/STOP button (p. 13, 36, 166) qa Battery pack mounting surface (p. 24) qs Hooks for shoulder strap Caméscope 7 8 9 q; Quick Reference - - Identifying parts and controls -
... (marche/arrêt) (pp. 17, 36 et 166) qa Surface de fixation de la batterie rechargeable (p. 24) qs Crochets pour la bandoulière Quick Reference Référence rapide 309 Identification des composants et des commandes Camcorder 1 2 3 4 5 6 1 Lens cap (p. 36) 2 LCD/Touch panel screen (p. 33, ...BATT INFO button (p. 29, 54) 7 CHG (charge) lamp (p. 25) 8 Eyecup (p. 298) 9 Viewfinder (p. 43) 0 START/STOP button (p. 13, 36, 166) qa Battery pack mounting surface (p. 24) qs Hooks for shoulder strap Caméscope 7 8 9 q; Quick Reference - - Identifying parts and controls -
Operating Instructions
Page 318
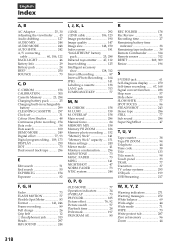
...protect tab 287 Zero set 31 Colour Slow Shutter 48 Continuous photo recording .. 154 Data code 54 Date search 100 DEMO MODE 249 Digital effect 77, 93 Digital program editing .. 109, 173 DISPLAY 250 DOT 73 Dual sound track tape .......... 286 E Edit search 51 End search 50 EXP ...Flexible Spot Meter 83 Format 141, 246 Frame recording 89 Full charge 26 Grip belt 12 i (headphones) jack 313 Heads 297 HiFi SOUND 244 I, J, K, L i.LINK 292 i.LINK cable 106, 123 Image protection 190 Image quality 147 Image size 148, 150 Index screen 181 "InfoLITHIUM" battery pack 25, 288 ...
...protect tab 287 Zero set 31 Colour Slow Shutter 48 Continuous photo recording .. 154 Data code 54 Date search 100 DEMO MODE 249 Digital effect 77, 93 Digital program editing .. 109, 173 DISPLAY 250 DOT 73 Dual sound track tape .......... 286 E Edit search 51 End search 50 EXP ...Flexible Spot Meter 83 Format 141, 246 Frame recording 89 Full charge 26 Grip belt 12 i (headphones) jack 313 Heads 297 HiFi SOUND 244 I, J, K, L i.LINK 292 i.LINK cable 106, 123 Image protection 190 Image quality 147 Image size 148, 150 Index screen 181 "InfoLITHIUM" battery pack 25, 288 ...


