Operating Instructions
Page 4
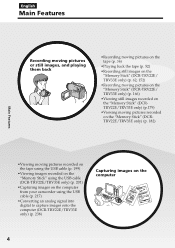
... "Memory Stick" (DCR-TRV22E/ TRV33E only) (p. 166) •Viewing still images recorded on the "Memory Stick" (DCRTRV22E/TRV33E only) (p.179) •Viewing moving pictures recorded on the "Memory Stick" (DCRTRV22E/TRV33E only) (p. 182) Main Features •Viewing moving pictures recorded on the tape using the USB cable (p. 199) •Viewing images recorded on the "Memory Stick" using the USB cable (DCR-TRV22E/TRV33E only) (p. 201) •Capturing images on the computer from your camcorder using the USB cable (p. 217) •Converting an analog signal into digital to capture images onto...
... "Memory Stick" (DCR-TRV22E/ TRV33E only) (p. 166) •Viewing still images recorded on the "Memory Stick" (DCRTRV22E/TRV33E only) (p.179) •Viewing moving pictures recorded on the "Memory Stick" (DCRTRV22E/TRV33E only) (p. 182) Main Features •Viewing moving pictures recorded on the tape using the USB cable (p. 199) •Viewing images recorded on the "Memory Stick" using the USB cable (DCR-TRV22E/TRV33E only) (p. 201) •Capturing images on the computer from your camcorder using the USB cable (p. 217) •Converting an analog signal into digital to capture images onto...

Operating Instructions
Page 5
... model used for example, "DCR-TRV33E only." 5 SPORTS - LANDSCAPE •Manual focus (p. 84) •Spot Focus (p. 86) Functions for using after recording •End search/Edit search/Rec Review (p. 50) •Data code (p. 54) •Tape PB ZOOM* (p. 94)/Memory PB ZOOM* (p. 186) •Zero set memory** (p. 96) •Title search** (p. 98) •Digital program editing (p. 109, 173*) * DCR-TRV22E/TRV33E only **Except for DCR-TRV12E Before you start reading this manual and operating your camcorder, check the model number...
... model used for example, "DCR-TRV33E only." 5 SPORTS - LANDSCAPE •Manual focus (p. 84) •Spot Focus (p. 86) Functions for using after recording •End search/Edit search/Rec Review (p. 50) •Data code (p. 54) •Tape PB ZOOM* (p. 94)/Memory PB ZOOM* (p. 186) •Zero set memory** (p. 96) •Title search** (p. 98) •Digital program editing (p. 109, 173*) * DCR-TRV22E/TRV33E only **Except for DCR-TRV12E Before you start reading this manual and operating your camcorder, check the model number...

Operating Instructions
Page 8
... on a cassette with digital effect (DCR-TRV22E/TRV33E only) ...... 93 Enlarging images recorded on "Memory Stick" (DCR-TRV22E/TRV33E only) ...... 14 Getting Started Using this manual 20 Step 1 Preparing the power source ..... 24 Installing the battery pack 24 Charging the battery pack 25 Checking status of recorded tape by date - End search/Edit search/Rec Review 50 Playback - Picture effect .. 76 Using special effects - Basics Playing back tape 52 To display the screen indicators - Date search (DCR-TRV14E/TRV19E/ TRV22E/TRV33E only 100...
... on a cassette with digital effect (DCR-TRV22E/TRV33E only) ...... 93 Enlarging images recorded on "Memory Stick" (DCR-TRV22E/TRV33E only) ...... 14 Getting Started Using this manual 20 Step 1 Preparing the power source ..... 24 Installing the battery pack 24 Charging the battery pack 25 Checking status of recorded tape by date - End search/Edit search/Rec Review 50 Playback - Picture effect .. 76 Using special effects - Basics Playing back tape 52 To display the screen indicators - Date search (DCR-TRV14E/TRV19E/ TRV22E/TRV33E only 100...

Operating Instructions
Page 9
... 296 Specifications 305 Quick Reference Identifying parts and controls 309 Index 318 9 MPEG MOVIE recording 166 Self-timer recording 168 Recording a picture from tape as a moving pictures on "Memory Stick" - Resize (DCR-TRV33E only 196 Writing a print mark - Memory Photo playback .......... 179 Viewing a moving picture - Image protection 190 Deleting images - DELETE 192 Changing image size - Print mark ... 197 Viewing images with your camcorder to a computer using the USB cable (For Windows users 203 Viewing pictures recorded on tape on an image - Signal...
... 296 Specifications 305 Quick Reference Identifying parts and controls 309 Index 318 9 MPEG MOVIE recording 166 Self-timer recording 168 Recording a picture from tape as a moving pictures on "Memory Stick" - Resize (DCR-TRV33E only 196 Writing a print mark - Memory Photo playback .......... 179 Viewing a moving picture - Image protection 190 Deleting images - DELETE 192 Changing image size - Print mark ... 197 Viewing images with your camcorder to a computer using the USB cable (For Windows users 203 Viewing pictures recorded on tape on an image - Signal...
Operating Instructions
Page 13
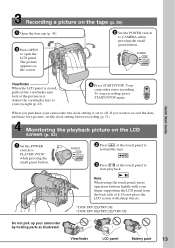
... to record the date and time for a picture, set to your camcorder by holding parts as illustrated. When you want to rewind the tape. 3 Press of it . Recording a picture on the tape (p. 36) 1 Open the lens cap (p. 36). 3 Press OPEN to start playback. POWER VCR OFF(CHG) CAMERA MEMORY Viewfinder When the LCD panel is set the clock setting before recording (p. 31). Adjust the viewfinder lens to off. Note When using the touch panel, press operation buttons lightly with...
... to record the date and time for a picture, set to your camcorder by holding parts as illustrated. When you want to rewind the tape. 3 Press of it . Recording a picture on the tape (p. 36) 1 Open the lens cap (p. 36). 3 Press OPEN to start playback. POWER VCR OFF(CHG) CAMERA MEMORY Viewfinder When the LCD panel is set the clock setting before recording (p. 31). Adjust the viewfinder lens to off. Note When using the touch panel, press operation buttons lightly with...
Operating Instructions
Page 15
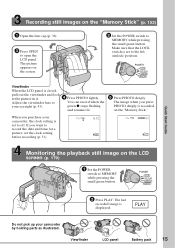
... displayed. When you purchase your camcorder, the clock setting is set to MEMORY while pressing the small green button. Viewfinder LCD panel Battery pack 15 POWER VCR OFF(CHG) CAMERA MEMORY 2 Press PLAY. Make sure that the LOCK switch is recorded on the screen. 2 Set the POWER switch to off. You can record when the green z stops flashing and remains lit. 5 Press PHOTO deeply. Quick Start Guide Recording still images on the "Memory Stick" (p. 152) 1 Open the lens cap (p. 36). 3 Press OPEN...
... displayed. When you purchase your camcorder, the clock setting is set to MEMORY while pressing the small green button. Viewfinder LCD panel Battery pack 15 POWER VCR OFF(CHG) CAMERA MEMORY 2 Press PLAY. Make sure that the LOCK switch is recorded on the screen. 2 Set the POWER switch to off. You can record when the green z stops flashing and remains lit. 5 Press PHOTO deeply. Quick Start Guide Recording still images on the "Memory Stick" (p. 152) 1 Open the lens cap (p. 36). 3 Press OPEN...

Operating Instructions
Page 20
... DCR-TRV33E. Dans ce manuel, les touches et les réglages de votre caméscope sont indiqués en majuscules. Chaque opération effectuée est confirmée par un signal sonore. 20 Any differences in operation are shown in the table on your camcorder, check the model number by the icons below. POWER VCR OFF(CHG) CAMERA MEMORY : Set the POWER switch...
... DCR-TRV33E. Dans ce manuel, les touches et les réglages de votre caméscope sont indiqués en majuscules. Chaque opération effectuée est confirmée par un signal sonore. 20 Any differences in operation are shown in the table on your camcorder, check the model number by the icons below. POWER VCR OFF(CHG) CAMERA MEMORY : Set the POWER switch...

Operating Instructions
Page 27
... 485 255 725 380 Recording with the LCD screen/ Enregistrement avec l'écran LCD Continuous/ Continu Typical*/ Normal* 90 45 150 75 310 160 365 190 550 290 DCR-TRV33E Battery pack/ Batterie NP-FM30 (supplied/fournie...Recording with the LCD screen/ Enregistrement avec l'écran LCD Continuous/ Continu Typical*/ Normal* 75 40 120 65 255 145 300 170 455 255 Approximate minutes when you use a fully charged battery pack * Approximate number of minutes when recording while you repeat recording start/ stop, zooming and turning the power on/off. The actual battery...
... 485 255 725 380 Recording with the LCD screen/ Enregistrement avec l'écran LCD Continuous/ Continu Typical*/ Normal* 90 45 150 75 310 160 365 190 550 290 DCR-TRV33E Battery pack/ Batterie NP-FM30 (supplied/fournie...Recording with the LCD screen/ Enregistrement avec l'écran LCD Continuous/ Continu Typical*/ Normal* 75 40 120 65 255 145 300 170 455 255 Approximate minutes when you use a fully charged battery pack * Approximate number of minutes when recording while you repeat recording start/ stop, zooming and turning the power on/off. The actual battery...
Operating Instructions
Page 29
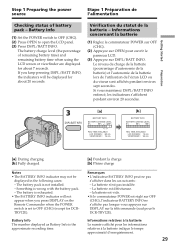
... remaining battery time) and remaining battery time when using the LCD screen or viewfinder are displayed for about 20 seconds. Battery Info (1) Set the POWER switch to OFF (CHG). (2) Press OPEN to OFF (CHG) (except for DCRTRV12E). If you press DISPLAY on the Remote Commander when the POWER switch is set to open the LCD panel. (3) Press DSPL/BATT INFO. The battery is not installed. - Something is the approximate recording time. [a] Pendant la charge [b] Pleine charge...
... remaining battery time) and remaining battery time when using the LCD screen or viewfinder are displayed for about 20 seconds. Battery Info (1) Set the POWER switch to OFF (CHG). (2) Press OPEN to OFF (CHG) (except for DCRTRV12E). If you press DISPLAY on the Remote Commander when the POWER switch is set to open the LCD panel. (3) Press DSPL/BATT INFO. The battery is not installed. - Something is the approximate recording time. [a] Pendant la charge [b] Pleine charge...
Operating Instructions
Page 152
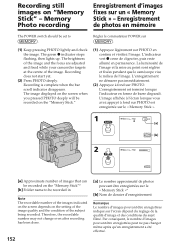
...;moire The POWER switch should be set to be recorded on the "Memory Stick"* [b] Folder name to . Réglez le commutateur POWER sur . (1) Keep pressing PHOTO lightly and check the image. L'enregistrement est terminé lorsque l'indicateur en forme de barre disparaît. Recording still images on "Memory Stick" - Memory Photo recording Enregistrement d'images fixes sur un « Memory Stick » - The brightness of the image and the focus are adjusted and fixed while your camcorder targets...
...;moire The POWER switch should be set to be recorded on the "Memory Stick"* [b] Folder name to . Réglez le commutateur POWER sur . (1) Keep pressing PHOTO lightly and check the image. L'enregistrement est terminé lorsque l'indicateur en forme de barre disparaît. Recording still images on "Memory Stick" - Memory Photo recording Enregistrement d'images fixes sur un « Memory Stick » - The brightness of the image and the focus are adjusted and fixed while your camcorder targets...
Operating Instructions
Page 213
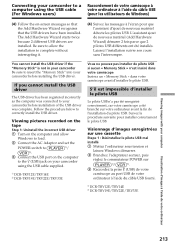
... USB driver. Viewing pictures recorded on the tape Step 1: Uninstall the incorrect USB driver 1 Turn on -screen messages so that the Add Hardware Wizard recognises that the USB drivers have been installed. Suivez la procédure suivante pour installer correctement le pilote USB. Be sure to allow Windows to load. 2 Connect the AC Adaptor and set the POWER switch to 1)/ 2). 3 Connect the USB port on the computer to the (USB) jack on your camcorder using...
... USB driver. Viewing pictures recorded on the tape Step 1: Uninstall the incorrect USB driver 1 Turn on -screen messages so that the Add Hardware Wizard recognises that the USB drivers have been installed. Suivez la procédure suivante pour installer correctement le pilote USB. Be sure to allow Windows to load. 2 Connect the AC Adaptor and set the POWER switch to 1)/ 2). 3 Connect the USB port on the computer to the (USB) jack on your camcorder using...

Operating Instructions
Page 233
...-ROM fourni. The USB driver can be found on the CD-ROM supplied, along with the application software required for the following models. •iMac with the Mac OS 8.6 standard installation and a slot loading type CD-ROM drive •iBook or Power Mac G4 with your camcorder to the computer's USB port. QuickTime 3.0 or later must be used for viewing images. However, note that the update to play back moving pictures...
...-ROM fourni. The USB driver can be found on the CD-ROM supplied, along with the application software required for the following models. •iMac with the Mac OS 8.6 standard installation and a slot loading type CD-ROM drive •iBook or Power Mac G4 with your camcorder to the computer's USB port. QuickTime 3.0 or later must be used for viewing images. However, note that the update to play back moving pictures...

Operating Instructions
Page 241
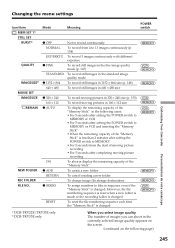
EXEC RET. 1) DCR-TRV12E/TRV14E 2) DCR-TRV19E/TRV22E/TRV33E 3) DCR-TRV22E/TRV33E Customizing Your Camcorder Personnalisation de votre caméscope To return to FN Press EXIT. OTHERS EXIT WORLD TIME BEEP COMMANDER OFF DISPLAY REC LAMP EXEC RET. Menu items are displayed as the following icons: MANUAL SET CAMERA SET PLAYER SET (DCR-TRV12E/TRV14E) VCR SET (DCR-TRV19E/TRV22E/ TRV33E) LCD/VF SET MEM SET 1 (DCR-TRV22E/TRV33E only) MEM SET 2 (DCR-TRV22E/TRV33E only) CM SET TAPE SET SETUP MENU OTHERS Les ic...
EXEC RET. 1) DCR-TRV12E/TRV14E 2) DCR-TRV19E/TRV22E/TRV33E 3) DCR-TRV22E/TRV33E Customizing Your Camcorder Personnalisation de votre caméscope To return to FN Press EXIT. OTHERS EXIT WORLD TIME BEEP COMMANDER OFF DISPLAY REC LAMP EXEC RET. Menu items are displayed as the following icons: MANUAL SET CAMERA SET PLAYER SET (DCR-TRV12E/TRV14E) VCR SET (DCR-TRV19E/TRV22E/ TRV33E) LCD/VF SET MEM SET 1 (DCR-TRV22E/TRV33E only) MEM SET 2 (DCR-TRV22E/TRV33E only) CM SET TAPE SET SETUP MENU OTHERS Les ic...
Operating Instructions
Page 245
... POWER switch to MEMORY or VCR and inserting the "Memory Stick" • When the remaining capacity of the "Memory Stick" is changed . To reset the file numbering sequence each time the "Memory Stick" is changed POWER switch 1) DCR-TRV22E/TRV33E only 2) DCR-TRV33E only When you can shoot in sequence even if the "Memory Stick" is changed . z SERIES RESET Meaning Not to record continuously To record from the start of moving picture recording • For 5 seconds after completing moving picture recording To always display...
... POWER switch to MEMORY or VCR and inserting the "Memory Stick" • When the remaining capacity of the "Memory Stick" is changed . To reset the file numbering sequence each time the "Memory Stick" is changed POWER switch 1) DCR-TRV22E/TRV33E only 2) DCR-TRV33E only When you can shoot in sequence even if the "Memory Stick" is changed . z SERIES RESET Meaning Not to record continuously To record from the start of moving picture recording • For 5 seconds after completing moving picture recording To always display...
Operating Instructions
Page 264
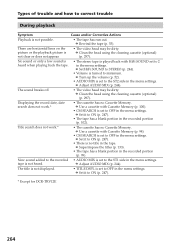
... in the menu settings. c Rewind the tape (p. 53). c Set HiFi SOUND to STEREO (p. 244). • Volume is set to 2 in the menu settings. c Clean the head using the cleaning cassette (optional) (p. 297). c Turn up the volume (p. 52). • AUDIO MIX is turned to the ST2 side in the recorded portion (p. 102). The sound breaks off. • The video head may be dirty. Displaying the record date, date search does not work .* • The cassette has no Cassette Memory. c Set it to...
... in the menu settings. c Rewind the tape (p. 53). c Set HiFi SOUND to STEREO (p. 244). • Volume is set to 2 in the menu settings. c Clean the head using the cleaning cassette (optional) (p. 297). c Turn up the volume (p. 52). • AUDIO MIX is turned to the ST2 side in the recorded portion (p. 102). The sound breaks off. • The video head may be dirty. Displaying the record date, date search does not work .* • The cassette has no Cassette Memory. c Set it to...
Operating Instructions
Page 265
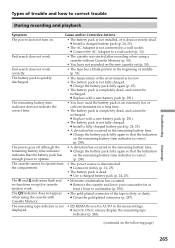
... cassette was ejected after recording when using the cassette with Cassette Memory. • The gold-plated connector of the environment is too low. • The battery pack is disconnected. c Replace with a new battery pack (p. 291). c Remove the cassette and leave your camcorder for cassette ejection work correctly. • The tape has a blank portion in the remaining battery time. The remaining tape indicator is not • q REMAIN is not fully charged. c Install a fully charged battery...
... cassette was ejected after recording when using the cassette with Cassette Memory. • The gold-plated connector of the environment is too low. • The battery pack is disconnected. c Replace with a new battery pack (p. 291). c Remove the cassette and leave your camcorder for cassette ejection work correctly. • The tape has a blank portion in the remaining battery time. The remaining tape indicator is not • q REMAIN is not fully charged. c Install a fully charged battery...

Operating Instructions
Page 269
... USB cable was complete. c Press the LCD screen lightly. c Remove the cassette and insert it to ON (p. 249). This is set to OFF in about 1 minute. You cannot charge the battery pack. • The POWER switch is not properly installed. Troubleshooting Dépannage 269 Types of the USB driver was connected before installation of trouble and how to correct trouble Symptom Cause and/or Corrective Actions The melody or beep sounds for...
... USB cable was complete. c Press the LCD screen lightly. c Remove the cassette and insert it to ON (p. 249). This is set to OFF in about 1 minute. You cannot charge the battery pack. • The POWER switch is not properly installed. Troubleshooting Dépannage 269 Types of the USB driver was connected before installation of trouble and how to correct trouble Symptom Cause and/or Corrective Actions The melody or beep sounds for...

Operating Instructions
Page 272
...) USB streaming is set to record a picture that cannot be recorded by your camcorder while formatting the "Memory Stick."1) • NOW CHARGING Charging an external flash (optional) does not work correctly.1) • FOLDER NO. FULL3) You have reached the maximum number of the tape.1) • Q NO TAPE Insert a cassette.1) • DELETING3) You press PHOTO on your camcorder while deleting data in the "Memory Stick."1) • FORMATTING3) You press PHOTO on your camcorder on the screen. • COPY INHIBIT4...
...) USB streaming is set to record a picture that cannot be recorded by your camcorder while formatting the "Memory Stick."1) • NOW CHARGING Charging an external flash (optional) does not work correctly.1) • FOLDER NO. FULL3) You have reached the maximum number of the tape.1) • Q NO TAPE Insert a cassette.1) • DELETING3) You press PHOTO on your camcorder while deleting data in the "Memory Stick."1) • FORMATTING3) You press PHOTO on your camcorder on the screen. • COPY INHIBIT4...
Operating Instructions
Page 305
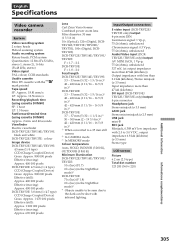
English Specifications Video camera recorder System Video recording system 2 rotary heads Helical scanning system Audio recording system Rotary heads, PCM system Quantization: 12 bits (Fs 32 kHz, stereo 1, stereo 2), 16 bits (Fs 48 kHz, stereo) Video signal PAL colour, CCIR standards Usable cassette Mini DV cassette with infrared lighting. and 40 seconds Viewfinder Electric viewfinder DCR-TRV12E/TRV14E/TRV19E: black and white DCR-TRV22E/TRV33E: colour Image device DCR-TRV12E/TRV14E/TRV19E: 4.5 mm (1/4 type) CCD (Charge Coupled Device) Gross: Approx...
English Specifications Video camera recorder System Video recording system 2 rotary heads Helical scanning system Audio recording system Rotary heads, PCM system Quantization: 12 bits (Fs 32 kHz, stereo 1, stereo 2), 16 bits (Fs 48 kHz, stereo) Video signal PAL colour, CCIR standards Usable cassette Mini DV cassette with infrared lighting. and 40 seconds Viewfinder Electric viewfinder DCR-TRV12E/TRV14E/TRV19E: black and white DCR-TRV22E/TRV33E: colour Image device DCR-TRV12E/TRV14E/TRV19E: 4.5 mm (1/4 type) CCD (Charge Coupled Device) Gross: Approx...
Operating Instructions
Page 318
... M, N M. OVERLAP 158 Main sound 286 Manual focus 84 MEMORY MIX 158 Memory PB ZOOM 186 Memory photo recording .... 152 "Memory Stick 141 "Memory Stick" capacity ..... 151 Menu settings 240 Mirror mode 41 Moisture condensation ........ 296 MONOTONE 73 MOSC. CHROM 158 M. English Index A, B AC Adaptor 25, 30 Adjusting the viewfinder ...... 43 Audio dubbing 127 AUDIO MIX 244 AUDIO MODE 248 AUTO SHTR 242 A/V connecting cable 60, 106, 122 BACK LIGHT 46 Battery Info 29 Battery pack 24 BEEP 250...
... M, N M. OVERLAP 158 Main sound 286 Manual focus 84 MEMORY MIX 158 Memory PB ZOOM 186 Memory photo recording .... 152 "Memory Stick 141 "Memory Stick" capacity ..... 151 Menu settings 240 Mirror mode 41 Moisture condensation ........ 296 MONOTONE 73 MOSC. CHROM 158 M. English Index A, B AC Adaptor 25, 30 Adjusting the viewfinder ...... 43 Audio dubbing 127 AUDIO MIX 244 AUDIO MODE 248 AUTO SHTR 242 A/V connecting cable 60, 106, 122 BACK LIGHT 46 Battery Info 29 Battery pack 24 BEEP 250...


