Operating Instructions
Page 6
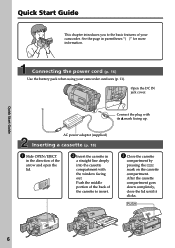
Connecting the power cord (p. 16) Use the battery pack when using your camcorder. Connect the plug with the window facing out. AC power adaptor (supplied) Inserting a cassette (p. 18) 1 Slide OPEN/EJECT in the direction of your camcorder outdoors (p. 11). Push the middle portion of the back of the cassette to the basic features of...
Connecting the power cord (p. 16) Use the battery pack when using your camcorder. Connect the plug with the window facing out. AC power adaptor (supplied) Inserting a cassette (p. 18) 1 Slide OPEN/EJECT in the direction of your camcorder outdoors (p. 11). Push the middle portion of the back of the cassette to the basic features of...
Operating Instructions
Page 9
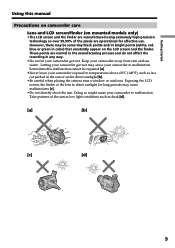
...the pixels are normal in the manufacturing process and do not affect the recording in any way. •Do not let your camcorder get wet may cause your camcorder away from rain and sea water. Getting started Using this malfunction cannot be some tiny black points and/or bright points (...white, red, blue or green in low light conditions such as in a car parked in the sun or under direct sunlight [b]. •Be careful when placing the camera near a window...
...the pixels are normal in the manufacturing process and do not affect the recording in any way. •Do not let your camcorder get wet may cause your camcorder away from rain and sea water. Getting started Using this malfunction cannot be some tiny black points and/or bright points (...white, red, blue or green in low light conditions such as in a car parked in the sun or under direct sunlight [b]. •Be careful when placing the camera near a window...
Operating Instructions
Page 12
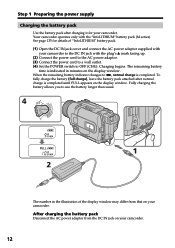
... longer than usual. 4 V POWER 1 2 The number in minutes on the display window. After charging the battery pack Disconnect the AC power adaptor from that on your camcorder. 12 See page 135 for your camcorder to the DC IN jack with the plug's v mark facing up. (2) Connect the...the power supply Charging the battery pack Use the battery pack after normal charge is completed until FULL appears on the display window. Your camcorder operates only with your camcorder. When the remaining battery indicator changes to OFF (CHG). To fully charge the battery (full charge), leave the battery...
... longer than usual. 4 V POWER 1 2 The number in minutes on the display window. After charging the battery pack Disconnect the AC power adaptor from that on your camcorder. 12 See page 135 for your camcorder to the DC IN jack with the plug's v mark facing up. (2) Connect the...the power supply Charging the battery pack Use the battery pack after normal charge is completed until FULL appears on the display window. Your camcorder operates only with your camcorder. When the remaining battery indicator changes to OFF (CHG). To fully charge the battery (full charge), leave the battery...

Operating Instructions
Page 13
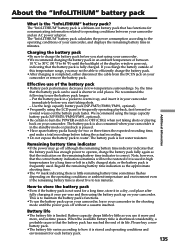
... near a wall outlet. TM SERIES 13 This may go off . When the battery pack is compatible with the "InfoLITHIUM" battery. Your camcorder operates only with the "InfoLITHIUM" battery pack (M series). Do this unit, disconnect the plug from coming into contact with the metal parts ...power adaptor. The battery pack is "InfoLITHIUM"? Keep the battery pack in the display window. When you use it until it fully discharges again. This unit is charged fully The LCD backlight of Sony Corporation. What is not installed correctly. - Getting started Step 1 Preparing the power supply...
... near a wall outlet. TM SERIES 13 This may go off . When the battery pack is compatible with the "InfoLITHIUM" battery. Your camcorder operates only with the "InfoLITHIUM" battery pack (M series). Do this unit, disconnect the plug from coming into contact with the metal parts ...power adaptor. The battery pack is "InfoLITHIUM"? Keep the battery pack in the display window. When you use it until it fully discharges again. This unit is charged fully The LCD backlight of Sony Corporation. What is not installed correctly. - Getting started Step 1 Preparing the power supply...
Operating Instructions
Page 18
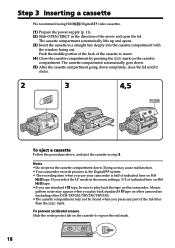
...play back standard 8 tape on other camcorders (including other DCR-TRV230/TRV330/TRV530). •The cassette compartment may cause malfunction. •Your camcorder records pictures in the menu settings,... 3/4 of indicated time on Hi8 tape. •If you use standard 8 tape, be closed when you use your camcorder is half of the lid other than the mark. If you select the LP mode in the Digital8... compartment with the window facing out.
...play back standard 8 tape on other camcorders (including other DCR-TRV230/TRV330/TRV530). •The cassette compartment may cause malfunction. •Your camcorder records pictures in the menu settings,... 3/4 of indicated time on Hi8 tape. •If you use standard 8 tape, be closed when you use your camcorder is half of the lid other than the mark. If you select the LP mode in the Digital8... compartment with the window facing out.
Operating Instructions
Page 44
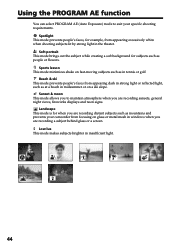
... such as mountains and prevents your specific shooting requirements. Sports lesson This mode minimizes shake on a ski slope. Sunset & moon This mode allows you to suit your camcorder from focusing on glass or metal mesh in windows when you are recording a subject behind glass or a screen. Beach ...& ski This mode prevents people's faces from appearing excessively white when shooting subjects...
... such as mountains and prevents your specific shooting requirements. Sports lesson This mode minimizes shake on a ski slope. Sunset & moon This mode allows you to suit your camcorder from focusing on glass or metal mesh in windows when you are recording a subject behind glass or a screen. Beach ...& ski This mode prevents people's faces from appearing excessively white when shooting subjects...

Operating Instructions
Page 87
... not aware of the recording To make program and perform video editing (p. 63) To adjust and set here. Notes on the screen even when your camcorder is automatically selected. 87 LINK cable) In more than the battery pack, BL ON is connected to the local time. INDICATOR z BL OFF BL ON... 5 minutes after removing the power source The AUDIO MIX, FLASH LVL, COMMANDER and HiFi SOUND items are held in edit set mode (p. 63) To turn off the backlight on display window To turn on the backlight POWER switch CAMERA MEMORY CAMERA VCR MEMORY CAMERA VCR MEMORY CAMERA VCR MEMORY CAMERA MEMORY VCR...
... not aware of the recording To make program and perform video editing (p. 63) To adjust and set here. Notes on the screen even when your camcorder is automatically selected. 87 LINK cable) In more than the battery pack, BL ON is connected to the local time. INDICATOR z BL OFF BL ON... 5 minutes after removing the power source The AUDIO MIX, FLASH LVL, COMMANDER and HiFi SOUND items are held in edit set mode (p. 63) To turn off the backlight on display window To turn on the backlight POWER switch CAMERA MEMORY CAMERA VCR MEMORY CAMERA VCR MEMORY CAMERA VCR MEMORY CAMERA MEMORY VCR...

Operating Instructions
Page 89
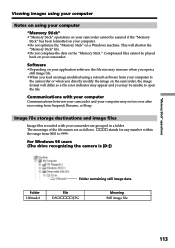
... with this manual. "Memory Stick" and are trademarks of Sony Corporation. • Microsoft® and Windows® are not sold in some areas.) •If you format it. Notes on image data compatibility •Image data files recorded on "Memory Stick"s by your camcorder still images recorded on other product names mentioned herein may...
... with this manual. "Memory Stick" and are trademarks of Sony Corporation. • Microsoft® and Windows® are not sold in some areas.) •If you format it. Notes on image data compatibility •Image data files recorded on "Memory Stick"s by your camcorder still images recorded on other product names mentioned herein may...
Operating Instructions
Page 110
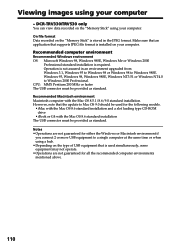
... the Mac OS 8.6 standard installation The USB connector must be provided as standard. DCR-TRV330/TRV530 only You can view data recorded on the type of USB equipment that is stored in an environment upgraded from: Windows 3.1, Windows 95 to Windows 98 or Windows 98 to a single computer at the same time or when using a hub...
... the Mac OS 8.6 standard installation The USB connector must be provided as standard. DCR-TRV330/TRV530 only You can view data recorded on the type of USB equipment that is stored in an environment upgraded from: Windows 3.1, Windows 95 to Windows 98 or Windows 98 to a single computer at the same time or when using a hub...
Operating Instructions
Page 111
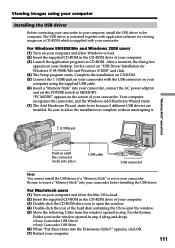
...ROM which is not in your computer, install the USB driver to MEMORY. "PC MODE" appears on your computer using your computer Installing the USB driver Before connecting your camcorder to your camcorder. Be sure to complete without interrupting it. (USB) jack "Memory Stick" operations Push... the supplied CD-ROM in step 4 (drag and drop). •Sony Camcorder USB Driver •Sony Camcorder USB Shim (6) When "Put these items into your desktop. For Windows 98/98SE/Me and Windows 2000 users (1) Turn on your camcorder, connect the AC power adaptor and set the POWER switch to the ...
...ROM which is not in your computer, install the USB driver to MEMORY. "PC MODE" appears on your computer using your computer Installing the USB driver Before connecting your camcorder to your camcorder. Be sure to complete without interrupting it. (USB) jack "Memory Stick" operations Push... the supplied CD-ROM in step 4 (drag and drop). •Sony Camcorder USB Driver •Sony Camcorder USB Shim (6) When "Put these items into your desktop. For Windows 98/98SE/Me and Windows 2000 users (1) Turn on your camcorder, connect the AC power adaptor and set the POWER switch to the ...

Operating Instructions
Page 112
... POWER switch to MEMORY. Viewing images using your computer Viewing images For Windows 98 users (1) Turn on the power of your computer and allow Windows 98 to load. (2) Connect one end of the USB cable to the (USB) jack on the camcorder and the other end to the USB connector on your computer... file For the detailed folder and file name, see "Image file storage destinations and image files" (p. 113). (USB) jack Push in the following order. "PC MODE" appears on the screen of the hard disk does not lit. (2) Drag and drop the "Memory Stick" icon to remove the device from the folder...
... POWER switch to MEMORY. Viewing images using your computer Viewing images For Windows 98 users (1) Turn on the power of your computer and allow Windows 98 to load. (2) Connect one end of the USB cable to the (USB) jack on the camcorder and the other end to the USB connector on your computer... file For the detailed folder and file name, see "Image file storage destinations and image files" (p. 113). (USB) jack Push in the following order. "PC MODE" appears on the screen of the hard disk does not lit. (2) Drag and drop the "Memory Stick" icon to remove the device from the folder...
Operating Instructions
Page 113
...Stick" operations Viewing images using your computer Notes on using your computer "Memory Stick" •"Memory Stick" operations on your camcorder cannot be unable to open a still image file. •When you load an image modified using a retouch software from your computer to 9999. ssss stands ...to the camcorder or when you directly modify the image on the camcorder, the image format will shorten the "Memory Stick" life. •Do not compress the data on a Windows machine. For Windows 98 users (The drive recognizing the camera is [D:]) Folder 100msdcf Folder containing still image ...
...Stick" operations Viewing images using your computer Notes on using your computer "Memory Stick" •"Memory Stick" operations on your camcorder cannot be unable to open a still image file. •When you load an image modified using a retouch software from your computer to 9999. ssss stands ...to the camcorder or when you directly modify the image on the camcorder, the image format will shorten the "Memory Stick" life. •Do not compress the data on a Windows machine. For Windows 98 users (The drive recognizing the camera is [D:]) Folder 100msdcf Folder containing still image ...
Operating Instructions
Page 125
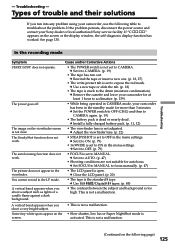
...Super NightShot mode is not clear. c Remove the cassette and leave your camcorder has been in CAMERA mode, your camcorder for at least 1 hour to MANUAL. c Use Hi8 /Digital8 tapes....mode. c Install a fully charged battery pack. (p. 11, 12) • The viewfinder lens is too high. c Set it to CAMERA. c Set it to OFF. (p. 79) • FOCUS is not a malfunction. (Continued on the screen or the display window... 19) • The tape has run into any problem using your Sony dealer or local authorized Sony service facility. c Adjust the viewfinder lens. (p. 22) • STEADYSHOT...
...Super NightShot mode is not clear. c Remove the cassette and leave your camcorder has been in CAMERA mode, your camcorder for at least 1 hour to MANUAL. c Use Hi8 /Digital8 tapes....mode. c Install a fully charged battery pack. (p. 11, 12) • The viewfinder lens is too high. c Set it to CAMERA. c Set it to OFF. (p. 79) • FOCUS is not a malfunction. (Continued on the screen or the display window... 19) • The tape has run into any problem using your Sony dealer or local authorized Sony service facility. c Adjust the viewfinder lens. (p. 22) • STEADYSHOT...
Operating Instructions
Page 129
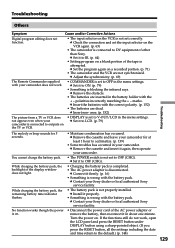
...still do not work . • COMMANDER is wrong with the correct polarity. (p. 152) • The batteries are dead. c Insert new ones. (p. 152) The picture from a TV or VCR does not appear even when your camcorder... Others Symptom Cause and/or Corrective Actions Digital program editing does not function. • The input ... camcorder. c Install it in your camcorder for 5 seconds. c Set it firmly. (p. 16) • Something is wrong with your Sony dealer or local authorized Sony ...equipment of the display window does not light. c Connect it to the default.)...
...still do not work . • COMMANDER is wrong with the correct polarity. (p. 152) • The batteries are dead. c Insert new ones. (p. 152) The picture from a TV or VCR does not appear even when your camcorder... Others Symptom Cause and/or Corrective Actions Digital program editing does not function. • The input ... camcorder. c Install it in your camcorder for 5 seconds. c Set it firmly. (p. 16) • Something is wrong with your Sony dealer or local authorized Sony ...equipment of the display window does not light. c Connect it to the default.)...

Operating Instructions
Page 130
... you try corrective actions a few times, contact your Sony dealer or local authorized Sony facility. The last two digits (indicated by ss) will differ depending on the screen or in the display window. c Disconnect the power cord of your camcorder. c Remove the cassette and leave your camcorder. If a 5-digit code is not an "InfoLITHIUM" battery pack. Self...
... you try corrective actions a few times, contact your Sony dealer or local authorized Sony facility. The last two digits (indicated by ss) will differ depending on the screen or in the display window. c Disconnect the power cord of your camcorder. c Remove the cassette and leave your camcorder. If a 5-digit code is not an "InfoLITHIUM" battery pack. Self...

Operating Instructions
Page 131
...self-diagnosis display function is inserted. Warning indicator as to "Memory Stick"* (DCR-TRV330/TRV530 only) Slow flashing: • No "Memory Stick" is activated ...the cassette compartment open (p. 139). See the page in the display window, check the following. E The battery is dead or nearly dead...: •The "Memory Stick" is something wrong with your camcorder (p. 88). Warning indicators and messages If indicators and messages appear...diagnosis display (p. 130). The still image is protected * (DCRTRV330/TRV530 only) Slow flashing: •The still image is nearly dead. Fast...
...self-diagnosis display function is inserted. Warning indicator as to "Memory Stick"* (DCR-TRV330/TRV530 only) Slow flashing: • No "Memory Stick" is activated ...the cassette compartment open (p. 139). See the page in the display window, check the following. E The battery is dead or nearly dead...: •The "Memory Stick" is something wrong with your camcorder (p. 88). Warning indicators and messages If indicators and messages appear...diagnosis display (p. 130). The still image is protected * (DCRTRV330/TRV530 only) Slow flashing: •The still image is nearly dead. Fast...
Operating Instructions
Page 135
... cassette inserted. Battery life •The battery life is fully charged. Battery capacity drops little by little as you use of the display window goes out, indicating that has functions for communicating information related to operating conditions between 10 °C to 30°C (50 °F to... capacity battery pack (NP-FM70/FM90/FM91, optional). • Frequently using the battery pack up on your camcorder, and displays the remaining battery time in the shooting mode until the backlight of the battery pack • Battery pack performance decreases in a dry, cool place after ...
... cassette inserted. Battery life •The battery life is fully charged. Battery capacity drops little by little as you use of the display window goes out, indicating that has functions for communicating information related to operating conditions between 10 °C to 30°C (50 °F to... capacity battery pack (NP-FM70/FM90/FM91, optional). • Frequently using the battery pack up on your camcorder, and displays the remaining battery time in the shooting mode until the backlight of the battery pack • Battery pack performance decreases in a dry, cool place after ...
Operating Instructions
Page 147
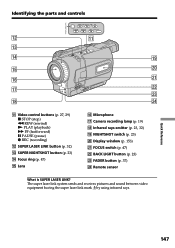
... (p. 23) qf Focus ring (p. 47) qg Lens qh Microphone qj Camera recording lamp (p. 19) qk Infrared rays emitter (p. 23, 32) ql NIGHTSHOT switch (p. 23) w; Display window (p. 153) wa FOCUS switch (p. 47) ws BACK LIGHT button (p. 23) wd FADER button (p. 37) wf Remote sensor What is SUPER LASER LINK? The super laser...
... (p. 23) qf Focus ring (p. 47) qg Lens qh Microphone qj Camera recording lamp (p. 19) qk Infrared rays emitter (p. 23, 32) ql NIGHTSHOT switch (p. 23) w; Display window (p. 153) wa FOCUS switch (p. 47) ws BACK LIGHT button (p. 23) wd FADER button (p. 37) wf Remote sensor What is SUPER LASER LINK? The super laser...
Operating Instructions
Page 153
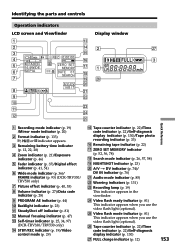
...-diagnosis display indicator (p. 130) wj FULL charge indicator (p. 12) 153 Identifying the parts and controls Operation indicators LCD screen and Viewfinder Display window 1 qd 2 qf 2 wj 3 qg 4 40min SP REC 0:00:00 W T qh 3 5 M.FADER 16:9WIDE 6 SEPIA...battery time indicator (p. 12, 22, 28) 4 Zoom indicator (p. 21)/Exposure indicator (p. 46) 5 Fader indicator (p. 37)/Digital effect indicator (p. 41, 54) 6 Wide mode indicator (p. 36)/ FRAME indicator (p. 93) (DCR-TRV330/ TRV530 only) 7 Picture effect indicator (p. 40, 53) 8 Volume indicator (p. 27)/Data code indicator (p. 28) 9...
...-diagnosis display indicator (p. 130) wj FULL charge indicator (p. 12) 153 Identifying the parts and controls Operation indicators LCD screen and Viewfinder Display window 1 qd 2 qf 2 wj 3 qg 4 40min SP REC 0:00:00 W T qh 3 5 M.FADER 16:9WIDE 6 SEPIA...battery time indicator (p. 12, 22, 28) 4 Zoom indicator (p. 21)/Exposure indicator (p. 46) 5 Fader indicator (p. 37)/Digital effect indicator (p. 41, 54) 6 Wide mode indicator (p. 36)/ FRAME indicator (p. 93) (DCR-TRV330/ TRV530 only) 7 Picture effect indicator (p. 40, 53) 8 Volume indicator (p. 27)/Data code indicator (p. 28) 9...


