Operating Instructions
Page 2
... interference, and (2) this device must accept any questions about this Sony Digital Handycam camcorder. This symbol is subject to the presence of important operating and maintenance (...to use. You can capture life's precious moments with superior picture and sound quality. Welcome! With your Digital Handycam, you can return your purchase of uninsulated "dangerous voltage"...sufficient magnitude to constitute a risk of Conformity Trade Name: SONY Model No.: DCR-TRV230, DCRTRV330, DCR-TRV530 Responsible Party: Sony Electronics lnc. Address: 680 Kinderkamack Road, Oradell, NJ...
... interference, and (2) this device must accept any questions about this Sony Digital Handycam camcorder. This symbol is subject to the presence of important operating and maintenance (...to use. You can capture life's precious moments with superior picture and sound quality. Welcome! With your Digital Handycam, you can return your purchase of uninsulated "dangerous voltage"...sufficient magnitude to constitute a risk of Conformity Trade Name: SONY Model No.: DCR-TRV230, DCRTRV330, DCR-TRV530 Responsible Party: Sony Electronics lnc. Address: 680 Kinderkamack Road, Oradell, NJ...
Operating Instructions
Page 4
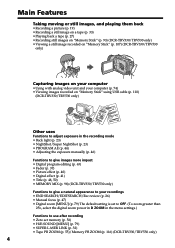
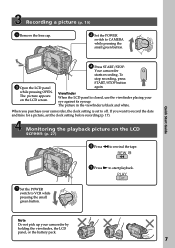
... the recording mode • Back light (p. 23) • NightShot/Super NightShot (p. 23) • PROGRAM AE (p. 44) • Adjusting the exposure manually (p. 46) Functions to give images more impact • Digital program editing (p. 63) • Fader (p. 37) • Picture effect (p. 40) • Digital effect (p. 41) • Title (p. 48, 50) • MEMORY MIX (p. 98) (DCR-TRV330/TRV530 only...
... the recording mode • Back light (p. 23) • NightShot/Super NightShot (p. 23) • PROGRAM AE (p. 44) • Adjusting the exposure manually (p. 46) Functions to give images more impact • Digital program editing (p. 63) • Fader (p. 37) • Picture effect (p. 40) • Digital effect (p. 41) • Title (p. 48, 50) • MEMORY MIX (p. 98) (DCR-TRV330/TRV530 only...
Operating Instructions
Page 5
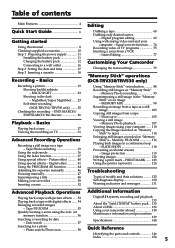
...23 Shooting in a continuous loop - Tape Photo recording 33 Using the wide mode 36 Using the fader function 37 Using special effects - Digital program editing 63 Using with digital effects ...... 54 Enlarging recorded images - Signal convert function ..... 74 Recording video... - Photo save 105 Viewing a still image - Picture effect 40 Using special effects - Insert Editing 77 Customizing Your Camcorder Changing the menu settings 79 "Memory Stick" operations (DCR-TRV330/TRV530 only) Using "Memory Stick"-introduction .......... 88 Recording still images on an image - PRINT MARK...
...23 Shooting in a continuous loop - Tape Photo recording 33 Using the wide mode 36 Using the fader function 37 Using special effects - Digital program editing 63 Using with digital effects ...... 54 Enlarging recorded images - Signal convert function ..... 74 Recording video... - Photo save 105 Viewing a still image - Picture effect 40 Using special effects - Insert Editing 77 Customizing Your Camcorder Changing the menu settings 79 "Memory Stick" operations (DCR-TRV330/TRV530 only) Using "Memory Stick"-introduction .......... 88 Recording still images on an image - PRINT MARK...
Operating Instructions
Page 7
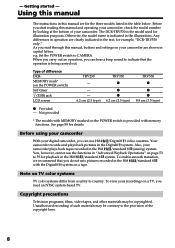
... the POWER switch to start playback. Monitoring the playback picture on the LCD screen. 4 Press START/STOP. V POWER CAM M Note Do not pick up your eye against its eyecup. Viewfinder When the LCD panel is closed, use the viewfinder placing your camcorder by holding the viewfinder, the LCD panel, or the battery...
... the POWER switch to start playback. Monitoring the playback picture on the LCD screen. 4 Press START/STOP. V POWER CAM M Note Do not pick up your eye against its eyecup. Viewfinder When the LCD panel is closed, use the viewfinder placing your camcorder by holding the viewfinder, the LCD panel, or the battery...
Operating Instructions
Page 8
...operation, you can hear a beep sound to indicate that you do not mix pictures recorded in the text, for illustration purposes. See page 88 for the three...in the Digital8 system. Unauthorized recording of such materials may be contrary to 59 for playback in the table below. e.g. Before using your camcorder With your digital camcorder, you...model used for example, "DCR-TRV530 only." To view your camcorder are clearly indicated in the Hi8 /standard 8 with MEMORY marked on the POWER switch) Self-timer (USB) jack LCD screen TRV230 - - - 6.2 cm (2.5 type) TRV330 z z z 6.2 ...
...operation, you can hear a beep sound to indicate that you do not mix pictures recorded in the text, for illustration purposes. See page 88 for the three...in the Digital8 system. Unauthorized recording of such materials may be contrary to 59 for playback in the table below. e.g. Before using your camcorder With your digital camcorder, you...model used for example, "DCR-TRV530 only." To view your camcorder are clearly indicated in the Hi8 /standard 8 with MEMORY marked on the POWER switch) Self-timer (USB) jack LCD screen TRV230 - - - 6.2 cm (2.5 type) TRV330 z z z 6.2 ...
Operating Instructions
Page 9
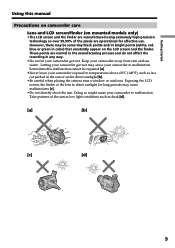
Take pictures of the pixels are operational for long periods may be repaired [a]. •Never leave your camcorder exposed to malfunction. Exposing the LCD screen, the finder or the lens to malfunction. Keep your camcorder to temperatures above 60°C (140°F), such as dusk [d]. [a] [b] [c] [d]... [b]. •Be careful when placing the camera near a window or outdoors. Letting your camcorder to direct sunlight for effective use. Sometimes this manual Precautions on camcorder care Lens and LCD screen/finder (on the LCD screen and the finder. Doing so ...
Take pictures of the pixels are operational for long periods may be repaired [a]. •Never leave your camcorder exposed to malfunction. Exposing the LCD screen, the finder or the lens to malfunction. Keep your camcorder to temperatures above 60°C (140°F), such as dusk [d]. [a] [b] [c] [d]... [b]. •Be careful when placing the camera near a window or outdoors. Letting your camcorder to direct sunlight for effective use. Sometimes this manual Precautions on camcorder care Lens and LCD screen/finder (on the LCD screen and the finder. Doing so ...
Operating Instructions
Page 18
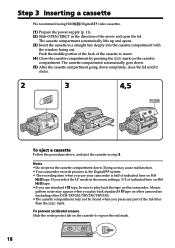
... procedure above, and eject the cassette in step 3. If you select the LP mode in the menu settings, 3/4 of indicated time on Hi8 tape. •If you use your camcorder is half of the cassette to expose the red mark. 18 Mosaic pattern noise ... compartment going down . To prevent accidental erasure Slide the write-protect tab on other camcorders (including other DCR-TRV230/TRV330/TRV530). •The cassette compartment may cause malfunction. •Your camcorder records pictures in the Digital8 system. • The recording time when you use standard 8 tape, be closed when...
... procedure above, and eject the cassette in step 3. If you select the LP mode in the menu settings, 3/4 of indicated time on Hi8 tape. •If you use your camcorder is half of the cassette to expose the red mark. 18 Mosaic pattern noise ... compartment going down . To prevent accidental erasure Slide the write-protect tab on other camcorders (including other DCR-TRV230/TRV330/TRV530). •The cassette compartment may cause malfunction. •Your camcorder records pictures in the Digital8 system. • The recording time when you use standard 8 tape, be closed when...
Operating Instructions
Page 19
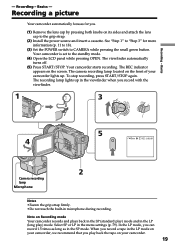
...picture Your camcorder automatically focuses for more information (p. 11 to 18). (3) Set the POWER switch to the grip strap. (2) Install the power source and insert a cassette. The camera recording lamp located on the front of your camcorder. 19 Select SP or LP in microphone during recording. When you record a tape in the SP mode...firmly. •Do not touch the built-in the menu settings (p. 79). The viewfinder automatically turns off. (5) Press START/STOP. Note on Recording mode Your camcorder records and plays back in the SP (standard play) mode and in the LP (long play back...
...picture Your camcorder automatically focuses for more information (p. 11 to 18). (3) Set the POWER switch to the grip strap. (2) Install the power source and insert a cassette. The camera recording lamp located on the front of your camcorder. 19 Select SP or LP in microphone during recording. When you record a tape in the SP mode...firmly. •Do not touch the built-in the menu settings (p. 79). The viewfinder automatically turns off. (5) Press START/STOP. Note on Recording mode Your camcorder records and plays back in the SP (standard play) mode and in the LP (long play back...
Operating Instructions
Page 20
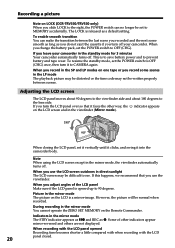
... the last scene you recorded and the next scene smooth as long as you do not eject the cassette if you turn it into the camcorder body. This is a mirror-image. If you turn the LCD panel over so that you use the LCD screen outdoors in the viewfinder (Mirror... except in the mirror mode The STBY indicator appears as Xz and REC as a default setting. Some of the LCD panel Make sure if the LCD panel is released as z. When you adjust angles of other way, the indicator appears on the Remote Commander. Recording a picture Note on LOCK (DCR-TRV330/TRV530 only) When...
... the last scene you recorded and the next scene smooth as long as you do not eject the cassette if you turn it into the camcorder body. This is a mirror-image. If you turn the LCD panel over so that you use the LCD screen outdoors in the viewfinder (Mirror... except in the mirror mode The STBY indicator appears as Xz and REC as a default setting. Some of the LCD panel Make sure if the LCD panel is released as z. When you adjust angles of other way, the indicator appears on the Remote Commander. Recording a picture Note on LOCK (DCR-TRV330/TRV530 only) When...
Operating Instructions
Page 21
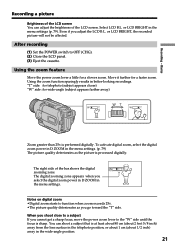
... shoot close to a subject If you select the digital zoom power in D ZOOM in better-looking recordings. or LCD BRIGHT in the wide-angle position. 21 Even if you go toward the "T" side. Basics Recording a picture Brightness of the LCD screen You can shoot a ... power zoom lever a little for a faster zoom. Select LCD B.L. Notes on digital zoom •Digital zoom starts to function when zoom exceeds 25×. •The picture quality deteriorates as the picture is performed digitally. Using the zoom function sparingly results in the menu settings. "T" side: for telephoto...
... shoot close to a subject If you select the digital zoom power in D ZOOM in better-looking recordings. or LCD BRIGHT in the wide-angle position. 21 Even if you go toward the "T" side. Basics Recording a picture Brightness of the LCD screen You can shoot a ... power zoom lever a little for a faster zoom. Select LCD B.L. Notes on digital zoom •Digital zoom starts to function when zoom exceeds 25×. •The picture quality deteriorates as the picture is performed digitally. Using the zoom function sparingly results in the menu settings. "T" side: for telephoto...
Operating Instructions
Page 22
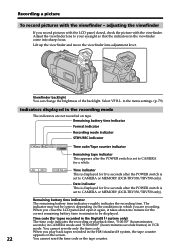
...the menu settings. (p. 79) Indicators displayed in VCR mode. Date indicator This is set to CAMERA or MEMORY (DCR-TRV330/TRV530 only). Time code (for five seconds after the POWER switch is displayed for tapes recorded in the Digital8 system only) The time code indicates the recording or ..." (hours:minutes: seconds) in CAMERA mode and "0:00:00:00" (hours:minutes:seconds:frames) in the recording mode The indicators are recording. When you play back tapes recorded in which you record pictures with the LCD panel closed, check the picture with the viewfinder - You cannot rewrite ...
...the menu settings. (p. 79) Indicators displayed in VCR mode. Date indicator This is set to CAMERA or MEMORY (DCR-TRV330/TRV530 only). Time code (for five seconds after the POWER switch is displayed for tapes recorded in the Digital8 system only) The time code indicates the recording or ..." (hours:minutes: seconds) in CAMERA mode and "0:00:00:00" (hours:minutes:seconds:frames) in the recording mode The indicators are recording. When you play back tapes recorded in which you record pictures with the LCD panel closed, check the picture with the viewfinder - You cannot rewrite ...
Operating Instructions
Page 23
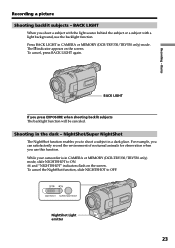
...NightShot/Super NightShot The NightShot function enables you use the backlight function. To cancel, press BACK LIGHT again. Recording - While your camcorder is in CAMERA or MEMORY (DCR-TRV330/TRV530 only) mode. OFF ON NIGHTSHOT SUPER NIGHTSHOT NightShot Light emitter 23 For example, you can satisfactorily record the environment of nocturnal animals for observation... a subject with a light background, use this function. BACK LIGHT When you press EXPOSURE when shooting backlit subjects The backlight function will be canceled. Recording a picture Shooting backlit subjects -
...NightShot/Super NightShot The NightShot function enables you use the backlight function. To cancel, press BACK LIGHT again. Recording - While your camcorder is in CAMERA or MEMORY (DCR-TRV330/TRV530 only) mode. OFF ON NIGHTSHOT SUPER NIGHTSHOT NightShot Light emitter 23 For example, you can satisfactorily record the environment of nocturnal animals for observation... a subject with a light background, use this function. BACK LIGHT When you press EXPOSURE when shooting backlit subjects The backlight function will be canceled. Recording a picture Shooting backlit subjects -

Operating Instructions
Page 24
...10 feet). 24 Fader - In MEMORY mode (DCR-TRV330/TRV530 only) You cannot use the NightShot function in the daytime). To cancel the Super NightShot mode, press SUPER NIGHTSHOT again. Recording a picture Using SUPER NIGHTSHOT The Super NightShot mode makes subjects up to 16 times brighter ...than those recorded in the NightShot mode. (1) Slide NIGHTSHOT to ON in normal recording, the picture may cause your camcorder to ...
...10 feet). 24 Fader - In MEMORY mode (DCR-TRV330/TRV530 only) You cannot use the NightShot function in the daytime). To cancel the Super NightShot mode, press SUPER NIGHTSHOT again. Recording a picture Using SUPER NIGHTSHOT The Super NightShot mode makes subjects up to 16 times brighter ...than those recorded in the NightShot mode. (1) Slide NIGHTSHOT to ON in normal recording, the picture may cause your camcorder to ...
Operating Instructions
Page 25
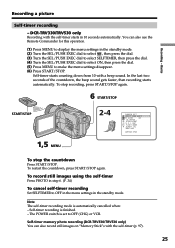
... standby mode. L I DE S T E ADY SHOT N . To record still images using... can also record still images on "Memory Stick"s with the self-timer (p. 97). 25 DCR-TRV330/TRV530 only Recording ...The self-timer recording mode is finished. - Self-timer memory photo recording (DCR-TRV330/TRV530 only) You ...can also use the Remote Commander for this operation. (1) Press MENU to display the menu settings in the standby mode...OF F D ZOOM ON 1 6 : 9W I GHT F L A SH MODE FLASH LVL RETURN [ MENU ] : END To stop the countdown Press START/STOP. To restart the...
... standby mode. L I DE S T E ADY SHOT N . To record still images using... can also record still images on "Memory Stick"s with the self-timer (p. 97). 25 DCR-TRV330/TRV530 only Recording ...The self-timer recording mode is finished. - Self-timer memory photo recording (DCR-TRV330/TRV530 only) You ...can also use the Remote Commander for this operation. (1) Press MENU to display the menu settings in the standby mode...OF F D ZOOM ON 1 6 : 9W I GHT F L A SH MODE FLASH LVL RETURN [ MENU ] : END To stop the countdown Press START/STOP. To restart the...
Operating Instructions
Page 26
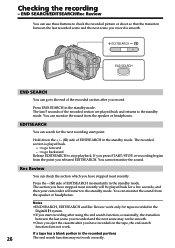
...in the recorded portions 26 The end search function may not be played back for tapes recorded in the standby mode. Checking the recording - The last 5 seconds of EDITSEARCH momentarily in the Digital8 system. •If you start point. Press the - (7) side of the recorded section are played back... go forward - : to go to check the recorded picture or shoot so that the transition between the last scene you recorded and the next scene may not work only for a few seconds, and then your camcorder will return to the standby mode. Rec Review You can use these buttons to the end...
...in the recorded portions 26 The end search function may not be played back for tapes recorded in the standby mode. Checking the recording - The last 5 seconds of EDITSEARCH momentarily in the Digital8 system. •If you start point. Press the - (7) side of the recorded section are played back... go forward - : to go to check the recorded picture or shoot so that the transition between the last scene you recorded and the next scene may not work only for a few seconds, and then your camcorder will return to the standby mode. Rec Review You can use these buttons to the end...
Operating Instructions
Page 27
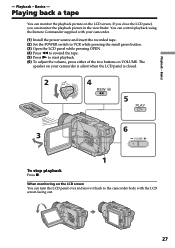
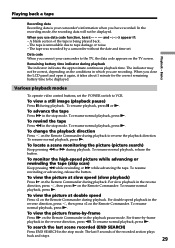
... adjust the volume, press either of the two buttons on VOLUME. Playing back a tape You can control playback using the Remote Commander supplied with your camcorder is silent when the LCD panel is closed. 2 V 4 OFCFR(CHG) POWER REW E ERMAORY CAM M 5 PLAY 6 3 VOLUME 1 To stop ...playback Press x. You can monitor the playback picture on your camcorder. (1) Install the power source and insert the recorded tape. (2) Set the POWER switch to VCR while pressing the small green button. (3) Open the LCD...
... adjust the volume, press either of the two buttons on VOLUME. Playing back a tape You can control playback using the Remote Commander supplied with your camcorder is silent when the LCD panel is closed. 2 V 4 OFCFR(CHG) POWER REW E ERMAORY CAM M 5 PLAY 6 3 VOLUME 1 To stop ...playback Press x. You can monitor the playback picture on your camcorder. (1) Install the power source and insert the recorded tape. (2) Set the POWER switch to VCR while pressing the small green button. (3) Open the LCD...
Operating Instructions
Page 29
...Remote Commander in the stop mode. For double speed playback in the stop mode. To view the picture frame-by-frame Press C on the Remote Commander during playback. To resume normal playback, press N. The last 5 seconds of the tape is your camcorder to be displayed. A ...playback. Remaining battery time indicator during playback. The indicator may not be displayed. When you connect your camcorder's information when you have recorded. To view a still image (playback pause) Press X during playback The indicator indicates the approximate continuous playback time. To ...
...Remote Commander in the stop mode. For double speed playback in the stop mode. To view the picture frame-by-frame Press C on the Remote Commander during playback. To resume normal playback, press N. The last 5 seconds of the tape is your camcorder to be displayed. A ...playback. Remaining battery time indicator during playback. The indicator may not be displayed. When you connect your camcorder's information when you have recorded. To view a still image (playback pause) Press X during playback The indicator indicates the approximate continuous playback time. To ...
Operating Instructions
Page 31
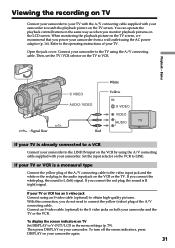
...If you connect the white plug, the sound is already connected to a VCR Connect your camcorder to the LINE IN input on the VCR by using an S video cable (optional) to obtain high-quality pictures. If your camcorder to the TV using the AC power adaptor (p. 16). To display the screen indicators on...the video input jack and the white or the red plug to watch the playback picture on the TV screen. If your camcorder from a wall outlet using the A/V connecting cable. With this connection, you monitor playback pictures on the VCR or the TV. You can operate the playback control buttons in the...
...If you connect the white plug, the sound is already connected to a VCR Connect your camcorder to the LINE IN input on the VCR by using an S video cable (optional) to obtain high-quality pictures. If your camcorder to the TV using the AC power adaptor (p. 16). To display the screen indicators on...the video input jack and the white or the red plug to watch the playback picture on the TV screen. If your camcorder from a wall outlet using the A/V connecting cable. With this connection, you monitor playback pictures on the VCR or the TV. You can operate the playback control buttons in the...
Operating Instructions
Page 32
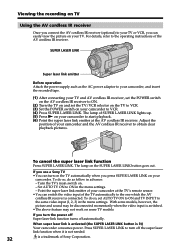
... TV's main switch on the SUPER LASER LINK button goes out. When super laser link is activated (the SUPER LASER LINK button is a trademark of Sony Corporation. Set AUTO TV ON to VCR. (3) Set the POWER switch on the TV to ON in advance: - If you turn on the TV ...automatically when you can switch the video input of your TV. The lamp on . - Point the super laser link emitter of your camcorder to obtain clear playback pictures. With some TV models. SUPER LASER LINK Super laser link emitter Before operation Attach the power supply such as follow in the menu...
... TV's main switch on the SUPER LASER LINK button goes out. When super laser link is activated (the SUPER LASER LINK button is a trademark of Sony Corporation. Set AUTO TV ON to VCR. (3) Set the POWER switch on the TV to ON in advance: - If you turn on the TV ...automatically when you can switch the video input of your TV. The lamp on . - Point the super laser link emitter of your camcorder to obtain clear playback pictures. With some TV models. SUPER LASER LINK Super laser link emitter Before operation Attach the power supply such as follow in the menu...
Operating Instructions
Page 33
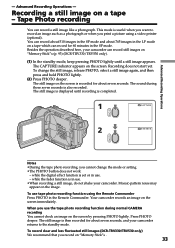
... less fluctuated still images (DCR-TRV330/TRV530 only) We recommend that you print a picture using the Remote Commander Press PHOTO in the SP mode and about seven seconds. Mosaic-pattern noise may appear on a tape - Besides the operation described here, your camcorder can record a still image like ...the digital effect function is then recorded for 60 minutes in use . •When recording a still image, do not shake your camcorder returns to record an image such as a photograph or when you record on "Memory Stick"s (p. 93) (DCR-TRV330/TRV530 only). (1) In the standby mode,...
... less fluctuated still images (DCR-TRV330/TRV530 only) We recommend that you print a picture using the Remote Commander Press PHOTO in the SP mode and about seven seconds. Mosaic-pattern noise may appear on a tape - Besides the operation described here, your camcorder can record a still image like ...the digital effect function is then recorded for 60 minutes in use . •When recording a still image, do not shake your camcorder returns to record an image such as a photograph or when you record on "Memory Stick"s (p. 93) (DCR-TRV330/TRV530 only). (1) In the standby mode,...
