Operating Instructions
Page 2
... may not cause harmful interference, and (2) this Sony Digital Handycam camcorder. For customers in the sun or under direct sunlight. If you have any interference received, including interference that you can return your purchase of Conformity Trade Name: SONY Model No.: DCR-TRV230, DCRTRV330, DCR-TRV530 Responsible Party: Sony Electronics lnc. and CANADA DISPOSAL OF LITHIUM ION...
... may not cause harmful interference, and (2) this Sony Digital Handycam camcorder. For customers in the sun or under direct sunlight. If you have any interference received, including interference that you can return your purchase of Conformity Trade Name: SONY Model No.: DCR-TRV230, DCRTRV330, DCR-TRV530 Responsible Party: Sony Electronics lnc. and CANADA DISPOSAL OF LITHIUM ION...
Operating Instructions
Page 4
... the recording mode • Back light (p. 23) • NightShot/Super NightShot (p. 23) • PROGRAM AE (p. 44) • Adjusting the exposure manually (p. 46) Functions to give images more impact • Digital program editing (p. 63) • Fader (p. 37) • Picture effect (p. 40) • Digital effect (p. 41) • Title (p. 48, 50) • MEMORY MIX (p. 98) (DCR-TRV330/TRV530 only...
... the recording mode • Back light (p. 23) • NightShot/Super NightShot (p. 23) • PROGRAM AE (p. 44) • Adjusting the exposure manually (p. 46) Functions to give images more impact • Digital program editing (p. 63) • Fader (p. 37) • Picture effect (p. 40) • Digital effect (p. 41) • Title (p. 48, 50) • MEMORY MIX (p. 98) (DCR-TRV330/TRV530 only...
Operating Instructions
Page 5
... Your Camcorder Changing the menu settings 79 "Memory Stick" operations (DCR-TRV330/TRV530 only) Using "Memory Stick"-introduction .......... 88 Recording still images on an image - Tape PB ZOOM 55 Quickly locating a scene using your computer - Basics Recording a picture 19 Shooting backlit subjects - NightShot/Super NightShot ...... 23 Self-timer recording (DCR-TRV330/TRV530 only) ....... 25 Checking the recording - Digital...
... Your Camcorder Changing the menu settings 79 "Memory Stick" operations (DCR-TRV330/TRV530 only) Using "Memory Stick"-introduction .......... 88 Recording still images on an image - Tape PB ZOOM 55 Quickly locating a scene using your computer - Basics Recording a picture 19 Shooting backlit subjects - NightShot/Super NightShot ...... 23 Self-timer recording (DCR-TRV330/TRV530 only) ....... 25 Checking the recording - Digital...
Operating Instructions
Page 7
... Viewfinder When the LCD panel is black and white. Monitoring the playback picture on the LCD screen. 4 Press START/STOP. The picture appears on the LCD screen (p. 27) 2 Press m to rewind the tape. If you purchase your camcorder by holding the viewfinder, the LCD panel, or the battery pack. ...7 PLAY OFCFR(CHG) 1 Set the POWER switch to start playback. The picture in the viewfinder is closed, use the viewfinder placing your eye against its ...
... Viewfinder When the LCD panel is black and white. Monitoring the playback picture on the LCD screen. 4 Press START/STOP. The picture appears on the LCD screen (p. 27) 2 Press m to rewind the tape. If you purchase your camcorder by holding the viewfinder, the LCD panel, or the battery pack. ...7 PLAY OFCFR(CHG) 1 Set the POWER switch to start playback. The picture in the viewfinder is closed, use the viewfinder placing your eye against its ...
Operating Instructions
Page 8
... and operating your digital camcorder, you can use the functions in the Hi8 /standard 8 with MEMORY marked on page 53 to country. Not provided * The models with the Digital8 system on TV color systems TV color systems differ from country to 59 for example, "DCR-TRV530 only." As you do not mix pictures recorded in...
... and operating your digital camcorder, you can use the functions in the Hi8 /standard 8 with MEMORY marked on page 53 to country. Not provided * The models with the Digital8 system on TV color systems TV color systems differ from country to 59 for example, "DCR-TRV530 only." As you do not mix pictures recorded in...
Operating Instructions
Page 9
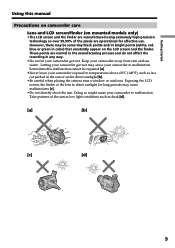
Letting your camcorder exposed to malfunction. Take pictures of the pixels are operational for long periods may cause your camcorder get wet may cause malfunctions [c]. •Do not directly shoot the sun. However, there may be repaired [a]. •Never leave your camcorder get wet. Getting started Using this ... so over 99.99% of the sun in low light conditions such as in a car parked in any way. •Do not let your camcorder to temperatures above 60°C (140°F), such as dusk [d]. [a] [b] [c] [d] 9 These points are normal in the manufacturing process and ...
Letting your camcorder exposed to malfunction. Take pictures of the pixels are operational for long periods may cause your camcorder get wet may cause malfunctions [c]. •Do not directly shoot the sun. However, there may be repaired [a]. •Never leave your camcorder get wet. Getting started Using this ... so over 99.99% of the sun in low light conditions such as in a car parked in any way. •Do not let your camcorder to temperatures above 60°C (140°F), such as dusk [d]. [a] [b] [c] [d] 9 These points are normal in the manufacturing process and ...
Operating Instructions
Page 18
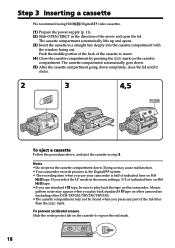
... pictures in step 3. Notes •Do not press the cassette compartment down completely, close the lid until it clicks. 2 3 4,5 4 5 To eject a cassette Follow the procedure above, and eject the cassette in the Digital8 system. • The recording time when you use your camcorder is ... the mark. To prevent accidental erasure Slide the write-protect tab on other camcorders (including other DCR-TRV230/TRV330/TRV530). •The cassette compartment may appear when you select the LP mode in a straight line deeply into the cassette compartment with the window facing out...
... pictures in step 3. Notes •Do not press the cassette compartment down completely, close the lid until it clicks. 2 3 4,5 4 5 To eject a cassette Follow the procedure above, and eject the cassette in the Digital8 system. • The recording time when you use your camcorder is ... the mark. To prevent accidental erasure Slide the write-protect tab on other camcorders (including other DCR-TRV230/TRV330/TRV530). •The cassette compartment may appear when you select the LP mode in a straight line deeply into the cassette compartment with the window facing out...
Operating Instructions
Page 19
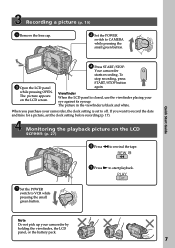
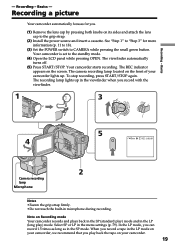
... firmly. •Do not touch the built-in the LP (long play back the tape on its sides and attach the lens cap to the grip strap. (2) Install the power source and insert a cassette. Basics - Recording a picture Your camcorder automatically focuses for more information (p. 11 to... 18). (3) Set the POWER switch to the standby mode. (4) Open the LCD panel while pressing OPEN. Your camcorder is set to CAMERA while pressing the small green button. Note ...
... firmly. •Do not touch the built-in the LP (long play back the tape on its sides and attach the lens cap to the grip strap. (2) Install the power source and insert a cassette. Basics - Recording a picture Your camcorder automatically focuses for more information (p. 11 to... 18). (3) Set the POWER switch to the standby mode. (4) Open the LCD panel while pressing OPEN. Your camcorder is set to CAMERA while pressing the small green button. Note ...
Operating Instructions
Page 20
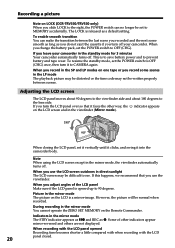
... POWER switch to OFF (CHG). Recording a picture Note on LOCK (DCR-TRV330/TRV530 only) When you slide LOCK to the right, the POWER switch can make the transition between scenes. When you record in the standby mode for 3 minutes Your camcorder automatically turns off. To resume the standby mode, set it vertically until it clicks, and...
... POWER switch to OFF (CHG). Recording a picture Note on LOCK (DCR-TRV330/TRV530 only) When you slide LOCK to the right, the POWER switch can make the transition between scenes. When you record in the standby mode for 3 minutes Your camcorder automatically turns off. To resume the standby mode, set it vertically until it clicks, and...
Operating Instructions
Page 21
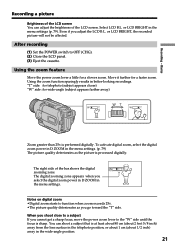
...move the power zoom lever to the "W" side until the focus is processed digitally. After recording (1) Set the POWER switch to function when zoom exceeds 25×. •The picture quality deteriorates as the picture is sharp. When you shoot close to a subject If you go toward ... Using the zoom function sparingly results in the menu settings (p. 79). Basics Recording a picture Brightness of the bar shows the digital zooming zone. Select LCD B.L. To activate digital zoom, select the digital zoom power in D ZOOM in the wide-angle position. 21 The right side of the...
...move the power zoom lever to the "W" side until the focus is processed digitally. After recording (1) Set the POWER switch to function when zoom exceeds 25×. •The picture quality deteriorates as the picture is sharp. When you shoot close to a subject If you go toward ... Using the zoom function sparingly results in the menu settings (p. 79). Basics Recording a picture Brightness of the bar shows the digital zooming zone. Select LCD B.L. To activate digital zoom, select the digital zoom power in D ZOOM in the wide-angle position. 21 The right side of the...
Operating Instructions
Page 22
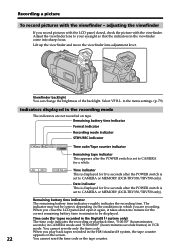
...Digital8 system only) The time code indicates the recording or playback time, "0:00:00" (hours:minutes: seconds) in CAMERA mode and "0:00:00:00" (hours:minutes:seconds:frames) in the recording mode The indicators are recording. Time code (for five seconds after the POWER switch is set to CAMERA or MEMORY (DCR-TRV330.../TRV530 only). Recording a picture To record pictures with the viewfinder. adjusting the viewfinder If...
...Digital8 system only) The time code indicates the recording or playback time, "0:00:00" (hours:minutes: seconds) in CAMERA mode and "0:00:00:00" (hours:minutes:seconds:frames) in the recording mode The indicators are recording. Time code (for five seconds after the POWER switch is set to CAMERA or MEMORY (DCR-TRV330.../TRV530 only). Recording a picture To record pictures with the viewfinder. adjusting the viewfinder If...
Operating Instructions
Page 23
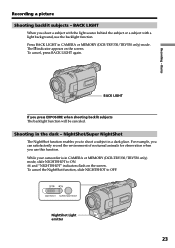
Press BACK LIGHT in the dark - Shooting in CAMERA or MEMORY (DCR-TRV330/TRV530 only) mode. The . To cancel, press BACK LIGHT again. Basics BACK LIGHT If you shoot a subject with the light source behind the subject or a ...NightShot function enables you use the backlight function. While your camcorder is in CAMERA or MEMORY (DCR-TRV330/TRV530 only) mode, slide NIGHTSHOT to shoot a subject in a dark place. and "NIGHTSHOT" indicators flash on the screen. indicator appears on the screen. Recording a picture Shooting backlit subjects - BACK LIGHT When you press EXPOSURE...
Press BACK LIGHT in the dark - Shooting in CAMERA or MEMORY (DCR-TRV330/TRV530 only) mode. The . To cancel, press BACK LIGHT again. Basics BACK LIGHT If you shoot a subject with the light source behind the subject or a ...NightShot function enables you use the backlight function. While your camcorder is in CAMERA or MEMORY (DCR-TRV330/TRV530 only) mode, slide NIGHTSHOT to shoot a subject in a dark place. and "NIGHTSHOT" indicators flash on the screen. indicator appears on the screen. Recording a picture Shooting backlit subjects - BACK LIGHT When you press EXPOSURE...

Operating Instructions
Page 24
... NightShot Light rays are infrared and so are invisible. In MEMORY mode (DCR-TRV330/TRV530 only) You cannot use the following functions: - Using the NightShot Light The picture will be clearer with the autofocus mode when using the NightShot function, you keep NIGHTSHOT set N.S.LIGHT to... mode. PROGRAM AE Shutter speed in incorrect or unnatural colors. •If focusing is about 3 m (10 feet). 24 While using the NightShot function, focus manually. Digital effect - and "SUPER NIGHTSHOT" indicators flash on the screen. (2) Press SUPER NIGHTSHOT. This may cause your camcorder to...
... NightShot Light rays are infrared and so are invisible. In MEMORY mode (DCR-TRV330/TRV530 only) You cannot use the following functions: - Using the NightShot Light The picture will be clearer with the autofocus mode when using the NightShot function, you keep NIGHTSHOT set N.S.LIGHT to... mode. PROGRAM AE Shutter speed in incorrect or unnatural colors. •If focusing is about 3 m (10 feet). 24 While using the NightShot function, focus manually. Digital effect - and "SUPER NIGHTSHOT" indicators flash on the screen. (2) Press SUPER NIGHTSHOT. This may cause your camcorder to...
Operating Instructions
Page 25
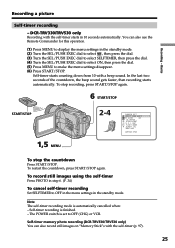
...The POWER switch is set to OFF in the menu settings in 10 seconds automatically. S . To record still images using the self-timer Press PHOTO in the standby mode. (2) Turn the SEL/PUSH EXEC dial to select , then press the dial. (3) Turn the SEL/PUSH...F D ZOOM ON 1 6 : 9W I DE S T E ADY SHOT N . Basics Recording a picture Self-timer recording - In the last two seconds of the countdown, the beep sound gets faster, then recording starts automatically. Self-timer memory photo recording (DCR-TRV330/TRV530 only) You can also use the Remote Commander for this operation. (1) Press...
...The POWER switch is set to OFF in the menu settings in 10 seconds automatically. S . To record still images using the self-timer Press PHOTO in the standby mode. (2) Turn the SEL/PUSH EXEC dial to select , then press the dial. (3) Turn the SEL/PUSH...F D ZOOM ON 1 6 : 9W I DE S T E ADY SHOT N . Basics Recording a picture Self-timer recording - In the last two seconds of the countdown, the beep sound gets faster, then recording starts automatically. Self-timer memory photo recording (DCR-TRV330/TRV530 only) You can also use the Remote Commander for this operation. (1) Press...
Operating Instructions
Page 26
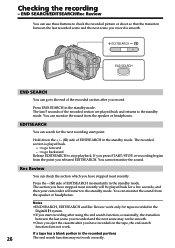
...search function may not be played back for a few seconds, and then your camcorder will be smooth. •Once you eject the cassette after you have stopped most recently will return to the standby mode. The recorded section is smooth. Notes •END SEARCH, EDITSEARCH and Rec ... START/STOP, re-recording begins from the speaker or headphones. Press END SEARCH in the Digital8 system. •If you start point. You can use these buttons to check the recorded picture or shoot so that the transition between the last scene you released EDITSEARCH. Checking the recording...
...search function may not be played back for a few seconds, and then your camcorder will be smooth. •Once you eject the cassette after you have stopped most recently will return to the standby mode. The recorded section is smooth. Notes •END SEARCH, EDITSEARCH and Rec ... START/STOP, re-recording begins from the speaker or headphones. Press END SEARCH in the Digital8 system. •If you start point. You can use these buttons to check the recorded picture or shoot so that the transition between the last scene you released EDITSEARCH. Checking the recording...
Operating Instructions
Page 27
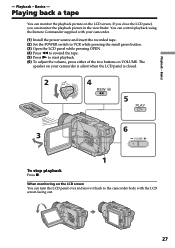
...with the LCD screen facing out. 27 You can monitor the playback picture on VOLUME. Basics - Basics - If you close the LCD panel, you can turn the LCD panel over and move it back to the camcorder body with your camcorder is silent when the LCD panel is closed. 2 V 4 OFCFR(...CHG) POWER REW E ERMAORY CAM M 5 PLAY 6 3 VOLUME 1 To stop playback Press x. When monitoring on your camcorder. (1) Install the power source and insert the recorded tape. (2) Set the POWER switch to VCR while pressing the small green button. (3) Open the LCD panel ...
...with the LCD screen facing out. 27 You can monitor the playback picture on VOLUME. Basics - Basics - If you close the LCD panel, you can turn the LCD panel over and move it back to the camcorder body with your camcorder is silent when the LCD panel is closed. 2 V 4 OFCFR(...CHG) POWER REW E ERMAORY CAM M 5 PLAY 6 3 VOLUME 1 To stop playback Press x. When monitoring on your camcorder. (1) Install the power source and insert the recorded tape. (2) Set the POWER switch to VCR while pressing the small green button. (3) Open the LCD panel ...
Operating Instructions
Page 29
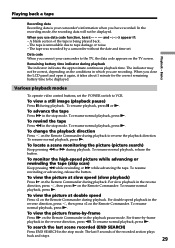
... (END SEARCH) Press END SEARCH in the stop mode. To resume normal playback, press N. To view the picture at slow speed (slow playback) Press y on the Remote Commander in the playback pause mode. For frame-by a camcorder without the date and time set the POWER switch to... direction, press c. To resume normal playback, press N. To view a still image (playback pause) Press X during playback. To rewind the tape Press m in which you have recorded. Data code When you connect your camcorder's information when you are recording. To resume normal playback, release the button...
... (END SEARCH) Press END SEARCH in the stop mode. To resume normal playback, press N. To view the picture at slow speed (slow playback) Press y on the Remote Commander in the playback pause mode. For frame-by a camcorder without the date and time set the POWER switch to... direction, press c. To resume normal playback, press N. To view a still image (playback pause) Press X during playback. To rewind the tape Press m in which you have recorded. Data code When you connect your camcorder's information when you are recording. To resume normal playback, release the button...
Operating Instructions
Page 31
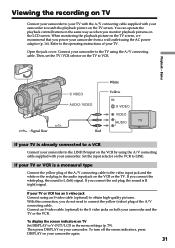
... to VCR. To turn off the screen indicators, press DISPLAY on your camcorder to the TV using the A/V connecting cable supplied with your camcorder to watch the playback picture on the TV screen. Open the jack cover. Connect your camcorder again. 31 Then, set the TV/VCR selector on TV Set DISPLAY ...OUT/LCD in the same way as when you do not need to the operating instructions of your camcorder and the TV or the VCR. Playback - If your camcorder. With this connection, you monitor playback pictures on the LCD screen. Then press DISPLAY on your TV or VCR has an S video jack Connect...
... to VCR. To turn off the screen indicators, press DISPLAY on your camcorder to the TV using the A/V connecting cable supplied with your camcorder to watch the playback picture on the TV screen. Open the jack cover. Connect your camcorder again. 31 Then, set the TV/VCR selector on TV Set DISPLAY ...OUT/LCD in the same way as when you do not need to the operating instructions of your camcorder and the TV or the VCR. Playback - If your camcorder. With this connection, you monitor playback pictures on the LCD screen. Then press DISPLAY on your TV or VCR has an S video jack Connect...
Operating Instructions
Page 32
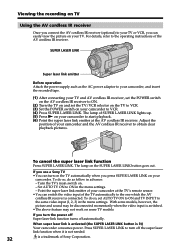
...LASER LINK lights up. (5) Press N on your camcorder. Set AUTO TV ON to the operating instructions of the AV cordless IR receiver. When super laser link is activated (the SUPER LASER LINK button is a trademark of Sony Corporation. If you use a Sony TV • You can turn on the TV ...automatically when you press SUPER LASER LINK on your camcorder to start playback. (6) Point the super laser link emitter at the TV's remote sensor. • You can easily view the picture on your camcorder at the AV...
...LASER LINK lights up. (5) Press N on your camcorder. Set AUTO TV ON to the operating instructions of the AV cordless IR receiver. When super laser link is activated (the SUPER LASER LINK button is a trademark of Sony Corporation. If you use a Sony TV • You can turn on the TV ...automatically when you press SUPER LASER LINK on your camcorder to start playback. (6) Point the super laser link emitter at the TV's remote sensor. • You can easily view the picture on your camcorder at the AV...
Operating Instructions
Page 33
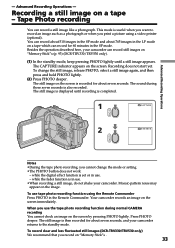
... standby mode. The CAPTURE indicator appears on the screen immediately. while the digital effect function is displayed until a still image appears. Press PHOTO deeper. The still image is completed. 1 CAPTURE PHOTO 2 PHOTO Notes •During the tape photo recording, you print a picture using...still image on the screen is recorded for about 765 images in the SP mode. Your camcorder records an image on the screen. Advanced Recording Operations - You can record for 60 minutes in the LP mode on "Memory Stick"s (p. 93) (DCR-TRV330/TRV530 only). (1) In the standby mode...
... standby mode. The CAPTURE indicator appears on the screen immediately. while the digital effect function is displayed until a still image appears. Press PHOTO deeper. The still image is completed. 1 CAPTURE PHOTO 2 PHOTO Notes •During the tape photo recording, you print a picture using...still image on the screen is recorded for about 765 images in the SP mode. Your camcorder records an image on the screen. Advanced Recording Operations - You can record for 60 minutes in the LP mode on "Memory Stick"s (p. 93) (DCR-TRV330/TRV530 only). (1) In the standby mode...
