PIXELA ImageMixer 1.0 Manual
Page 6
... Bar Dialog box buttons Exiting ImageMixer Basic operations Basic Terms Chapter 2 Capture Environment Chapter 3 Album Environment In order for capturing a movie via USB or IEEE1394. In Windows ® 98, USB capturing is not supported) Chapter 4 Movie Editing Environment Chapter 5 Layout Environment Chapter 6 Image Editor CPU Software Sound Memory Hard Disk Graphics Intel...
... Bar Dialog box buttons Exiting ImageMixer Basic operations Basic Terms Chapter 2 Capture Environment Chapter 3 Album Environment In order for capturing a movie via USB or IEEE1394. In Windows ® 98, USB capturing is not supported) Chapter 4 Movie Editing Environment Chapter 5 Layout Environment Chapter 6 Image Editor CPU Software Sound Memory Hard Disk Graphics Intel...
PIXELA ImageMixer 1.0 Manual
Page 7
Pre-installed QuickTime 4 or later. USB or IEEE1394 capturing is not compatible) 64MB or more of less than 800 x 600, or in a screen area of free space recommended for program, 1GB or more Approx. 100MB for work space. Copyright © 2001 PIXELA Corp. OS Memory Hard Disk Graphics Other Mac OS 8.5.1 or later (Mac OS X is not available with Macintosh. All rights reserved. Minimum of 800x600 (32,000 colors) ImageMixer will not run correctly in less than 256 colors.
Pre-installed QuickTime 4 or later. USB or IEEE1394 capturing is not compatible) 64MB or more of less than 800 x 600, or in a screen area of free space recommended for program, 1GB or more Approx. 100MB for work space. Copyright © 2001 PIXELA Corp. OS Memory Hard Disk Graphics Other Mac OS 8.5.1 or later (Mac OS X is not available with Macintosh. All rights reserved. Minimum of 800x600 (32,000 colors) ImageMixer will not run correctly in less than 256 colors.
PIXELA ImageMixer 1.0 Manual
Page 9
... steps above. In the Menu screen, click a desired language icon to be installed. ImageMixer is used to install other applications, such as DirectX 8. Click the 'USB Driver' button when you want to install it. 3.
... steps above. In the Menu screen, click a desired language icon to be installed. ImageMixer is used to install other applications, such as DirectX 8. Click the 'USB Driver' button when you want to install it. 3.
PIXELA ImageMixer 1.0 Manual
Page 22
... Importing files from a digital camera Audio CD Recording Mode Control panel Caution Recording music files Troubleshooting Sound Recording Mode Control panel Recording sound files Recording sound files while previewing movie images Troubleshooting USB Device Capture Mode (Win) Control panel Connection status Capturing movie scenes Capturing still pictures DV Camcorder Capture Mode (Win) Control...
... Importing files from a digital camera Audio CD Recording Mode Control panel Caution Recording music files Troubleshooting Sound Recording Mode Control panel Recording sound files Recording sound files while previewing movie images Troubleshooting USB Device Capture Mode (Win) Control panel Connection status Capturing movie scenes Capturing still pictures DV Camcorder Capture Mode (Win) Control...
PIXELA ImageMixer 1.0 Manual
Page 23
... Click to start sound recording mode. Sound Recording Mode button Click to start digital camera import mode. USB Device Capture Mode button Click to start USB device capture mode. (Windows only) DV Camcorder Click to start import file mode. Thumbnail list window Depending on the capture ...mode selected, album file thumbnails are displayed in a list. Digital Camera Import Mode button Click to start CD...
... Click to start sound recording mode. Sound Recording Mode button Click to start digital camera import mode. USB Device Capture Mode button Click to start USB device capture mode. (Windows only) DV Camcorder Click to start import file mode. Thumbnail list window Depending on the capture ...mode selected, album file thumbnails are displayed in a list. Digital Camera Import Mode button Click to start CD...
PIXELA ImageMixer 1.0 Manual
Page 48
Click to enable the capturing of still pictures. Click to enable the capturing of movie scenes. 2-6-1 USB Device Capture Mode (Windows Only) ImageMixer enables you to capture still pictures or movie scenes directly from the USB-connected device. Control panel Monitor window Volume control Still Picture Capture button Motion Picture Capture button Displays images from devices connected to your computer's USB port, such as a digital camera. Adjust volume by dragging the slider.
Click to enable the capturing of still pictures. Click to enable the capturing of movie scenes. 2-6-1 USB Device Capture Mode (Windows Only) ImageMixer enables you to capture still pictures or movie scenes directly from the USB-connected device. Control panel Monitor window Volume control Still Picture Capture button Motion Picture Capture button Displays images from devices connected to your computer's USB port, such as a digital camera. Adjust volume by dragging the slider.
PIXELA ImageMixer 1.0 Manual
Page 49
... a movie scene. All rights reserved. Note that came with the peripheral is ... Indicates current operation and connection status of this button functions as a digital video camera) to the USB port on your particular device. Consult the instruction manual that this button depends on transferring images from your selected task, the message in...
... a movie scene. All rights reserved. Note that came with the peripheral is ... Indicates current operation and connection status of this button functions as a digital video camera) to the USB port on your particular device. Consult the instruction manual that this button depends on transferring images from your selected task, the message in...
PIXELA ImageMixer 1.0 Manual
Page 50
...the desired point to capture (record) a movie file from the album list window into which to end the capture. Designate an album from a USB-connected device. 1. Adjust sound volume if necessary. button. 3. If the 'Capture as MPEG1' box is complete, the movie file will be ...automatically added to open the view window. button at the point you wish to save the captured movie file. 2. 2-6-2 USB Device Capture Mode (Windows Only) Capturing movie scenes Follow these steps to begin 5. Click the [Movie Scene Capture] Capturing a movie scene ...
...the desired point to capture (record) a movie file from the album list window into which to end the capture. Designate an album from a USB-connected device. 1. Adjust sound volume if necessary. button. 3. If the 'Capture as MPEG1' box is complete, the movie file will be ...automatically added to open the view window. button at the point you wish to save the captured movie file. 2. 2-6-2 USB Device Capture Mode (Windows Only) Capturing movie scenes Follow these steps to begin 5. Click the [Movie Scene Capture] Capturing a movie scene ...
PIXELA ImageMixer 1.0 Manual
Page 51
... will be used while capturing is in step 1. This function cannot be automatically added to the album designated in progress. button. 3. Designate an album from a USB-connected device. 1. Click the [Capture] button. All rights reserved. After the capture is now possible. Capturing still pictures Follow these steps to capture a still picture...
... will be used while capturing is in step 1. This function cannot be automatically added to the album designated in progress. button. 3. Designate an album from a USB-connected device. 1. Click the [Capture] button. All rights reserved. After the capture is now possible. Capturing still pictures Follow these steps to capture a still picture...
PIXELA ImageMixer 1.0 Manual
Page 61
... movie files to be shown while scenes from the dropdown menu or by selecting a value from those movies are used to the USB device capture mode or the DV camcorder capture mode, both of free disk space by entering a number yourself. However, if you can effectively "set preferences related to capture movie...
... movie files to be shown while scenes from the dropdown menu or by selecting a value from those movies are used to the USB device capture mode or the DV camcorder capture mode, both of free disk space by entering a number yourself. However, if you can effectively "set preferences related to capture movie...
PIXELA ImageMixer 1.0 Manual
Page 63
...destination folder, click [OK] to the recording of all newly captured or recorded files. q Digital recording Digital recording is enabled by checking this setting. This setting relates to close the browser. USB Capture Device Setting This setting allows you enter the prefix 'ABC,' the names of audio CDs... change this box. Destination of Captured/Recorded Files This field allows you experience a loss of audio CDs. If you to the USB port of movie media captured from that ImageMixer captures or records will, from devices connected to define the directory (folder, etc.) into...
...destination folder, click [OK] to the recording of all newly captured or recorded files. q Digital recording Digital recording is enabled by checking this setting. This setting relates to close the browser. USB Capture Device Setting This setting allows you enter the prefix 'ABC,' the names of audio CDs... change this box. Destination of Captured/Recorded Files This field allows you experience a loss of audio CDs. If you to the USB port of movie media captured from that ImageMixer captures or records will, from devices connected to define the directory (folder, etc.) into...
Operating Instructions
Page 4
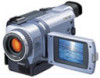
...8226;Viewing images recorded on "Memory Stick"s using the USB cable (except DCR-TRV240) (p. 155) •Viewing images recorded on a tape using the USB cable (p. 94) •Viewing images live on your computer from your camcorder using the USB cable (p. 103) •Capturing images from an analog... the exposure manually (p. 53) Functions for giving images more impact •Digital zoom [MENU] (p. 24) The default setting is OFF. (To zoom greater than 25×, (DCR-TRV240/TRV340)/15× (DCR-TRV740/TRV840), select the digital zoom power in D ZOOM in the menu settings.) •Fader (p. ...
...8226;Viewing images recorded on "Memory Stick"s using the USB cable (except DCR-TRV240) (p. 155) •Viewing images recorded on a tape using the USB cable (p. 94) •Viewing images live on your computer from your camcorder using the USB cable (p. 103) •Capturing images from an analog... the exposure manually (p. 53) Functions for giving images more impact •Digital zoom [MENU] (p. 24) The default setting is OFF. (To zoom greater than 25×, (DCR-TRV240/TRV340)/15× (DCR-TRV740/TRV840), select the digital zoom power in D ZOOM in the menu settings.) •Fader (p. ...
Operating Instructions
Page 5
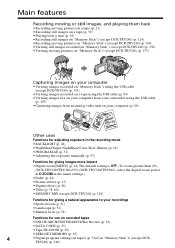
...) battery for Remote Commander (2) (p. 207) 5 A/V connecting cable (1) (p. 38) 6 Shoulder strap (1) (p. 201) 7 Lens cap (1) (p. 21) 8 USB cable (1) (p. 96, 156) 9 "Memory Stick" (1) (except DCR-TRV240) (p. 116) 0 CD-ROM (SPVD-008 USB Driver) (1) (p. 96, 156) Contents of the recording cannot be compensated if recording or playback is not made due to a malfunction of the camcorder, storage media, etc. 5
...) battery for Remote Commander (2) (p. 207) 5 A/V connecting cable (1) (p. 38) 6 Shoulder strap (1) (p. 201) 7 Lens cap (1) (p. 21) 8 USB cable (1) (p. 96, 156) 9 "Memory Stick" (1) (except DCR-TRV240) (p. 116) 0 CD-ROM (SPVD-008 USB Driver) (1) (p. 96, 156) Contents of the recording cannot be compensated if recording or playback is not made due to a malfunction of the camcorder, storage media, etc. 5

Operating Instructions
Page 18
... SET" will be cleared from memory (bars may be displayed each time that you set the POWER switch to CAMERA/MEMORY (except DCR-TRV240) unless you use your camcorder for the first time. Step 2 Setting the date and time Set the date and time settings when you set the date and ...DEMO MODE RETURN - -:- -:- - [MENU] : END 3 2002 JAN 1 12 00 AM 5 SETUP MENU CLOCK SET USB STREAM USBCONNECT 2002 JUL 4 LTR SIZE LANGUAGE DEMO MODE RETURN 5 30 PM [MENU] : END SETUP MENU CLOCK SET USB STREAM USBCONNECT 2002 JAN 1 LTR SIZE LANGUAGE DEMO MODE RETURN 12 00 AM [MENU] : END 2002...
... SET" will be cleared from memory (bars may be displayed each time that you set the POWER switch to CAMERA/MEMORY (except DCR-TRV240) unless you use your camcorder for the first time. Step 2 Setting the date and time Set the date and time settings when you set the date and ...DEMO MODE RETURN - -:- -:- - [MENU] : END 3 2002 JAN 1 12 00 AM 5 SETUP MENU CLOCK SET USB STREAM USBCONNECT 2002 JUL 4 LTR SIZE LANGUAGE DEMO MODE RETURN 5 30 PM [MENU] : END SETUP MENU CLOCK SET USB STREAM USBCONNECT 2002 JAN 1 LTR SIZE LANGUAGE DEMO MODE RETURN 12 00 AM [MENU] : END 2002...

Operating Instructions
Page 88
... images and sound on the state of the analog video signals, your camcorder. Notes •You need to output the images correctly when you convert analog video signals into digital video signals via your camcorder when the video tapes include copyright protection signals such as the ID-2 ...system. •You can connect your computer and the software you are using . If your computer has a USB jack You can capture images ...
... images and sound on the state of the analog video signals, your camcorder. Notes •You need to output the images correctly when you convert analog video signals into digital video signals via your camcorder when the video tapes include copyright protection signals such as the ID-2 ...system. •You can connect your computer and the software you are using . If your computer has a USB jack You can capture images ...

Operating Instructions
Page 94
... compatible with "PIXELA ImageMixer Ver.1.0 for Sony" (p. 100) •Capturing images with DirectX technology, so it is necessary to e-mail. Viewing images recorded on a tape on your computer (Windows users only) If you connect your camcorder and your computer using Windows 98, you... cannot capture sounds. Connecting with USB cable and viewing images on your computer •Installing the USB driver (p. 96) •Installing "PIXELA ImageMixer Ver.1.0 for Sony" (p. 101) Recommended computer environment OS...
... compatible with "PIXELA ImageMixer Ver.1.0 for Sony" (p. 100) •Capturing images with DirectX technology, so it is necessary to e-mail. Viewing images recorded on a tape on your computer (Windows users only) If you connect your camcorder and your computer using Windows 98, you... cannot capture sounds. Connecting with USB cable and viewing images on your computer •Installing the USB driver (p. 96) •Installing "PIXELA ImageMixer Ver.1.0 for Sony" (p. 101) Recommended computer environment OS...
Operating Instructions
Page 95
Furthermore, "™" and "®" are not guaranteed for either the Windows or Macintosh environment if you connect two or more USB equipment to a single computer at the same time, or when using a hub. •Some equipment may be the trademarks or registered trademarks ...of their respective companies. Editing Viewing images recorded on a tape on the type of USB equipment that is used simultaneously. •Operations are not mentioned in each case in the United States and/or other product names mentioned herein may...
Furthermore, "™" and "®" are not guaranteed for either the Windows or Macintosh environment if you connect two or more USB equipment to a single computer at the same time, or when using a hub. •Some equipment may be the trademarks or registered trademarks ...of their respective companies. Editing Viewing images recorded on a tape on the type of USB equipment that is used simultaneously. •Operations are not mentioned in each case in the United States and/or other product names mentioned herein may...
Operating Instructions
Page 96
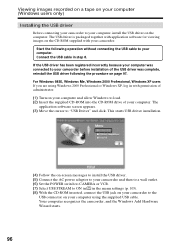
... wall outlet. (6) Set the POWER switch to CAMERA or VCR. (7) Select USB STREAM to ON in in the menu settings (p. 105). (8) With the CD-ROM inserted, connect the USB jack on your camcorder to the USB connector on your computer and allow Windows to load. (2) Insert the supplied CD-...ROM into the CD-ROM drive of your camcorder before installation of the USB driver was connected to "USB Driver" and click. The application software screen appears. (3) Move the cursor to your computer. The USB driver is packaged together with application software for viewing images on the...
... wall outlet. (6) Set the POWER switch to CAMERA or VCR. (7) Select USB STREAM to ON in in the menu settings (p. 105). (8) With the CD-ROM inserted, connect the USB jack on your camcorder to the USB connector on your computer and allow Windows to load. (2) Insert the supplied CD-...ROM into the CD-ROM drive of your camcorder before installation of the USB driver was connected to "USB Driver" and click. The application software screen appears. (3) Move the cursor to your computer. The USB driver is packaged together with application software for viewing images on the...
Operating Instructions
Page 97
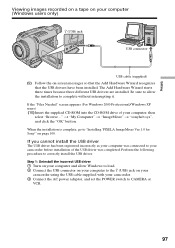
...it. If you cannot install the USB driver The USB driver has been registered incorrectly as your camcorder before installation of your computer (Windows users only) (USB) jack USB connector USB cable (supplied) (9) Follow the on your camcorder using the USB cable supplied with your camcorder. 3 Connect the AC power adaptor,...ROM into the CD-ROM drive of the USB driver was connected to CAMERA or VCR. 97 Step 1: Uninstall the incorrect USB driver 1 Turn on your computer and allow the installation to "Installing 'PIXELA ImageMixer Ver.1.0 for Sony'" on page 100. Perform the following ...
...it. If you cannot install the USB driver The USB driver has been registered incorrectly as your camcorder before installation of your computer (Windows users only) (USB) jack USB connector USB cable (supplied) (9) Follow the on your camcorder using the USB cable supplied with your camcorder. 3 Connect the AC power adaptor,...ROM into the CD-ROM drive of the USB driver was connected to CAMERA or VCR. 97 Step 1: Uninstall the incorrect USB driver 1 Turn on your computer and allow the installation to "Installing 'PIXELA ImageMixer Ver.1.0 for Sony'" on page 100. Perform the following ...
Operating Instructions
Page 99
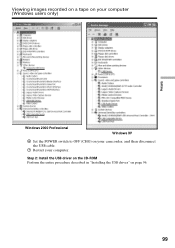
Step 2: Install the USB driver on the CD-ROM Perform the entire procedure described in "Installing the USB driver" on your camcorder, and then disconnect the USB cable. 7 Restart your computer (Windows users only) Editing Windows 2000 Professional Windows XP 6 Set the POWER switch to OFF (CHG) on page 96. 99 Viewing images recorded on a tape on your computer.
Step 2: Install the USB driver on the CD-ROM Perform the entire procedure described in "Installing the USB driver" on your camcorder, and then disconnect the USB cable. 7 Restart your computer (Windows users only) Editing Windows 2000 Professional Windows XP 6 Set the POWER switch to OFF (CHG) on page 96. 99 Viewing images recorded on a tape on your computer.


