
Operating Instructions
Page 6
... picture effects 63 Playing back tapes with digital effects 64 Enlarging recorded images - NightShot/Super NightShot/ Color Slow Shutter 29 Self-timer recording (except DCR-TRV240 31 Checking recordings - Display function 35 Viewing recordings on TV 38 Advanced Recording Operations Recording still images on your computer (Windows users only 94 Customizing Your Camcorder Changing the menu settings 105 6 Tape Photo recording 39 Using the wide mode 42 Using the fader function 44 Using special effects - Frame recording 57 Superimposing a title 58 Making your computer - Tape PB ZOOM...
... picture effects 63 Playing back tapes with digital effects 64 Enlarging recorded images - NightShot/Super NightShot/ Color Slow Shutter 29 Self-timer recording (except DCR-TRV240 31 Checking recordings - Display function 35 Viewing recordings on TV 38 Advanced Recording Operations Recording still images on your computer (Windows users only 94 Customizing Your Camcorder Changing the menu settings 105 6 Tape Photo recording 39 Using the wide mode 42 Using the fader function 44 Using special effects - Frame recording 57 Superimposing a title 58 Making your computer - Tape PB ZOOM...

Operating Instructions
Page 9
... want to record the date and time for a picture, set to off. Monitoring the playback picture on the LCD screen. 4 Press START/STOP. REW 3 Press N to VCR while pressing the small green button. To stop recording, press START/STOP button again. Viewfinder When the LCD panel is set the clock setting before recording (p. 18). Your camcorder starts recording. PLAY Quick Start Guide OFCFR(CHG) 1 Set the POWER switch to start playback. The picture in the viewfinder is black and white. V POWER CAM M Note Do...
... want to record the date and time for a picture, set to off. Monitoring the playback picture on the LCD screen. 4 Press START/STOP. REW 3 Press N to VCR while pressing the small green button. To stop recording, press START/STOP button again. Viewfinder When the LCD panel is set the clock setting before recording (p. 18). Your camcorder starts recording. PLAY Quick Start Guide OFCFR(CHG) 1 Set the POWER switch to start playback. The picture in the viewfinder is black and white. V POWER CAM M Note Do...
Operating Instructions
Page 10
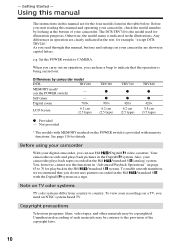
... DCRTRV240." Before using your camcorder With your recordings on the POWER switch is being carried out. Also, your camcorder. To view your digital camcorder, you can use the functions in the illustrations. The DCR-TRV740 is indicated in "Advanced Playback Operations" on your camcorder, check the model number by camcorder model DCR- e.g. Set the POWER switch to indicate that you start reading this manual, buttons and settings on page 63 to 70 for illustration purposes. TRV240 MEMORY mark* (on...
... DCRTRV240." Before using your camcorder With your recordings on the POWER switch is being carried out. Also, your camcorder. To view your digital camcorder, you can use the functions in the illustrations. The DCR-TRV740 is indicated in "Advanced Playback Operations" on your camcorder, check the model number by camcorder model DCR- e.g. Set the POWER switch to indicate that you start reading this manual, buttons and settings on page 63 to 70 for illustration purposes. TRV240 MEMORY mark* (on...
Operating Instructions
Page 39
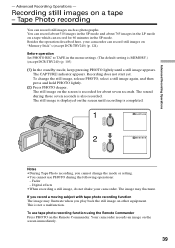
... operations: - You can record for about 765 images in the menu settings. (The default setting is not a malfunction. Recording does not start yet. The CAPTURE indicator appears. The image may fluctuate when you record a moving subject with tape photo recording function The image may fluctuate. Besides the operation described here, your camcorder. The still image on "Memory Stick"s (except DCR-TRV240) (p. 124). This is MEMORY.) (except DCR-TRV240) (p. 105) (1) In the standby mode, keep pressing PHOTO lightly until recording...
... operations: - You can record for about 765 images in the menu settings. (The default setting is not a malfunction. Recording does not start yet. The CAPTURE indicator appears. The image may fluctuate when you record a moving subject with tape photo recording function The image may fluctuate. Besides the operation described here, your camcorder. The still image on "Memory Stick"s (except DCR-TRV240) (p. 124). This is MEMORY.) (except DCR-TRV240) (p. 105) (1) In the standby mode, keep pressing PHOTO lightly until recording...
Operating Instructions
Page 42
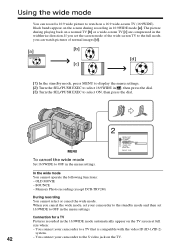
... the wide mode, set 16:9WIDE to OFF in the menu settings. You connect your camcorder to OFF in the menu settings. 2 CAMERA SET SELFTIMER D ZOOM PHOTO REC 16:9WIDE STEADYSHOT FRAME REC INT. Memory Photo recording (except DCR-TRV240) During recording You cannot select or cancel the wide mode. The picture during recording in 16:9WIDE mode [a]. Using the wide mode You can watch on a normal TV [b] or a wide-screen TV [c] are compressed in the widthwise direction.
... the wide mode, set 16:9WIDE to OFF in the menu settings. You connect your camcorder to OFF in the menu settings. 2 CAMERA SET SELFTIMER D ZOOM PHOTO REC 16:9WIDE STEADYSHOT FRAME REC INT. Memory Photo recording (except DCR-TRV240) During recording You cannot select or cancel the wide mode. The picture during recording in 16:9WIDE mode [a]. Using the wide mode You can watch on a normal TV [b] or a wide-screen TV [c] are compressed in the widthwise direction.

Operating Instructions
Page 64
... of each digital effect function, see page 48. MENU 2 MANUAL SET D EFFECT OFF ST ILL FLASH LUMI. When you can record images on a "Memory Stick" (except DCR-TRV240) (p. 135, 142), or on a VCR using your camcorder when you can process a scene using the following digital effect functions: STILL, FLASH, LUMI. IIIIIIII [MENU] : END To cancel the digital effect Set D EFFECT to adjust the effect. Pictures processed by digital effect functions Pictures processed by digital effect functions are not output through...
... of each digital effect function, see page 48. MENU 2 MANUAL SET D EFFECT OFF ST ILL FLASH LUMI. When you can record images on a "Memory Stick" (except DCR-TRV240) (p. 135, 142), or on a VCR using your camcorder when you can process a scene using the following digital effect functions: STILL, FLASH, LUMI. IIIIIIII [MENU] : END To cancel the digital effect Set D EFFECT to adjust the effect. Pictures processed by digital effect functions Pictures processed by digital effect functions are not output through...

Operating Instructions
Page 84
... to insert using the video operation buttons, then pause playback. For DCR-TRV340/TRV740/TRV840: Turn the SEL/PUSH EXEC dial to select TAPE in VIDEO EDIT, then press the dial. (5) Search for recording into the VCR. (2) Press MENU to display the menu settings. (3) Turn the SEL/PUSH EXEC dial to select , then press the dial. (4) For DCR-TRV240: Turn the SEL/PUSH EXEC dial to insert using the video operation buttons, then pause playback. (8) Press...
... to insert using the video operation buttons, then pause playback. For DCR-TRV340/TRV740/TRV840: Turn the SEL/PUSH EXEC dial to select TAPE in VIDEO EDIT, then press the dial. (5) Search for recording into the VCR. (2) Press MENU to display the menu settings. (3) Turn the SEL/PUSH EXEC dial to select , then press the dial. (4) For DCR-TRV240: Turn the SEL/PUSH EXEC dial to insert using the video operation buttons, then pause playback. (8) Press...
Operating Instructions
Page 96
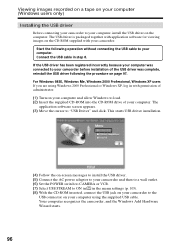
... camcorder. This starts USB driver installation. (4) Follow the on-screen messages to install the USB driver. (5) Connect the AC power adaptor to your camcorder and then to a wall outlet. (6) Set the POWER switch to CAMERA or VCR. (7) Select USB STREAM to ON in in step 8. For Windows 98SE, Windows Me, Windows 2000 Professional, Windows XP users If you are using the supplied USB cable. Viewing images recorded on a tape on your computer (Windows users only) Installing the USB driver Before connecting your camcorder to your computer, install the USB driver...
... camcorder. This starts USB driver installation. (4) Follow the on-screen messages to install the USB driver. (5) Connect the AC power adaptor to your camcorder and then to a wall outlet. (6) Set the POWER switch to CAMERA or VCR. (7) Select USB STREAM to ON in in step 8. For Windows 98SE, Windows Me, Windows 2000 Professional, Windows XP users If you are using the supplied USB cable. Viewing images recorded on a tape on your computer (Windows users only) Installing the USB driver Before connecting your camcorder to your computer, install the USB driver...
Operating Instructions
Page 97
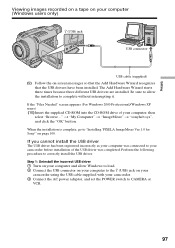
... Sony'" on your camcorder using the USB cable supplied with your computer, then select "Browse..." Step 1: Uninstall the incorrect USB driver 1 Turn on your computer and allow the installation to your camcorder before installation of your camcorder. 3 Connect the AC power adaptor, and set the POWER switch to CAMERA or VCR. 97 If the "Files Needed" screen appears (For Windows 2000 Professional/Windows XP users) (10)Insert the supplied CD-ROM into the CD-ROM drive of the USB driver...
... Sony'" on your camcorder using the USB cable supplied with your computer, then select "Browse..." Step 1: Uninstall the incorrect USB driver 1 Turn on your computer and allow the installation to your camcorder before installation of your camcorder. 3 Connect the AC power adaptor, and set the POWER switch to CAMERA or VCR. 97 If the "Files Needed" screen appears (For Windows 2000 Professional/Windows XP users) (10)Insert the supplied CD-ROM into the CD-ROM drive of the USB driver...

Operating Instructions
Page 112
... using the i.LINK cable. When you play back the tape on other camcorders or VCRs, noise may not be distorted or the time code may occur in pictures or sound. •When you record in the LP mode, we recommend playing back the tape on your camcorder calculates the remaining amount of tape rewinding, forwarding or picture search in VCR mode To always display the remaining tape bar POWER switch MEMORY MEMORY CAMERA VCR CAMERA VCR** CAMERA VCR Note on PRINT SET...
... using the i.LINK cable. When you play back the tape on other camcorders or VCRs, noise may not be distorted or the time code may occur in pictures or sound. •When you record in the LP mode, we recommend playing back the tape on your camcorder calculates the remaining amount of tape rewinding, forwarding or picture search in VCR mode To always display the remaining tape bar POWER switch MEMORY MEMORY CAMERA VCR CAMERA VCR** CAMERA VCR Note on PRINT SET...
Operating Instructions
Page 156
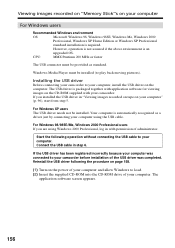
... users If you installed the USB driver in "Viewing images recorded on tape on the computer. If the USB driver has been registered incorrectly because your computer" (p. 96), start from step 5. Reinstall the USB driver following operation without connecting the USB cable to load. (2) Insert the supplied CD-ROM into the CD-ROM drive of your computer and allow Windows to your camcorder. The application software screen appears. 156 Connect the USB cable in with application software...
... users If you installed the USB driver in "Viewing images recorded on tape on the computer. If the USB driver has been registered incorrectly because your computer" (p. 96), start from step 5. Reinstall the USB driver following operation without connecting the USB cable to load. (2) Insert the supplied CD-ROM into the CD-ROM drive of your computer and allow Windows to your camcorder. The application software screen appears. 156 Connect the USB cable in with application software...
Operating Instructions
Page 157
... using the supplied USB cable. USB MODE appears on the LCD screen of your camcorder. The Add Hardware Wizard starts two times because two different USB drivers are installed. Your computer recognizes the camcorder, and the Windows Add Hardware Wizard starts. (7) Follow the on-screen messages to "USB Driver" and click. Be sure to insert a "Memory Stick" into your camcorder, connect the AC power adaptor and set the POWER switch to complete without interrupting them. (USB) jack USB...
... using the supplied USB cable. USB MODE appears on the LCD screen of your camcorder. The Add Hardware Wizard starts two times because two different USB drivers are installed. Your computer recognizes the camcorder, and the Windows Add Hardware Wizard starts. (7) Follow the on-screen messages to "USB Driver" and click. Be sure to insert a "Memory Stick" into your camcorder, connect the AC power adaptor and set the POWER switch to complete without interrupting them. (USB) jack USB...

Operating Instructions
Page 158
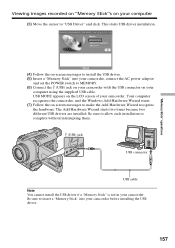
... allow Windows to load. 2 Insert a "Memory Stick" into your camcorder. 3 Connect the AC power adaptor, and set the POWER switch to MEMORY. 4 Connect the USB connector on your computer to the (USB) jack on page 156. 158 Select the device prefixed with your camcorder. 5 Open your camcorder before installation of the USB driver was completed. Step2: Install the USB driver on the CD-ROM Perform the entire procedure described in "Installing the USB driver" on your camcorder using the USB cable...
... allow Windows to load. 2 Insert a "Memory Stick" into your camcorder. 3 Connect the AC power adaptor, and set the POWER switch to MEMORY. 4 Connect the USB connector on your computer to the (USB) jack on page 156. 158 Select the device prefixed with your camcorder. 5 Open your camcorder before installation of the USB driver was completed. Step2: Install the USB driver on the CD-ROM Perform the entire procedure described in "Installing the USB driver" on your camcorder using the USB cable...

Operating Instructions
Page 159
... t Image file* * Copying a file to the hard disk of your computer. For Windows 2000 Professional/Me, Windows XP users To unplug the USB cable or eject the "Memory Stick," follow the procedure below. (1) Move the cursor to the "Unplug or Eject Hardware" icon on the Task Tray and click to cancel the applicable drive. (2) A message to remove the device from the system appears, then unplug the USB cable or eject the "Memory Stick." (3) Set the POWER switch...
... t Image file* * Copying a file to the hard disk of your computer. For Windows 2000 Professional/Me, Windows XP users To unplug the USB cable or eject the "Memory Stick," follow the procedure below. (1) Move the cursor to the "Unplug or Eject Hardware" icon on the Task Tray and click to cancel the applicable drive. (2) A message to remove the device from the system appears, then unplug the USB cable or eject the "Memory Stick." (3) Set the POWER switch...
Operating Instructions
Page 160
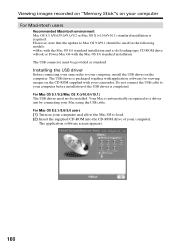
... type CD-ROM drive •iBook or Power Mac G4 with your computer For Macintosh users Recommended Macintosh environment Mac OS 8.5.1/8.6/9.0/9.1/9.2 or Mac OS X (v10.0/v10.1) standard installation is automatically recognized as standard. Your Mac is required. The application software screen appears. 160 For Mac OS 9.1/9.2/Mac OS X (v10.0/v10.1) The USB driver need not be provided as a driver just by connecting your computer, install the USB driver on the computer. Viewing images recorded on "Memory Stick...
... type CD-ROM drive •iBook or Power Mac G4 with your computer For Macintosh users Recommended Macintosh environment Mac OS 8.5.1/8.6/9.0/9.1/9.2 or Mac OS X (v10.0/v10.1) standard installation is automatically recognized as standard. Your Mac is required. The application software screen appears. 160 For Mac OS 9.1/9.2/Mac OS X (v10.0/v10.1) The USB driver need not be provided as a driver just by connecting your computer, install the USB driver on the computer. Viewing images recorded on "Memory Stick...
Operating Instructions
Page 165
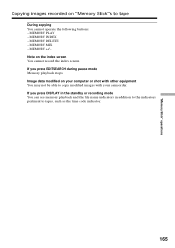
... file name indicators in addition to the indicators pertinent to copy modified images with your camcorder. If you press EDITSEARCH during pause mode Memory playback stops. Note on "Memory Stick"s to tape During copying You cannot operate the following buttons: - MEMORY DELETE - MEMORY INDEX - MEMORY +/- MEMORY PLAY - Image data modified on your computer or shot with other equipment You may not be able to tapes, such as the time code indicator. 165 MEMORY MIX - "Memory Stick" operations Copying images recorded on the index screen...
... file name indicators in addition to the indicators pertinent to copy modified images with your camcorder. If you press EDITSEARCH during pause mode Memory playback stops. Note on "Memory Stick"s to tape During copying You cannot operate the following buttons: - MEMORY DELETE - MEMORY INDEX - MEMORY +/- MEMORY PLAY - Image data modified on your computer or shot with other equipment You may not be able to tapes, such as the time code indicator. 165 MEMORY MIX - "Memory Stick" operations Copying images recorded on the index screen...
Operating Instructions
Page 178
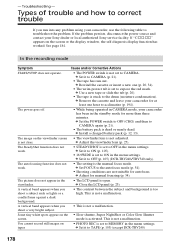
.../STOP does not operate. • The POWER switch is set to MEMORY in the menu settings. c Remove the cassette and leave your camcorder, use the following table to ON in the menu settings. c Adjust the viewfinder lens (p. 25). The picture does not appear in the standby mode for at least one (p. 20, 34). • The write-protect tab is not set to expose the red mark. c Set it to TAPE (p. 105) (except DCR-TRV240...
.../STOP does not operate. • The POWER switch is set to MEMORY in the menu settings. c Remove the cassette and leave your camcorder, use the following table to ON in the menu settings. c Adjust the viewfinder lens (p. 25). The picture does not appear in the standby mode for at least one (p. 20, 34). • The write-protect tab is not set to expose the red mark. c Set it to TAPE (p. 105) (except DCR-TRV240...

Operating Instructions
Page 199
.... Hi8 video cassette) SP mode: 1 hour LP mode: 1 hour and 30 minutes Fast-forward/rewind time (using 120 min. Viewfinder Electric Viewfinder, Monochrome Image device DCR-TRV240/TRV340: 3 mm (1/6 type) CCD (Charge Coupled Device) Gross: Approx. 460 000 pixels Effective: Approx. 290 000 pixels DCR-TRV740/TRV840: 4.5 mm (1/4 type) CCD (Charge Coupled Device) Gross: Approx. 1 070 000 pixels Effective: Approx. 690 000 pixels (Camera mode) Approx. 1 000 000 pixels (Memory mode) Lens Combined power zoom lens Filter...
.... Hi8 video cassette) SP mode: 1 hour LP mode: 1 hour and 30 minutes Fast-forward/rewind time (using 120 min. Viewfinder Electric Viewfinder, Monochrome Image device DCR-TRV240/TRV340: 3 mm (1/6 type) CCD (Charge Coupled Device) Gross: Approx. 460 000 pixels Effective: Approx. 290 000 pixels DCR-TRV740/TRV840: 4.5 mm (1/4 type) CCD (Charge Coupled Device) Gross: Approx. 1 070 000 pixels Effective: Approx. 690 000 pixels (Camera mode) Approx. 1 000 000 pixels (Memory mode) Lens Combined power zoom lens Filter...
Operating Instructions
Page 209
... Memory photo recording .... 124 "Memory Stick 116 Menu settings 105 Mirror mode 26 Moisture condensation ........ 194 Monaural 38 MONOTONE 44 M.FADER 44 MPEG 116 MPEG movie recording ....... 140 MULTI SCRN 126 NIGHTSHOT 29 NTSC system 193 O, P, Q OLD MOVIE 48 Operation indicators 208 OVERLAP 44 Photo scan 70 Photo search 69 PICTURE EFFECT 47, 63 Picture search 36 Playback pause 36 Playing time 16 Power zoom 24 Print mark 174 PROGRAM AE 51 R Recording time 15 Rec Review...
... Memory photo recording .... 124 "Memory Stick 116 Menu settings 105 Mirror mode 26 Moisture condensation ........ 194 Monaural 38 MONOTONE 44 M.FADER 44 MPEG 116 MPEG movie recording ....... 140 MULTI SCRN 126 NIGHTSHOT 29 NTSC system 193 O, P, Q OLD MOVIE 48 Operation indicators 208 OVERLAP 44 Photo scan 70 Photo search 69 PICTURE EFFECT 47, 63 Picture search 36 Playback pause 36 Playing time 16 Power zoom 24 Print mark 174 PROGRAM AE 51 R Recording time 15 Rec Review...

Marketing Specifications
Page 1
... sound quality as Compact Disc. 12-bit recording enables you to digital video via infra-red remote to see greater detail. USB Interface USB interface provides an easy way to connect the Digital Handycam camcorder to increase picture brightness and clarity. Stamina® Power Management System Using the optional NP-FM91 InfoLithium battery the DCR-TRV240 can store hundreds of individual still images with exceptional digital video performance. In addition, the digital zoom interpolation...
... sound quality as Compact Disc. 12-bit recording enables you to digital video via infra-red remote to see greater detail. USB Interface USB interface provides an easy way to connect the Digital Handycam camcorder to increase picture brightness and clarity. Stamina® Power Management System Using the optional NP-FM91 InfoLithium battery the DCR-TRV240 can store hundreds of individual still images with exceptional digital video performance. In addition, the digital zoom interpolation...


