Operating Instructions
Page 2
... Center nearest you can return your unwanted lithium ion batteries to the following two conditions.: (1) This device may not cause harmful interference, and (2)this device must accept any questions about this Sony Digital Handycam camcorder. Declaration of Conformity Trade Name: SONY Model No.: DCR-TRV6, DCR-TRV11 Responsible Party:Sony Electronics Inc. If you have any interference received, including...
... Center nearest you can return your unwanted lithium ion batteries to the following two conditions.: (1) This device may not cause harmful interference, and (2)this device must accept any questions about this Sony Digital Handycam camcorder. Declaration of Conformity Trade Name: SONY Model No.: DCR-TRV6, DCR-TRV11 Responsible Party:Sony Electronics Inc. If you have any interference received, including...
Operating Instructions
Page 4
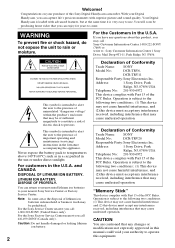
...DCR-TRV11/TRV20 only) Using a "Memory Stick" - Digital program editing 56 Identifying the parts and controls .... 144 Quick Function Guide 151 Index Back cover 4 MEMORY MIX 105 Recording an image from a mini DV tape as a still image 108 Copying still... power supply .......... 10 Installing the battery pack 10 Charging the battery pack 11 Connecting to mini DV tapes 116 Enlarging still images recorded on "Memory Stick"s ...Your Camcorder Recording - Table of recorded tape by date - Insert editing 71 Audio dubbing 73 Superimposing a title 77 Making your camcorder abroad...
...DCR-TRV11/TRV20 only) Using a "Memory Stick" - Digital program editing 56 Identifying the parts and controls .... 144 Quick Function Guide 151 Index Back cover 4 MEMORY MIX 105 Recording an image from a mini DV tape as a still image 108 Copying still... power supply .......... 10 Installing the battery pack 10 Charging the battery pack 11 Connecting to mini DV tapes 116 Enlarging still images recorded on "Memory Stick"s ...Your Camcorder Recording - Table of recorded tape by date - Insert editing 71 Audio dubbing 73 Superimposing a title 77 Making your camcorder abroad...
Operating Instructions
Page 5
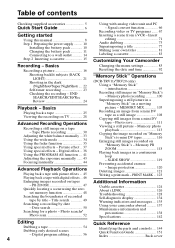
... following accessories are supplied with your camcorder. 1 2 or RMT-808 RMT-811 3 4 5 6 7 DCR-TRV20 DCR-TRV6/TRV11 8 9 or 0 qa 1 Wireless Remote Commander (1) (p. 149) RMT-808: DCR-TRV6 RMT-811: DCR-TRV11/TRV20 2 AC-L10A/L10B/L10C AC power adaptor (1), Power cord (1) (p. 11) 3 Size AA (R6) battery for Remote Commander (2) (p. 149) 4 NP-FM50 battery pack (1) (p. 10, 11) 5 A/V connecting cable (1) (p. 28...
... following accessories are supplied with your camcorder. 1 2 or RMT-808 RMT-811 3 4 5 6 7 DCR-TRV20 DCR-TRV6/TRV11 8 9 or 0 qa 1 Wireless Remote Commander (1) (p. 149) RMT-808: DCR-TRV6 RMT-811: DCR-TRV11/TRV20 2 AC-L10A/L10B/L10C AC power adaptor (1), Power cord (1) (p. 11) 3 Size AA (R6) battery for Remote Commander (2) (p. 149) 4 NP-FM50 battery pack (1) (p. 10, 11) 5 A/V connecting cable (1) (p. 28...
Operating Instructions
Page 6
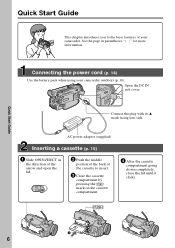
... compartment going down completely, close the lid until it clicks. Open the DC IN jack cover. Connecting the power cord (p. 14) Use the battery pack when using your camcorder. EJECT 2 Push the middle portion of the back of the arrow and open the lid. AC power adaptor (supplied) Inserting a cassette (p. 15) 1 Slide...
... compartment going down completely, close the lid until it clicks. Open the DC IN jack cover. Connecting the power cord (p. 14) Use the battery pack when using your camcorder. EJECT 2 Push the middle portion of the back of the arrow and open the lid. AC power adaptor (supplied) Inserting a cassette (p. 15) 1 Slide...
Operating Instructions
Page 10
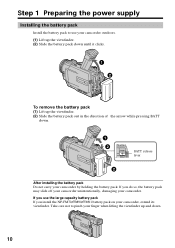
... its viewfinder. If you install the NP-FM70/FM90/FM91 battery pack on your camcorder. Step 1 Preparing the power supply Installing the battery pack Install the battery pack to pinch your finger when lifting the viewfinder up the viewfinder. (2) Slide the battery pack out in the direction of the arrow while pressing BATT down . 10...
... its viewfinder. If you install the NP-FM70/FM90/FM91 battery pack on your camcorder. Step 1 Preparing the power supply Installing the battery pack Install the battery pack to pinch your finger when lifting the viewfinder up the viewfinder. (2) Slide the battery pack out in the direction of the arrow while pressing BATT down . 10...
Operating Instructions
Page 11
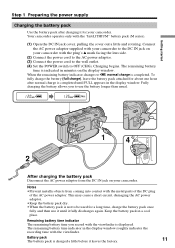
... the power cord to the AC power adaptor. (3) Connect the power cord to the wall outlet. (4) Set the POWER switch to be used for your camcorder. The remaining battery time is indicated in the display window roughly indicates the recording time with the viewfinder. To fully charge the.... This may cause a short-circuit, damaging the AC power adaptor. •Keep the battery pack dry. •When the battery pack is not to OFF (CHG). When the remaining battery indicator changes to the DC IN jack on your camcorder with the metal parts of the DC plug of the AC power adaptor. Notes...
... the power cord to the AC power adaptor. (3) Connect the power cord to the wall outlet. (4) Set the POWER switch to be used for your camcorder. The remaining battery time is indicated in the display window roughly indicates the recording time with the viewfinder. To fully charge the.... This may cause a short-circuit, damaging the AC power adaptor. •Keep the battery pack dry. •When the battery pack is not to OFF (CHG). When the remaining battery indicator changes to the DC IN jack on your camcorder with the metal parts of the DC plug of the AC power adaptor. Notes...
Operating Instructions
Page 12
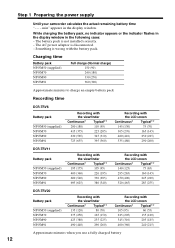
...LCD screen Continuous* Typical** 145 (130) 75 (70) 305 (270) 165 (145) 460 (410) 250 (225) 535 (480) 290 (260) DCR-TRV11 Battery pack NP-FM50 (supplied) NP-FM70 NP-FM90 NP-FM91 Recording with the viewfinder Continuous* Typical** 195 (175) 105 (95) 400 (360) 220 (195...70) 275 (250) 165 (150) 425 (380) 255 (225) 490 (440) 290 (260) Recording with the battery pack. Step 1 Preparing the power supply Until your camcorder calculates the actual remaining battery time "- - - min" appears in the following cases: - The AC power adaptor is not installed correctly. - ...
...LCD screen Continuous* Typical** 145 (130) 75 (70) 305 (270) 165 (145) 460 (410) 250 (225) 535 (480) 290 (260) DCR-TRV11 Battery pack NP-FM50 (supplied) NP-FM70 NP-FM90 NP-FM91 Recording with the viewfinder Continuous* Typical** 195 (175) 105 (95) 400 (360) 220 (195...70) 275 (250) 165 (150) 425 (380) 255 (225) 490 (440) 290 (260) Recording with the battery pack. Step 1 Preparing the power supply Until your camcorder calculates the actual remaining battery time "- - - min" appears in the following cases: - The AC power adaptor is not installed correctly. - ...
Operating Instructions
Page 13
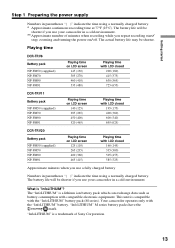
... of Sony Corporation. 13 Playing time DCR-TRV6 Battery pack NP-FM50 (supplied) NP-FM70 NP-FM90 NP-FM91 Playing time on LCD screen 145 (130) 305 (270) 460 (410) 535 (480) Playing time with LCD closed 200 (180) 415 (375) 630 (565) 725 (655) DCR-TRV11 Battery pack NP... time on /off. The actual battery life may be shorter if you use your camcorder in parentheses "( )" indicate the time using a normally charged battery. This unit is a lithium ion battery pack which can exchange data such as battery consumption with the "InfoLITHIUM" battery pack (M series). The "InfoLITHIUM"...
... of Sony Corporation. 13 Playing time DCR-TRV6 Battery pack NP-FM50 (supplied) NP-FM70 NP-FM90 NP-FM91 Playing time on LCD screen 145 (130) 305 (270) 460 (410) 535 (480) Playing time with LCD closed 200 (180) 415 (375) 630 (565) 725 (655) DCR-TRV11 Battery pack NP... time on /off. The actual battery life may be shorter if you use your camcorder in parentheses "( )" indicate the time using a normally charged battery. This unit is a lithium ion battery pack which can exchange data such as battery consumption with the "InfoLITHIUM" battery pack (M series). The "InfoLITHIUM"...

Operating Instructions
Page 14
Using a car battery Use Sony DC Adaptor/Charger (not supplied). 14 Step 1 Preparing the power supply Connecting to the DC IN jack, even when the power cord is not plugged into a wall outlet. This means that the battery pack cannot supply any power if the power cord is connected to a wall ...outlet When you use your camcorder...
Using a car battery Use Sony DC Adaptor/Charger (not supplied). 14 Step 1 Preparing the power supply Connecting to the DC IN jack, even when the power cord is not plugged into a wall outlet. This means that the battery pack cannot supply any power if the power cord is connected to a wall ...outlet When you use your camcorder...
Operating Instructions
Page 17
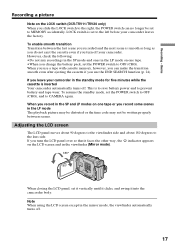
...some scenes in the LP mode on one tape. •When you change the battery pack, set to prevent battery and tape wear. To resume the standby mode, set it vertically until it clicks, and swing it faces the other way, the indicator appears on the LOCK switch (DCR-TRV11/TRV20 only) When you ... turns off . To enable smooth transition Transition between scenes. If you recorded and the next scene is set to the left before your camcorder in the viewfinder (Mirror mode). 180° 90° When closing the LCD panel, set the POWER switch to OFF (CHG), and to the lens side. Recording...
...some scenes in the LP mode on one tape. •When you change the battery pack, set to prevent battery and tape wear. To resume the standby mode, set it vertically until it clicks, and swing it faces the other way, the indicator appears on the LOCK switch (DCR-TRV11/TRV20 only) When you ... turns off . To enable smooth transition Transition between scenes. If you recorded and the next scene is set to the left before your camcorder in the viewfinder (Mirror mode). 180° 90° When closing the LCD panel, set the POWER switch to OFF (CHG), and to the lens side. Recording...
Operating Instructions
Page 21
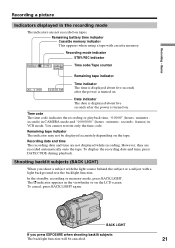
...(BACK LIGHT) When you press EXPOSURE when shooting backlit subjects The backlight function will be displayed accurately depending on . Recording mode indicator STBY/REC indicator 40min REC 0:00:01 45min Time code/Tape counter Remaining tape indicator JUL 4 2000 12:05:... source behind the subject or a subject with cassette memory. Remaining tape indicator The indicator may not be canceled. 21 Recording - Remaining battery time indicator Cassette memory indicator This appears when using a tape with a light background, use the backlight function. To cancel, press BACK...
...(BACK LIGHT) When you press EXPOSURE when shooting backlit subjects The backlight function will be displayed accurately depending on . Recording mode indicator STBY/REC indicator 40min REC 0:00:01 45min Time code/Tape counter Remaining tape indicator JUL 4 2000 12:05:... source behind the subject or a subject with cassette memory. Remaining tape indicator The indicator may not be canceled. 21 Recording - Remaining battery time indicator Cassette memory indicator This appears when using a tape with a light background, use the backlight function. To cancel, press BACK...
Operating Instructions
Page 33
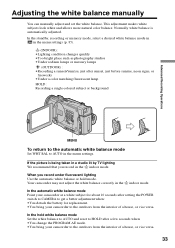
...more natural color balance. If the picture is automatically adjusted. In the hold mode. In the standby, recording or memory mode, select a desired white balance mode in in the n indoor mode. Your camcorder may not adjust the white balance correctly in the menu settings. Normally white ...switch to CAMERA to get a better adjustment when: •You detach the battery for replacement. •You bring your camcorder to AUTO in the n indoor mode. In the automatic white balance mode Point your camcorder at a white subject for about 10 seconds after sunset, just before sunrise, ...
...more natural color balance. If the picture is automatically adjusted. In the hold mode. In the standby, recording or memory mode, select a desired white balance mode in in the n indoor mode. Your camcorder may not adjust the white balance correctly in the menu settings. Normally white ...switch to CAMERA to get a better adjustment when: •You detach the battery for replacement. •You bring your camcorder to AUTO in the n indoor mode. In the automatic white balance mode Point your camcorder at a white subject for about 10 seconds after sunset, just before sunrise, ...
Operating Instructions
Page 75
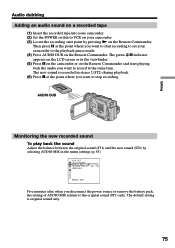
... ST2 RETURN [MENU] : END Five minutes after when you want to the playback pause mode. (4) Press AUDIO DUB on the Remote Commander. Audio dubbing Adding an audio sound on a recorded tape (1) Insert the recorded tape into your camcorder. (2) Set the POWER switch to the original sound (ST1) only. The green X indicator .... The default setting is recorded in the menu settings (p. 85). Then press X at the point where you disconnect the power source or remove the battery pack, the setting of AUDIO MIX returns to VCR on your camcorder. (3) Locate the recording start recording to set your...
... ST2 RETURN [MENU] : END Five minutes after when you want to the playback pause mode. (4) Press AUDIO DUB on the Remote Commander. Audio dubbing Adding an audio sound on a recorded tape (1) Insert the recorded tape into your camcorder. (2) Set the POWER switch to the original sound (ST1) only. The green X indicator .... The default setting is recorded in the menu settings (p. 85). Then press X at the point where you disconnect the power source or remove the battery pack, the setting of AUDIO MIX returns to VCR on your camcorder. (3) Locate the recording start recording to set your...
Operating Instructions
Page 87
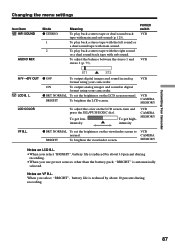
...between the stereo 1 and stereo 2 (p. 75). BRIGHT To brighten the viewfinder screen. z OFF To output digital images and sound in digital format using your camcorder. BRIGHT To brighten the LCD screen. To get lowintensity To get highintensity VCR CAMERA MEMORY VF B.L. z BRT ...8226;When you select "BRIGHT", battery life is automatically selected. VCR CAMERA MEMORY Notes on the LCD screen normal. POWER switch VCR VCR ST1 ST2 A/VtDV OUT LCD B. Customizing Your Camcorder Changing the menu settings Icon/item HiFi SOUND AUDIO MIX Mode z STEREO 1 2 Meaning ...
...between the stereo 1 and stereo 2 (p. 75). BRIGHT To brighten the viewfinder screen. z OFF To output digital images and sound in digital format using your camcorder. BRIGHT To brighten the LCD screen. To get lowintensity To get highintensity VCR CAMERA MEMORY VF B.L. z BRT ...8226;When you select "BRIGHT", battery life is automatically selected. VCR CAMERA MEMORY Notes on the LCD screen normal. POWER switch VCR VCR ST1 ST2 A/VtDV OUT LCD B. Customizing Your Camcorder Changing the menu settings Icon/item HiFi SOUND AUDIO MIX Mode z STEREO 1 2 Meaning ...
Operating Instructions
Page 91
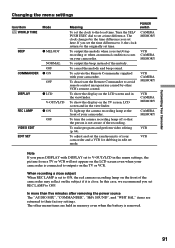
...the subject if it is not aware of the melody. To adjust and set the synchronicity of the camcorder may reflect on the TV screen, LCD screen and in memory even when the battery is set to OFF. When recording a close subject When REC LAMP is removed. 91 Customizing Your... Camcorder Changing the menu settings Icon/item Mode WORLD TIME BEEP z MELODY COMMANDER NORMAL OFF z ON OFF DISPLAY REC LAMP VIDEO...
...the subject if it is not aware of the melody. To adjust and set the synchronicity of the camcorder may reflect on the TV screen, LCD screen and in memory even when the battery is set to OFF. When recording a close subject When REC LAMP is removed. 91 Customizing Your... Camcorder Changing the menu settings Icon/item Mode WORLD TIME BEEP z MELODY COMMANDER NORMAL OFF z ON OFF DISPLAY REC LAMP VIDEO...
Operating Instructions
Page 92
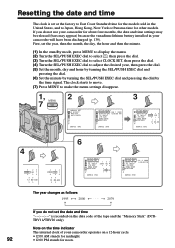
... of your camcorder will have been discharged (p. 139). If you do not use your camcorder for about four months, the date and time settings may be released (bars may appear) because the vanadium-lithium battery installed in ...12 00 AM 6 SETUP MENU CLOCK SET AUTO TV ON TV INPUT 2000 JUL 4 LTR SIZE DEMO MODE RETURN 5 30 PM [MENU] : END SETUP MENU CLOCK SET JUL 4 2000 AUTO TV ON 5:30:00 PM TV ... set the year, then the month, the day, the hour and then the minute. (1) In the standby mode, press MENU to display the menu. (2) Turn the SEL/PUSH EXEC dial to select , then press the dial...
... of your camcorder will have been discharged (p. 139). If you do not use your camcorder for about four months, the date and time settings may be released (bars may appear) because the vanadium-lithium battery installed in ...12 00 AM 6 SETUP MENU CLOCK SET AUTO TV ON TV INPUT 2000 JUL 4 LTR SIZE DEMO MODE RETURN 5 30 PM [MENU] : END SETUP MENU CLOCK SET JUL 4 2000 AUTO TV ON 5:30:00 PM TV ... set the year, then the month, the day, the hour and then the minute. (1) In the standby mode, press MENU to display the menu. (2) Turn the SEL/PUSH EXEC dial to select , then press the dial...
Operating Instructions
Page 95
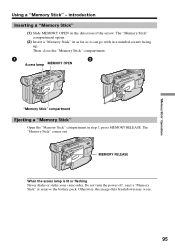
The "Memory Stick" comes out. MEMORY RELEASE When the access lamp is lit or flashing Never shake or strike your camcorder. Otherwise, the image data breakdown may occur. 95 The "Memory Stick" compartment opens. (2) Insert a "Memory Stick" in step 1, press MEMORY... RELEASE. Do not turn the power off , eject a "Memory Stick" or remove the battery pack. Then, close the "Memory Stick" compartment. 1 2 Access lamp MEMORY OPEN "Memory Stick" compartment Ejecting a "Memory Stick" Open the "Memory Stick" compartment ...
The "Memory Stick" comes out. MEMORY RELEASE When the access lamp is lit or flashing Never shake or strike your camcorder. Otherwise, the image data breakdown may occur. 95 The "Memory Stick" compartment opens. (2) Insert a "Memory Stick" in step 1, press MEMORY... RELEASE. Do not turn the power off , eject a "Memory Stick" or remove the battery pack. Then, close the "Memory Stick" compartment. 1 2 Access lamp MEMORY OPEN "Memory Stick" compartment Ejecting a "Memory Stick" Open the "Memory Stick" compartment ...
Operating Instructions
Page 108
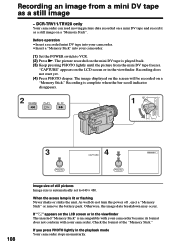
...mode Your camcorder stops momentarily. VCR 2 REW PLAY FF 1 POWER OFF(CHG) CAMERA MEMORY 108 3 4 CAPTURE PHOTO PHOTO Image size of the "Memory Stick." Check the format of still pictures Image size is incompatible with your camcorder because its format does not conform with your camcorder. (1) Set the POWER switch to 640 × 480. DCR-TRV11...or remove the battery pack. If " " appears on a mini DV tape and record it as a still image - Before operation • Insert a recorded mini DV tape into your camcorder. • Insert a "Memory Stick" into your camcorder. "CAPTURE" ...
...mode Your camcorder stops momentarily. VCR 2 REW PLAY FF 1 POWER OFF(CHG) CAMERA MEMORY 108 3 4 CAPTURE PHOTO PHOTO Image size of the "Memory Stick." Check the format of still pictures Image size is incompatible with your camcorder because its format does not conform with your camcorder. (1) Set the POWER switch to 640 × 480. DCR-TRV11...or remove the battery pack. If " " appears on a mini DV tape and record it as a still image - Before operation • Insert a recorded mini DV tape into your camcorder. • Insert a "Memory Stick" into your camcorder. "CAPTURE" ...

Operating Instructions
Page 112
... on the previous "Memory Stick." 112 As well do not turn the power off, eject a "Memory Stick" or remove the battery pack. Copying still images from step 2. Image size of still pictures Image size is automatically set to 640 × 480. To record all the way back and start copying. When the... "NOT READY" appears when you change "Memory Stick"s in the middle of the "Memory Stick" is lit or flashing Never shake or strike your camcorder. Otherwise, the image data breakdown may occur. When you select the item in the viewfinder, and the copying stops. Photo save To stop or end...
... on the previous "Memory Stick." 112 As well do not turn the power off, eject a "Memory Stick" or remove the battery pack. Copying still images from step 2. Image size of still pictures Image size is automatically set to 640 × 480. To record all the way back and start copying. When the... "NOT READY" appears when you change "Memory Stick"s in the middle of the "Memory Stick" is lit or flashing Never shake or strike your camcorder. Otherwise, the image data breakdown may occur. When you select the item in the viewfinder, and the copying stops. Photo save To stop or end...

Operating Instructions
Page 130
...recharged. c Remove the cassette and leave your camcorder for at least one hour to a wall outlet. c Charge the battery pack again. (p. 11) • The battery pack is not fully charged. c Charge the battery pack fully again so that the battery pack has enough power to AUTO in an ...wall outlet. (p. 14) The end search function does not work . • Moisture condensation has occurred. Troubleshooting In the recording and playback modes Symptom Cause and/or Corrective Actions The power does not turn on the new cassette yet. (p. 24, 27) The end search function does...
...recharged. c Remove the cassette and leave your camcorder for at least one hour to a wall outlet. c Charge the battery pack again. (p. 11) • The battery pack is not fully charged. c Charge the battery pack fully again so that the battery pack has enough power to AUTO in an ...wall outlet. (p. 14) The end search function does not work . • Moisture condensation has occurred. Troubleshooting In the recording and playback modes Symptom Cause and/or Corrective Actions The power does not turn on the new cassette yet. (p. 24, 27) The end search function does...


