Operating Instructions
Page 28
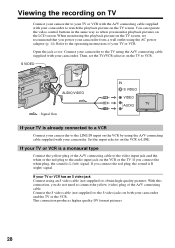
...when you connect the white plug, the sound is R (right) signal. If your camcorder and the TV or the VCR. Then, set the TV/VCR selector on the VCR to LINE. S VIDEO AUDIO/VIDEO : Signal flow IN S VIDEO VIDEO AUDIO If your TV or VCR. With this connection, you do not need to ...the red plug to the audio input jack on the VCR or the TV. Connect the S video cable (not supplied) to the S video jacks on both your TV or VCR has an S video jack Connect using an S video cable (not supplied) to obtain high-quality pictures. This connection produces higher quality DV format pictures. 28...
...when you connect the white plug, the sound is R (right) signal. If your camcorder and the TV or the VCR. Then, set the TV/VCR selector on the VCR to LINE. S VIDEO AUDIO/VIDEO : Signal flow IN S VIDEO VIDEO AUDIO If your TV or VCR. With this connection, you do not need to ...the red plug to the audio input jack on the VCR or the TV. Connect the S video cable (not supplied) to the S video jacks on both your TV or VCR has an S video jack Connect using an S video cable (not supplied) to obtain high-quality pictures. This connection produces higher quality DV format pictures. 28...

Operating Instructions
Page 32
... of the video printer. S VIDEO Video printer LINE IN VIDEO S VIDEO AUDIO/VIDEO : Signal flow If the video printer is equipped with your camcorder. Refer to the video input of the video printer as well. Tape Photo recording Printing the still picture You can print a still picture by using the A/V connecting cable supplied with S video input Use the S video connecting cable (not supplied). Recording a still image on...
... of the video printer. S VIDEO Video printer LINE IN VIDEO S VIDEO AUDIO/VIDEO : Signal flow If the video printer is equipped with your camcorder. Refer to the video input of the video printer as well. Tape Photo recording Printing the still picture You can print a still picture by using the A/V connecting cable supplied with S video input Use the S video connecting cable (not supplied). Recording a still image on...
Operating Instructions
Page 34
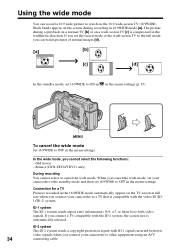
... is automatically selected. In the wide mode, you cancel the wide mode, set your camcorder to other equipment using an A/V 34 connecting cable. If you connect a TV compatible with video signals. MENU To cancel the wide mode Set 16:9WIDE to ON in in the menu settings (p. 85). Bounce (DCR-TRV6/TRV11 only) During recording You cannot select...
... is automatically selected. In the wide mode, you cancel the wide mode, set your camcorder to other equipment using an A/V 34 connecting cable. If you connect a TV compatible with video signals. MENU To cancel the wide mode Set 16:9WIDE to ON in in the menu settings (p. 85). Bounce (DCR-TRV6/TRV11 only) During recording You cannot select...

Operating Instructions
Page 54
...(5) StartrecordingontheVCR.RefertotheoperatinginstructionsofyourVCR. Editing - Dubbing a tape Using the A/V connecting cable Connect your camcorder to the operating instructions of the A/V connecting cable to the video input jack and the white or the red plug to record the ...indicators on the dubbed tape: • The DISPLAY button • The DATA CODE button • The SEARCH MODE button on the Remote Commander You can edit on both your camcorder...
...(5) StartrecordingontheVCR.RefertotheoperatinginstructionsofyourVCR. Editing - Dubbing a tape Using the A/V connecting cable Connect your camcorder to the operating instructions of the A/V connecting cable to the video input jack and the white or the red plug to record the ...indicators on the dubbed tape: • The DISPLAY button • The DATA CODE button • The SEARCH MODE button on the Remote Commander You can edit on both your camcorder...
Operating Instructions
Page 55
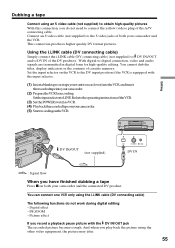
... supplied) to DV IN/OUT and to DV IN of the VCR. (3) SetthePOWERswitchtoVCR. (4) Playbacktherecordedtapeonyourcamcorder. (5) StartrecordingontheVCR. Digital effect - Set the input selector on both your camcorder. (2) PreparetheVCRforrecording. Dubbing a tape Connect using an S video cable (not supplied) to obtain high-quality pictures With this connection, you have finished dubbing a tape Press x on the VCR to the...
... supplied) to DV IN/OUT and to DV IN of the VCR. (3) SetthePOWERswitchtoVCR. (4) Playbacktherecordedtapeonyourcamcorder. (5) StartrecordingontheVCR. Digital effect - Set the input selector on both your camcorder. (2) PreparetheVCRforrecording. Dubbing a tape Connect using an S video cable (not supplied) to obtain high-quality pictures With this connection, you have finished dubbing a tape Press x on the VCR to the...
Operating Instructions
Page 57
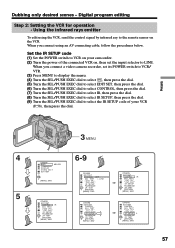
...TEST RETURN [MENU] : END OTHERS ED I TSET CONTROL I R ADJ TEST CUT - Digital program editing Step 2: Setting the VCR for operation - When you connect using the VCR, send... emitter To edit using an AV connecting cable, follow the procedures below. Set the IR... SEL/PUSH EXEC dial to select the IR SETUP code of your camcorder. (2) Turn the power of the connected VCR on the VCR. ...L I NK OTHERS ED I TSET CONTROL ADJ TEST CUT - Dubbing only desired scenes - When you connect a video camera recorder, set the input selector to LINE. I N CUT -OUT I R SETUP PAUSEMODE I R TEST RETURN...
...TEST RETURN [MENU] : END OTHERS ED I TSET CONTROL I R ADJ TEST CUT - Digital program editing Step 2: Setting the VCR for operation - When you connect using the VCR, send... emitter To edit using an AV connecting cable, follow the procedures below. Set the IR... SEL/PUSH EXEC dial to select the IR SETUP code of your camcorder. (2) Turn the power of the connected VCR on the VCR. ...L I NK OTHERS ED I TSET CONTROL ADJ TEST CUT - Dubbing only desired scenes - When you connect a video camera recorder, set the input selector to LINE. I N CUT -OUT I R SETUP PAUSEMODE I R TEST RETURN...
Operating Instructions
Page 61
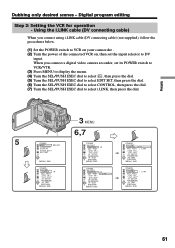
Digital program editing Step 2: Setting the VCR for operation - I N CUT -OUT I R SETUP PAUSEMODE I NK 61 L I R TEST RETURN [MENU] : END i . When you connect using i.LINK cable (DV connecting cable) (not supplied), follow the procedures below. (1) Set the POWER switch to VCR on your camcorder...RETURN [MENU] : END 3 MENU 6,7 OTHERS ED I TSET CONTROL I TSET CONTROL ADJ TEST CUT - Using the i.LINK cable (DV connecting cable) When you connect a digital video camera recorder, set the input selector to select i.LINK, then press the dial. 5 OTHERS BEEP MELODY COMMANDER D I SPL ...
Digital program editing Step 2: Setting the VCR for operation - I N CUT -OUT I R SETUP PAUSEMODE I NK 61 L I R TEST RETURN [MENU] : END i . When you connect using i.LINK cable (DV connecting cable) (not supplied), follow the procedures below. (1) Set the POWER switch to VCR on your camcorder...RETURN [MENU] : END 3 MENU 6,7 OTHERS ED I TSET CONTROL I TSET CONTROL ADJ TEST CUT - Using the i.LINK cable (DV connecting cable) When you connect a digital video camera recorder, set the input selector to select i.LINK, then press the dial. 5 OTHERS BEEP MELODY COMMANDER D I SPL ...

Operating Instructions
Page 63
.... •When you connect with an i.LINK cable (DV connecting cable), you start recording from the very beginning of the tape, the first few seconds of your camcorder . •When editing digital video, the operation signals cannot be able to -digital connection, video and audio signals are transmitted in digital form for high-quality editing. Set CONTROL to...
.... •When you connect with an i.LINK cable (DV connecting cable), you start recording from the very beginning of the tape, the first few seconds of your camcorder . •When editing digital video, the operation signals cannot be able to -digital connection, video and audio signals are transmitted in digital form for high-quality editing. Set CONTROL to...
Operating Instructions
Page 65
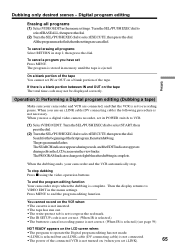
... tape. To cancel erasing all programs (1) SelectVIDEOEDITinthemenusettings. Editing Operation 2: Performing a Digital program editing (Dubbing a tape) Make sure your camcorder and the VCR automatically stop dubbing Press x using the video operation buttons. When you have set to recording pause. TurntheSEL/PUSHEXECdialtoselectSTART,then press...program to operate the Digital program editing has not made. •i.LINK is selected but an i.LINK cable (DV connecting cable) is not connected. •The power of the tape You cannot set its POWER switch to VIDEO EDIT in memory until...
... tape. To cancel erasing all programs (1) SelectVIDEOEDITinthemenusettings. Editing Operation 2: Performing a Digital program editing (Dubbing a tape) Make sure your camcorder and the VCR automatically stop dubbing Press x using the video operation buttons. When you have set to recording pause. TurntheSEL/PUSHEXECdialtoselectSTART,then press...program to operate the Digital program editing has not made. •i.LINK is selected but an i.LINK cable (DV connecting cable) is not connected. •The power of the tape You cannot set its POWER switch to VIDEO EDIT in memory until...

Operating Instructions
Page 67
... on its right simultaneously on your camcorder, then immediately press X on your camcorder. (5) Press N on both your camcorder as a recorder. (1) Insert a blank tape (or a tape you want to start recording from. 4 REC PAUSE OUT TV S VIDEO VIDEO AUDIO S VIDEO AUDIO/VIDEO : Signal flow When you have finished...if you record a tape from . 67 Using the Remote Commander (DCR-TRV11/TRV20 only) In step 4, press z REC and MARK simultaneously, then immediately press X. Editing Recording video or TV programs Using the A/V connecting cable You can record a tape from another VCR or a TV program ...
... on its right simultaneously on your camcorder, then immediately press X on your camcorder. (5) Press N on both your camcorder as a recorder. (1) Insert a blank tape (or a tape you want to start recording from. 4 REC PAUSE OUT TV S VIDEO VIDEO AUDIO S VIDEO AUDIO/VIDEO : Signal flow When you have finished...if you record a tape from . 67 Using the Remote Commander (DCR-TRV11/TRV20 only) In step 4, press z REC and MARK simultaneously, then immediately press X. Editing Recording video or TV programs Using the A/V connecting cable You can record a tape from another VCR or a TV program ...
Operating Instructions
Page 68
... TV programs Note When the picture from the VCR or TV does not appear on the VCR or the TV. If your camcorder and the VCR. Connect using an S video cable (not supplied) to obtain high-quality pictures With this connection, you do not need to the audio output jack on the LCD... screen or in the viewfinder, check if the A/V connecting cable is output. Connect an S video cable (not supplied) to the S (S1) video jacks of both your VCR is a monaural type Connect the yellow plug of the A/V connecting cable to the video output jack and the white or the red plug to connect the...
... TV programs Note When the picture from the VCR or TV does not appear on the VCR or the TV. If your camcorder and the VCR. Connect using an S video cable (not supplied) to obtain high-quality pictures With this connection, you do not need to the audio output jack on the LCD... screen or in the viewfinder, check if the A/V connecting cable is output. Connect an S video cable (not supplied) to the S (S1) video jacks of both your VCR is a monaural type Connect the yellow plug of the A/V connecting cable to the video output jack and the white or the red plug to connect the...

Operating Instructions
Page 69
With digital-to-digital connection, video and audio signals are transmitted in digital form for high-quality editing. (1) Insert a blank tape (or a tape you want to record over) into your camcorder, and insert the recorded tape into the VCR. ...DCR-TRV11/TRV20 only) In step 4, press z REC and MARK simultaneously, then immediately press X. And in step 6, press X at the scene where you want to LCD in the viewfinder. (6) Press X on your camcorder and the VCR. Recording video or TV programs Using the i.LINK cable (DV connecting cable) Simply connect the i.LINK cable (DV connecting cable...
With digital-to-digital connection, video and audio signals are transmitted in digital form for high-quality editing. (1) Insert a blank tape (or a tape you want to record over) into your camcorder, and insert the recorded tape into the VCR. ...DCR-TRV11/TRV20 only) In step 4, press z REC and MARK simultaneously, then immediately press X. And in step 6, press X at the scene where you want to LCD in the viewfinder. (6) Press X on your camcorder and the VCR. Recording video or TV programs Using the i.LINK cable (DV connecting cable) Simply connect the i.LINK cable (DV connecting cable...

Operating Instructions
Page 70
And when you play back the picture using the i.LINK cable (DV connecting cable) When you record playback pause picture with the DV IN/OUT jack The recorded picture becomes rough. Recording video or TV programs You can connect one VCR only using your camcorder, the picture may be uneven. However this does not affect the dubbed picture. Before recording Make sure if the DV IN indicator appears on both equipment. 70 If you dub a picture in the viewfinder. The DV IN indicator may appear on the LCD screen or in digital form The color of the display may jitter.
And when you play back the picture using the i.LINK cable (DV connecting cable) When you record playback pause picture with the DV IN/OUT jack The recorded picture becomes rough. Recording video or TV programs You can connect one VCR only using your camcorder, the picture may be uneven. However this does not affect the dubbed picture. Before recording Make sure if the DV IN indicator appears on both equipment. 70 If you dub a picture in the viewfinder. The DV IN indicator may appear on the LCD screen or in digital form The color of the display may jitter.
Operating Instructions
Page 76
... DCR-TRV6/TRV11/TRV20), the sound quality may become worse. On blank portions You cannot add an audio. 76 To add new sound more precisely Press ZERO SET MEMORY on a tape already recorded in the LP mode. • You cannot add audio with your camcorder You cannot add a sound to a ...following order. • MIC (PLUG IN POWER) jack • Intelligent accessory shoe • AUDIO/VIDEO jack • Built-in microphone If an i.LINK cable (DV connecting cable) (not supplied) is connected to your camcorder If you add new sound on a tape. If you make all the connections The audio input ...
... DCR-TRV6/TRV11/TRV20), the sound quality may become worse. On blank portions You cannot add an audio. 76 To add new sound more precisely Press ZERO SET MEMORY on a tape already recorded in the LP mode. • You cannot add audio with your camcorder You cannot add a sound to a ...following order. • MIC (PLUG IN POWER) jack • Intelligent accessory shoe • AUDIO/VIDEO jack • Built-in microphone If an i.LINK cable (DV connecting cable) (not supplied) is connected to your camcorder If you add new sound on a tape. If you make all the connections The audio input ...

Operating Instructions
Page 109
The title does not appear while you press the button. When you press PHOTO on the Remote Commander Your camcorder immediately records the image that is displayed on the LCD screen or in the viewfinder. (3) Follow steps 3 and 4 on a mini DV tape You cannot record ... plug of the other equipment (1) Set the POWER switch to VCR and set DISPLAY in to the video jack on the screen when you are recording a still picture with PHOTO. The image of the A/V connecting cable to LCD in the menu settings. (2) Play back the recorded tape, or turn the TV on "Memory...
The title does not appear while you press the button. When you press PHOTO on the Remote Commander Your camcorder immediately records the image that is displayed on the LCD screen or in the viewfinder. (3) Follow steps 3 and 4 on a mini DV tape You cannot record ... plug of the other equipment (1) Set the POWER switch to VCR and set DISPLAY in to the video jack on the screen when you are recording a still picture with PHOTO. The image of the A/V connecting cable to LCD in the menu settings. (2) Play back the recorded tape, or turn the TV on "Memory...

Operating Instructions
Page 110
This connection produces higher quality DV format pictures. 110 Recording an image from a mini DV tape as a still image When recording the image through the DV IN/OUT jack DV S VIDEO LANC : Signal flow i.LINK cable (DV connecting cable) Connect using an S video cable (not supplied) to obtain high-quality pictures With this connection, you do not need to the S video jacks of the A/V connecting cable. Connect an S video cable (not supplied) to connect the yellow (video) plug of both your camcorder and the VCR.
This connection produces higher quality DV format pictures. 110 Recording an image from a mini DV tape as a still image When recording the image through the DV IN/OUT jack DV S VIDEO LANC : Signal flow i.LINK cable (DV connecting cable) Connect using an S video cable (not supplied) to obtain high-quality pictures With this connection, you do not need to the S video jacks of the A/V connecting cable. Connect an S video cable (not supplied) to connect the yellow (video) plug of both your camcorder and the VCR.
Operating Instructions
Page 126
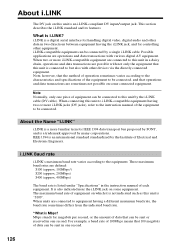
...equipment on which it is not indicated such as this unit is an i.LINK-compliant DV input/output jack. i.LINK is a digital serial interface for handling digital video, digital audio and other data in one piece of Electrical and Electronic Engineers. Three maximum baud rates are defined: S100 (approx. 100Mbps... cable). When units are operations and data transactions with not only the equipment that 100 megabits of data can be connected. Mbps stands for IEEE 1394 data transport bus proposed by SONY, and is a more i.LINK jacks (DV jacks), refer to the instruction manual of the ...
...equipment on which it is not indicated such as this unit is an i.LINK-compliant DV input/output jack. i.LINK is a digital serial interface for handling digital video, digital audio and other data in one piece of Electrical and Electronic Engineers. Three maximum baud rates are defined: S100 (approx. 100Mbps... cable). When units are operations and data transactions with not only the equipment that 100 megabits of data can be connected. Mbps stands for IEEE 1394 data transport bus proposed by SONY, and is a more i.LINK jacks (DV jacks), refer to the instruction manual of the ...

Operating Instructions
Page 127
Before connecting this unit to a personal computer, make sure that application software supported by SONY (e.g. Additional Information About i.LINK i.LINK functions on this unit For details on how to dub when this unit is already installed on precautions... compatible equipment made by this unit is connected to other than video equipment. VAIO series personal computer) other video equipment having DV jacks, see page 55, 69. For details on the personal computer. Required i.LINK Cable Use the Sony i.LINK 4-pin-to-4-pin cable (during DV dubbing). i.LINK and are trademarks. 127 This ...
Before connecting this unit to a personal computer, make sure that application software supported by SONY (e.g. Additional Information About i.LINK i.LINK functions on this unit For details on how to dub when this unit is already installed on precautions... compatible equipment made by this unit is connected to other than video equipment. VAIO series personal computer) other video equipment having DV jacks, see page 55, 69. For details on the personal computer. Required i.LINK Cable Use the Sony i.LINK 4-pin-to-4-pin cable (during DV dubbing). i.LINK and are trademarks. 127 This ...
Operating Instructions
Page 136
... dub new sound. • "i.LINK" CABLE i.LINK cable is connected (p. 76).* You cannot dub new sound. • FULL The "Memory Stick" is full.* (DCR-TRV11/TRV20 only) (p. 103) • The write-protect tab on the "Memory Stick" is set to LOCK (p. 93).* (DCR-TRV11/TRV20 only) • NO FILE No still image is more than two same...
... dub new sound. • "i.LINK" CABLE i.LINK cable is connected (p. 76).* You cannot dub new sound. • FULL The "Memory Stick" is full.* (DCR-TRV11/TRV20 only) (p. 103) • The write-protect tab on the "Memory Stick" is set to LOCK (p. 93).* (DCR-TRV11/TRV20 only) • NO FILE No still image is more than two same...
Operating Instructions
Page 152
...mode 89 AUTO SHTR 86 A/V connecting cable...DIGITAL EFFECT 38, 46 DIGITAL I/O/ (LANC 148 Digital program editing ......... 56 DISPLAY 26 Dual sound track tape .......... 125 Dubbing a tape 54 DV connecting cable... ......... 55, 69 E EDITSEARCH 24 END SEARCH 24, 27 Exposure 43 External microphone (not supplied 148 F, G, H FADER 35 Fade in/out 35 FLASH MOTION 38 FOCUS 44 Format 93 Full charge 11 Grip strap 147 Headphone jack 148 Heads 139 HiFi SOUND 87 I, J, K, L i.LINK 126 Image protection 120 Image quality mode... mode ... video...STILL...mode 34 WIPE 35 WORLD TIME 91 Write-protect...
...mode 89 AUTO SHTR 86 A/V connecting cable...DIGITAL EFFECT 38, 46 DIGITAL I/O/ (LANC 148 Digital program editing ......... 56 DISPLAY 26 Dual sound track tape .......... 125 Dubbing a tape 54 DV connecting cable... ......... 55, 69 E EDITSEARCH 24 END SEARCH 24, 27 Exposure 43 External microphone (not supplied 148 F, G, H FADER 35 Fade in/out 35 FLASH MOTION 38 FOCUS 44 Format 93 Full charge 11 Grip strap 147 Headphone jack 148 Heads 139 HiFi SOUND 87 I, J, K, L i.LINK 126 Image protection 120 Image quality mode... mode ... video...STILL...mode 34 WIPE 35 WORLD TIME 91 Write-protect...

