
Operating Guide
Page 1
3-098-548-11(1) Digital Video Camera Recorder Operating Guide DCR-SR42/SR62/SR82/SR200/SR300 For details on the advanced operations, please refer to "Handycam Handbook" (PDF). © 2007 Sony Corporation
3-098-548-11(1) Digital Video Camera Recorder Operating Guide DCR-SR42/SR62/SR82/SR200/SR300 For details on the advanced operations, please refer to "Handycam Handbook" (PDF). © 2007 Sony Corporation
Operating Guide
Page 5
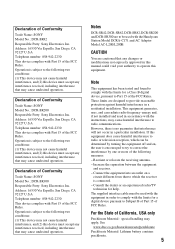
...technician for a digital device pursuant to Subpart B of Part 15 of Conformity Trade Name: SONY Model No.: DCR-SR300 Responsible Party: Sony Electronics Inc. special handling may cause undesired operation. Declaration of Conformity Trade Name: SONY Model No.: DCR-SR200 Responsible Party: Sony Electronics Inc....Handycam Station Model DCRA-C171 and AC Adaptor Model AC-L200/L200B. For the State of the FCC Rules. Operation is subject to Part 15 of the following two conditions: (1) This device may cause undesired operation. Notes DCR-SR42, DCR-SR62, DCR-SR82, DCR-SR200 and DCR-SR300...
...technician for a digital device pursuant to Subpart B of Part 15 of Conformity Trade Name: SONY Model No.: DCR-SR300 Responsible Party: Sony Electronics Inc. special handling may cause undesired operation. Declaration of Conformity Trade Name: SONY Model No.: DCR-SR200 Responsible Party: Sony Electronics Inc....Handycam Station Model DCRA-C171 and AC Adaptor Model AC-L200/L200B. For the State of the FCC Rules. Operation is subject to Part 15 of the following two conditions: (1) This device may cause undesired operation. Notes DCR-SR42, DCR-SR62, DCR-SR82, DCR-SR200 and DCR-SR300...

Operating Guide
Page 7
.... * Refer to "Handycam Handbook" (PDF). 7 On recording • Before starting to record, test the recording function to make sure the image and sound are recorded without notice. • Unless otherwise specially indicated, illustrations in such situations. Do not apply shock or vibration to your camcorder if necessary (p.13). When the camcorder is on DCR-SR300. • The...
.... * Refer to "Handycam Handbook" (PDF). 7 On recording • Before starting to record, test the recording function to make sure the image and sound are recorded without notice. • Unless otherwise specially indicated, illustrations in such situations. Do not apply shock or vibration to your camcorder if necessary (p.13). When the camcorder is on DCR-SR300. • The...

Operating Guide
Page 9
... manual) (1) 9 AC Adaptor (1) (p.11) Power cord (1) (p.11) Wireless Remote Commander (1) (except for DCR-SR42) A button-type lithium battery is already installed. Rechargeable battery pack NP-FH40 (1) (p.11) (DCR-SR42/SR62/ SR82) NP-FH60 (1) (p.11) (DCR-SR200/SR300) Handycam Station (1) (p.11) A/V connecting cable (1) (p.25) USB cable (1) (p.27) CD-ROM "Handycam Application Software" (1) (p.26) - Picture Motion Browser (Software) -
... manual) (1) 9 AC Adaptor (1) (p.11) Power cord (1) (p.11) Wireless Remote Commander (1) (except for DCR-SR42) A button-type lithium battery is already installed. Rechargeable battery pack NP-FH40 (1) (p.11) (DCR-SR42/SR62/ SR82) NP-FH60 (1) (p.11) (DCR-SR200/SR300) Handycam Station (1) (p.11) A/V connecting cable (1) (p.25) USB cable (1) (p.27) CD-ROM "Handycam Application Software" (1) (p.26) - Picture Motion Browser (Software) -
Operating Guide
Page 11
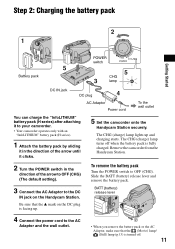
... that the (Movie) lamp/ (Still) lamp (p.13) is turned off when the battery pack is facing up and charging starts. Remove the camcorder from the Handycam Station. 2 Turn the POWER switch in the direction of the arrow to OFF (CHG) (The default setting). 3 Connect the AC Adaptor to the DC IN... the AC Adaptor and the wall outlet. • When you remove the battery pack or the AC Adaptor, make sure that the v mark on the Handycam Station. To remove the battery pack Turn the POWER switch to OFF (CHG). Step 2: Charging the battery pack Getting Started POWER switch Battery pack CHG...
... that the (Movie) lamp/ (Still) lamp (p.13) is turned off when the battery pack is facing up and charging starts. Remove the camcorder from the Handycam Station. 2 Turn the POWER switch in the direction of the arrow to OFF (CHG) (The default setting). 3 Connect the AC Adaptor to the DC IN... the AC Adaptor and the wall outlet. • When you remove the battery pack or the AC Adaptor, make sure that the v mark on the Handycam Station. To remove the battery pack Turn the POWER switch to OFF (CHG). Step 2: Charging the battery pack Getting Started POWER switch Battery pack CHG...

Operating Guide
Page 12
...AC Adaptor or battery terminal with any malfunction occurs while using your camcorder. • Do not use your camcorder or the Handycam Station, even when the power cord is still supplied to it while connected to the DC IN jack of your camcorder....pack. NP-FH40: (Unit:min.) DCR-SR42 Charging time 125 Recording time*1 Continuous 105 recording time Typical recording time*4 50 Playback time 120 DCR-SR62/ SR82 125 90*2 100*3 45*2 50*3 110*2 12 NP-FH60: (Unit:min.) DCR-SR200 DCR-SR300 Charging time 135 135 Recording time*1 Continuous recording time 115*2 120*3 95*2 100...
...AC Adaptor or battery terminal with any malfunction occurs while using your camcorder. • Do not use your camcorder or the Handycam Station, even when the power cord is still supplied to it while connected to the DC IN jack of your camcorder....pack. NP-FH40: (Unit:min.) DCR-SR42 Charging time 125 Recording time*1 Continuous 105 recording time Typical recording time*4 50 Playback time 120 DCR-SR62/ SR82 125 90*2 100*3 45*2 50*3 110*2 12 NP-FH60: (Unit:min.) DCR-SR200 DCR-SR300 Charging time 135 135 Recording time*1 Continuous recording time 115*2 120*3 95*2 100...

Operating Guide
Page 16
...DCR-SR42: 5,900 ([VGA (0.3M)]) DCR-SR62/SR82: 1,800 ([1.0M]) DCR-SR200: 480 ([4.0M]) DCR-SR300: 315 ([6.1M]) • All numbers measured when using a "Memory Stick Duo" made by pressing PHOTO during Easy Handycam operation. The number of recordable images varies depending on the recording environment. • The number of recordable...it means data is still being written onto the hard disk or "Memory Stick Duo." • You can use some buttons/functions during movie recording (DCR-SR200/ SR300). • The maximum continuous recordable time is approximately 13 hours. • When ...
...DCR-SR42: 5,900 ([VGA (0.3M)]) DCR-SR62/SR82: 1,800 ([1.0M]) DCR-SR200: 480 ([4.0M]) DCR-SR300: 315 ([6.1M]) • All numbers measured when using a "Memory Stick Duo" made by pressing PHOTO during Easy Handycam operation. The number of recordable images varies depending on the recording environment. • The number of recordable...it means data is still being written onto the hard disk or "Memory Stick Duo." • You can use some buttons/functions during movie recording (DCR-SR200/ SR300). • The maximum continuous recordable time is approximately 13 hours. • When ...
Operating Guide
Page 19
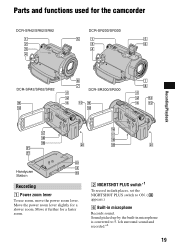
Move it further for a faster zoom. 2 NIGHTSHOT PLUS switch*1 To record in microphone Records sound. Sound picked up by the built-in microphone is converted to ON. ( appears.) 6 Built-in dark places, set the NIGHTSHOT PLUS switch to 5.1ch surround sound and recorded.*2 19 Move the power zoom lever slightly for the camcorder DCR-SR42/SR62/SR82 DCR-SR200/SR300 DCR-SR42/SR62/SR82 DCR-SR200/SR300 Recording/Playback Handycam Station Recording 1 Power zoom lever To use zoom, move the power zoom lever. Parts and functions used for a slower zoom.
Move it further for a faster zoom. 2 NIGHTSHOT PLUS switch*1 To record in microphone Records sound. Sound picked up by the built-in microphone is converted to ON. ( appears.) 6 Built-in dark places, set the NIGHTSHOT PLUS switch to 5.1ch surround sound and recorded.*2 19 Move the power zoom lever slightly for the camcorder DCR-SR42/SR62/SR82 DCR-SR200/SR300 DCR-SR42/SR62/SR82 DCR-SR200/SR300 Recording/Playback Handycam Station Recording 1 Power zoom lever To use zoom, move the power zoom lever. Parts and functions used for a slower zoom.
Operating Guide
Page 21
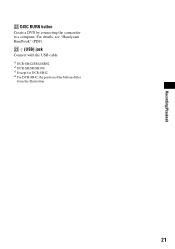
For details, see "Handycam Handbook" (PDF). wd (USB) jack Connect with the USB cable. *1 DCR-SR42/SR62/SR82 *2 DCR-SR200/SR300 *3 Except for DCR-SR42 *4 For DCR-SR42, the position of the buttons differ from the illustration. 21 Recording/Playback ws DISC BURN button Create a DVD by connecting the camcorder to a computer.
For details, see "Handycam Handbook" (PDF). wd (USB) jack Connect with the USB cable. *1 DCR-SR42/SR62/SR82 *2 DCR-SR200/SR300 *3 Except for DCR-SR42 *4 For DCR-SR42, the position of the buttons differ from the illustration. 21 Recording/Playback ws DISC BURN button Create a DVD by connecting the camcorder to a computer.

Operating Guide
Page 24
... [ DELETE]. 2 Touch [ DELETE], then touch the still image to be deleted. For details, see "Handycam Handbook" (PDF). Creating a DVD with One Touch (One Touch Disc Burn) You can save images recorded on the camcorder on the camcorder as a DVD-R or a computer. Saving images by connecting your camcorder. Deleting... computer By using the software on the supplied CD-ROM, you save the images recorded on the hard disk of a computer. Saving images Deleting images Recorded images are stored on the internal hard disk of your camcorder to other devices You can dub images to VCR or DVD/...
... [ DELETE]. 2 Touch [ DELETE], then touch the still image to be deleted. For details, see "Handycam Handbook" (PDF). Creating a DVD with One Touch (One Touch Disc Burn) You can save images recorded on the camcorder on the camcorder as a DVD-R or a computer. Saving images by connecting your camcorder. Deleting... computer By using the software on the supplied CD-ROM, you save the images recorded on the hard disk of a computer. Saving images Deleting images Recorded images are stored on the internal hard disk of your camcorder to other devices You can dub images to VCR or DVD/...
Operating Guide
Page 25
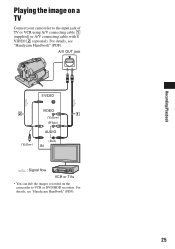
Recording/Playback Playing the image on the camcorder to the input jack of TV or VCR using A/V connecting cable 1 (supplied) or A/V connecting cable with S VIDEO 2 (optional). A/V OUT jack S VIDEO VIDEO (Yellow) (White) AUDIO (Yellow) (Red) IN : Signal flow VCR or TVs • You can dub the images recorded on a TV Connect your camcorder to VCR or DVD/HDD recorders. For details, see "Handycam Handbook" (PDF). For details, see "Handycam Handbook" (PDF). 25
Recording/Playback Playing the image on the camcorder to the input jack of TV or VCR using A/V connecting cable 1 (supplied) or A/V connecting cable with S VIDEO 2 (optional). A/V OUT jack S VIDEO VIDEO (Yellow) (White) AUDIO (Yellow) (Red) IN : Signal flow VCR or TVs • You can dub the images recorded on a TV Connect your camcorder to VCR or DVD/HDD recorders. For details, see "Handycam Handbook" (PDF). For details, see "Handycam Handbook" (PDF). 25
Operating Guide
Page 26
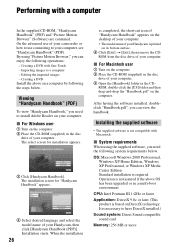
... and then drag-and-drop the "Handbook.pdf" on the computer. 2 Place the CD-ROM (supplied) in the disc drive of your Handycam is not assured if the above on DirectX technology. ROM from the disc drive of your computer. 3 Open the [Handbook] folder in a multi-boot environment. CPU: Intel Pentium III 1 GHz or faster...
... and then drag-and-drop the "Handbook.pdf" on the computer. 2 Place the CD-ROM (supplied) in the disc drive of your Handycam is not assured if the above on DirectX technology. ROM from the disc drive of your computer. 3 Open the [Handbook] folder in a multi-boot environment. CPU: Intel Pentium III 1 GHz or faster...

Operating Guide
Page 27
Contents to your computer. The installation screen appears. Recording/Playback Hard disk: Available free hard disk space for installation required: Approximately 600 MB (for creating a DVD, 5 GB or more may be required) Display: DirectX 7 or later-compatible video card, Minimum 1024 × 768 dots, High Color ...) • Even in the disc drive of your computer using the supplied USB cable, then click [Next] on the connection confirmation screen. The sound is not connected to restart it to the computer. Provide the camcorder and the Handycam Station, and a USB cable ...
Contents to your computer. The installation screen appears. Recording/Playback Hard disk: Available free hard disk space for installation required: Approximately 600 MB (for creating a DVD, 5 GB or more may be required) Display: DirectX 7 or later-compatible video card, Minimum 1024 × 768 dots, High Color ...) • Even in the disc drive of your computer using the supplied USB cable, then click [Next] on the connection confirmation screen. The sound is not connected to restart it to the computer. Provide the camcorder and the Handycam Station, and a USB cable ...

Operating Guide
Page 28
.... Microsoft DirectX 9.0c Software required to handle movies Restart the computer if required to install the software. To see "Handycam Handbook" (PDF). http://www.sony.net/registration/di/ • For the information about Picture Motion Browser, visit the following URL: http://www....sony.net/support-disoft/ Performing various functions - After you may need to change the page. • To hide the HOME MENU screen, touch . • You cannot select or activate simultaneously the grayed items in the current recording/playback situation. qa Remove the CD-ROM from the disc drive of...
.... Microsoft DirectX 9.0c Software required to handle movies Restart the computer if required to install the software. To see "Handycam Handbook" (PDF). http://www.sony.net/registration/di/ • For the information about Picture Motion Browser, visit the following URL: http://www....sony.net/support-disoft/ Performing various functions - After you may need to change the page. • To hide the HOME MENU screen, touch . • You cannot select or activate simultaneously the grayed items in the current recording/playback situation. qa Remove the CD-ROM from the disc drive of...
Operating Guide
Page 29
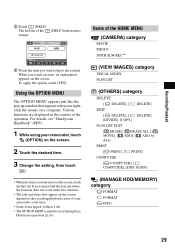
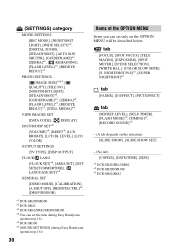
...appear without a tab. • The OPTION MENU cannot be used during Easy Handycam operation (p.16). Recording/Playback 2 Touch (HELP). When you want to know the content. The bottom...screen, touch another tab. Various functions are displayed in the context of the HOME MENU (CAMERA) category MOVIE PHOTO SMTH SLW REC*1 (VIEW IMAGES) category VISUAL INDEX PLAYLIST (OTHERS) ... MOVE], [ ADD], [ ADD by date] PRINT [ PRINT], [ PRINT] COMPUTER [ COMPUTER], [ COMPUTER], [DISC BURN] (MANAGE HDD/MEMORY) category FORMAT FORMAT INFO 29 Using the OPTION MENU The OPTION MENU appears just like the...
...appear without a tab. • The OPTION MENU cannot be used during Easy Handycam operation (p.16). Recording/Playback 2 Touch (HELP). When you want to know the content. The bottom...screen, touch another tab. Various functions are displayed in the context of the HOME MENU (CAMERA) category MOVIE PHOTO SMTH SLW REC*1 (VIEW IMAGES) category VISUAL INDEX PLAYLIST (OTHERS) ... MOVE], [ ADD], [ ADD by date] PRINT [ PRINT], [ PRINT] COMPUTER [ COMPUTER], [ COMPUTER], [DISC BURN] (MANAGE HDD/MEMORY) category FORMAT FORMAT INFO 29 Using the OPTION MENU The OPTION MENU appears just like the...
Operating Guide
Page 30
... tab [MICREF LEVEL], [SELF-TIMER], [FLASH MODE]*3, [TIMING]*2, [RECORD SOUND]*2 - (A tab depends on the OPTION MENU will be described below. (SETTINGS) category MOVIE SETTINGS [REC MODE], [NIGHTSHOT LIGHT], [WIDE SELECT]*2, [DIGITAL ZOOM], [STEADYSHOT], [AUTO SLW SHUTTR], [GUIDEFRAME]*1, [ZEBRA]*1, [ ...CALIBRATION], [A.SHUT OFF], [REMOTE CTRL]*3, [DROP SENSOR] *1 DCR-SR200/SR300 *2 DCR-SR42 *3 DCR-SR62/SR82/SR200/SR300 *4 You can set the item during Easy Handycam operation (p.16). *5 DCR-SR300 *6 [SOUND SETTINGS] (during Easy Handycam operation (p.16)) 30 Items of the OPTION MENU Items you...
... tab [MICREF LEVEL], [SELF-TIMER], [FLASH MODE]*3, [TIMING]*2, [RECORD SOUND]*2 - (A tab depends on the OPTION MENU will be described below. (SETTINGS) category MOVIE SETTINGS [REC MODE], [NIGHTSHOT LIGHT], [WIDE SELECT]*2, [DIGITAL ZOOM], [STEADYSHOT], [AUTO SLW SHUTTR], [GUIDEFRAME]*1, [ZEBRA]*1, [ ...CALIBRATION], [A.SHUT OFF], [REMOTE CTRL]*3, [DROP SENSOR] *1 DCR-SR200/SR300 *2 DCR-SR42 *3 DCR-SR62/SR82/SR200/SR300 *4 You can set the item during Easy Handycam operation (p.16). *5 DCR-SR300 *6 [SOUND SETTINGS] (during Easy Handycam operation (p.16)) 30 Items of the OPTION MENU Items you...

Operating Guide
Page 31
... However, your Sony dealer will be ready to shoot after about 1 minute. The power abruptly turns off. • When approximately 5 minutes have just shot on the hard disk in a cool/warm place. 31 Set your camcorder to recording standby (p.15). • Your camcorder is recording the image you...persists, disconnect the power source and contact your camcorder is because the power has been turned on for a long time. Cancel Easy Handycam operation. Turn off the camcorder and take it after the power is full. Turn off (A.SHUT OFF). This is extremely high. ...
... However, your Sony dealer will be ready to shoot after about 1 minute. The power abruptly turns off. • When approximately 5 minutes have just shot on the hard disk in a cool/warm place. 31 Set your camcorder to recording standby (p.15). • Your camcorder is recording the image you...persists, disconnect the power source and contact your camcorder is because the power has been turned on for a long time. Cancel Easy Handycam operation. Turn off the camcorder and take it after the power is full. Turn off (A.SHUT OFF). This is extremely high. ...

Operating Guide
Page 32
Lights appear on the screen even if the lens cover is closed (DCR-SR42/ SR62/SR82). • When you turn on your camcorder while .../ E:62:ss / E:91:ss / E:94:ss • A malfunction that you cannot activate simultaneously. Inform them of the 5-digit code, which starts from "E." 101-0001 (Warning indicator pertaining to the DC IN jack of the lens cover may appear on the ...) C:04:ss • The battery pack is closed, lights through gaps of the Handycam Station or your Sony dealer or local authorized Sony service facility. Reconnect it and operate your camcorder again. • Turn on your...
Lights appear on the screen even if the lens cover is closed (DCR-SR42/ SR62/SR82). • When you turn on your camcorder while .../ E:62:ss / E:91:ss / E:94:ss • A malfunction that you cannot activate simultaneously. Inform them of the 5-digit code, which starts from "E." 101-0001 (Warning indicator pertaining to the DC IN jack of the lens cover may appear on the ...) C:04:ss • The battery pack is closed, lights through gaps of the Handycam Station or your Sony dealer or local authorized Sony service facility. Reconnect it and operate your camcorder again. • Turn on your...

Operating Guide
Page 38
Handycam Station DCRA-C171 Input/Output connectors Audio/Video output 10 pin connector Video signal: 1 Vp-p, 75 Ω (ohms) Luminance signal: 1 Vp-p, 75 Ω (ohms) Chrominance signal: 0.286 Vp-p, 75 Ω (ohms) Audio signal: 327 mV (at load impedance .../16 in.)(w×h×d) Mass (Approx.) 45 g (1.6 oz) Operating temperature 0°C to + 40°C (32°F to 104°F) 38 Type Li-ion NP-FH60 (DCR-SR200/SR300) Maximum output voltage DC 8.4 V Output voltage DC 7.2 V Capacity 7.2 wh (1 000 mAh) Dimensions (Approx.) 31.8 × 33.3 × 45.0 mm (1 5/16 × 1 5/16 × 1 13...
Handycam Station DCRA-C171 Input/Output connectors Audio/Video output 10 pin connector Video signal: 1 Vp-p, 75 Ω (ohms) Luminance signal: 1 Vp-p, 75 Ω (ohms) Chrominance signal: 0.286 Vp-p, 75 Ω (ohms) Audio signal: 327 mV (at load impedance .../16 in.)(w×h×d) Mass (Approx.) 45 g (1.6 oz) Operating temperature 0°C to + 40°C (32°F to 104°F) 38 Type Li-ion NP-FH60 (DCR-SR200/SR300) Maximum output voltage DC 8.4 V Output voltage DC 7.2 V Capacity 7.2 wh (1 000 mAh) Dimensions (Approx.) 31.8 × 33.3 × 45.0 mm (1 5/16 × 1 5/16 × 1 13...
Operating Guide
Page 39
...8226; "Handycam" and are registered trademarks of Sony Corporation. • "Memory Stick," " ," "Memory Stick Duo," " PRO Duo," " "MagicGate," " ," "Memory Stick ," ," "MagicGate Memory Stick" and "MagicGate Memory Stick Duo" are trademarks of Sony Corporation. • "InfoLITHIUM" is a trademark of Sony Corporation. &#...8226; DVD-R, DVD+R DL, DVD-RW, and DVD+RW logo are trademarks. • Dolby and the double-D symbol are trademarks of Dolby Laboratories. • Dolby Digital 5.1 Creator ...
...8226; "Handycam" and are registered trademarks of Sony Corporation. • "Memory Stick," " ," "Memory Stick Duo," " PRO Duo," " "MagicGate," " ," "Memory Stick ," ," "MagicGate Memory Stick" and "MagicGate Memory Stick Duo" are trademarks of Sony Corporation. • "InfoLITHIUM" is a trademark of Sony Corporation. &#...8226; DVD-R, DVD+R DL, DVD-RW, and DVD+RW logo are trademarks. • Dolby and the double-D symbol are trademarks of Dolby Laboratories. • Dolby Digital 5.1 Creator ...


