Operating Instructions
Page 160
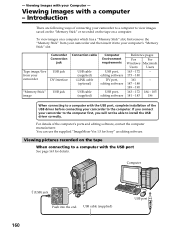
..." or recorded on the tape on the tape When connecting to install the USB driver correctly. Computer (USB) jack Push into your camcorder to a computer to the computer. Tape image/live from your camcorder and then insert it into the end. For details of connecting your computer's "... USB port, editing software Reference pages For For Windows Macintosh Users Users 163 - 172 - 173 - 180 161 - 187 - 188 189 - 190 163 - 172 184 - 185 181 - 183 186 When connecting to a computer with the USB port See page 163 for Sony" as editing software. - Viewing Images with a...
..." or recorded on the tape on the tape When connecting to install the USB driver correctly. Computer (USB) jack Push into your camcorder to a computer to the computer. Tape image/live from your camcorder and then insert it into the end. For details of connecting your computer's "... USB port, editing software Reference pages For For Windows Macintosh Users Users 163 - 172 - 173 - 180 161 - 187 - 188 189 - 190 163 - 172 184 - 185 181 - 183 186 When connecting to a computer with the USB port See page 163 for Sony" as editing software. - Viewing Images with a...
Operating Instructions
Page 163
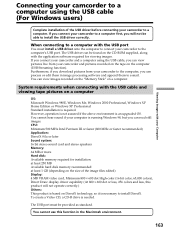
The USB driver can view images recorded on the "Memory Stick" on a computer. To create a Video CD, a CD-R drive is an upgraded OS. If you connect your camcorder and a computer using the USB cable (For Windows users) Complete installation of the image files edited) Display: 4 MB VRAM video card..., Minimum 800 × 600 dot High-color (16 bit color, 65,000 colors), Direct Draw display driver capability (At 800 ×...
The USB driver can view images recorded on the "Memory Stick" on a computer. To create a Video CD, a CD-R drive is an upgraded OS. If you connect your camcorder and a computer using the USB cable (For Windows users) Complete installation of the image files edited) Display: 4 MB VRAM video card..., Minimum 800 × 600 dot High-color (16 bit color, 65,000 colors), Direct Draw display driver capability (At 800 ×...
Operating Instructions
Page 164
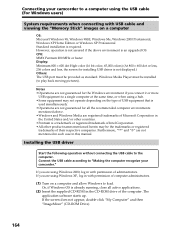
... less, the screen for all active applications. (2) Insert the supplied CD-ROM in the CD-ROM drive of administrators. Windows Media Player must be provided as standard. Connecting your camcorder." Installing the USB driver Start the following operation without connecting the USB cable to a single computer at the same time, or when using...
... less, the screen for all active applications. (2) Insert the supplied CD-ROM in the CD-ROM drive of administrators. Windows Media Player must be provided as standard. Connecting your camcorder." Installing the USB driver Start the following operation without connecting the USB cable to a single computer at the same time, or when using...
Operating Instructions
Page 165
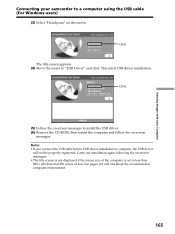
... appears. (4) Move the cursor to a computer using the USB cable (For Windows users) (3) Select "Handycam" on -screen messages. See pages 163 and 164 about the recommended computer environment. 165 This starts USB driver installation. Viewing Images with your Computer Connecting your camcorder to "USB Driver" and click. Click (5) Follow the on -screen messages. •The...
... appears. (4) Move the cursor to a computer using the USB cable (For Windows users) (3) Select "Handycam" on -screen messages. See pages 163 and 164 about the recommended computer environment. 165 This starts USB driver installation. Viewing Images with your Computer Connecting your camcorder to "USB Driver" and click. Click (5) Follow the on -screen messages. •The...

Operating Instructions
Page 166
...Handycam" on -screen messages. Or, if Windows OS is already running, close all active applications. (2) Insert the supplied CD-ROM in with permission of administrators. The title screen appears. (4) Move the cursor to a computer using the USB cable (For Windows users) Installing Image Transfer Make sure USB driver... function enables image data recorded on your computer and allow Windows to your camcorder to "Image Transfer" and click. The installation screen disappears when installation is complete. If you are using Windows XP, log in the CD-ROM drive of computer administrators...
...Handycam" on -screen messages. Or, if Windows OS is already running, close all active applications. (2) Insert the supplied CD-ROM in with permission of administrators. The title screen appears. (4) Move the cursor to a computer using the USB cable (For Windows users) Installing Image Transfer Make sure USB driver... function enables image data recorded on your computer and allow Windows to your camcorder to "Image Transfer" and click. The installation screen disappears when installation is complete. If you are using Windows XP, log in the CD-ROM drive of computer administrators...
Operating Instructions
Page 167
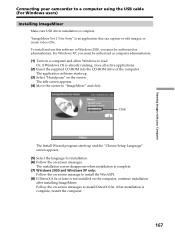
...after installing ImageMixer. The application software starts up and the "Choose Setup Language" screen appears. (5) Select the language for Sony" is complete, restart the computer. 167 The installation screen disappears when installation is not installed on -screen messages. To ... program starts up . (3) Select "Handycam" on -screen messages to load. Follow the on the screen. Viewing Images with your Computer Connecting your camcorder to a computer using the USB cable (For Windows users) Installing ImageMixer Make sure USB driver installation is already running, close all...
...after installing ImageMixer. The application software starts up and the "Choose Setup Language" screen appears. (5) Select the language for Sony" is complete, restart the computer. 167 The installation screen disappears when installation is not installed on -screen messages. To ... program starts up . (3) Select "Handycam" on -screen messages to load. Follow the on the screen. Viewing Images with your Computer Connecting your camcorder to a computer using the USB cable (For Windows users) Installing ImageMixer Make sure USB driver installation is already running, close all...
Operating Instructions
Page 169
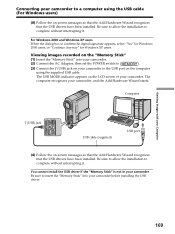
... sure to allow the installation to confirm the digital signature appears, select "Yes" for Windows 2000 users, or "Continue Anyway" for Windows XP users. You cannot install the USB driver if the "Memory Stick" is not in your camcorder Be sure to a computer using the supplied USB cable. Viewing Images with your Computer Connecting...
... sure to allow the installation to confirm the digital signature appears, select "Yes" for Windows 2000 users, or "Continue Anyway" for Windows XP users. You cannot install the USB driver if the "Memory Stick" is not in your camcorder Be sure to a computer using the supplied USB cable. Viewing Images with your Computer Connecting...
Operating Instructions
Page 170
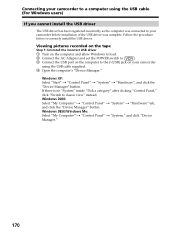
... the USB port on the computer to the (USB) jack on your camcorder before installation of the USB driver was complete. Windows XP: Select "Start" t "Control Panel" t "System" t "Hardware", and click the "Device Manager" button. Windows 98SE/Windows Me: Select "My Computer" t "Control Panel" t "System," and... click "Switch to correctly install the USB driver. Follow the procedure below to classic view" instead. Connecting your camcorder to a computer using the USB cable (For Windows users) If you cannot install the USB driver The USB driver has been registered incorrectly as the computer was...
... the USB port on the computer to the (USB) jack on your camcorder before installation of the USB driver was complete. Windows XP: Select "Start" t "Control Panel" t "System" t "Hardware", and click the "Device Manager" button. Windows 98SE/Windows Me: Select "My Computer" t "Control Panel" t "System," and... click "Switch to correctly install the USB driver. Follow the procedure below to classic view" instead. Connecting your camcorder to a computer using the USB cable (For Windows users) If you cannot install the USB driver The USB driver has been registered incorrectly as the computer was...
Operating Instructions
Page 172
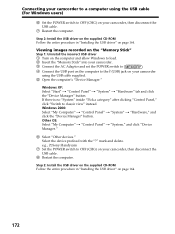
..." t "System" t "Hardware," and click the "Device Manager" button. e.g., (?)Sony Handycam 7 Set the POWER switch to classic view" instead. Step 2: Install the USB driver on the supplied CD-ROM Follow the entire procedure in "Installing the USB driver" on your camcorder, then disconnect the USB cable. 8 Restart the computer. Windows XP: Select "Start" t "Control Panel" t "System" t "Hardware...
..." t "System" t "Hardware," and click the "Device Manager" button. e.g., (?)Sony Handycam 7 Set the POWER switch to classic view" instead. Step 2: Install the USB driver on the supplied CD-ROM Follow the entire procedure in "Installing the USB driver" on your camcorder, then disconnect the USB cable. 8 Restart the computer. Windows XP: Select "Start" t "Control Panel" t "System" t "Hardware...
Operating Instructions
Page 173
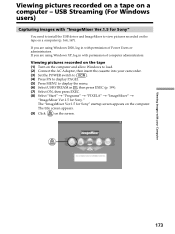
...on a tape on the screen. If you are using Windows 2000, log in with "ImageMixer Ver.1.5 for Sony" You need to install the USB driver and ImageMixer to display the menu. (6) Select USB STREAM in with your camcorder. (3) Set the POWER switch to . (4) Press ..." t "Programs" t "PIXELA" t "ImageMixer" t "ImageMixer Ver.1.5 for Sony" startup screen appears on a computer (p. 164, 167). The "ImageMixer Ver.1.5 for Sony." Viewing pictures recorded on the tape (1) Turn on the computer and allow Windows to load. (2) Connect the AC Adaptor, then insert the cassette into your Computer...
...on a tape on the screen. If you are using Windows 2000, log in with "ImageMixer Ver.1.5 for Sony" You need to install the USB driver and ImageMixer to display the menu. (6) Select USB STREAM in with your camcorder. (3) Set the POWER switch to . (4) Press ..." t "Programs" t "PIXELA" t "ImageMixer" t "ImageMixer Ver.1.5 for Sony" startup screen appears on a computer (p. 164, 167). The "ImageMixer Ver.1.5 for Sony." Viewing pictures recorded on the tape (1) Turn on the computer and allow Windows to load. (2) Connect the AC Adaptor, then insert the cassette into your Computer...

Operating Instructions
Page 177
...smoothly by the USB connection The USB driver has been registered incorrectly as the computer was connected to your camcorder before installation of your camcorder do not appear on the screen of the USB driver was complete. USB Streaming (For Windows users) Notes •When you capture ...a fast moving picture, the preview window may occur. This is not a malfunction...
...smoothly by the USB connection The USB driver has been registered incorrectly as the computer was connected to your camcorder before installation of your camcorder do not appear on the screen of the USB driver was complete. USB Streaming (For Windows users) Notes •When you capture ...a fast moving picture, the preview window may occur. This is not a malfunction...
Operating Instructions
Page 181
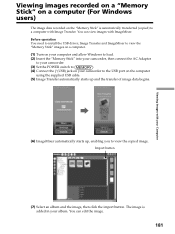
... operation You need to install the USB driver, Image Transfer and ImageMixer to view the "Memory Stick" images on a computer. (1) Turn on your computer and allow Windows to load. (2) Insert the "Memory Stick" into your camcorder, then connect the AC Adaptor to your camcorder. (3) Set the POWER switch to .... (4) Connect the (USB) jack on your camcorder to the USB port on the "Memory Stick" is ...
... operation You need to install the USB driver, Image Transfer and ImageMixer to view the "Memory Stick" images on a computer. (1) Turn on your computer and allow Windows to load. (2) Insert the "Memory Stick" into your camcorder, then connect the AC Adaptor to your camcorder. (3) Set the POWER switch to .... (4) Connect the (USB) jack on your camcorder to the USB port on the "Memory Stick" is ...
Operating Instructions
Page 182
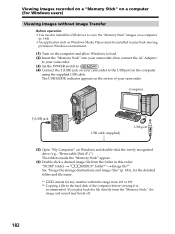
...a desired image file from the folder in Windows environment. (1) Turn on the computer and allow Windows to load. (2) Insert the "Memory Stick" into your camcorder, then connect the AC Adaptor to your camcorder. (3) Set the POWER switch to the USB port on Windows and double-click the newly recognized drive (e.g.,... to install the USB driver to view the "Memory Stick" images on a computer (p. 164). •An application such as Windows Media Player must be installed to play back the file directly from 101 to 999. *2) Copying a file to the hard disk of your camcorder to . (4) Connect ...
...a desired image file from the folder in Windows environment. (1) Turn on the computer and allow Windows to load. (2) Insert the "Memory Stick" into your camcorder, then connect the AC Adaptor to your camcorder. (3) Set the POWER switch to the USB port on Windows and double-click the newly recognized drive (e.g.,... to install the USB driver to view the "Memory Stick" images on a computer (p. 164). •An application such as Windows Media Player must be installed to play back the file directly from 101 to 999. *2) Copying a file to the hard disk of your camcorder to . (4) Connect ...


