Operating Instructions
Page 6
... the screen indicators - Display function 43 Viewing a recording on TV 47 Advanced Recording Operations Recording still images on tape - Frame recording 73 Using the viewfinder 74 Advanced Playback Operations Playing back a tape with picture effect 76 Playing back a tape with digital effect ... 77 Enlarging images recorded on a "Memory Stick" during tape recording standby or tape recording 49 Self-timer recording 51 Adjusting the white balance manually 53 Using the wide mode 55 Using the fader function 57 Using special effects - NightShot/Super NightShot/ Color Slow Shutter...
... the screen indicators - Display function 43 Viewing a recording on TV 47 Advanced Recording Operations Recording still images on tape - Frame recording 73 Using the viewfinder 74 Advanced Playback Operations Playing back a tape with picture effect 76 Playing back a tape with digital effect ... 77 Enlarging images recorded on a "Memory Stick" during tape recording standby or tape recording 49 Self-timer recording 51 Adjusting the white balance manually 53 Using the wide mode 55 Using the fader function 57 Using special effects - NightShot/Super NightShot/ Color Slow Shutter...
Operating Instructions
Page 44
... [d] White balance [e] Gain [f] Shutter speed [g] Aperture value To not display date/time or the various data Select OFF in step 4. Playing back a tape To display date/time and various settings Your camcorder automatically records not only images on the Remote Commander. 44 The tape is unreadable due to VCR, then play back the tape. (2) During playback, press FN and select PAGE2 (p. 25). (3) Press DATA CODE. (4) Select CAM DATA or DATE DATA, then press OK. (5) Press EXIT. Data code When you connect your camcorder's recording...
... [d] White balance [e] Gain [f] Shutter speed [g] Aperture value To not display date/time or the various data Select OFF in step 4. Playing back a tape To display date/time and various settings Your camcorder automatically records not only images on the Remote Commander. 44 The tape is unreadable due to VCR, then play back the tape. (2) During playback, press FN and select PAGE2 (p. 25). (3) Press DATA CODE. (4) Select CAM DATA or DATE DATA, then press OK. (5) Press EXIT. Data code When you connect your camcorder's recording...

Operating Instructions
Page 47
AUDIO/ VIDEO Black Yellow A/V connecting cable (supplied) : Signal flow IN S VIDEO TV VIDEO AUDIO Red White If your TV is equipped with your camcorder. Set the input selector on the TV screen. Playback - Open the jack cover. Use either the S video plug or the video plug depending on the LCD screen. Refer to LINE. 47 You can operate the playback control buttons in the same way as when you power your camcorder from your camcorder to view images from a wall outlet using the AC...
AUDIO/ VIDEO Black Yellow A/V connecting cable (supplied) : Signal flow IN S VIDEO TV VIDEO AUDIO Red White If your TV is equipped with your camcorder. Set the input selector on the TV screen. Playback - Open the jack cover. Use either the S video plug or the video plug depending on the LCD screen. Refer to LINE. 47 You can operate the playback control buttons in the same way as when you power your camcorder from your camcorder to view images from a wall outlet using the AC...
Operating Instructions
Page 50
... button. Recording with the flash During recording standby, you pressed PHOTO deeper will be recorded on the "Memory Stick" with BOUNCE - To record still images on the "Memory Stick" during tape recording standby or tape recording During tape recording The POWER switch should be changed. During and after recording still images on the "Memory Stick" Your camcorder continues recording on the screen by pressing PHOTO lightly. The image displayed on the screen when you can record still images on the "Memory Stick" with image quality as set when the POWER switch...
... button. Recording with the flash During recording standby, you pressed PHOTO deeper will be recorded on the "Memory Stick" with BOUNCE - To record still images on the "Memory Stick" during tape recording standby or tape recording During tape recording The POWER switch should be changed. During and after recording still images on the "Memory Stick" Your camcorder continues recording on the screen by pressing PHOTO lightly. The image displayed on the screen when you can record still images on the "Memory Stick" with image quality as set when the POWER switch...
Operating Instructions
Page 94
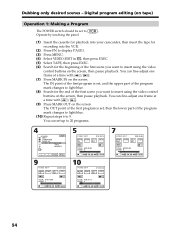
... on the screen, then pause playback. The OUT point of the first program is set , then the lower part of the program mark changes to light blue. (10) Repeat steps 6 to insert using the video control buttons on the screen. Operate by touching the panel. (1) Insert the cassette for playback into your camcorder, then insert the tape for recording into the VCR. (2) Press FN to display PAGE1. (3) Press MENU. (4) Select VIDEO EDIT...
... on the screen, then pause playback. The OUT point of the first program is set , then the lower part of the program mark changes to light blue. (10) Repeat steps 6 to insert using the video control buttons on the screen. Operate by touching the panel. (1) Insert the cassette for playback into your camcorder, then insert the tape for recording into the VCR. (2) Press FN to display PAGE1. (3) Press MENU. (4) Select VIDEO EDIT...
Operating Instructions
Page 121
... PHOTO. Recording data The recording data (date/time or various settings when recorded) does not appear during playback. "Memory Stick" Operations Recording a still image on the screen when you press the button. Color Slow Shutter - When you press PHOTO on the Remote Commander Your camcorder immediately records the image that is set to MEMORY The following functions do not work: - However, they are recorded automatically onto a "Memory Stick." If you press PHOTO lightly in step 1 The image momentarily flickers. SPORTS of view when the POWER switch is on a "Memory Stick...
... PHOTO. Recording data The recording data (date/time or various settings when recorded) does not appear during playback. "Memory Stick" Operations Recording a still image on the screen when you press the button. Color Slow Shutter - When you press PHOTO on the Remote Commander Your camcorder immediately records the image that is set to MEMORY The following functions do not work: - However, they are recorded automatically onto a "Memory Stick." If you press PHOTO lightly in step 1 The image momentarily flickers. SPORTS of view when the POWER switch is on a "Memory Stick...

Operating Instructions
Page 168
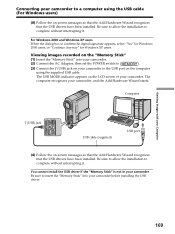
Viewing pictures recorded on the tape (1) Connect the AC Adaptor to your camcorder. (2) Set the POWER switch to . (3) Press FN to display PAGE1. (4) Press MENU to display the menu. (5) Select USB STREAM in , then press EXEC. (6) Select ON, then press EXEC. (7) Connect the (USB) jack on the computer using the supplied USB cable. The computer recognizes your camcorder, and the Windows Add Hardware Wizard starts. Those sample images can be transferred from the MEMORY MIX...
Viewing pictures recorded on the tape (1) Connect the AC Adaptor to your camcorder. (2) Set the POWER switch to . (3) Press FN to display PAGE1. (4) Press MENU to display the menu. (5) Select USB STREAM in , then press EXEC. (6) Select ON, then press EXEC. (7) Connect the (USB) jack on the computer using the supplied USB cable. The computer recognizes your camcorder, and the Windows Add Hardware Wizard starts. Those sample images can be transferred from the MEMORY MIX...
Operating Instructions
Page 169
... (USB) jack USB cable (supplied) USB port (4) Follow the on the "Memory Stick" (1) Insert the "Memory Stick" into your camcorder before installing the USB driver. 169 Viewing images recorded on -screen messages so that the Add Hardware Wizard recognizes that the USB drivers have been installed. For Windows 2000 and Windows XP users When the dialog box to insert the "Memory Stick" into your camcorder. (2) Connect the AC Adaptor, then set the POWER switch to the USB port on your camcorder. The USB MODE...
... (USB) jack USB cable (supplied) USB port (4) Follow the on the "Memory Stick" (1) Insert the "Memory Stick" into your camcorder before installing the USB driver. 169 Viewing images recorded on -screen messages so that the Add Hardware Wizard recognizes that the USB drivers have been installed. For Windows 2000 and Windows XP users When the dialog box to insert the "Memory Stick" into your camcorder. (2) Connect the AC Adaptor, then set the POWER switch to the USB port on your camcorder. The USB MODE...
Operating Instructions
Page 170
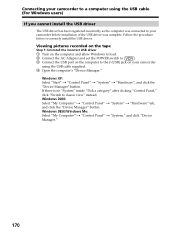
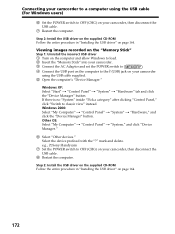
... click the "Device Manager" button. Viewing pictures recorded on the tape Step 1: Uninstall the incorrect USB driver 1 Turn on the computer and allow Windows to load. 2 Connect the AC Adaptor and set the POWER switch to . 3 Connect the USB port on the computer to the (USB) jack on your camcorder before installation of the USB driver was complete. Windows XP: Select "Start" t "Control Panel" t "System" t "Hardware", and click the "Device Manager" button. Windows 98SE/Windows Me: Select...
... click the "Device Manager" button. Viewing pictures recorded on the tape Step 1: Uninstall the incorrect USB driver 1 Turn on the computer and allow Windows to load. 2 Connect the AC Adaptor and set the POWER switch to . 3 Connect the USB port on the computer to the (USB) jack on your camcorder before installation of the USB driver was complete. Windows XP: Select "Start" t "Control Panel" t "System" t "Hardware", and click the "Device Manager" button. Windows 98SE/Windows Me: Select...
Operating Instructions
Page 172
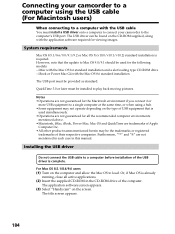
... camcorder to a computer using the USB cable supplied. 5 Open the computer's "Device Manager." Viewing images recorded on the "Memory Stick" Step 1: Uninstall the incorrect USB driver 1 Turn on the computer and allow Windows to load. 2 Insert the "Memory Stick" into your camcorder. 3 Connect the AC Adaptor and set the POWER switch to . 4 Connect the USB port on the computer to the (USB) jack on your camcorder using the USB cable (For Windows users) 6 Set the POWER switch to classic view" instead. Windows 2000: Select "My Computer" t "Control...
... camcorder to a computer using the USB cable supplied. 5 Open the computer's "Device Manager." Viewing images recorded on the "Memory Stick" Step 1: Uninstall the incorrect USB driver 1 Turn on the computer and allow Windows to load. 2 Insert the "Memory Stick" into your camcorder. 3 Connect the AC Adaptor and set the POWER switch to . 4 Connect the USB port on the computer to the (USB) jack on your camcorder using the USB cable (For Windows users) 6 Set the POWER switch to classic view" instead. Windows 2000: Select "My Computer" t "Control...
Operating Instructions
Page 173
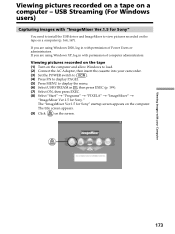
... Windows users) Capturing images with permission of Power Users or administrators. If you are using Windows 2000, log in with your camcorder. (3) Set the POWER switch to . (4) Press FN to display PAGE1. (5) Press MENU to load. (2) Connect the AC Adaptor, then insert the cassette into your Computer 173 The "ImageMixer Ver.1.5 for Sony" You need to install the USB driver and ImageMixer to view pictures recorded on the tape on the computer and allow Windows to display...
... Windows users) Capturing images with permission of Power Users or administrators. If you are using Windows 2000, log in with your camcorder. (3) Set the POWER switch to . (4) Press FN to display PAGE1. (5) Press MENU to load. (2) Connect the AC Adaptor, then insert the cassette into your Computer 173 The "ImageMixer Ver.1.5 for Sony" You need to install the USB driver and ImageMixer to view pictures recorded on the tape on the computer and allow Windows to display...

Operating Instructions
Page 177
... images are displayed with a cracking noise. - Reinstall the USB driver following the procedure on your camcorder. 177 Carry out the following operations after 5 minutes. •We recommend setting DEMO MODE to OFF in the menu settings when your camcorder is in standby, and no cassette is inserted. •Indicators on the screen of the USB driver was connected to another position on page 170. Turn the POWER switch to your camcorder...
... images are displayed with a cracking noise. - Reinstall the USB driver following the procedure on your camcorder. 177 Carry out the following operations after 5 minutes. •We recommend setting DEMO MODE to OFF in the menu settings when your camcorder is in standby, and no cassette is inserted. •Indicators on the screen of the USB driver was connected to another position on page 170. Turn the POWER switch to your camcorder...
Operating Instructions
Page 178
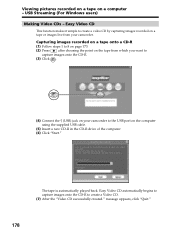
... Viewing pictures recorded on a tape on the computer using the supplied USB cable. (5) Insert a new CD-R in the CD-R drive of the computer. (6) Click "Start." The tape is automatically played back. Easy Video CD automatically begins to capture images onto the CD-R to create a video CD by capturing images recorded on a tape or images live from which you want to capture images onto the CD-R. (3) Click . (4) Connect the (USB) jack on your camcorder. Easy Video...
... Viewing pictures recorded on a tape on the computer using the supplied USB cable. (5) Insert a new CD-R in the CD-R drive of the computer. (6) Click "Start." The tape is automatically played back. Easy Video CD automatically begins to capture images onto the CD-R to create a video CD by capturing images recorded on a tape or images live from which you want to capture images onto the CD-R. (3) Click . (4) Connect the (USB) jack on your camcorder. Easy Video...
Operating Instructions
Page 181
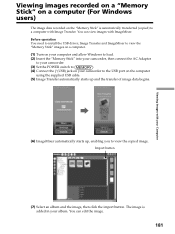
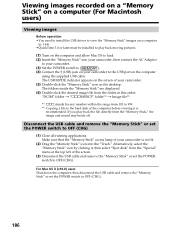
The image is automatically transferred (copied) to a computer with Image Transfer. You can view images with your album. Before operation You need to install the USB driver, Image Transfer and ImageMixer to view the "Memory Stick" images on a computer. (1) Turn on your computer and allow Windows to load. (2) Insert the "Memory Stick" into your camcorder, then connect the AC Adaptor to your camcorder. (3) Set the POWER switch to . (4) Connect the (USB) jack on your camcorder to the USB port on the "Memory Stick" is added...
The image is automatically transferred (copied) to a computer with Image Transfer. You can view images with your album. Before operation You need to install the USB driver, Image Transfer and ImageMixer to view the "Memory Stick" images on a computer. (1) Turn on your computer and allow Windows to load. (2) Insert the "Memory Stick" into your camcorder, then connect the AC Adaptor to your camcorder. (3) Set the POWER switch to . (4) Connect the (USB) jack on your camcorder to the USB port on the "Memory Stick" is added...
Operating Instructions
Page 182
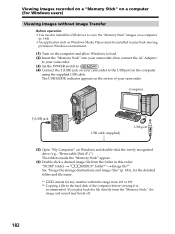
... your camcorder. (3) Set the POWER switch to . (4) Connect the (USB) jack on your camcorder. If you play back moving pictures in this order. Viewing images recorded on a "Memory Stick" on a computer (For Windows users) Viewing images without Image Transfer Before operation •You need to install the USB driver to view the "Memory Stick" images on a computer (p. 164). •An application such as Windows Media Player must be installed to play back the file directly from 101 to 999. *2) Copying a file to the hard disk of your camcorder to the USB...
... your camcorder. (3) Set the POWER switch to . (4) Connect the (USB) jack on your camcorder. If you play back moving pictures in this order. Viewing images recorded on a "Memory Stick" on a computer (For Windows users) Viewing images without Image Transfer Before operation •You need to install the USB driver to view the "Memory Stick" images on a computer (p. 164). •An application such as Windows Media Player must be installed to play back the file directly from 101 to 999. *2) Copying a file to the hard disk of your camcorder to the USB...
Operating Instructions
Page 184
.... iBook or Power Mac G4 with the application software required for viewing images. Or, if Mac OS is used for the following models: - QuickTime 3.0 or later must install a USB driver onto a computer to connect your camcorder to the computer's USB port. For Mac OS 8.5.1/8.6/9.0 users (1) Turn on the CD-ROM supplied, along with the Mac OS 8.6 standard installation The USB port must be installed to play back moving pictures. iMac with the USB cable You must...
.... iBook or Power Mac G4 with the application software required for viewing images. Or, if Mac OS is used for the following models: - QuickTime 3.0 or later must install a USB driver onto a computer to connect your camcorder to the computer's USB port. For Mac OS 8.5.1/8.6/9.0 users (1) Turn on the CD-ROM supplied, along with the Mac OS 8.6 standard installation The USB port must be installed to play back moving pictures. iMac with the USB cable You must...
Operating Instructions
Page 186
...*1) t Image file*2) *1) sss stands for any number within the range from the "Special" menu at the top left of the computer before viewing it , then select "Eject disk" from 101 to 999. *2) Copying a file to the hard disk of the screen. (3) Disconnect the USB cable and remove the "Memory Stick" or set the POWER switch to OFF (CHG). 186 If you play back moving pictures. (1) Turn on the desktop. Alternatively, select the "Memory Stick" icon...
...*1) t Image file*2) *1) sss stands for any number within the range from the "Special" menu at the top left of the computer before viewing it , then select "Eject disk" from 101 to 999. *2) Copying a file to the hard disk of the screen. (3) Disconnect the USB cable and remove the "Memory Stick" or set the POWER switch to OFF (CHG). 186 If you play back moving pictures. (1) Turn on the desktop. Alternatively, select the "Memory Stick" icon...

Operating Instructions
Page 188
... software and computer that support the exchange of digital video signals. •Depending on the analog video unit, the image may contain noise or incorrect colors. •You cannot record or capture video output via your camcorder when the video tapes include copyright protection signals. Signal convert function After capturing images and sound Stop capturing procedures on the computer, and stop playback on a computer - If the computer has a USB port You can connect using a USB cable, but images...
... software and computer that support the exchange of digital video signals. •Depending on the analog video unit, the image may contain noise or incorrect colors. •You cannot record or capture video output via your camcorder when the video tapes include copyright protection signals. Signal convert function After capturing images and sound Stop capturing procedures on the computer, and stop playback on a computer - If the computer has a USB port You can connect using a USB cable, but images...
Operating Instructions
Page 227
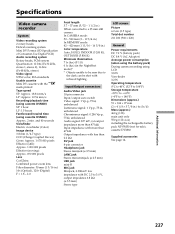
... Specifications Video camera recorder System Video recording system 2 rotary heads Helical scanning system Mini DV Format (SD Specification of Consumer-Use Digital VCR) Audio recording system Rotary heads, PCM system Quantization: 12 bits (Fs 32 kHz, stereo 1, stereo 2), 16 bits (Fs 48 kHz, stereo) Video signal NTSC color, EIA standards Usable cassette Mini DV cassette with DC 2.5 to 3.0 V, output impedance 6.8 kΩ (ø 3.5 mm) Stereo type LCD screen Picture 6.2 cm (2.5 type) Total dot number 211 200 (960 × 220) General Power...
... Specifications Video camera recorder System Video recording system 2 rotary heads Helical scanning system Mini DV Format (SD Specification of Consumer-Use Digital VCR) Audio recording system Rotary heads, PCM system Quantization: 12 bits (Fs 32 kHz, stereo 1, stereo 2), 16 bits (Fs 48 kHz, stereo) Video signal NTSC color, EIA standards Usable cassette Mini DV cassette with DC 2.5 to 3.0 V, output impedance 6.8 kΩ (ø 3.5 mm) Stereo type LCD screen Picture 6.2 cm (2.5 type) Total dot number 211 200 (960 × 220) General Power...

Operating Instructions
Page 237
... Main sound 214 Manual focus 68 MEMORY MIX 128 Memory PB ZOOM 151 Memory photo recording ..... 120 "Memory Stick 112 "Memory Stick" capacity ...... 119 Menu settings 191 Mirror mode 32 Moisture condensation ......... 221 MONOTONE 57 MOSC. FADER 57 NTSC system 220 O, P, Q OLD MOVIE 61 Operation indicators 236 OVERLAP 57 PB FOLDR 150 Picture effect 60, 76 Picture search 45 Playing time 18 Print mark 158 PROGRAM AE 64 R REC FOLDER 143 Rec Review 41 Recording time 18 Remaining battery time...
... Main sound 214 Manual focus 68 MEMORY MIX 128 Memory PB ZOOM 151 Memory photo recording ..... 120 "Memory Stick 112 "Memory Stick" capacity ...... 119 Menu settings 191 Mirror mode 32 Moisture condensation ......... 221 MONOTONE 57 MOSC. FADER 57 NTSC system 220 O, P, Q OLD MOVIE 61 Operation indicators 236 OVERLAP 57 PB FOLDR 150 Picture effect 60, 76 Picture search 45 Playing time 18 Print mark 158 PROGRAM AE 64 R REC FOLDER 143 Rec Review 41 Recording time 18 Remaining battery time...


