
Operating Instructions
Page 2
...of sufficient magnitude to constitute a risk of electric shock to the presence of this Sony Handycam. For customers in this device must accept any interference received, including interference ...TO WIDE SLOT, FULLY INSERT. Operation is intended to alert the user to persons. DCR-IP55 only Countries and areas where you can capture life's precious moments with advanced ...Your Handycam is loaded with superior picture and sound quality. This Class B digital apparatus complies with Part 15 of rechargeable batteries, call toll free 1-800-8228837, or visit http://www.rbrc.org/. This...
...of sufficient magnitude to constitute a risk of electric shock to the presence of this Sony Handycam. For customers in this device must accept any interference received, including interference ...TO WIDE SLOT, FULLY INSERT. Operation is intended to alert the user to persons. DCR-IP55 only Countries and areas where you can capture life's precious moments with advanced ...Your Handycam is loaded with superior picture and sound quality. This Class B digital apparatus complies with Part 15 of rechargeable batteries, call toll free 1-800-8228837, or visit http://www.rbrc.org/. This...

Operating Instructions
Page 6
... Spot Focus 72 Using the viewfinder 73 Advanced Playback Operations Playing back a tape with picture effects ... 75 Playing back a tape with digital effects .... 76 Enlarging images recorded on a "Memory Stick 12 Getting started Using this manual 14 Checking supplied accessories 16 Step 1 Preparing ...the power supply ........ 17 Installing the battery pack 17 Charging the battery pack 18 Connecting to a wall outlet 21 Step 2 Setting the date and time 22 Step 3 Inserting a cassette 25...
... Spot Focus 72 Using the viewfinder 73 Advanced Playback Operations Playing back a tape with picture effects ... 75 Playing back a tape with digital effects .... 76 Enlarging images recorded on a "Memory Stick 12 Getting started Using this manual 14 Checking supplied accessories 16 Step 1 Preparing ...the power supply ........ 17 Installing the battery pack 17 Charging the battery pack 18 Connecting to a wall outlet 21 Step 2 Setting the date and time 22 Step 3 Inserting a cassette 25...
Operating Instructions
Page 7
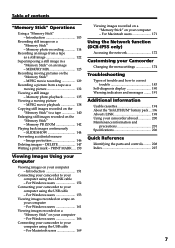
...190 Warning indicators and messages ........ 191 Additional Information Usable cassettes 194 About the "InfoLITHIUM" battery pack .... 196 About i.LINK 198 Using your camcorder abroad 200 Maintenance information and precautions 201 Specifications 206 Quick Reference Identifying the parts and controls...Stick" - SLIDE SHOW 144 Preventing accidental erasure - For Macintosh users 171 Using the Network function (DCR-IP55 only) Accessing the network 172 Customising your Camcorder Changing the menu settings 174 Troubleshooting Types of contents "Memory Stick" Operations Using a "Memory Stick...
...190 Warning indicators and messages ........ 191 Additional Information Usable cassettes 194 About the "InfoLITHIUM" battery pack .... 196 About i.LINK 198 Using your camcorder abroad 200 Maintenance information and precautions 201 Specifications 206 Quick Reference Identifying the parts and controls...Stick" - SLIDE SHOW 144 Preventing accidental erasure - For Macintosh users 171 Using the Network function (DCR-IP55 only) Accessing the network 172 Customising your Camcorder Changing the menu settings 174 Troubleshooting Types of contents "Memory Stick" Operations Using a "Memory Stick...

Operating Instructions
Page 10
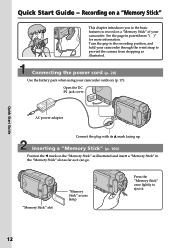
Connecting the power cord (p. 20) Use the battery pack when using your camcorder through the wrist strap to prevent the camera from ...with the cassette window facing out. 4 Press the cassette compartment lightly to the recording position, and hold your camcorder outdoors (p. 17). Quick Start Guide Quick Start Guide - Recording on tepes of the cassette into it clicks...in the direction of the arrow and open the lid. 3 Push the middle portion of the back of your camcorder. Open the DC IN jack cover. Otherwise, the cassette cannot be inserted or ejected. 2 Slide OPEN/ EJECT ...
Connecting the power cord (p. 20) Use the battery pack when using your camcorder through the wrist strap to prevent the camera from ...with the cassette window facing out. 4 Press the cassette compartment lightly to the recording position, and hold your camcorder outdoors (p. 17). Quick Start Guide Quick Start Guide - Recording on tepes of the cassette into it clicks...in the direction of the arrow and open the lid. 3 Push the middle portion of the back of your camcorder. Open the DC IN jack cover. Otherwise, the cassette cannot be inserted or ejected. 2 Slide OPEN/ EJECT ...

Operating Instructions
Page 11
...OPEN in the direction of the touch panel to your camcorder through the wrist strap. 5 Press START/ STOP. The VCR lamp lights up your camcorder by the LCD panel, the battery pack, the flash or the jack cover. Your camcorder starts recording. To stop recording, press START/ STOP again.... Do not press the LCD screen with your camcorder, the clock setting is closed, use the viewfinder. START/STOP When you purchase your thumb or the supplied stylus (DCR-...
...OPEN in the direction of the touch panel to your camcorder through the wrist strap. 5 Press START/ STOP. The VCR lamp lights up your camcorder by the LCD panel, the battery pack, the flash or the jack cover. Your camcorder starts recording. To stop recording, press START/ STOP again.... Do not press the LCD screen with your camcorder, the clock setting is closed, use the viewfinder. START/STOP When you purchase your thumb or the supplied stylus (DCR-...
Operating Instructions
Page 12
... Connect the plug with its v mark facing up. Connecting the power cord (p. 20) Use the battery pack when using your camcorder. Turn the grip to the recording position, and hold your camcorder through the wrist strap to prevent the camera from dropping as it . 12 "Memory Stick" slot ..."Memory Stick" access lamp Press the "Memory Stick" once lightly to record on a "Memory Stick" of your camcorder outdoors (p. 17). Inserting a "Memory Stick" (p. 104) Position the b mark on a "Memory Stick" This chapter introduces you to the basic features to...
... Connect the plug with its v mark facing up. Connecting the power cord (p. 20) Use the battery pack when using your camcorder. Turn the grip to the recording position, and hold your camcorder through the wrist strap to prevent the camera from dropping as it . 12 "Memory Stick" slot ..."Memory Stick" access lamp Press the "Memory Stick" once lightly to record on a "Memory Stick" of your camcorder outdoors (p. 17). Inserting a "Memory Stick" (p. 104) Position the b mark on a "Memory Stick" This chapter introduces you to the basic features to...

Operating Instructions
Page 13
... the wrist strap. 5 Press PHOTO lightly. If you purchase your camcorder, the clock setting is displayed. The MEMORY/NETWORK or VCR lamp lights up your eyesight (p. 33). 3 Set the POWER switch to MEMORY/ NETWORK (DCR-IP55 only). When the green z mark stops flashing, then lights up . 4 Slide ... still image on the LCD screen (p. 135) 1 Set the POWER switch to MEMORY/NETWORK (DCR-IP55 only) or VCR. The picture appears on the camcorder to your camcorder by the LCD panel, the battery pack, the flash or the jack cover. 13 Adjust the viewfinder lens to open the LCD panel...
... the wrist strap. 5 Press PHOTO lightly. If you purchase your camcorder, the clock setting is displayed. The MEMORY/NETWORK or VCR lamp lights up your eyesight (p. 33). 3 Set the POWER switch to MEMORY/ NETWORK (DCR-IP55 only). When the green z mark stops flashing, then lights up . 4 Slide ... still image on the LCD screen (p. 135) 1 Set the POWER switch to MEMORY/NETWORK (DCR-IP55 only) or VCR. The picture appears on the camcorder to your camcorder by the LCD panel, the battery pack, the flash or the jack cover. 13 Adjust the viewfinder lens to open the LCD panel...

Operating Instructions
Page 16
..., 85) 4 Wireless Remote Commander (1) (p. 212) 5 Size AA (R6) batteries for MICROMV) (1) (p. 152) qa Battery terminal cover (1) (p. 17) qs Cleaning cloth (1) (p. 202) qd Stylus (1) (DCR-IP55 only) Contents of the recording cannot be compensated if recording or playback is not made due to a malfunction of the camcorder, storage media, etc. 16 CD-ROM (MovieShaker Ver.3.1 for...
..., 85) 4 Wireless Remote Commander (1) (p. 212) 5 Size AA (R6) batteries for MICROMV) (1) (p. 152) qa Battery terminal cover (1) (p. 17) qs Cleaning cloth (1) (p. 202) qd Stylus (1) (DCR-IP55 only) Contents of the recording cannot be compensated if recording or playback is not made due to a malfunction of the camcorder, storage media, etc. 16 CD-ROM (MovieShaker Ver.3.1 for...
Operating Instructions
Page 17
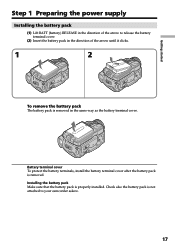
... 1 Preparing the power supply Installing the battery pack (1) Lift BATT (battery) RELEASE in the direction of the arrow until it clicks. 1 2 To remove the battery pack The battery pack is not attached to your camcorder askew. 17 Battery terminal cover To protect the battery terminals, install the battery terminal cover after the battery pack is properly installed. Installing the...
... 1 Preparing the power supply Installing the battery pack (1) Lift BATT (battery) RELEASE in the direction of the arrow until it clicks. 1 2 To remove the battery pack The battery pack is not attached to your camcorder askew. 17 Battery terminal cover To protect the battery terminals, install the battery terminal cover after the battery pack is properly installed. Installing the...
Operating Instructions
Page 18
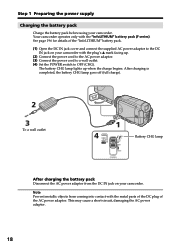
...the supplied AC power adaptor to OFF (CHG). Note Prevent metallic objects from the DC IN jack on your camcorder. See page 196 for details of the AC power adaptor. The battery CHG lamp lights up . (2) Connect the power cord to the AC power adaptor. (3) Connect the power ...cord to a wall outlet. (4) Set the POWER switch to the DC IN jack on your camcorder. Your camcorder operates only with the "InfoLITHIUM" battery pack (F series). This may cause a short-circuit, damaging the AC power adaptor. 18 Step 1 Preparing the power supply Charging the...
...the supplied AC power adaptor to OFF (CHG). Note Prevent metallic objects from the DC IN jack on your camcorder. See page 196 for details of the AC power adaptor. The battery CHG lamp lights up . (2) Connect the power cord to the AC power adaptor. (3) Connect the power ...cord to a wall outlet. (4) Set the POWER switch to the DC IN jack on your camcorder. Your camcorder operates only with the "InfoLITHIUM" battery pack (F series). This may cause a short-circuit, damaging the AC power adaptor. 18 Step 1 Preparing the power supply Charging the...
Operating Instructions
Page 19
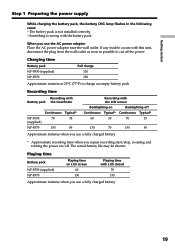
...°F) to cut off Continuous Typical* Continuous Typical* 60 30 70 35 130 70 155 85 Approximate minutes when you use a fully charged battery * Approximate recording time when you repeat recording start/stop, zooming and turning the power on LCD screen 60 130 Playing time with LCD closed... is wrong with this unit, disconnect the plug from the wall outlet as soon as possible to charge an empty battery pack Recording time Recording with Battery pack the viewfinder Continuous Typical* NP-FF50 70 35 (supplied) NP-FF70 155 85 Recording with the LCD screen Backlighting ...
...°F) to cut off Continuous Typical* Continuous Typical* 60 30 70 35 130 70 155 85 Approximate minutes when you use a fully charged battery * Approximate recording time when you repeat recording start/stop, zooming and turning the power on LCD screen 60 130 Playing time with LCD closed... is wrong with this unit, disconnect the plug from the wall outlet as soon as possible to charge an empty battery pack Recording time Recording with Battery pack the viewfinder Continuous Typical* NP-FF50 70 35 (supplied) NP-FF70 155 85 Recording with the LCD screen Backlighting ...
Operating Instructions
Page 20
... °C (50 °F to operate Charge the battery pack fully again so that the battery pack has enough power to 86 °F). The battery life will be shorter if you use your camcorder in an ambient temperature of Sony Corporation. 20 The "InfoLITHIUM" is correct. "InfoLITHIUM" F series battery packs have the mark. Step 1 Preparing the power...
... °C (50 °F to operate Charge the battery pack fully again so that the battery pack has enough power to 86 °F). The battery life will be shorter if you use your camcorder in an ambient temperature of Sony Corporation. 20 The "InfoLITHIUM" is correct. "InfoLITHIUM" F series battery packs have the mark. Step 1 Preparing the power...

Operating Instructions
Page 21
... connected to the DC IN jack, even when the power cord is not plugged into contact with the camcorder. 21 Notes •The AC power adaptor can supply power even if the battery pack is attached to your camcorder. •The DC IN jack has "source priority." This means that you use a car... battery with the metal parts of the DC plug of the AC power adaptor. Getting started Step 1 Preparing the power...
... connected to the DC IN jack, even when the power cord is not plugged into contact with the camcorder. 21 Notes •The AC power adaptor can supply power even if the battery pack is attached to your camcorder. •The DC IN jack has "source priority." This means that you use a car... battery with the metal parts of the DC plug of the AC power adaptor. Getting started Step 1 Preparing the power...

Operating Instructions
Page 22
... discharged (p. 203). The clock starts to CAMERA or MEMORY/ NETWORK (DCR-IP55 only) unless you do not use your camcorder will be released (bars may appear) because the built-in rechargeable battery installed in your camcorder for about three months, the date and time settings may be displayed each...select CLOCK SET, then press EXEC. (6) Press r/R to select your area, then press EXEC. (7) Press r/R to select whether your area is in rechargeable battery, then set your area, the daylight saving time (DST), the year, the month, the day, the hour and the minute. (1) Set the POWER switch ...
... discharged (p. 203). The clock starts to CAMERA or MEMORY/ NETWORK (DCR-IP55 only) unless you do not use your camcorder will be released (bars may appear) because the built-in rechargeable battery installed in your camcorder for about three months, the date and time settings may be displayed each...select CLOCK SET, then press EXEC. (6) Press r/R to select your area, then press EXEC. (7) Press r/R to select whether your area is in rechargeable battery, then set your area, the daylight saving time (DST), the year, the month, the day, the hour and the minute. (1) Set the POWER switch ...
Operating Instructions
Page 30
..., be performed as long as you do not eject the cassette even if you record using the LCD screen The battery time is inserted Your camcorder automatically turns off. Note The recording data (date/time or various settings when recorded) are recorded automatically onto the tape.... This is not inserted. However, your camcorder in microphone during playback. The battery life when you turn off automatically while the cassette is to save battery power and to the storing position. (5) Remove the power source. To enable transition...
..., be performed as long as you do not eject the cassette even if you record using the LCD screen The battery time is inserted Your camcorder automatically turns off. Note The recording data (date/time or various settings when recorded) are recorded automatically onto the tape.... This is not inserted. However, your camcorder in microphone during playback. The battery life when you turn off automatically while the cassette is to save battery power and to the storing position. (5) Remove the power source. To enable transition...
Operating Instructions
Page 32
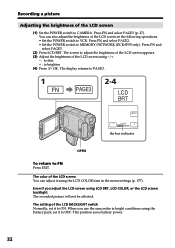
... 1 FN PAGE3 2-4 LCD BRT OK - Even if you use the camcorder in the following operations. • Set the POWER switch to OFF. The setting of the LCD BACKLIGHT switch Normally, set it to VCR. This position saves battery power. 32 You can adjust it to brighten (4) Press OK. The ...display returns to MEMORY/NETWORK (DCR-IP55 only). LCD BRT + the bar indicator OPEN To return to CAMERA. Press FN and ...
... 1 FN PAGE3 2-4 LCD BRT OK - Even if you use the camcorder in the following operations. • Set the POWER switch to OFF. The setting of the LCD BACKLIGHT switch Normally, set it to VCR. This position saves battery power. 32 You can adjust it to brighten (4) Press OK. The ...display returns to MEMORY/NETWORK (DCR-IP55 only). LCD BRT + the bar indicator OPEN To return to CAMERA. Press FN and ...
Operating Instructions
Page 33
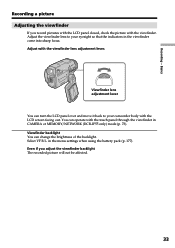
... adjustment lever. Viewfinder lens adjustment lever You can turn the LCD panel over and move it back to your camcorder body with the touch panel through the viewfinder in CAMERA or MEMORY/NETWORK (DCR-IP55 only) mode (p. 73). Adjust the viewfinder lens to your eyesight so that the indicators in the menu...
... adjustment lever. Viewfinder lens adjustment lever You can turn the LCD panel over and move it back to your camcorder body with the touch panel through the viewfinder in CAMERA or MEMORY/NETWORK (DCR-IP55 only) mode (p. 73). Adjust the viewfinder lens to your eyesight so that the indicators in the menu...
Operating Instructions
Page 36
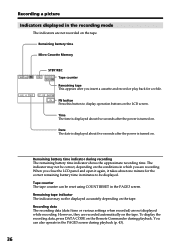
...for a while. When you insert a cassette and record or play back for the correct remaining battery time in minutes to display operation buttons on the tape. Remaining battery time indicator during playback (p. 43). 36 Remaining tape indicator The indicator may not be displayed accurately.... Tape counter The tape counter can also operate in the PAGE3 screen during recording The remaining battery time indicator shows the approximate recording time. Remaining battery time Micro Cassette Memory STBY/REC 40min REC 0:00:01 Tape counter 45min Remaining tape This appears...
...for a while. When you insert a cassette and record or play back for the correct remaining battery time in minutes to display operation buttons on the tape. Remaining battery time indicator during playback (p. 43). 36 Remaining tape indicator The indicator may not be displayed accurately.... Tape counter The tape counter can also operate in the PAGE3 screen during recording The remaining battery time indicator shows the approximate recording time. Remaining battery time Micro Cassette Memory STBY/REC 40min REC 0:00:01 Tape counter 45min Remaining tape This appears...

Operating Instructions
Page 44
... [f] Aperture value Various settings 40min B AUTO 60 AWB F1.8 9dB 0:00:23 [a] [b] [c] [d] [e] [f] Various settings Various settings shows the camcorder's recording information at the time of the tape is unreadable due to be displayed. In the recording mode, the various settings will not be displayed.... 44 A blank portion of recording. Remaining battery time indicator during playback The indicator shows the approximate continuous playback time. The indicator may not be correct, depending on ...
... [f] Aperture value Various settings 40min B AUTO 60 AWB F1.8 9dB 0:00:23 [a] [b] [c] [d] [e] [f] Various settings Various settings shows the camcorder's recording information at the time of the tape is unreadable due to be displayed. In the recording mode, the various settings will not be displayed.... 44 A blank portion of recording. Remaining battery time indicator during playback The indicator shows the approximate continuous playback time. The indicator may not be correct, depending on ...
Operating Instructions
Page 55
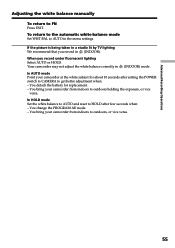
... in n (INDOOR) mode. In HOLD mode Set the white balance to AUTO and reset to FN Press EXIT. You change the PROGRAM AE mode. - Your camcorder may not adjust the white balance correctly in the menu settings. When you record in n (INDOOR). If the picture is being taken in a studio lit... by TV lighting We recommend that you record under fluorescent lighting Select AUTO or HOLD. In AUTO mode Point your camcorder at the white subject for replacement. - You detach the battery for about 10 seconds after few seconds when: -
... in n (INDOOR) mode. In HOLD mode Set the white balance to AUTO and reset to FN Press EXIT. You change the PROGRAM AE mode. - Your camcorder may not adjust the white balance correctly in the menu settings. When you record in n (INDOOR). If the picture is being taken in a studio lit... by TV lighting We recommend that you record under fluorescent lighting Select AUTO or HOLD. In AUTO mode Point your camcorder at the white subject for replacement. - You detach the battery for about 10 seconds after few seconds when: -


