Operating Instructions
Page 3
SET 7 Using optional remote commander 8 Card remote commander RM-X114 8 Additional Information Precautions 9 Notes on discs 9 About MP3 files 9 About ATRAC CD 10 Maintenance 10 Removing the unit 11 Specifications 11 Troubleshooting 12 Error ...automatically 6 Other functions Changing the sound settings 7 Adjusting the sound characteristics - Table of Contents Getting Started Resetting the unit 4 Setting the clock 4 DEMO mode 4 Detaching the front panel 4 Attaching the front panel 4 Location of controls and basic operations Main unit 5 CD Display items 6 Repeat and ...
SET 7 Using optional remote commander 8 Card remote commander RM-X114 8 Additional Information Precautions 9 Notes on discs 9 About MP3 files 9 About ATRAC CD 10 Maintenance 10 Removing the unit 11 Specifications 11 Troubleshooting 12 Error ...automatically 6 Other functions Changing the sound settings 7 Adjusting the sound characteristics - Table of Contents Getting Started Resetting the unit 4 Setting the clock 4 DEMO mode 4 Detaching the front panel 4 Attaching the front panel 4 Location of controls and basic operations Main unit 5 CD Display items 6 Repeat and ...
Operating Instructions
Page 4
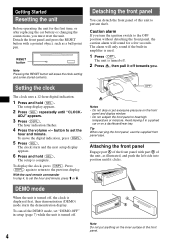
...display window. • Do not subject the front panel to heat/high temperature or moisture. B To cancel the DEMO mode, set "DEMO-OFF" in amplifier is A displayed first, then demonstration (DEMO) mode starts the demonstration display. Detach the front panel and press the RESET button with part B of the front panel....will only sound if the built-in setup (page 7) while the unit is turned off , the clock is used. 1 Press (OFF). DEMO mode When the unit is complete. Note Do not put excessive pressure on a dashboard/rear tray. Tip When carrying the front panel, use the ...
...display window. • Do not subject the front panel to heat/high temperature or moisture. B To cancel the DEMO mode, set "DEMO-OFF" in amplifier is A displayed first, then demonstration (DEMO) mode starts the demonstration display. Detach the front panel and press the RESET button with part B of the front panel....will only sound if the built-in setup (page 7) while the unit is turned off , the clock is used. 1 Press (OFF). DEMO mode When the unit is complete. Note Do not put excessive pressure on a dashboard/rear tray. Tip When carrying the front panel, use the ...
Operating Instructions
Page 7
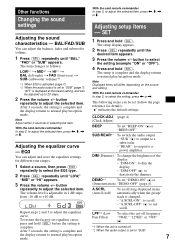
... remote commander In step 2, to "SUB" (page 7). "ATT" is complete and the display returns to adjust the selected item. button repeatedly to normal play/reception mode. BAL/FAD/SUB You can be adjusted up to 20 steps. 2 Press the volume +/- After 3 seconds, the setting is displayed at the lowest setting, and...
... remote commander In step 2, to "SUB" (page 7). "ATT" is complete and the display returns to adjust the selected item. button repeatedly to normal play/reception mode. BAL/FAD/SUB You can be adjusted up to 20 steps. 2 Press the volume +/- After 3 seconds, the setting is displayed at the lowest setting, and...


