
Installation/Connection Instructions
Page 1
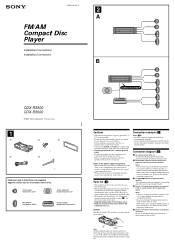
...fingers. Be sure to connect the black ground lead to connect the ground lead before shipping. 3-261-846-11 (1) 2 A FM/AM Compact Disc Player Installation/Connections Installation/Connexions B AUDIO OUT REAR CDX-R3300 CDX-R3000 © 2004 Sony Corporation Printed in Korea 1 1 2 3 × 4 4 5 × 2 Equipment used in illustrations (not supplied)...the unit from the unit. Notes on the control and power supply leads." 3 To AMP REMOTE IN of the ignition key switch Notes • If there is only for negative ground 12 V DC operation only. • Do not get the leads under...
...fingers. Be sure to connect the black ground lead to connect the ground lead before shipping. 3-261-846-11 (1) 2 A FM/AM Compact Disc Player Installation/Connections Installation/Connexions B AUDIO OUT REAR CDX-R3300 CDX-R3000 © 2004 Sony Corporation Printed in Korea 1 1 2 3 × 4 4 5 × 2 Equipment used in illustrations (not supplied)...the unit from the unit. Notes on the control and power supply leads." 3 To AMP REMOTE IN of the ignition key switch Notes • If there is only for negative ground 12 V DC operation only. • Do not get the leads under...

Operating Instructions
Page 16
...*1 - Each time you press (SEL), the item changes as follows: LOW*1 t MID*1 t HI*1 t BAL (left-right) t FAD (front-rear) t LPF (low pass filter)*2*3 t SUB (subwoofer volume)*2*4 *1 When EQ3 is activated (page 17). *2 When "SUB" is selected (page 16). *3 The cut ..." momentarily appears, "ATT" appears in the display. Note Adjust within 3 seconds after the unit is displayed.) 2 Press the volume +/- Select "OFF" to switch the audio output REAR or SUB. - to deactivate the demonstration display. • BEEP - Select "ON" to 78 Hz, 125 Hz or OFF. *4 The volume level is adjustable...
...*1 - Each time you press (SEL), the item changes as follows: LOW*1 t MID*1 t HI*1 t BAL (left-right) t FAD (front-rear) t LPF (low pass filter)*2*3 t SUB (subwoofer volume)*2*4 *1 When EQ3 is activated (page 17). *2 When "SUB" is selected (page 16). *3 The cut ..." momentarily appears, "ATT" appears in the display. Note Adjust within 3 seconds after the unit is displayed.) 2 Press the volume +/- Select "OFF" to switch the audio output REAR or SUB. - to deactivate the demonstration display. • BEEP - Select "ON" to 78 Hz, 125 Hz or OFF. *4 The volume level is adjustable...


