
Limited Warranty (U.S. Only)
Page 1
... product, Visit Sony's Web Site: www.sony.com/service Or call : 1-800-488-SONY (7669) Repair / Replacement Warranty: This Limited Warranty shall apply to be defective. For specific instructions on your unit. 3-272-643-01 ® Car Audio LIMITED WARRANTY (U.S. This Limited Warranty only covers product issues caused by any other materials will be lost or reformatted during ordinary consumer use , acts...
... product, Visit Sony's Web Site: www.sony.com/service Or call : 1-800-488-SONY (7669) Repair / Replacement Warranty: This Limited Warranty shall apply to be defective. For specific instructions on your unit. 3-272-643-01 ® Car Audio LIMITED WARRANTY (U.S. This Limited Warranty only covers product issues caused by any other materials will be lost or reformatted during ordinary consumer use , acts...
Operating Instructions
Page 1
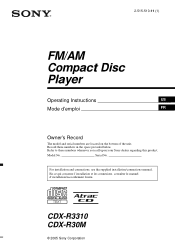
Serial No. En ce qui concerne l'installation et les connexions, consulter le manuel d'installation/raccordement fourni. Refer to these numbers in the space provided below. For installation and connections, see the supplied installation/connections manual. CDX-R3310 CDX-R30M © 2005 Sony Corporation Record these numbers whenever you call upon your Sony dealer regarding this product. Model No. 2-515-510-11 (1) FM/AM Compact Disc Player Operating Instructions US Mode d'emploi FR Owner's Record The model and serial numbers are located on the bottom of the unit.
Serial No. En ce qui concerne l'installation et les connexions, consulter le manuel d'installation/raccordement fourni. Refer to these numbers in the space provided below. For installation and connections, see the supplied installation/connections manual. CDX-R3310 CDX-R30M © 2005 Sony Corporation Record these numbers whenever you call upon your Sony dealer regarding this product. Model No. 2-515-510-11 (1) FM/AM Compact Disc Player Operating Instructions US Mode d'emploi FR Owner's Record The model and serial numbers are located on the bottom of the unit.
Operating Instructions
Page 2
... the receiving antenna. - CAUTION The use of the following functions. • CD playback: You can also control optional CD/MD changers, in a residential installation. CDX-R30M only This label is a CD-DA that interference will increase eye hazard. You can be sure to playing with this manual could void your drive with this product will not occur in this unit. * A CD TEXT disc is located...
... the receiving antenna. - CAUTION The use of the following functions. • CD playback: You can also control optional CD/MD changers, in a residential installation. CDX-R30M only This label is a CD-DA that interference will increase eye hazard. You can be sure to playing with this manual could void your drive with this product will not occur in this unit. * A CD TEXT disc is located...

Operating Instructions
Page 3
... 14 Maintenance 14 Removing the unit 15 Specifications 15 Troubleshooting 16 Error displays/Messages 18 The "XM Ready" logo indicates that this product will control a Sony XM tuner module (sold separately). list-up 9 Other functions Changing the sound settings 9 Adjusting the sound characteristics - For instructions on XM tuner operation, please refer to the XM tuner module's included instruction manual. EQ3 . . . . 9 Labeling a station/disc 10 Adjusting setup items - BTM 8 Storing manually 8 Receiving the stored stations 8 Tuning automatically 8 Receiving a station through...
... 14 Maintenance 14 Removing the unit 15 Specifications 15 Troubleshooting 16 Error displays/Messages 18 The "XM Ready" logo indicates that this product will control a Sony XM tuner module (sold separately). list-up 9 Other functions Changing the sound settings 9 Adjusting the sound characteristics - For instructions on XM tuner operation, please refer to the XM tuner module's included instruction manual. EQ3 . . . . 9 Labeling a station/disc 10 Adjusting setup items - BTM 8 Storing manually 8 Receiving the stored stations 8 Tuning automatically 8 Receiving a station through...

Operating Instructions
Page 4
... detaching the front panel, the caution alarm will sound for the first time, or after replacing the car battery or changing the connections, you must reset the unit. Tip When carrying the front panel, use the supplied front panel case. The setup display appears. 2 Press (SEL) repeatedly until it in setup (page 10) while the unit is turned off. 2 Press , then pull it off , the clock is complete. To...
... detaching the front panel, the caution alarm will sound for the first time, or after replacing the car battery or changing the connections, you must reset the unit. Tip When carrying the front panel, use the supplied front panel case. The setup display appears. 2 Press (SEL) repeatedly until it in setup (page 10) while the unit is turned off. 2 Press , then pull it off , the clock is complete. To...

Operating Instructions
Page 5
Ejecting the disc 1 Open the shutter. 2 Insert the disc label side up. Notes • While ejecting or inserting the disc, do not close the shutter. x Playback starts. 3 Close the shutter. 2 Push down the shutter until it clicks. Click x The disc is ejected. Tip The disc can be ejected if you open the shutter forcefully. Inserting the disc in the unit 1 Open the shutter. The disc may be caught and damaged. • The disc may be played with the shutter opened or closed. 5
Ejecting the disc 1 Open the shutter. 2 Insert the disc label side up. Notes • While ejecting or inserting the disc, do not close the shutter. x Playback starts. 3 Close the shutter. 2 Push down the shutter until it clicks. Click x The disc is ejected. Tip The disc can be ejected if you open the shutter forcefully. Inserting the disc in the unit 1 Open the shutter. The disc may be caught and damaged. • The disc may be played with the shutter opened or closed. 5
Operating Instructions
Page 6
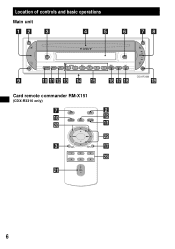
Location of controls and basic operations Main unit 12 3 4 5 6 78 ATT 9 OPEN DSPL DIM - GP/DISC + REP SHUF SOURCE MODE SEL 1 2 3 4 5 EQ3 BTM CAT 6 SENS SCRL LIST 0 qa qs qd qf qg qh qj qk OFF SESEKEK CDX-R30M ql Card remote commander RM-X151 (CDX-R3310 only) 7 0 w; 3 OFF ATT SOURCE SEL MODE + - DSPL SCRL 1 2 3 4 5 6 2 qs qa ws qj wd wa + VOL - 6
Location of controls and basic operations Main unit 12 3 4 5 6 78 ATT 9 OPEN DSPL DIM - GP/DISC + REP SHUF SOURCE MODE SEL 1 2 3 4 5 EQ3 BTM CAT 6 SENS SCRL LIST 0 qa qs qd qf qg qh qj qk OFF SESEKEK CDX-R30M ql Card remote commander RM-X151 (CDX-R3310 only) 7 0 w; 3 OFF ATT SOURCE SEL MODE + - DSPL SCRL 1 2 3 4 5 6 2 qs qa ws qj wd wa + VOL - 6
Operating Instructions
Page 7
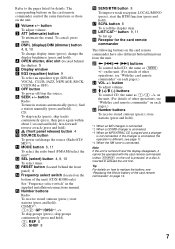
... connected, the operation is different, see page 11. *4 When the XM tuner is inserted to replace the battery, see "Replacing the lithium battery of the unit) (CDX-R30M only) See "Frequency select switch" in stations automatically (press); Tip For details on the unit is pressed, or a disc is connected. The corresponding buttons on the card remote commander control the same functions as those on /change display items (press); c DSPL (display)/DIM (dimmer) button 4, 8, 10 To change the source (Radio...
... connected, the operation is different, see page 11. *4 When the XM tuner is inserted to replace the battery, see "Replacing the lithium battery of the unit) (CDX-R30M only) See "Frequency select switch" in stations automatically (press); Tip For details on the unit is pressed, or a disc is connected. The corresponding buttons on the card remote commander control the same functions as those on /change display items (press); c DSPL (display)/DIM (dimmer) button 4, 8, 10 To change the source (Radio...
Operating Instructions
Page 8
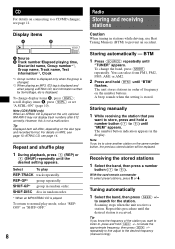
... the unit receives a station. Display items A B Radio Storing and receiving stations Caution When tuning in the display. However, this procedure until "BTM" flashes. SHUF-DISC disc in random order. Receiving the stored stations 1 Select the band, then press a number button ((1) to search for the station. ATRAC CD, see page 13; BTM 1 Press (SOURCE) repeatedly until the desired setting appears. to (6)). scroll display items B, press (SCRL) or set "A.SCRL-ON" (page 10). Note (CDX-R30M...
... the unit receives a station. Display items A B Radio Storing and receiving stations Caution When tuning in the display. However, this procedure until "BTM" flashes. SHUF-DISC disc in random order. Receiving the stored stations 1 Select the band, then press a number button ((1) to search for the station. ATRAC CD, see page 13; BTM 1 Press (SOURCE) repeatedly until the desired setting appears. to (6)). scroll display items B, press (SCRL) or set "A.SCRL-ON" (page 10). Note (CDX-R30M...

Operating Instructions
Page 9
... is activated (page 9). *2 When the audio output is set to receive the station. "ATT" is complete and the display returns to normal reception mode. 3 Press (SEEK) +/- Note Adjust within 3 seconds of selecting the item. list-up You can adjust the balance, fader, and subwoofer volume. 1 Press (SEL) repeatedly until the desired station appears. Other functions Changing the sound settings Adjusting the sound characteristics - With the card remote commander In step 2, to adjust the selected item. button...
... is activated (page 9). *2 When the audio output is set to receive the station. "ATT" is complete and the display returns to normal reception mode. 3 Press (SEEK) +/- Note Adjust within 3 seconds of selecting the item. list-up You can adjust the balance, fader, and subwoofer volume. 1 Press (SEL) repeatedly until the desired station appears. Other functions Changing the sound settings Adjusting the sound characteristics - With the card remote commander In step 2, to adjust the selected item. button...
Operating Instructions
Page 10
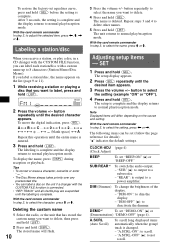
After 3 seconds, the setting is complete. With the card remote commander In step 3, to normal play/reception mode. To restore the factory-set equalizer curve, press and hold (SEL) before the setting is complete and the display returns to adjust the selected item, press
After 3 seconds, the setting is complete. With the card remote commander In step 3, to normal play/reception mode. To restore the factory-set equalizer curve, press and hold (SEL) before the setting is complete and the display returns to adjust the selected item, press
Operating Instructions
Page 11
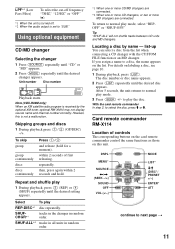
.... 2 Press (MODE) repeatedly until the desired disc appears. Locating a disc by the optional XM tuner, optional RM-XM10 may not display source name and channel number correctly. For details on the list. to normal play 1 During playback, press (3) (REP) or (4) (SHUF) repeatedly until the desired setting appears. Note (CDX-R30M only) When an XM satellite radio program is not a malfunction. SHUF-ALL*2 tracks in all units in...
.... 2 Press (MODE) repeatedly until the desired disc appears. Locating a disc by the optional XM tuner, optional RM-XM10 may not display source name and channel number correctly. For details on the list. to normal play 1 During playback, press (3) (REP) or (4) (SHUF) repeatedly until the desired setting appears. Note (CDX-R30M only) When an XM satellite radio program is not a malfunction. SHUF-ALL*2 tracks in all units in...

Operating Instructions
Page 12
The following buttons on the card remote commander have also different buttons/functions from the unit. •
The following buttons on the card remote commander have also different buttons/functions from the unit. •

Operating Instructions
Page 13
... before operating it. • Power antenna will not operate properly. Wipe each disc from using such discs: - Music discs encoded with copyright protection technologies This product is designed to cool off and jamming the eject mechanism). - It compresses audio CD data to approximately 1/10 of its edge. • Keep your car has been parked in direct sunlight, allow the unit to play back discs that is operating. Additional...
... before operating it. • Power antenna will not operate properly. Wipe each disc from using such discs: - Music discs encoded with copyright protection technologies This product is designed to cool off and jamming the eject mechanism). - It compresses audio CD data to approximately 1/10 of its edge. • Keep your car has been parked in direct sunlight, allow the unit to play back discs that is operating. Additional...
Operating Instructions
Page 14
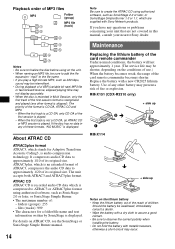
... SonicStage or SonicStage Simple Burner manual. 14 x Maintenance Replacing the lithium battery of the card remote commander Under normal conditions, the battery will last approximately 1 year. (The service life may be swallowed, immediately consult a doctor. • Wipe the battery with Sony Network products. Notes • Be sure to finalize the disc before using on the unit. • When naming an MP3...
... SonicStage or SonicStage Simple Burner manual. 14 x Maintenance Replacing the lithium battery of the card remote commander Under normal conditions, the battery will last approximately 1 year. (The service life may be swallowed, immediately consult a doctor. • Wipe the battery with Sony Network products. Notes • Be sure to finalize the disc before using on the unit. • When naming an MP3...
Operating Instructions
Page 15
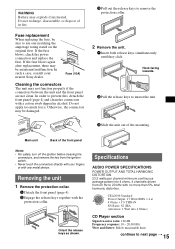
... device. Removing the unit 1 Remove the protection collar. 1 Detach the front panel (page 4). 2 Engage the release keys together with your nearest Sony dealer. Orient the release keys as shown. If the fuse blows, check the power connection and replace the fuse. Hook facing inwards. 2 Pull the release keys to unseat the unit. 3 Slide the unit out of in alcohol. Specifications AUDIO POWER SPECIFICATIONS POWER OUTPUT AND TOTAL HARMONIC DISTORTION 23.2 watts per channel...
... device. Removing the unit 1 Remove the protection collar. 1 Detach the front panel (page 4). 2 Engage the release keys together with your nearest Sony dealer. Orient the release keys as shown. If the fuse blows, check the power connection and replace the fuse. Hook facing inwards. 2 Pull the release keys to unseat the unit. 3 Slide the unit out of in alcohol. Specifications AUDIO POWER SPECIFICATIONS POWER OUTPUT AND TOTAL HARMONIC DISTORTION 23.2 watts per channel...
Operating Instructions
Page 16
... changer (6 discs): MDX-66XLP XM Satelite Radio Receiver: XT-XM1 Source selector: XA-C30 AUX-IN selector: XA-300 US and foreign patents licensed from Dolby Laboratories. Troubleshooting The following checklist will help you remedy problems you may encounter with a Sony MP3 compatible CD changer, or this unit. General No power is Sony BUS system compatible. Note This unit cannot be operated with the remote commander. t Turn on the unit. Tuner section FM Tuning range: CDX...
... changer (6 discs): MDX-66XLP XM Satelite Radio Receiver: XT-XM1 Source selector: XA-C30 AUX-IN selector: XA-300 US and foreign patents licensed from Dolby Laboratories. Troubleshooting The following checklist will help you remedy problems you may encounter with a Sony MP3 compatible CD changer, or this unit. General No power is Sony BUS system compatible. Note This unit cannot be operated with the remote commander. t Turn on the unit. Tuner section FM Tuning range: CDX...
Operating Instructions
Page 17
... power connecting lead is switched. Makes noise when the position of the car antenna. • The auto antenna will not eject. The disc is not created by noises. • Connect a power antenna control lead (blue) or accessory power supply lead (red) to "MONO-ON." a disc to which data can be played back. The ATRAC CD cannot play back than 45° in stereo is not correct. The sound skips. • Installation is...
... power connecting lead is switched. Makes noise when the position of the car antenna. • The auto antenna will not eject. The disc is not created by noises. • Connect a power antenna control lead (blue) or accessory power supply lead (red) to "MONO-ON." a disc to which data can be played back. The ATRAC CD cannot play back than 45° in stereo is not correct. The sound skips. • Installation is...
Operating Instructions
Page 18
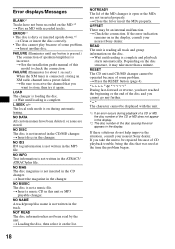
... automatically. NO MUSIC The disc is not written in the display. t Check the connection. RESET The CD unit and CD/MD changer cannot be repaired because of the disc causing the error appears in the ATRAC3/ ATRAC3plus file. t Be sure to receive the channel that was used at the time the problem began. 18 OFFSET There may take the unit to be operated because of speakers/amplifiers is incorrect...
... automatically. NO MUSIC The disc is not written in the display. t Check the connection. RESET The CD unit and CD/MD changer cannot be repaired because of the disc causing the error appears in the ATRAC3/ ATRAC3plus file. t Be sure to receive the channel that was used at the time the problem began. 18 OFFSET There may take the unit to be operated because of speakers/amplifiers is incorrect...
Marketing Specifications
Page 2
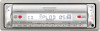
Reproduction in whole or in part without notice. CDX-R30M "Motion Blade" retractable faceplate Please visit the Dealer Network for more information at www.sony.com/dn ©2006 Sony Electronics Inc. Non-metric weights and measures are subject to change without written permission is a trademark of their respective owners. Features and specifications are approximate. Sony Electronics Inc. •16530 Via Esprillo •San Diego, CA 92127 •1-800-222-7669 •www.sony.com Last Updated: 11/02/2007 All other trademarks are property of Sony. Sony is prohibited.
Reproduction in whole or in part without notice. CDX-R30M "Motion Blade" retractable faceplate Please visit the Dealer Network for more information at www.sony.com/dn ©2006 Sony Electronics Inc. Non-metric weights and measures are subject to change without written permission is a trademark of their respective owners. Features and specifications are approximate. Sony Electronics Inc. •16530 Via Esprillo •San Diego, CA 92127 •1-800-222-7669 •www.sony.com Last Updated: 11/02/2007 All other trademarks are property of Sony. Sony is prohibited.


