
XM Satellite Radio Operating manual
Page 1
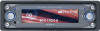
...the broadcast service of the main unit, and you to 8 characters. CDX-C8050X CDX-C800REC* CDX-M750 CDX-M650 CDX-M610 CDX-M600 MDX-C8500X XR-M550 * You may not function properly. This is... incorporated in Japan WARNING This equipment has been tested and found . 2 Press either Disc/Preset button to change the display item. Furthermore, the AMBE® voice compression software... checks, consult your nearest Sony dealer.) Introducing XMTM Satellite Radio There's a world beyond AM and FM. The display shows "CAT SRCH" to indicate that you have their Radio ID ready; Receiving a ...
...the broadcast service of the main unit, and you to 8 characters. CDX-C8050X CDX-C800REC* CDX-M750 CDX-M650 CDX-M610 CDX-M600 MDX-C8500X XR-M550 * You may not function properly. This is... incorporated in Japan WARNING This equipment has been tested and found . 2 Press either Disc/Preset button to change the display item. Furthermore, the AMBE® voice compression software... checks, consult your nearest Sony dealer.) Introducing XMTM Satellite Radio There's a world beyond AM and FM. The display shows "CAT SRCH" to indicate that you have their Radio ID ready; Receiving a ...
Operating Instructions (English, Español, Français)
Page 2
... United States. This equipment generates, uses, and can radiate radio frequency energy and, if not installed and used in a residential installation. Welcome ! BBE MP works by one or more of this Sony Compact Disc Player. Increase the separation between the equipment and receiver. - Please... see your nearest authorized Sony dealer for a Class B digital device, pursuant to Part 15 of optical instruments with Sony products only. *2 ID3 tag is an MP3...
... United States. This equipment generates, uses, and can radiate radio frequency energy and, if not installed and used in a residential installation. Welcome ! BBE MP works by one or more of this Sony Compact Disc Player. Increase the separation between the equipment and receiver. - Please... see your nearest authorized Sony dealer for a Class B digital device, pursuant to Part 15 of optical instruments with Sony products only. *2 ID3 tag is an MP3...
Operating Instructions (English, Español, Français)
Page 3
...- Station Memo 21 Tuning in random order - Snapshot 28 Selecting the start-up image - ATT 29 Setting the Dynamic Soundstage Organizer - Disc List 18 * Functions available with optional CD/MD unit Radio Storing stations automatically - Aspect 26 Turning off the display characters - Sub Woofer 33 Setting the loudness... unit 13 Setting the clock and the calendar - Auto Image 24 Selecting the effect pattern - Clock 13 CD Player CD/MD Unit (optional) Playing a disc 14 Display items 15 Playing tracks repeatedly - Repeat 16 Playing tracks in a station through a list -
...- Station Memo 21 Tuning in random order - Snapshot 28 Selecting the start-up image - ATT 29 Setting the Dynamic Soundstage Organizer - Disc List 18 * Functions available with optional CD/MD unit Radio Storing stations automatically - Aspect 26 Turning off the display characters - Sub Woofer 33 Setting the loudness... unit 13 Setting the clock and the calendar - Auto Image 24 Selecting the effect pattern - Clock 13 CD Player CD/MD Unit (optional) Playing a disc 14 Display items 15 Playing tracks repeatedly - Repeat 16 Playing tracks in a station through a list -
Operating Instructions (English, Español, Français)
Page 4
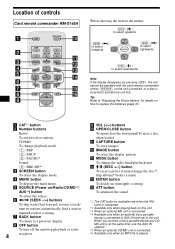
SEEK+ ENTER OFF + ATT VOL - When selecting the item in the menus (DISC) (M) : to select upwards (SEEK) ( BACK SOURCE DISC - Location of controls Card remote commander RM-X145A OPEN/CLOSE CAT REP SHUF 1 2 3 BBE MP PAUSE 4 5 6 SCREEN CAPTURE IMAGE MENU DISC + MODE SEEK-
SEEK+ ENTER OFF + ATT VOL - When selecting the item in the menus (DISC) (M) : to select upwards (SEEK) ( BACK SOURCE DISC - Location of controls Card remote commander RM-X145A OPEN/CLOSE CAT REP SHUF 1 2 3 BBE MP PAUSE 4 5 6 SCREEN CAPTURE IMAGE MENU DISC + MODE SEEK-
Operating Instructions (English, Español, Français)
Page 5
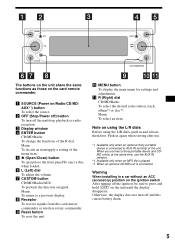
SOURCE OFF VOL CUSTOM ENTER MENU CDX-M9905X The buttons on the unit share the same functions as those on /Radio/CD/MD/ AUX*1) button To select the source. Menu: To ...off and this causes battery drain. 5 e Z (Open/Close) button To open/close the front panel/To eject a disc when loaded. Push in again when storing after use the AUX IN selector. *2 Available only when an MP3 file is...position on the ignition switch After turning off the unit/stop playback or radio reception. When you connect a Sony portable device and CD/ MD unit(s) at the same time, use . *1 Available only when an ...
SOURCE OFF VOL CUSTOM ENTER MENU CDX-M9905X The buttons on the unit share the same functions as those on /Radio/CD/MD/ AUX*1) button To select the source. Menu: To ...off and this causes battery drain. 5 e Z (Open/Close) button To open/close the front panel/To eject a disc when loaded. Push in again when storing after use the AUX IN selector. *2 Available only when an MP3 file is...position on the ignition switch After turning off the unit/stop playback or radio reception. When you connect a Sony portable device and CD/ MD unit(s) at the same time, use . *1 Available only when an ...

Operating Instructions (English, Español, Français)
Page 10
... desired setting item, then press (ENTER). 4 Rotate the R dial to select the desired setting, then press (ENTER). 5 Press (MENU). Editting disc and station names/ Controlling stored contents. Custom - PlayMode - For details on menu items, see "Menus and items" on page 36. The main menu... the menu selection, press (MENU). Operation by the main unit: ENTER R dial CUSTOM MENU 1 During playback or radio reception, press (MENU). SEEK+ ENTER ENTER 1 During playback or radio reception, press (MENU). The main menu appears. 2 Press < or , repeatedly to the previous display, press (...
... desired setting item, then press (ENTER). 4 Rotate the R dial to select the desired setting, then press (ENTER). 5 Press (MENU). Editting disc and station names/ Controlling stored contents. Custom - PlayMode - For details on menu items, see "Menus and items" on page 36. The main menu... the menu selection, press (MENU). Operation by the main unit: ENTER R dial CUSTOM MENU 1 During playback or radio reception, press (MENU). SEEK+ ENTER ENTER 1 During playback or radio reception, press (MENU). The main menu appears. 2 Press < or , repeatedly to the previous display, press (...
Operating Instructions (English, Español, Français)
Page 11
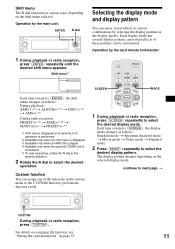
... time you press (SCREEN), the display mode changes as follows: During playback: AMS+/-*2 t ALBUM+/-*3 t DISC+/-*4 t AMS+/-*2 During radio reception: PRESET+/-*2 t SEEK+/-*5 t MANUAL+/- SEEK+ ENTER IMAGE 1 During playback or radio reception, press (SCREEN) repeatedly to next page t CUSTOM During playback or radio reception, press (CUSTOM). SCREEN OPEN/CLOSE CAT REP SHUF 1 2 3 BBE MP PAUSE 4 5 6 SCREEN...
... time you press (SCREEN), the display mode changes as follows: During playback: AMS+/-*2 t ALBUM+/-*3 t DISC+/-*4 t AMS+/-*2 During radio reception: PRESET+/-*2 t SEEK+/-*5 t MANUAL+/- SEEK+ ENTER IMAGE 1 During playback or radio reception, press (SCREEN) repeatedly to next page t CUSTOM During playback or radio reception, press (CUSTOM). SCREEN OPEN/CLOSE CAT REP SHUF 1 2 3 BBE MP PAUSE 4 5 6 SCREEN...

Operating Instructions (English, Español, Français)
Page 19
... band (FM1, FM2, FM3, AM1, and AM2). Display items Information on the selected face pattern. Positions of frequency. 1 Press (SOURCE) repeatedly to select the radio. 2 Press (MODE) repeatedly to select the desired band. 3 Press (MENU). 4 Press < or , repeatedly to select "Edit," then press (ENTER). 5 Press... to prevent accidents. For details, see "Selecting the face pattern" on page 21. 19 A D C When "Skin3" is selected. Radio The unit can be received due to weak signals, some stored preset numbers will retain their former settings. • The unit starts storing stations...
... band (FM1, FM2, FM3, AM1, and AM2). Display items Information on the selected face pattern. Positions of frequency. 1 Press (SOURCE) repeatedly to select the radio. 2 Press (MODE) repeatedly to select the desired band. 3 Press (MENU). 4 Press < or , repeatedly to select "Edit," then press (ENTER). 5 Press... to prevent accidents. For details, see "Selecting the face pattern" on page 21. 19 A D C When "Skin3" is selected. Radio The unit can be received due to weak signals, some stored preset numbers will retain their former settings. • The unit starts storing stations...
Operating Instructions (English, Español, Français)
Page 20
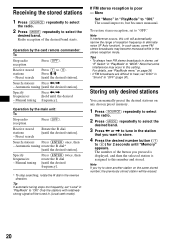
Receiving the stored stations 1 Press (SOURCE) repeatedly to select the radio. 2 Press (MODE) repeatedly to (6). Preset search Press (1) to select the desired band. Press M/m [until the desired station]. Radio reception of the desired band starts. Search stations Press Receive stored stations - Operation by the card remote commander: To Stop radio reception Press (OFF).
Receiving the stored stations 1 Press (SOURCE) repeatedly to select the radio. 2 Press (MODE) repeatedly to (6). Preset search Press (1) to select the desired band. Press M/m [until the desired station]. Radio reception of the desired band starts. Search stations Press Receive stored stations - Operation by the card remote commander: To Stop radio reception Press (OFF).

Operating Instructions (English, Español, Français)
Page 21
Name Delete 1 During radio reception, press (MENU). 2 Press < or , repeatedly to select "Edit," then press (ENTER). 3 Press < or , repeatedly to select "Name Delete," then press (ENTER). 4 Press < or , repeatedly ... station names, select "ALL" in step 4, the display will not be stored. Storing the station names 1 Tune in the menu). The display returns to each radio station. "Complete" appears, and the name is displayed automatically. The stored names appear. 5 Press M or m repeatedly to select the desired name to select "END," then...
Name Delete 1 During radio reception, press (MENU). 2 Press < or , repeatedly to select "Edit," then press (ENTER). 3 Press < or , repeatedly to select "Name Delete," then press (ENTER). 4 Press < or , repeatedly ... station names, select "ALL" in step 4, the display will not be stored. Storing the station names 1 Tune in the menu). The display returns to each radio station. "Complete" appears, and the name is displayed automatically. The stored names appear. 5 Press M or m repeatedly to select the desired name to select "END," then...

Operating Instructions (English, Español, Français)
Page 22
... desired station, then press (ENTER). The display returns to the normal display. Skin You can select a preset station easily from the list. 1 During radio reception, press (MENU). 2 Press < or , repeatedly to select "List," then press (ENTER). The display returns to the normal display. Selecting the...(ENTER). 5 Press (MENU). Tip For details on the display items, see "Selecting the display mode and display pattern" on playback/radio reception. Preset List You can select the face pattern for displaying information on page 11. Positions of display items differ depending on the ...
... desired station, then press (ENTER). The display returns to the normal display. Skin You can select a preset station easily from the list. 1 During radio reception, press (MENU). 2 Press < or , repeatedly to select "List," then press (ENTER). The display returns to the normal display. Selecting the...(ENTER). 5 Press (MENU). Tip For details on the display items, see "Selecting the display mode and display pattern" on playback/radio reception. Preset List You can select the face pattern for displaying information on page 11. Positions of display items differ depending on the ...

Operating Instructions (English, Español, Français)
Page 30
...Tip The sound effect of the doors, the sound will come from below and may not have a desirable effect. • If FM broadcasts are difficult to hear, set "DSO" in step 5. EQ7 You can store the DSO setting for best overall effect. 30 ...; Depending on the type of car interior or type of virtual speakers *3 *3 *2 *2 *1 *1 *4 *4 *1 DSO 1 *2 DSO 2 *3 DSO 3 *4 DSO OFF 1 Press (SOURCE) to select a source (radio, CD, MD, or AUX). 2 Press (MENU). 3 Press < or , repeatedly to select "Sound," then press (ENTER). 4 Press < or , repeatedly to select "DSO," then press (ENTER). 5 Press...
...Tip The sound effect of the doors, the sound will come from below and may not have a desirable effect. • If FM broadcasts are difficult to hear, set "DSO" in step 5. EQ7 You can store the DSO setting for best overall effect. 30 ...; Depending on the type of car interior or type of virtual speakers *3 *3 *2 *2 *1 *1 *4 *4 *1 DSO 1 *2 DSO 2 *3 DSO 3 *4 DSO OFF 1 Press (SOURCE) to select a source (radio, CD, MD, or AUX). 2 Press (MENU). 3 Press < or , repeatedly to select "Sound," then press (ENTER). 4 Press < or , repeatedly to select "DSO," then press (ENTER). 5 Press...

Operating Instructions (English, Español, Français)
Page 31
...the factory preset, select "Initialize" in 1 dB steps from -10 dB to +10 dB. 6 Press (MENU). Bass/Treble 1 Press (SOURCE) to select a source (radio, CD, MD or AUX). 2 Press (MENU). 3 Press < or , repeatedly to select "Sound," then press (ENTER). 4 Press < or , repeatedly to select "Bass... adjustable in step 5. Adjusting the selected equalizer curve You can store and adjust the equalizer settings for frequency and level. 1 Press (SOURCE) to select a source (radio, CD, MD or AUX). 2 Press (MENU). 3 Press < or , repeatedly to select "Sound," then press (ENTER). 4 Press < or , repeatedly to ...
...the factory preset, select "Initialize" in 1 dB steps from -10 dB to +10 dB. 6 Press (MENU). Bass/Treble 1 Press (SOURCE) to select a source (radio, CD, MD or AUX). 2 Press (MENU). 3 Press < or , repeatedly to select "Sound," then press (ENTER). 4 Press < or , repeatedly to select "Bass... adjustable in step 5. Adjusting the selected equalizer curve You can store and adjust the equalizer settings for frequency and level. 1 Press (SOURCE) to select a source (radio, CD, MD or AUX). 2 Press (MENU). 3 Press < or , repeatedly to select "Sound," then press (ENTER). 4 Press < or , repeatedly to ...

Operating Instructions (English, Español, Français)
Page 32
...rear volume - To adjust the balance between right and left speakers (Balance), and front and rear speakers (Fader). 1 Press (SOURCE) to select a source (radio, CD, MD or AUX). 2 Press (MENU). 3 Press < or , repeatedly to select "Sound," then press (ENTER). 4 Press < or , repeatedly ...to select the desired cut -off frequency, then press (ENTER). Cut-off frequency off Frequency (Hz) 1 Press (SOURCE) to select a source (radio, CD, MD or AUX). 2 Press (MENU). 3 Press < or , repeatedly to select "Sound," then press (ENTER). 4 Press < or , repeatedly to select "HPF...
...rear volume - To adjust the balance between right and left speakers (Balance), and front and rear speakers (Fader). 1 Press (SOURCE) to select a source (radio, CD, MD or AUX). 2 Press (MENU). 3 Press < or , repeatedly to select "Sound," then press (ENTER). 4 Press < or , repeatedly ...to select the desired cut -off frequency, then press (ENTER). Cut-off frequency off Frequency (Hz) 1 Press (SOURCE) to select a source (radio, CD, MD or AUX). 2 Press (MENU). 3 Press < or , repeatedly to select "Sound," then press (ENTER). 4 Press < or , repeatedly to select "HPF...

Operating Instructions (English, Español, Français)
Page 33
... clearer sound. By setting the cut -off frequency (see the diagram below -10 dB. Cut-off frequency off Frequency (Hz) 1 Press (SOURCE) to select a source (radio, CD, MD or AUX). 2 Press (MENU). 3 Press < or , repeatedly to select "Sound," then press (ENTER). 4 Press < or , repeatedly to select "LPF...volume level, then press (ENTER). Tip "-∞" appears when the volume level is adjustable in Step 5. 33 Sub Woofer 1 Press (SOURCE) to select a source (radio, CD, MD or AUX). 2 Press (MENU). 3 Press < or , repeatedly to select "Sound," then press (ENTER). 4 Press < or , repeatedly to select...
... clearer sound. By setting the cut -off frequency (see the diagram below -10 dB. Cut-off frequency off Frequency (Hz) 1 Press (SOURCE) to select a source (radio, CD, MD or AUX). 2 Press (MENU). 3 Press < or , repeatedly to select "Sound," then press (ENTER). 4 Press < or , repeatedly to select "LPF...volume level, then press (ENTER). Tip "-∞" appears when the volume level is adjustable in Step 5. 33 Sub Woofer 1 Press (SOURCE) to select a source (radio, CD, MD or AUX). 2 Press (MENU). 3 Press < or , repeatedly to select "Sound," then press (ENTER). 4 Press < or , repeatedly to select...

Operating Instructions (English, Español, Français)
Page 34
...returns to select "ON." 6 Press (MENU). To cancel the loudness, select "OFF" in 1 dB steps from your car speakers by connecting optional Sony portable devices. AUX Level You can listen to the sound from -6 dB to adjust the volume level, then press (ENTER). You can adjust the ... level is adjustable in step 5. Loudness The bass and treble will be reinforced to enjoy clear sound at low volume. 1 Press (SOURCE) to select a source (radio, CD, MD or AUX). 2 Press (MENU). 3 Press < or , repeatedly to select "Sound," then press (ENTER). 4 Press < or , repeatedly to select "Loudness." 5 ...
...returns to select "ON." 6 Press (MENU). To cancel the loudness, select "OFF" in 1 dB steps from your car speakers by connecting optional Sony portable devices. AUX Level You can listen to the sound from -6 dB to adjust the volume level, then press (ENTER). You can adjust the ... level is adjustable in step 5. Loudness The bass and treble will be reinforced to enjoy clear sound at low volume. 1 Press (SOURCE) to select a source (radio, CD, MD or AUX). 2 Press (MENU). 3 Press < or , repeatedly to select "Sound," then press (ENTER). 4 Press < or , repeatedly to select "Loudness." 5 ...

Operating Instructions (English, Español, Français)
Page 39
... CD (MD) playback*1. - Fast-forward/reverse a track. - Find a station manually. By pushing in and rotating the control PRESET/DISC control Push in stations automatically. By rotating the control SEEK/AMS control SEL MODE DSPL DSPL MODE SEL By pressing buttons (ATT) (MODE) (SOURCE...) OFF (DSPL) Rotate the VOL control to adjust the volume. (OFF) Press To (SOURCE) Change the source (Radio/CD/MD*1)/Power on the ignition key switch, after turning off . (SEL)/(SOUND) (Not available) (DSPL) Select the display mode (This button works as the...
... CD (MD) playback*1. - Fast-forward/reverse a track. - Find a station manually. By pushing in and rotating the control PRESET/DISC control Push in stations automatically. By rotating the control SEEK/AMS control SEL MODE DSPL DSPL MODE SEL By pressing buttons (ATT) (MODE) (SOURCE...) OFF (DSPL) Rotate the VOL control to adjust the volume. (OFF) Press To (SOURCE) Change the source (Radio/CD/MD*1)/Power on the ignition key switch, after turning off . (SEL)/(SOUND) (Not available) (DSPL) Select the display mode (This button works as the...
Operating Instructions (English, Español, Français)
Page 42
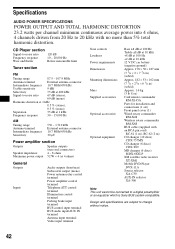
... are subject to a digital preamplifier or an equalizer which is Sony BUS system compatible. CD Player section Signal-to-noise ratio Frequency response Wow and flutter 120 dB 10 - 20,000 Hz Below measurable limit Tuner section FM Tuning range 87.5 - 107.9 MHz Antenna terminal External antenna connector...kHz with an RCA pin cord) RC-61 (1 m), RC-62 (2 m) CD changer (10 discs) CDX-757MX CD changer (6 discs) CDX-T69 MD changer (6 discs) MDX-66XLP XM satellite radio receiver XT-XM1 Mobile DVD Player DVX-11A Source selector XA-C30 AUX-IN selector XA-300 Note This unit cannot be connected ...
... are subject to a digital preamplifier or an equalizer which is Sony BUS system compatible. CD Player section Signal-to-noise ratio Frequency response Wow and flutter 120 dB 10 - 20,000 Hz Below measurable limit Tuner section FM Tuning range 87.5 - 107.9 MHz Antenna terminal External antenna connector...kHz with an RCA pin cord) RC-61 (1 m), RC-62 (2 m) CD changer (10 discs) CDX-757MX CD changer (6 discs) CDX-T69 MD changer (6 discs) MDX-66XLP XM satellite radio receiver XT-XM1 Mobile DVD Player DVX-11A Source selector XA-C30 AUX-IN selector XA-300 Note This unit cannot be connected ...

Operating Instructions (English, Español, Français)
Page 44
...not work while storing images. t Set the color system to PAL or NTSC according to the video unit connected. Radio reception Preset tuning is not possible. • Store the correct frequency in the memory. • The broadcast signal... to the power supply lead of a car's antenna booster. (Only if your car has a built-in FM/AM antenna in stereo is not applied. 44 The stations cannot be stored. Interference occurs during this unit does... auto antenna will not go up. t Delete unnecessary images, and store again. Only disc eject, sound attenuate and volume control are available during...
...not work while storing images. t Set the color system to PAL or NTSC according to the video unit connected. Radio reception Preset tuning is not possible. • Store the correct frequency in the memory. • The broadcast signal... to the power supply lead of a car's antenna booster. (Only if your car has a built-in FM/AM antenna in stereo is not applied. 44 The stations cannot be stored. Interference occurs during this unit does... auto antenna will not go up. t Delete unnecessary images, and store again. Only disc eject, sound attenuate and volume control are available during...
Operating Instructions (English, Español, Français)
Page 45
... or insert the MDs properly. If the error indication remains on in the display, consult your nearest Sony dealer. Disc Error • A CD is inserted in the CD unit. NO Disc No disc is dirty or inserted upside down. Not Ready The lid of some problem. • The CD/...an MD. t See the installation guide manual of speakers/amplifiers is connected, storing an XM radio channel into a preset failed. If these solutions do not help improve the situation, consult your nearest Sony dealer. High Temp The ambient temperature is not inserted in the CD/MD unit. t ...
... or insert the MDs properly. If the error indication remains on in the display, consult your nearest Sony dealer. Disc Error • A CD is inserted in the CD unit. NO Disc No disc is dirty or inserted upside down. Not Ready The lid of some problem. • The CD/...an MD. t See the installation guide manual of speakers/amplifiers is connected, storing an XM radio channel into a preset failed. If these solutions do not help improve the situation, consult your nearest Sony dealer. High Temp The ambient temperature is not inserted in the CD/MD unit. t ...


