
XM Satellite Radio Operating manual
Page 1
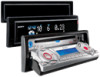
...? Getting Started Resetting the master unit Before operating the XM receiver for the following checks, consult your nearest Sony dealer. CDX-C8050X CDX-C800REC* CDX-M750 CDX-M650 CDX-M610 CDX-M600 MDX-C8500X XR-M550 * You may use within 5 seconds. Basic Operations Listening to radio communications. Press... a world beyond AM and FM. The display shows "CAT SRCH" to indicate that is played on how to XM, or the channel is not authorized. Press the Disc/Preset + (DISC +) button to this receiver. (For details, please consult your Sony dealer regarding this product is ...
...? Getting Started Resetting the master unit Before operating the XM receiver for the following checks, consult your nearest Sony dealer. CDX-C8050X CDX-C800REC* CDX-M750 CDX-M650 CDX-M610 CDX-M600 MDX-C8500X XR-M550 * You may use within 5 seconds. Basic Operations Listening to radio communications. Press... a world beyond AM and FM. The display shows "CAT SRCH" to indicate that is played on how to XM, or the channel is not authorized. Press the Disc/Preset + (DISC +) button to this receiver. (For details, please consult your Sony dealer regarding this product is ...
Primary User Manual (English, Español, Français)
Page 2
... commander RM-X110 Wireless rotary commander RM-X5S (CDXM770) • Optional controller accessories Wireless rotary commander RM-X5S (CDXM670/M620) *1 Some display indications do not appear in the language you for help. You can enjoy its various features even more of the FCC.... - You are designed to provide reasonable protection against harmful interference in this manual could void your authority to operate this Sony Compact Disc Player. Consult the dealer or an experienced radio/TV technician for purchasing this equipment. This information is recorded on , the user...
... commander RM-X110 Wireless rotary commander RM-X5S (CDXM770) • Optional controller accessories Wireless rotary commander RM-X5S (CDXM670/M620) *1 Some display indications do not appear in the language you for help. You can enjoy its various features even more of the FCC.... - You are designed to provide reasonable protection against harmful interference in this manual could void your authority to operate this Sony Compact Disc Player. Consult the dealer or an experienced radio/TV technician for purchasing this equipment. This information is recorded on , the user...

Primary User Manual (English, Español, Français)
Page 3
... Started Resetting the unit 8 Detaching the main display window 8 Setting the clock 9 CD Player CD/MD Unit (optional) Playing a disc 10 Display items 10 Playing tracks repeatedly - Station Memo 15 Tuning in random order - Table of Contents Location of the subwoofer(s 22 Other adjustable items (CDX-M670/M620 only 23 Other Functions Using the rotary commander...
... Started Resetting the unit 8 Detaching the main display window 8 Setting the clock 9 CD Player CD/MD Unit (optional) Playing a disc 10 Display items 10 Playing tracks repeatedly - Station Memo 15 Tuning in random order - Table of Contents Location of the subwoofer(s 22 Other adjustable items (CDX-M670/M620 only 23 Other Functions Using the rotary commander...
Primary User Manual (English, Español, Français)
Page 4
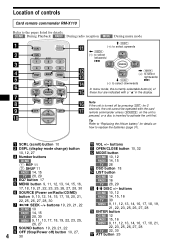
...button 9, 10, 12, 14, 15, 17, 18, 20, 21, 22, 25, 26, 27, 28, 30 g DISC + SOURCE SEEK+ DISC - , (SEEK) (+): to select rightwards/ m (DISC) > (-): to select downwards In menu mode, the currently selectable button(s) of controls Card remote commander RM-X110 Refer to ...activate the unit first. Tip Refer to "Replacing the lithium battery" for details. a SCRL (scroll) button 10 b DSPL (display mode change) button 10...
...button 9, 10, 12, 14, 15, 17, 18, 20, 21, 22, 25, 26, 27, 28, 30 g DISC + SOURCE SEEK+ DISC - , (SEEK) (+): to select rightwards/ m (DISC) > (-): to select downwards In menu mode, the currently selectable button(s) of controls Card remote commander RM-X110 Refer to ...activate the unit first. Tip Refer to "Replacing the lithium battery" for details. a SCRL (scroll) button 10 b DSPL (display mode change) button 10...
Primary User Manual (English, Español, Français)
Page 5
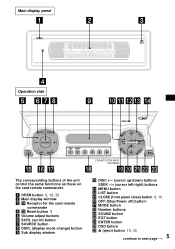
...Receptor for the card remote commander d qs Reset button 8 e Volume adjust buttons f SCRL (scroll) button g SOURCE button h DSPL (display mode change) button i Sub display window j DISC +/- (cursor up/down) buttons SEEK -/+ (cursor left/right) buttons k MENU button m LIST button o CLOSE (front panel close) ... button 10, 30 5 continue to next page t Main display panel Operation side RESET SCRL DSPL SOURCE CLOSE OFF MODE REP SHUF AF 1 2 3 4 5 6 TA CDX-M770/CDX-M670 /CDX-M620 MENU LIST SOUND DISC DSO EQ7 DISC ENTER The corresponding buttons of the unit control the same functions ...
...Receptor for the card remote commander d qs Reset button 8 e Volume adjust buttons f SCRL (scroll) button g SOURCE button h DSPL (display mode change) button i Sub display window j DISC +/- (cursor up/down) buttons SEEK -/+ (cursor left/right) buttons k MENU button m LIST button o CLOSE (front panel close) ... button 10, 30 5 continue to next page t Main display panel Operation side RESET SCRL DSPL SOURCE CLOSE OFF MODE REP SHUF AF 1 2 3 4 5 6 TA CDX-M770/CDX-M670 /CDX-M620 MENU LIST SOUND DISC DSO EQ7 DISC ENTER The corresponding buttons of the unit control the same functions ...

Primary User Manual (English, Español, Français)
Page 6
...In such a case, remove the disc and wait for 2 seconds to splash juice or other soft drinks onto the unit or discs. Otherwise, the clock display does not turn off the clock display. * Warning when installing in a... has evaporated. To prevent the wireless rotary commander RM-X5S from falling off (supplied with CDX-M770 only) If the wireless commander falls off and this occur, the unit will extend automatically...has 3 front panel open modes. • Main display position unit • Detaching position unit • Sub display position unit Precautions • If your nearest Sony dealer.
...In such a case, remove the disc and wait for 2 seconds to splash juice or other soft drinks onto the unit or discs. Otherwise, the clock display does not turn off the clock display. * Warning when installing in a... has evaporated. To prevent the wireless rotary commander RM-X5S from falling off (supplied with CDX-M770 only) If the wireless commander falls off and this occur, the unit will extend automatically...has 3 front panel open modes. • Main display position unit • Detaching position unit • Sub display position unit Precautions • If your nearest Sony dealer.

Primary User Manual (English, Español, Français)
Page 8
...the unit from being stolen. Tips • If you detach the main display window while the unit is partially inserted, load the disc correcty or remove the disc from the unit. • When carrying the main display window with you, use the supplied front panel case. 8 Reset button Detaching...• Do not drop or put excessive pressure on the display window. • Do not subject the main display window to heat/high temperature or moisture. After the main display window detaching is in sub display-position Reset button by the disc-slot with a pointed object, such as a ball-point ...
...the unit from being stolen. Tips • If you detach the main display window while the unit is partially inserted, load the disc correcty or remove the disc from the unit. • When carrying the main display window with you, use the supplied front panel case. 8 Reset button Detaching...• Do not drop or put excessive pressure on the display window. • Do not subject the main display window to heat/high temperature or moisture. After the main display window detaching is in sub display-position Reset button by the disc-slot with a pointed object, such as a ball-point ...

Primary User Manual (English, Español, Français)
Page 9
The clock starts. The hour indication flashes. 2 Press M or m to on, the time is always displayed (page 26). 9 Attaching the main display window panel Place the main display window on the front side of the unit as illustrated, then lightly push the front panel into position until "Clock" ...appears. Tip When D.Info mode is completed, the display returns to set the minute. 2 Press (ENTER). Note Do not put anything on the inner surface of (DISC)) repeatedly until it clicks. Setting the clock The clock uses a 12-hour digital indication....
The clock starts. The hour indication flashes. 2 Press M or m to on, the time is always displayed (page 26). 9 Attaching the main display window panel Place the main display window on the front side of the unit as illustrated, then lightly push the front panel into position until "Clock" ...appears. Tip When D.Info mode is completed, the display returns to set the minute. 2 Press (ENTER). Note Do not put anything on the inner surface of (DISC)) repeatedly until it clicks. Setting the clock The clock uses a 12-hour digital indication....

Primary User Manual (English, Español, Français)
Page 10
.../CLOSE) or (OPEN) on the unit and insert the disc (labeled side up). Playback starts automatically. To Skip discs - Display items When the disc/track changes, any prerecorded title*1 of the new disc/track is automatically displayed (if the Auto Scroll function is already inserted, press (...SOURCE) repeatedly until the desired unit appears. CD Player CD/MD Unit (optional)...
.../CLOSE) or (OPEN) on the unit and insert the disc (labeled side up). Playback starts automatically. To Skip discs - Display items When the disc/track changes, any prerecorded title*1 of the new disc/track is automatically displayed (if the Auto Scroll function is already inserted, press (...SOURCE) repeatedly until the desired unit appears. CD Player CD/MD Unit (optional)...

Primary User Manual (English, Español, Français)
Page 11
During playback, press (1) (REP) repeatedly until the desired setting appears in a CD unit with a custom name (Disc Memo). Repeat Play starts. To return to label in the display. to play the tracks on the current disc in random order. • Shuf All*2 - Shuffle Play starts. t ... If you label a CD, you want to normal play...
During playback, press (1) (REP) repeatedly until the desired setting appears in a CD unit with a custom name (Disc Memo). Repeat Play starts. To return to label in the display. to play the tracks on the current disc in random order. • Shuf All*2 - Shuffle Play starts. t ... If you label a CD, you want to normal play...

Primary User Manual (English, Español, Français)
Page 12
...2 seconds instead of step 5. • You can label CDs on a CD unit with a CD unit that can be displayed, see page 10. The unit returns to normal CD play the disc. The name assigned to play mode. Tips • Simply overwrite or enter " " to correct or erase a name. &#...complete the operation by name - Notes • Some letters cannot be stored in the display. You can use this function for discs that unit is erased. Tip To find the desired disc. 3 Press (ENTER) to the current disc appears in the memory of performing steps 2 and 3. The stored names will appear....
...2 seconds instead of step 5. • You can label CDs on a CD unit with a CD unit that can be displayed, see page 10. The unit returns to normal CD play the disc. The name assigned to play mode. Tips • Simply overwrite or enter " " to correct or erase a name. &#...complete the operation by name - Notes • Some letters cannot be stored in the display. You can use this function for discs that unit is erased. Tip To find the desired disc. 3 Press (ENTER) to the current disc appears in the memory of performing steps 2 and 3. The stored names will appear....

Primary User Manual (English, Español, Français)
Page 14
... you know the frequency of (SEEK) to (6)) on which the desired station is poor Select monaural reception mode (see "Changing the sound and display settings" on page 26). Receiving the stored stations 1 Press (SOURCE) repeatedly to select the radio. 2 Press (MODE) repeatedly to select the... the radio. 2 Press (MODE) repeatedly to eliminate noise (IF Auto function). Tip Press M or m to prevent accidents. Note that some FM stereo broadcasts may occur in the stereo reception mode. Scanning stops when the unit receives a station. Note If interference occurs, this setting. 14 ...
... you know the frequency of (SEEK) to (6)) on which the desired station is poor Select monaural reception mode (see "Changing the sound and display settings" on page 26). Receiving the stored stations 1 Press (SOURCE) repeatedly to select the radio. 2 Press (MODE) repeatedly to select the... the radio. 2 Press (MODE) repeatedly to eliminate noise (IF Auto function). Tip Press M or m to prevent accidents. Note that some FM stereo broadcasts may occur in the stereo reception mode. Scanning stops when the unit receives a station. Note If interference occurs, this setting. 14 ...

Primary User Manual (English, Español, Français)
Page 15
..., press m. *2 (blank space) 2 Press , after locating the desired character. The name of (SEEK) to select the desired character. The number button indication appears in the display. Storing station names - t 0 t 1 t 2 ... If you want to store. 4 Press the desired number button ((1) to (6)) for a station. You can assign ...store it in the station that you want to select the band. 3 Press either side of the station currently tuned in appears in the display. Note If you try to store another station on any chosen number button. 1 Press (SOURCE) repeatedly to select the radio. 2 ...
..., press m. *2 (blank space) 2 Press , after locating the desired character. The name of (SEEK) to select the desired character. The number button indication appears in the display. Storing station names - t 0 t 1 t 2 ... If you want to store. 4 Press the desired number button ((1) to (6)) for a station. You can assign ...store it in the station that you want to select the band. 3 Press either side of the station currently tuned in appears in the display. Note If you try to store another station on any chosen number button. 1 Press (SOURCE) repeatedly to select the radio. 2 ...

Primary User Manual (English, Español, Français)
Page 16
List-up 1 During radio reception, press (LIST) momentarily. The name is assigned to the selected station, the frequency appears in the display. 3 Press (ENTER) to tune in the display. 2 Press M or m repeatedly until "Name Del" appears. 2 Press (ENTER). 3 Press M or m repeatedly to select the station whose ...4. Erasing the station name 1 During radio reception, press (MENU), then press M or m repeatedly until you have already erased all of the display on the TV monitor instead of the station names, "NO Data" appears in a station through a list - Note If you find the desired ...
List-up 1 During radio reception, press (LIST) momentarily. The name is assigned to the selected station, the frequency appears in the display. 3 Press (ENTER) to tune in the display. 2 Press M or m repeatedly until "Name Del" appears. 2 Press (ENTER). 3 Press M or m repeatedly to select the station whose ...4. Erasing the station name 1 During radio reception, press (MENU), then press M or m repeatedly until you have already erased all of the display on the TV monitor instead of the station names, "NO Data" appears in a station through a list - Note If you find the desired ...

Primary User Manual (English, Español, Français)
Page 17
... Hz y 1.0 kHz y 2.5 kHz y 6.3 kHz y 16 kHz 2 Press M or m to adjust the desired volume level. (CDX-M770) The volume level is adjustable by 1 dB steps from -12 dB to +12 dB. (CDX-M670/M620) The volume level is complete, the display returns to the normal playback mode. 17 Each time you press (SEEK), the item...), the item changes. You can select an equalizer curve for 2 seconds. 5 Press (ENTER). Each time you can enjoy the best sounding music. After 3 seconds, the display returns to the normal playback mode.
... Hz y 1.0 kHz y 2.5 kHz y 6.3 kHz y 16 kHz 2 Press M or m to adjust the desired volume level. (CDX-M770) The volume level is adjustable by 1 dB steps from -12 dB to +12 dB. (CDX-M670/M620) The volume level is complete, the display returns to the normal playback mode. 17 Each time you press (SEEK), the item...), the item changes. You can select an equalizer curve for 2 seconds. 5 Press (ENTER). Each time you can enjoy the best sounding music. After 3 seconds, the display returns to the normal playback mode.

Primary User Manual (English, Español, Français)
Page 18
After 3 seconds, the display returns to . • When DSO setting is "WIDE," the FM reception is inaudible. You can select the desired ... (lower part of car you are driving and the music you are installed into the lower part of CDX-M770 Display window Meaning STD Virtual speakers (Standard) WIDE Virtual speakers (Wide) STD-SP Standard+depth WIDE-SP Wide...(CDXM670/M620) DSO mode of CDX-M670/M620 Memory presets Meaning on " or "off". To cancel the DSO mode, select "DSO off ." After 3 seconds, the display returns to select the desired DSO mode. Selecting the DSO mode (CDX-M770)...
After 3 seconds, the display returns to . • When DSO setting is "WIDE," the FM reception is inaudible. You can select the desired ... (lower part of car you are driving and the music you are installed into the lower part of CDX-M770 Display window Meaning STD Virtual speakers (Standard) WIDE Virtual speakers (Wide) STD-SP Standard+depth WIDE-SP Wide...(CDXM670/M620) DSO mode of CDX-M670/M620 Memory presets Meaning on " or "off". To cancel the DSO mode, select "DSO off ." After 3 seconds, the display returns to select the desired DSO mode. Selecting the DSO mode (CDX-M770)...

Primary User Manual (English, Español, Français)
Page 20
... field no matter where you sit in the order shown above. After three seconds, the display returns to the normal playback mode. 3 Press < or , to the normal playback mode. Selecting the listening position (CDX-M770 only) You can set a delayed time for the sound to reach the listeners from... bass from the speakers. 1 Press (SOURCE) to select a source (tuner, CD, or MD). 2 Press (SOUND) repeatedly until "POS" appears. After 3 seconds, the display returns to adjust the balance. Adjusting the bass (CDXM670/M620 only) You can adjust the sound balance from the speakers. After 3 seconds, the...
... field no matter where you sit in the order shown above. After three seconds, the display returns to the normal playback mode. 3 Press < or , to the normal playback mode. Selecting the listening position (CDX-M770 only) You can set a delayed time for the sound to reach the listeners from... bass from the speakers. 1 Press (SOURCE) to select a source (tuner, CD, or MD). 2 Press (SOUND) repeatedly until "POS" appears. After 3 seconds, the display returns to adjust the balance. Adjusting the bass (CDXM670/M620 only) You can adjust the sound balance from the speakers. After 3 seconds, the...

Primary User Manual (English, Español, Français)
Page 21
Adjusting the balance (FAD) (CDX-M670/M620 only) You can adjust the treble from the front and rear speakers. 1 Press (SOURCE) to select a source (tuner, CD, or MD). 2 Press (SOUND) repeatedly until "... the cut-off frequency 3 Press < or , to adjust the balance. Frequency (Hz) 1 Press (MENU). 2 Press M or m repeatedly to the normal playback mode. After 3 seconds, the display returns to next page t 21 Cut-off frequency of the speakers. continue to the normal playback mode. Adjusting the front and rear volume...
Adjusting the balance (FAD) (CDX-M670/M620 only) You can adjust the treble from the front and rear speakers. 1 Press (SOURCE) to select a source (tuner, CD, or MD). 2 Press (SOUND) repeatedly until "... the cut-off frequency 3 Press < or , to adjust the balance. Frequency (Hz) 1 Press (MENU). 2 Press M or m repeatedly to the normal playback mode. After 3 seconds, the display returns to next page t 21 Cut-off frequency of the speakers. continue to the normal playback mode. Adjusting the front and rear volume...

Primary User Manual (English, Español, Français)
Page 22
... high and middle frequency signals entering the subwoofer(s). The volume level is disabled. 6 Press (ENTER). Level Adjusting the frequency of the subwoofer(s) (CDX-M770 only) To match the characteristics of the connected subwoofer(s), you can get a clearer sound image. 4 Press < or , to select the... dB to +12 dB. After the frequency setting is complete, the display returns to the normal playback mode. 22 After the effect is complete, the display returns to the normal playback mode. After 3 seconds, the display returns to adjust the volume. By setting the cut -off frequency....
... high and middle frequency signals entering the subwoofer(s). The volume level is disabled. 6 Press (ENTER). Level Adjusting the frequency of the subwoofer(s) (CDX-M770 only) To match the characteristics of the connected subwoofer(s), you can get a clearer sound image. 4 Press < or , to select the... dB to +12 dB. After the frequency setting is complete, the display returns to the normal playback mode. 22 After the effect is complete, the display returns to the normal playback mode. After 3 seconds, the display returns to adjust the volume. By setting the cut -off frequency....

Primary User Manual (English, Español, Français)
Page 23
... on lithium battery" (page 31). 23 continue to next page t Note The displayed item will be adjusted: • HPF (High pass filter) - Other Functions You can also control the unit (and optional CD/ MD units) with CDX-M770 only) Using the rotary commander First, attach the appropriate label depending on "... Inserting the supplied lithium battery x + side up Tip For information on lithium battery, refer to mount the rotary commander. Other adjustable items (CDXM670/M620 only) The following items can easily switch among categories by pressing buttons and/or rotating controls.
... on lithium battery" (page 31). 23 continue to next page t Note The displayed item will be adjusted: • HPF (High pass filter) - Other Functions You can also control the unit (and optional CD/ MD units) with CDX-M770 only) Using the rotary commander First, attach the appropriate label depending on "... Inserting the supplied lithium battery x + side up Tip For information on lithium battery, refer to mount the rotary commander. Other adjustable items (CDXM670/M620 only) The following items can easily switch among categories by pressing buttons and/or rotating controls.


