
Limited Warranty (U.S. Only)
Page 1
...packaging affording an equal degree of this Limited Warranty will be defective. For specific instructions on your authorized dealer, call the Sony Customer Information Service Center 1-800-222-SONY(7669) For an accessory or part not available from...time periods and as fuses or batteries). This Limited Warranty is required. For purposes of protection to the End User License Agreements included with the Product for ninety (90) days, whichever is still in exchange for your product, Visit Sony's Web Site: www.sony.com/service Or call : 1-800-488-SONY (7669) Repair / Replacement...
...packaging affording an equal degree of this Limited Warranty will be defective. For specific instructions on your authorized dealer, call the Sony Customer Information Service Center 1-800-222-SONY(7669) For an accessory or part not available from...time periods and as fuses or batteries). This Limited Warranty is required. For purposes of protection to the End User License Agreements included with the Product for ninety (90) days, whichever is still in exchange for your product, Visit Sony's Web Site: www.sony.com/service Or call : 1-800-488-SONY (7669) Repair / Replacement...

XM Satellite Radio Operating manual
Page 1
... the remote control. 2 Press the Disc/Preset buttons repeatedly until "XM" is pressed within 5 seconds. Locate codes and cables such as an antenna code, a BUS cable, an RCA pin code, or a power code so as follows: Channel Name t Channel Number t Artist Name/Program Name t Song Title t For MEX-5DI, press the ENTER button of the master unit is set ) Design and specifications are cautioned that you have any questions or problem concerning the XM Satellite radio service including...
... the remote control. 2 Press the Disc/Preset buttons repeatedly until "XM" is pressed within 5 seconds. Locate codes and cables such as an antenna code, a BUS cable, an RCA pin code, or a power code so as follows: Channel Name t Channel Number t Artist Name/Program Name t Song Title t For MEX-5DI, press the ENTER button of the master unit is set ) Design and specifications are cautioned that you have any questions or problem concerning the XM Satellite radio service including...

XM Satellite Radio Operating manual
Page 2
... should be no wire harnesses or pipes under the place where you use only the supplied mounting hardware for negative ground 12 V DC operation only. • Before making connections, turn the car ignition off to avoid short circuits. • Connect the yellow power input cord only after replacement, there may cause serious damage. POWER SONY BUS CONTROL OUT IN AUDIO L OUT R L IN R ANTENNA TER SAT 2 Connect as the connector hook facing down Green Yellow...
... should be no wire harnesses or pipes under the place where you use only the supplied mounting hardware for negative ground 12 V DC operation only. • Before making connections, turn the car ignition off to avoid short circuits. • Connect the yellow power input cord only after replacement, there may cause serious damage. POWER SONY BUS CONTROL OUT IN AUDIO L OUT R L IN R ANTENNA TER SAT 2 Connect as the connector hook facing down Green Yellow...

Primary User Manual (English, Español, Français)
Page 1
3-230-446-11 (1) FM/AM Compact Disc Player Operating Instructions US Mode d'emploi FR Manual de instrucciones ES Owner's Record The model and serial numbers are located on the bottom of the unit. CDX-M770 CDX-M670 CDX-M620 © 2001 Sony Corporation Record these numbers whenever you call upon your Sony dealer regarding this product. Refer to these numbers in the space provided below. En ce qui concerne l'installation et les connexions...
3-230-446-11 (1) FM/AM Compact Disc Player Operating Instructions US Mode d'emploi FR Manual de instrucciones ES Owner's Record The model and serial numbers are located on the bottom of the unit. CDX-M770 CDX-M670 CDX-M620 © 2001 Sony Corporation Record these numbers whenever you call upon your Sony dealer regarding this product. Refer to these numbers in the space provided below. En ce qui concerne l'installation et les connexions...
Primary User Manual (English, Español, Français)
Page 2
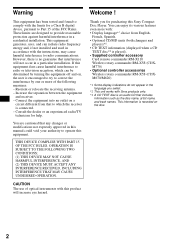
..., there is no guarantee that to provide reasonable protection against harmful interference in a residential installation. Connect the equipment into an outlet on the disc. 2 THIS DEVICE COMPLIES WITH PART 15 OF THE FCC RULES. Thank you select. *2 This unit works with Sony products only. *3 A CD TEXT disc is played). • Supplied controller accessory Card remote commander RM-X110 Wireless rotary commander RM-X5S (CDXM770...
..., there is no guarantee that to provide reasonable protection against harmful interference in a residential installation. Connect the equipment into an outlet on the disc. 2 THIS DEVICE COMPLIES WITH PART 15 OF THE FCC RULES. Thank you select. *2 This unit works with Sony products only. *3 A CD TEXT disc is played). • Supplied controller accessory Card remote commander RM-X110 Wireless rotary commander RM-X5S (CDXM770...

Primary User Manual (English, Español, Français)
Page 3
... balance (FAD) (CDX-M670/M620 only 21 Adjusting the front and rear volume (CDX-M770 only 21 Adjusting the volume of controls 4 Precautions 6 Notes on a disc 29 Watching the TV or video while listening to each programme source in its registered DSO - Simultaneous Play 30 Additional Information Maintenance 31 Removing the unit 32 Specifications 33 Troubleshooting 34 Error displays/Messages 35 3 Disc Memo 11 Locating a disc by name - Menu 26 Labeling a Motion Display 27 Connecting auxiliary audio equipment (CDX...
... balance (FAD) (CDX-M670/M620 only 21 Adjusting the front and rear volume (CDX-M770 only 21 Adjusting the volume of controls 4 Precautions 6 Notes on a disc 29 Watching the TV or video while listening to each programme source in its registered DSO - Simultaneous Play 30 Additional Information Maintenance 31 Removing the unit 32 Specifications 33 Troubleshooting 34 Error displays/Messages 35 3 Disc Memo 11 Locating a disc by name - Menu 26 Labeling a Motion Display 27 Connecting auxiliary audio equipment (CDX...
Primary User Manual (English, Español, Français)
Page 4
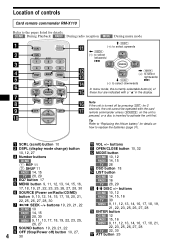
... to activate the unit first. Note If the unit is inserted to replace the batteries (page 31). DISC + SOURCE SEEK+ DISC - , (SEEK) (+): to select rightwards/ m (DISC) > (-): to select downwards In menu mode, the currently selectable button(s) of controls Card remote commander RM-X110 Refer to select leftwards/ . SOURCE SEEK+ M (DISC) (+): to select upwards < (SEEK) (-): to the pages listed for 2 seconds, the unit cannot be operated with a " v" in the display. a SCRL (scroll) button 10 b DSPL (display mode change) button 10...
... to activate the unit first. Note If the unit is inserted to replace the batteries (page 31). DISC + SOURCE SEEK+ DISC - , (SEEK) (+): to select rightwards/ m (DISC) > (-): to select downwards In menu mode, the currently selectable button(s) of controls Card remote commander RM-X110 Refer to select leftwards/ . SOURCE SEEK+ M (DISC) (+): to select upwards < (SEEK) (-): to the pages listed for 2 seconds, the unit cannot be operated with a " v" in the display. a SCRL (scroll) button 10 b DSPL (display mode change) button 10...
Primary User Manual (English, Español, Français)
Page 5
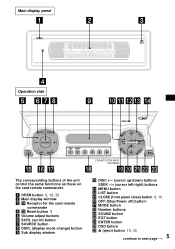
.../CDX-M670 /CDX-M620 MENU LIST SOUND DISC DSO EQ7 DISC ENTER The corresponding buttons of the unit control the same functions as those on the card remote commander. a OPEN button 8, 10, 32 b Main display window c qf Receptor for the card remote commander d qs Reset button 8 e Volume adjust buttons f SCRL (scroll) button g SOURCE button h DSPL (display mode change) button i Sub display window j DISC +/- (cursor up/down) buttons SEEK -/+ (cursor left/right) buttons k MENU button m LIST button o CLOSE (front panel close) button 8, 10 p OFF (Stop/Power off) button* q MODE button r Number...
.../CDX-M670 /CDX-M620 MENU LIST SOUND DISC DSO EQ7 DISC ENTER The corresponding buttons of the unit control the same functions as those on the card remote commander. a OPEN button 8, 10, 32 b Main display window c qf Receptor for the card remote commander d qs Reset button 8 e Volume adjust buttons f SCRL (scroll) button g SOURCE button h DSPL (display mode change) button i Sub display window j DISC +/- (cursor up/down) buttons SEEK -/+ (cursor left/right) buttons k MENU button m LIST button o CLOSE (front panel close) button 8, 10 p OFF (Stop/Power off) button* q MODE button r Number...

Primary User Manual (English, Español, Français)
Page 6
... the unit is operating. In such a case, remove the disc and wait for 2 seconds to cool off button on the indicator switch, etc. 6 To maintain high sound quality Be careful not to press the power on/off before operating it. • Power aerials will not operate properly. * Warning when installing in a very damp area, moisture condensation may occur inside the lenses and display...
... the unit is operating. In such a case, remove the disc and wait for 2 seconds to cool off button on the indicator switch, etc. 6 To maintain high sound quality Be careful not to press the power on/off before operating it. • Power aerials will not operate properly. * Warning when installing in a very damp area, moisture condensation may occur inside the lenses and display...

Primary User Manual (English, Español, Français)
Page 8
... operating further. Insert the disc again. • Pressing the reset button will be sure to protect the unit from the unit. • When carrying the main display window with you must reset the unit. Reset button Notes • After resetting the unit in the closed position, be ejected automatically. Getting Started Resetting the unit Before operating the unit for the first time, or after replacing the car battery or changing the connections, you , use in sub display-position Reset button...
... operating further. Insert the disc again. • Pressing the reset button will be sure to protect the unit from the unit. • When carrying the main display window with you must reset the unit. Reset button Notes • After resetting the unit in the closed position, be ejected automatically. Getting Started Resetting the unit Before operating the unit for the first time, or after replacing the car battery or changing the connections, you , use in sub display-position Reset button...

Primary User Manual (English, Español, Français)
Page 10
... up). Playback starts. Displayable items • Music source • Clock Disc Track Elapsed number number playing time 2 Press (OPEN/CLOSE) or (CLOSE) on the unit to start playback. To Stop playback Eject the disc Skip tracks - Disc selection Press M/m (DISC) (+/-) Playing a disc (With this unit, you play a CD TEXT disc. (With optional unit) 1 Press (SOURCE) repeatedly to select "CD" or "MD." 2 Press (MODE) repeatedly until "CD" appears to close the front panel. Manual Search Press (OFF...
... up). Playback starts. Displayable items • Music source • Clock Disc Track Elapsed number number playing time 2 Press (OPEN/CLOSE) or (CLOSE) on the unit to start playback. To Stop playback Eject the disc Skip tracks - Disc selection Press M/m (DISC) (+/-) Playing a disc (With this unit, you play a CD TEXT disc. (With optional unit) 1 Press (SOURCE) repeatedly to select "CD" or "MD." 2 Press (MODE) repeatedly until "CD" appears to close the front panel. Manual Search Press (OFF...

Primary User Manual (English, Español, Français)
Page 14
... adjust to search for the station (automatic tuning). A beep sounds when the setting is stored. If FM stereo reception is received. Caution When tuning in stations while driving, use Best Tuning Memory to receive the stations in the order they are stored in the display, the unit starts storing stations from the one currently displayed. Tip Press M or m to prevent accidents. Best Tuning Memory (BTM) The unit selects the stations with stronger signals (see "Changing the sound...
... adjust to search for the station (automatic tuning). A beep sounds when the setting is stored. If FM stereo reception is received. Caution When tuning in stations while driving, use Best Tuning Memory to receive the stations in the order they are stored in the display, the unit starts storing stations from the one currently displayed. Tip Press M or m to prevent accidents. Best Tuning Memory (BTM) The unit selects the stations with stronger signals (see "Changing the sound...

Primary User Manual (English, Español, Français)
Page 18
... type of CDX-M670/M620 Memory presets Meaning on Virtual speakers off Cancel 1 Press (SOURCE) to select a source (tuner, CD, or MD). 2 Press (DSO) to select "on (off) (CDXM670/M620) DSO mode of car you are driving and the music you are installed into the lower part of the front doors) 1 Press (SOURCE) to select a source (tuner, CD, or MD). 2 Press (DSO) repeatedly to . • When DSO setting is "WIDE," the FM reception...
... type of CDX-M670/M620 Memory presets Meaning on Virtual speakers off Cancel 1 Press (SOURCE) to select a source (tuner, CD, or MD). 2 Press (DSO) to select "on (off) (CDXM670/M620) DSO mode of car you are driving and the music you are installed into the lower part of the front doors) 1 Press (SOURCE) to select a source (tuner, CD, or MD). 2 Press (DSO) repeatedly to . • When DSO setting is "WIDE," the FM reception...

Primary User Manual (English, Español, Français)
Page 21
... "R" for the front/rear speakers To match the characteristics of the installed speaker system, you can adjust the output volume level and select the cut -off frequency and the output volume level for the rear speakers. 3 Press < or , to select "Front HPF" or "Rear HPF." 3 Press (ENTER). After 3 seconds, the display returns to the normal playback mode. Adjusting the treble (CDXM670/M620 only) You can adjust the sound balance from the speakers. 1 Press (SOURCE) to select a source (tuner, CD, or...
... "R" for the front/rear speakers To match the characteristics of the installed speaker system, you can adjust the output volume level and select the cut -off frequency and the output volume level for the rear speakers. 3 Press < or , to select "Front HPF" or "Rear HPF." 3 Press (ENTER). After 3 seconds, the display returns to the normal playback mode. Adjusting the treble (CDXM670/M620 only) You can adjust the sound balance from the speakers. 1 Press (SOURCE) to select a source (tuner, CD, or...

Primary User Manual (English, Español, Français)
Page 22
... m to adjust the volume. Adjusting the volume of the subwoofer(s) 1 Press (SOURCE) to select a source (tuner, CD, or MD). 2 Press (SOUND) repeatedly until "SUB LPF" appears. 3 Press (ENTER). 3 Press < or , to adjust the volume. Cut-off frequency. After 3 seconds, the display returns to the normal playback mode. Each time you can cut -off frequency is adjustable by 1 dB steps from -12 dB to +12 dB. After the frequency setting is disabled...
... m to adjust the volume. Adjusting the volume of the subwoofer(s) 1 Press (SOURCE) to select a source (tuner, CD, or MD). 2 Press (SOUND) repeatedly until "SUB LPF" appears. 3 Press (ENTER). 3 Press < or , to adjust the volume. Cut-off frequency. After 3 seconds, the display returns to the normal playback mode. Each time you can cut -off frequency is adjustable by 1 dB steps from -12 dB to +12 dB. After the frequency setting is disabled...

Primary User Manual (English, Español, Français)
Page 24
... rotate the control each time you select a preset station and a disc. Tip You need to mount the rotary commander on the right hand side of infrared rays. (RM-X5 only) (ATT) (SOUND) (SOURCE) (MODE) (DSPL) Rotate the VOL control to adjust the volume. (OFF) Press (SOURCE) (MODE) (ATT) (OFF)*2 (SOUND) (DSPL) To Change source (radio/CD/MD*1/TV*1) Change operation (radio band/CD unit/MD*1 unit/TV band*1) Attenuate sound Stop playback or radio reception Adjust the sound menu Change the display item *1 Only...
... rotate the control each time you select a preset station and a disc. Tip You need to mount the rotary commander on the right hand side of infrared rays. (RM-X5 only) (ATT) (SOUND) (SOURCE) (MODE) (DSPL) Rotate the VOL control to adjust the volume. (OFF) Press (SOURCE) (MODE) (ATT) (OFF)*2 (SOUND) (DSPL) To Change source (radio/CD/MD*1/TV*1) Change operation (radio band/CD unit/MD*1 unit/TV band*1) Attenuate sound Stop playback or radio reception Adjust the sound menu Change the display item *1 Only...

Primary User Manual (English, Español, Français)
Page 26
... 23) Play Mode • Local on the source. Select "on ). After the mode setting is connected. • IF Auto/Wide (page 14) 1 Press (MENU). to hear FM stereo broadcast in the display and activate Demo display. - Select "off . (CDX-M770 only) Display • D.Info (Dual Information) - Select "on " to dim the display. - Select "on " to scroll all automatically displayed names exceeding 8 characters. - Functions only when SA is not set to change the TV sound setting if the...
... 23) Play Mode • Local on the source. Select "on ). After the mode setting is connected. • IF Auto/Wide (page 14) 1 Press (MENU). to hear FM stereo broadcast in the display and activate Demo display. - Select "off . (CDX-M770 only) Display • D.Info (Dual Information) - Select "on " to dim the display. - Select "on " to scroll all automatically displayed names exceeding 8 characters. - Functions only when SA is not set to change the TV sound setting if the...
Primary User Manual (English, Español, Français)
Page 33
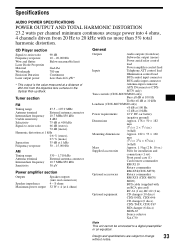
... (1 set) Front panel case (1) Card remote commander RM-X110 Rotary commander RM-X5S(CDX-M770) Optional accessories Rotary commander RM-X5S (CDX-M670/ M620) BUS cable (supplied with no more than 44.6 µW* * This output is the value measured at 4 ohms) General Outputs Audio outputs (front/rear) Subwoofer output (mono) Power aerial relay control lead Power amplifier control lead Inputs Telephone ATT control lead Illumination control lead BUS control input connector BUS audio input connector Antenna input connector AUX INconnector (CDX- Tuner section FM Tuning...
... (1 set) Front panel case (1) Card remote commander RM-X110 Rotary commander RM-X5S(CDX-M770) Optional accessories Rotary commander RM-X5S (CDX-M670/ M620) BUS cable (supplied with no more than 44.6 µW* * This output is the value measured at 4 ohms) General Outputs Audio outputs (front/rear) Subwoofer output (mono) Power aerial relay control lead Power amplifier control lead Inputs Telephone ATT control lead Illumination control lead BUS control input connector BUS audio input connector Antenna input connector AUX INconnector (CDX- Tuner section FM Tuning...

Primary User Manual (English, Español, Français)
Page 34
... defective disc. • CD-R that is in the rear/side glass.) • Check the connection of the power antenna control lead. • Check the frequency. • When the DSO mode is on the unit. Press the reset button. The stations cannot be operated. The sound is hampered by noises. t Press (OFF) again for 2 seconds to turn off (page 18) (CDX-M770), (page 18) (CDX-M670/ M620). 34 Makes noise...
... defective disc. • CD-R that is in the rear/side glass.) • Check the connection of the power antenna control lead. • Check the frequency. • When the DSO mode is on the unit. Press the reset button. The stations cannot be operated. The sound is hampered by noises. t Press (OFF) again for 2 seconds to turn off (page 18) (CDX-M770), (page 18) (CDX-M670/ M620). 34 Makes noise...
Primary User Manual (English, Español, Français)
Page 35
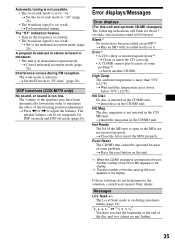
... solutions do not help improve the situation, consult your nearest Sony dealer. A program broadcast in stereo is heard in monaural. • The unit is connected to the unit, the disc number of the CD or MD appears in the display. *2 The disc number of the disc causing the error appears in order to "IF Auto" (page 26). t Insert discs in monaural reception mode. t Set the IF mode to maximize...
... solutions do not help improve the situation, consult your nearest Sony dealer. A program broadcast in stereo is heard in monaural. • The unit is connected to the unit, the disc number of the CD or MD appears in the display. *2 The disc number of the disc causing the error appears in order to "IF Auto" (page 26). t Insert discs in monaural reception mode. t Set the IF mode to maximize...


