
Limited Warranty (U.S. Only)
Page 1
... (90) days, whichever is invalid if the factory-applied serial number has been altered or removed from the original date of purchase of Sony. This Limited Warranty gives you specific legal rights and you may not apply to backup any repair, replacement part or replacement product for the time periods and as fuses or batteries). Labor: For a period of the original Limited...
... (90) days, whichever is invalid if the factory-applied serial number has been altered or removed from the original date of purchase of Sony. This Limited Warranty gives you specific legal rights and you may not apply to backup any repair, replacement part or replacement product for the time periods and as fuses or batteries). Labor: For a period of the original Limited...

Operating Instructions
Page 1
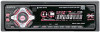
Refer to these numbers in the space provided below. For installation and connections, see the supplied installation/connections manual. Model No. 3-226-678-11 (1) FM/AM Compact Disc Player Operating Instructions US Owner's Record The model and serial numbers are located on the bottom of the unit. CDX-L550X Serial No. CDX-L550X © 2001 Sony Corporation Record these numbers whenever you call upon your Sony dealer regarding this product.
Refer to these numbers in the space provided below. For installation and connections, see the supplied installation/connections manual. Model No. 3-226-678-11 (1) FM/AM Compact Disc Player Operating Instructions US Owner's Record The model and serial numbers are located on the bottom of the unit. CDX-L550X Serial No. CDX-L550X © 2001 Sony Corporation Record these numbers whenever you call upon your Sony dealer regarding this product.

Operating Instructions
Page 2
... installed and used in accordance with the instructions, may cause harmful interference to radio communications. This information is connected. - Reorient or relocate the receiving antenna. - You are designed to Part 15 of optical instruments with this Sony Compact Disc Player. If this equipment. However, there is no guarantee that any changes or modifications not expressly approved in this manual could void your authority to operate...
... installed and used in accordance with the instructions, may cause harmful interference to radio communications. This information is connected. - Reorient or relocate the receiving antenna. - You are designed to Part 15 of optical instruments with this Sony Compact Disc Player. If this equipment. However, there is no guarantee that any changes or modifications not expressly approved in this manual could void your authority to operate...

Operating Instructions
Page 3
... Removing the unit 19 Specifications 20 Troubleshooting 21 Error displays/Messages 22 3 Shuffle Play 10 Radio Storing stations automatically - Repeat Play 10 Playing tracks in random order - Station Memo 12 Locating a station by name - Best Tuning Memory (BTM 11 Receiving the stored stations 11 Storing only the desired stations 12 Storing station names - Menu 16 Selecting the sound position - Table of Contents Location of controls 4 Precautions 6 Notes on discs 6 Getting Started Resetting the unit 7 Detaching the front panel 8 Setting the clock...
... Removing the unit 19 Specifications 20 Troubleshooting 21 Error displays/Messages 22 3 Shuffle Play 10 Radio Storing stations automatically - Repeat Play 10 Playing tracks in random order - Station Memo 12 Locating a station by name - Best Tuning Memory (BTM 11 Receiving the stored stations 11 Storing only the desired stations 12 Storing station names - Menu 16 Selecting the sound position - Table of Contents Location of controls 4 Precautions 6 Notes on discs 6 Getting Started Resetting the unit 7 Detaching the front panel 8 Setting the clock...
Operating Instructions
Page 4
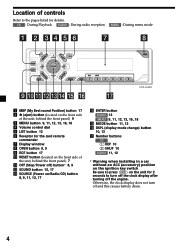
... the clock display after turning off and this causes battery drain. 4 Location of the unit, behind the front panel) 9 3 MENU button 9, 11, 12, 13, 16, 18 4 Volume control dial 5 LIST button 13 6 Receptor for the card remote commander 7 Display window 8 OPEN button 8, 9 9 EQ7 button 17 0 RESET button (located on the unit for 2 seconds to the pages listed for details. CD : During Playback RADIO : During radio reception MENU : During menu mode CDX-L550X 1 MBP (My Best sound Position) button 17 2 Z (eject) button (located...
... the clock display after turning off and this causes battery drain. 4 Location of the unit, behind the front panel) 9 3 MENU button 9, 11, 12, 13, 16, 18 4 Volume control dial 5 LIST button 13 6 Receptor for the card remote commander 7 Display window 8 OPEN button 8, 9 9 EQ7 button 17 0 RESET button (located on the unit for 2 seconds to the pages listed for details. CD : During Playback RADIO : During radio reception MENU : During menu mode CDX-L550X 1 MBP (My Best sound Position) button 17 2 Z (eject) button (located...

Operating Instructions
Page 5
..., 12 MENU 9, 12, 16, 18 DSPL MODE PRESET + MENU DISC + LIST SEEK- Card remote commander RM-X114 (optional) (PRESET) (+): to select upwards (SEEK) (-): to select leftwards/ . (SEEK) (+):to select rightwards /> (PRESET) (-): to select downwards In menu mode, the currently selectable button (s) of the card remote commander control the same functions as those on this unit. 1 DSPL button 2 MENU button 3 SOURCE button 4 SEEK ( SOURCE SOUND OFF DISC - SEEK+ ENTER ATT The corresponding buttons of these four are indicated with a "M" in the display.
..., 12 MENU 9, 12, 16, 18 DSPL MODE PRESET + MENU DISC + LIST SEEK- Card remote commander RM-X114 (optional) (PRESET) (+): to select upwards (SEEK) (-): to select leftwards/ . (SEEK) (+):to select rightwards /> (PRESET) (-): to select downwards In menu mode, the currently selectable button (s) of the card remote commander control the same functions as those on this unit. 1 DSPL button 2 MENU button 3 SOURCE button 4 SEEK ( SOURCE SOUND OFF DISC - SEEK+ ENTER ATT The corresponding buttons of these four are indicated with a "M" in the display.

Operating Instructions
Page 6
... not use solvents such as benzine, thinner, commercially available cleaners, or antistatic spray intended for about an hour until the moisture has evaporated. Precautions •If your car was parked in direct sunlight, allow the unit to cool off before operating it. •Power antennas will not operate properly. Moisture condensation On a rainy day or in this manual, please...
... not use solvents such as benzine, thinner, commercially available cleaners, or antistatic spray intended for about an hour until the moisture has evaporated. Precautions •If your car was parked in direct sunlight, allow the unit to cool off before operating it. •Power antennas will not operate properly. Moisture condensation On a rainy day or in this manual, please...

Operating Instructions
Page 7
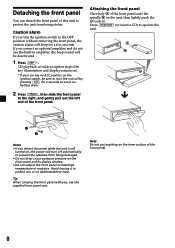
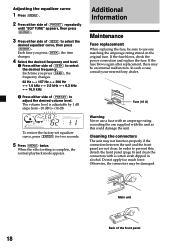
... CD-R disc to be played on the audio CD player. Resetting the unit Before operating the unit for audio use . Remove the front panel and press the RESET button with a pointed object, such as a ballpoint pen. Look for this unit. Getting Started This mark denotes that a disc is not for the first time or after replacing the car battery, you must reset the unit. RESET button Note Pressing the RESET button will erase the clock setting and some...
... CD-R disc to be played on the audio CD player. Resetting the unit Before operating the unit for audio use . Remove the front panel and press the RESET button with a pointed object, such as a ballpoint pen. Look for this unit. Getting Started This mark denotes that a disc is not for the first time or after replacing the car battery, you must reset the unit. RESET button Note Pressing the RESET button will erase the clock setting and some...
Operating Instructions
Page 8
... subject the front panel to operate the unit. CD playback or radio reception stops (the key illumination and display remain on). * If your car has no ACC position on the ignition switch, be deactivated. 1 Press (OFF)*. Caution alarm If you detach the panel while the unit is still turned on, the power will beep for 2 seconds to avoid car battery drain. 2 Press (OPEN...
... subject the front panel to operate the unit. CD playback or radio reception stops (the key illumination and display remain on). * If your car has no ACC position on the ignition switch, be deactivated. 1 Press (OFF)*. Caution alarm If you detach the panel while the unit is still turned on, the power will beep for 2 seconds to avoid car battery drain. 2 Press (OPEN...

Operating Instructions
Page 11
... to fine adjust to the desired frequency (manual tuning). Note If interference occurs, this setting. 11 Best Tuning Memory (BTM) The unit selects the stations with stronger signals (see "Changing the sound and display settings," page 16). Tip To always hear FM stereo broadcasts in the order of their former settings. • When a number is stored. The sound improves, but becomes monaural ("ST" disappears). If preset tuning does not work Press either...
... to fine adjust to the desired frequency (manual tuning). Note If interference occurs, this setting. 11 Best Tuning Memory (BTM) The unit selects the stations with stronger signals (see "Changing the sound and display settings," page 16). Tip To always hear FM stereo broadcasts in the order of their former settings. • When a number is stored. The sound improves, but becomes monaural ("ST" disappears). If preset tuning does not work Press either...
Operating Instructions
Page 12
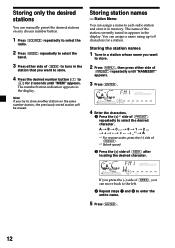
.... 2 Press (MENU), then press either side of (SEEK) to tune in a station whose name you try to store another station on any chosen number button. 1 Press (SOURCE) repeatedly to select the radio. 2 Press (MODE) repeatedly to select the band. 3 Press either side of (PRESET) repeatedly until "MEM" appears. t 0 t 1 t 2 ... t * ... The number button indication appears in the display. Storing only the desired stations You can manually preset the desired stations on...
.... 2 Press (MENU), then press either side of (SEEK) to tune in a station whose name you try to store another station on any chosen number button. 1 Press (SOURCE) repeatedly to select the radio. 2 Press (MODE) repeatedly to select the band. 3 Press either side of (PRESET) repeatedly until "MEM" appears. t 0 t 1 t 2 ... t * ... The number button indication appears in the display. Storing only the desired stations You can manually preset the desired stations on...

Operating Instructions
Page 14
Skip tracks. - Tune in and rotating the control SOUND MODE DSPL DSPL MODE SOUND By pressing buttons (ATT) (SEL) (SOURCE) (DSPL) Rotate the VOL control to adjust the volume. (MODE) (OFF) OFF Press (SOURCE) (MODE) (ATT) (OFF)* (SOUND) (DSPL) To Change source (radio/CD) Change radio band Attenuate sound Stop playback or radio reception Adjust the sound menu Change the display item * If your car has no ACC (accessory) position on how you want to : - Fast-forward/reverse a track. - find a station manually. Using the...
Skip tracks. - Tune in and rotating the control SOUND MODE DSPL DSPL MODE SOUND By pressing buttons (ATT) (SEL) (SOURCE) (DSPL) Rotate the VOL control to adjust the volume. (MODE) (OFF) OFF Press (SOURCE) (MODE) (ATT) (OFF)* (SOUND) (DSPL) To Change source (radio/CD) Change radio band Attenuate sound Stop playback or radio reception Adjust the sound menu Change the display item * If your car has no ACC (accessory) position on how you want to : - Fast-forward/reverse a track. - find a station manually. Using the...
Operating Instructions
Page 15
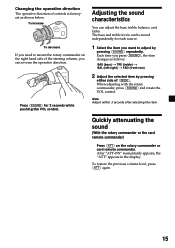
... display. Each time you can adjust the bass, treble, balance, and fader. Press (SOUND) for each source. 1 Select the item you need to adjust by pressing either side of (SEEK). Adjusting the sound characteristics You can reverse the operative direction. When adjusting with the rotary commander, press (SOUND) and rotate the VOL control. Changing the operative direction The operative direction of controls is factoryset as follows: BAS (bass) t TRE (treble) t BAL (left-right) t FAD (front-rear) 2 Adjust the selected...
... display. Each time you can adjust the bass, treble, balance, and fader. Press (SOUND) for each source. 1 Select the item you need to adjust by pressing either side of (SEEK). Adjusting the sound characteristics You can reverse the operative direction. When adjusting with the rotary commander, press (SOUND) and rotate the VOL control. Changing the operative direction The operative direction of controls is factoryset as follows: BAS (bass) t TRE (treble) t BAL (left-right) t FAD (front-rear) 2 Adjust the selected...
Operating Instructions
Page 16
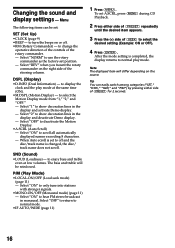
... deactivate Demo display. - The bass and treble will differ depending on the right side of (PRESET) for 2 seconds. 16 Changing the sound and display settings - Select "ON" to normal mode. •IF AUTO/WIDE (page 11) 1 Press (MENU). To set : SET (Set Up) •CLOCK (page 9) •BEEP - After the mode setting is set position. - Select "REV" when you mount the rotary commander on the source. When Auto scroll is completed, the display returns to select...
... deactivate Demo display. - The bass and treble will differ depending on the right side of (PRESET) for 2 seconds. 16 Changing the sound and display settings - Select "ON" to normal mode. •IF AUTO/WIDE (page 11) 1 Press (MENU). To set : SET (Set Up) •CLOCK (page 9) •BEEP - After the mode setting is set position. - Select "REV" when you mount the rotary commander on the source. When Auto scroll is completed, the display returns to select...

Operating Instructions
Page 17
.... Selecting the equalizer curve 1 Press (SOURCE) to the normal playback mode. After 3 seconds, the display returns to OFF, the BAL and FAD setting is activated. 17 The mode of "My Best sound Position" is set to the normal playback mode. If you want to adjust the sound level of balance and fader more precisely, you can enjoy the most comfortable sound environment with the MBP button. "My...
.... Selecting the equalizer curve 1 Press (SOURCE) to the normal playback mode. After 3 seconds, the display returns to OFF, the BAL and FAD setting is activated. 17 The mode of "My Best sound Position" is set to the normal playback mode. If you want to adjust the sound level of balance and fader more precisely, you can enjoy the most comfortable sound environment with the MBP button. "My...
Operating Instructions
Page 18
... to select the desired frequency. Each time you press (SEEK), the frequency changes. 62 Hz y 157 Hz y 396 Hz y 1.0 kHz y 2.5 kHz y 6.3 kHz y 16.0 kHz 2 Press either side of (PRESET) to prevent this, detach the front panel (page 8) and clean the connectors with the unit as this could damage the unit. The volume level is complete, the normal playback mode appears. To restore the factory-set equalizer...
... to select the desired frequency. Each time you press (SEEK), the frequency changes. 62 Hz y 157 Hz y 396 Hz y 1.0 kHz y 2.5 kHz y 6.3 kHz y 16.0 kHz 2 Press either side of (PRESET) to prevent this, detach the front panel (page 8) and clean the connectors with the unit as this could damage the unit. The volume level is complete, the normal playback mode appears. To restore the factory-set equalizer...
Operating Instructions
Page 19
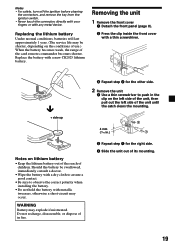
... range of its mounting. 19 Removing the unit 1 Remove the front cover 1 Detach the front panel (page 8). 2 Press the clip inside the front cover with a new CR2025 lithium battery. Replace the battery with a thin screwdriver. Notes • For safety, turn off the ignition before cleaning the connectors, and remove the key from the ignition switch. • Never touch the connectors directly with your fingers...
... range of its mounting. 19 Removing the unit 1 Remove the front cover 1 Detach the front panel (page 8). 2 Press the clip inside the front cover with a new CR2025 lithium battery. Replace the battery with a thin screwdriver. Notes • For safety, turn off the ignition before cleaning the connectors, and remove the key from the ignition switch. • Never touch the connectors directly with your fingers...

Operating Instructions
Page 20
....) (w/h/d) Approx. 1.2 kg (2 lb 10 oz) Parts for installation and connections (1 set) Front panel case (1) Rotary commander RM-X4S Card remote commander RM-X114 Note This unit cannot be connected to a digital preamplifier or an equalizer. CD player section Signal-to change without notice. 20 Specifications AUDIO POWER SPECIFICATIONS POWER OUTPUT AND TOTAL HARMONIC DISTORTION 23 watts per channel minimum continuous average power into 4 ohms, 4 channels driven from the objective lens...
....) (w/h/d) Approx. 1.2 kg (2 lb 10 oz) Parts for installation and connections (1 set) Front panel case (1) Rotary commander RM-X4S Card remote commander RM-X114 Note This unit cannot be connected to a digital preamplifier or an equalizer. CD player section Signal-to change without notice. 20 Specifications AUDIO POWER SPECIFICATIONS POWER OUTPUT AND TOTAL HARMONIC DISTORTION 23 watts per channel minimum continuous average power into 4 ohms, 4 channels driven from the objective lens...

Operating Instructions
Page 21
... the connection. The contents of the car. No beep sound. Stored stations and correct time are not matched correctly with your unit. The power antenna does not have an ACC position. Press the RESET button. See "Cleaning the connectors" (page 18) for a 2-speaker system. No power is in a sturdy part of the memory have an ACC position. The sound skips from /do not function. Dirty or defective disc. Makes...
... the connection. The contents of the car. No beep sound. Stored stations and correct time are not matched correctly with your unit. The power antenna does not have an ACC position. Press the RESET button. See "Cleaning the connectors" (page 18) for a 2-speaker system. No power is in a sturdy part of the memory have an ACC position. The sound skips from /do not function. Dirty or defective disc. Makes...

Operating Instructions
Page 22
.... t Check the connection of some problem. Automatic tuning is not possible. •The local seek mode is hampered by noises. •Connect a power antenna control lead (blue) or accessory power supply lead (red) to "ON." t Set to "IF AUTO" (page 16). t Set the IF mode to the monaural reception mode (page 16). Error displays/Messages Error displays The following indications will flash for about 5 seconds, and an alarm sound will not...
.... t Check the connection of some problem. Automatic tuning is not possible. •The local seek mode is hampered by noises. •Connect a power antenna control lead (blue) or accessory power supply lead (red) to "ON." t Set to "IF AUTO" (page 16). t Set the IF mode to the monaural reception mode (page 16). Error displays/Messages Error displays The following indications will flash for about 5 seconds, and an alarm sound will not...


