Operating Instructions
Page 1
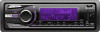
CDX-GT650UI Serial No. CDX-GT650UI ©2010 Sony Corporation Model No. 4-193-831-11(1) FM/AM Compact Disc Player Operating Instructions US Mode d'emploi FR Owner's Record The model and serial numbers are located on the bottom of the unit. To cancel the demonstration (DEMO) display, see page 6. Refer to these numbers whenever you call upon your Sony dealer regarding this product. Record the serial number in the space provided below. Pour annuler l'affichage de démonstration (DEMO), reportez-vous à la page 6.
CDX-GT650UI Serial No. CDX-GT650UI ©2010 Sony Corporation Model No. 4-193-831-11(1) FM/AM Compact Disc Player Operating Instructions US Mode d'emploi FR Owner's Record The model and serial numbers are located on the bottom of the unit. To cancel the demonstration (DEMO) display, see page 6. Refer to these numbers whenever you call upon your Sony dealer regarding this product. Record the serial number in the space provided below. Pour annuler l'affichage de démonstration (DEMO), reportez-vous à la page 6.
Operating Instructions
Page 2
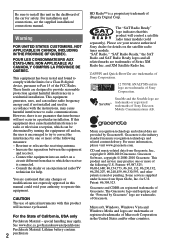
...reasonable protection against harmful interference in a residential installation. The "SAT Radio Ready" logo indicates that any changes or modifications not expressly approved in this manual could void your nearest authorized Sony ...unit in the dashboard of the car for a Class B digital device, pursuant to Part 15 of Sirius XM Radio Inc. Connect the equipment into an outlet on the satellite radio tuner module. and XM Satellite Radio Inc. Music recognition technology and related data are provided by Gracenote" logo are cautioned that this product will control a satellite radio tuner...
...reasonable protection against harmful interference in a residential installation. The "SAT Radio Ready" logo indicates that any changes or modifications not expressly approved in this manual could void your nearest authorized Sony ...unit in the dashboard of the car for a Class B digital device, pursuant to Part 15 of Sirius XM Radio Inc. Connect the equipment into an outlet on the satellite radio tuner module. and XM Satellite Radio Inc. Music recognition technology and related data are provided by Gracenote" logo are cautioned that this product will control a satellite radio tuner...
Operating Instructions
Page 4
... this unit 6 Resetting the unit 6 Canceling the DEMO mode 6 Preparing the card remote commander 6 Setting the clock 6 Detaching the front panel 7 Attaching the front panel 7 Location of display and buttons -Dynamic Color Illuminator 20 Customizing the display and button color - BTM 11 Storing manually 11 Receiving the stored stations 11 Tuning automatically 11 RDS 11 Overview 11 Selecting PTY 12 Setting CT 12 CD Playing a disc 12 Display items 12 Repeat and shuffle play 12 USB devices Playing back a USB device 13 Display...
... this unit 6 Resetting the unit 6 Canceling the DEMO mode 6 Preparing the card remote commander 6 Setting the clock 6 Detaching the front panel 7 Attaching the front panel 7 Location of display and buttons -Dynamic Color Illuminator 20 Customizing the display and button color - BTM 11 Storing manually 11 Receiving the stored stations 11 Tuning automatically 11 RDS 11 Overview 11 Selecting PTY 12 Setting CT 12 CD Playing a disc 12 Display items 12 Repeat and shuffle play 12 USB devices Playing back a USB device 13 Display...
Operating Instructions
Page 5
... the equalizer curve - Rear Bass Enhancer 24 Adjusting setup items - Sound Settings and Setup Menu Changing the sound settings 22 Adjusting the sound characteristics 22 Enjoying sophisticated sound functions - Advanced Sound Engine 22 Selecting the sound quality - SET 24 Other functions Using optional equipment 25 Auxiliary audio equipment 25 Additional Information Precautions 26 Notes on discs 26 Playback order of MP3/WMA/AAC files 26 About iPod 26 Maintenance 27 Removing the unit 28 Specifications 28 Troubleshooting 29 Error displays/Messages 31 Support...
... the equalizer curve - Rear Bass Enhancer 24 Adjusting setup items - Sound Settings and Setup Menu Changing the sound settings 22 Adjusting the sound characteristics 22 Enjoying sophisticated sound functions - Advanced Sound Engine 22 Selecting the sound quality - SET 24 Other functions Using optional equipment 25 Auxiliary audio equipment 25 Additional Information Precautions 26 Notes on discs 26 Playback order of MP3/WMA/AAC files 26 About iPod 26 Maintenance 27 Removing the unit 28 Specifications 28 Troubleshooting 29 Error displays/Messages 31 Support...
Operating Instructions
Page 6
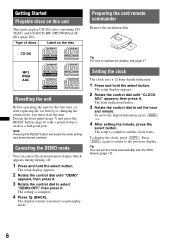
... AAC Resetting the unit Before operating the unit for the first time, or after replacing the car battery or changing the connections, you must reset the unit. The setup display appears. 2 Rotate the control dial until "CLOCK ADJ" appears, then press it . Canceling the DEMO mode You can cancel the demonstration display which appears during turning off. 1 Press and hold the select button. Getting Started Playable discs on the disc Preparing the card remote commander Remove...
... AAC Resetting the unit Before operating the unit for the first time, or after replacing the car battery or changing the connections, you must reset the unit. The setup display appears. 2 Rotate the control dial until "CLOCK ADJ" appears, then press it . Canceling the DEMO mode You can cancel the demonstration display which appears during turning off. 1 Press and hold the select button. Getting Started Playable discs on the disc Preparing the card remote commander Remove...
Operating Instructions
Page 8
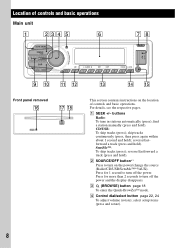
... the power/change the source (Radio/CD/USB/SensMe™*2/AUX). Press for 1 second to turn on the location of controls and basic operations. CD/USB: To skip tracks (press); B SOURCE/OFF button*1 Press to turn off the power. select setup items (press and rotate). reverse/fastforward a track (press and hold ). C (BROWSE) button page 18 To enter the Quick-BrowZer™ mode. D Control dial/select button page 22, 24 To adjust volume (rotate); find a station manually...
... the power/change the source (Radio/CD/USB/SensMe™*2/AUX). Press for 1 second to turn on the location of controls and basic operations. CD/USB: To skip tracks (press); B SOURCE/OFF button*1 Press to turn off the power. select setup items (press and rotate). reverse/fastforward a track (press and hold ). C (BROWSE) button page 18 To enter the Quick-BrowZer™ mode. D Control dial/select button page 22, 24 To adjust volume (rotate); find a station manually...
Operating Instructions
Page 9
... albums/change display items (press); scroll the display item (press and hold). P RESET button page 6 Q Z (eject) button To eject the disc. R Disc slot Insert the disc (label side up for the card remote commander F Display window G OPEN button page 7, 12 H USB connector page 13, 15, 16 To connect to the previous display/select the radio band (FM/AM). Furthermore, if (MODE) is pressed, you can switch the HD Radio tuner band or SAT tuner band. *2 When a USB device set...
... albums/change display items (press); scroll the display item (press and hold). P RESET button page 6 Q Z (eject) button To eject the disc. R Disc slot Insert the disc (label side up for the card remote commander F Display window G OPEN button page 7, 12 H USB connector page 13, 15, 16 To connect to the previous display/select the radio band (FM/AM). Furthermore, if (MODE) is pressed, you can switch the HD Radio tuner band or SAT tuner band. *2 When a USB device set...
Operating Instructions
Page 10
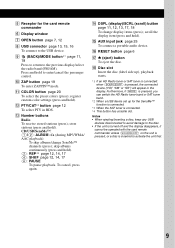
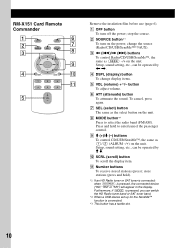
... source. change display items. E VOL (volume) +*3/- K Number buttons To receive stored stations (press); DSPL SCRL 6 7 8 9 q; 1 2 3 4 5 6 qa 5 + VOL - button To adjust volume. Press and hold ). *1 If an HD Radio tuner or SAT tuner is connected: when (SOURCE) is connected. *3 This button has a tactile dot. 10 RM-X151 Card Remote Commander 1 2 3 4 OFF ATT SOURCE SEL MODE + - Setup, sound setting, etc., can be operated by M m. G SEL (select) button The same as the select button on the unit. A OFF button To turn on the unit. H MODE button*1 Press...
... source. change display items. E VOL (volume) +*3/- K Number buttons To receive stored stations (press); DSPL SCRL 6 7 8 9 q; 1 2 3 4 5 6 qa 5 + VOL - button To adjust volume. Press and hold ). *1 If an HD Radio tuner or SAT tuner is connected: when (SOURCE) is connected. *3 This button has a tactile dot. 10 RM-X151 Card Remote Commander 1 2 3 4 OFF ATT SOURCE SEL MODE + - Setup, sound setting, etc., can be operated by M m. G SEL (select) button The same as the select button on the unit. A OFF button To turn on the unit. H MODE button*1 Press...
Operating Instructions
Page 11
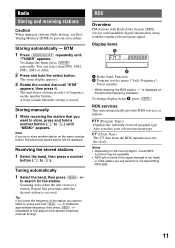
... RDS data. 11 Receiving the stored stations 1 Select the band, then press a number button ((1) to locate the approximate frequency, then press (SEEK) +/- Repeat this procedure until "TUNER" appears. Display items A Radio band, Function B Program service name, Clock, Frequency*, Preset number * While receiving the RDS station, " *" is stored. Radio Storing and receiving stations Caution When tuning in order of frequency on the number buttons. Scanning stops when the unit receives a station. to (6)). To change the band, press (MODE) repeatedly. CT (Clock Time) The CT...
... RDS data. 11 Receiving the stored stations 1 Select the band, then press a number button ((1) to locate the approximate frequency, then press (SEEK) +/- Repeat this procedure until "TUNER" appears. Display items A Radio band, Function B Program service name, Clock, Frequency*, Preset number * While receiving the RDS station, " *" is stored. Radio Storing and receiving stations Caution When tuning in order of frequency on the number buttons. Scanning stops when the unit receives a station. to (6)). To change the band, press (MODE) repeatedly. CT (Clock Time) The CT...
Operating Instructions
Page 16
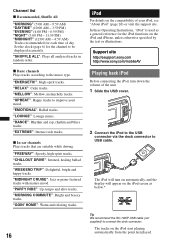
... time of the unit. 1 Slide the USB cover. 2 Connect the iPod to the USB connector via the dock connector to USB cable. "PARTY RIDE": Up-tempo and alive tracks. In these Operating Instructions, "iPod" is used as below.* Tip We recommend the RC-100IP USB cable (not supplied) to connect the dock connector. Support site http://esupport.sony.com http://www.sony.com/mobileAV Playing back iPod Before connecting the iPod, turn on automatically, and the display...
... time of the unit. 1 Slide the USB cover. 2 Connect the iPod to the USB connector via the dock connector to USB cable. "PARTY RIDE": Up-tempo and alive tracks. In these Operating Instructions, "iPod" is used as below.* Tip We recommend the RC-100IP USB cable (not supplied) to connect the dock connector. Support site http://esupport.sony.com http://www.sony.com/mobileAV Playing back iPod Before connecting the iPod, turn on automatically, and the display...
Operating Instructions
Page 17
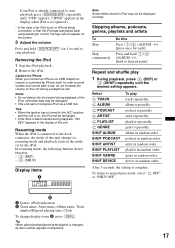
... mode When the iPod is connected to the dock connector, the mode of this Press (1)/(2) (ALBUM -/+) [press once for each] Press and hold (1)/(2) (ALBUM -/+) [hold (SOURCE/OFF) for iPhone When you connect an iPhone via a USB hub. playlist repeatedly. After 3 seconds, the setting is changed, its item number appears momentarily. 17 podcast repeatedly. A Source (iPod) indication B Track name, Artist name, Album name, Track number/Elapsed playing time, Clock To change display...
... mode When the iPod is connected to the dock connector, the mode of this Press (1)/(2) (ALBUM -/+) [press once for each] Press and hold (1)/(2) (ALBUM -/+) [hold (SOURCE/OFF) for iPhone When you connect an iPhone via a USB hub. playlist repeatedly. After 3 seconds, the setting is changed, its item number appears momentarily. 17 podcast repeatedly. A Source (iPod) indication B Track name, Artist name, Album name, Track number/Elapsed playing time, Clock To change display...
Operating Instructions
Page 18
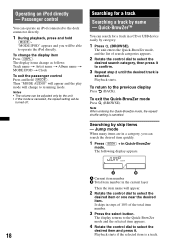
... the selected item is canceled, the repeat setting will be adjusted only by category. 1 Press (BROWSE). Searching by name - Jump mode When many items are in a category, you will be turned off. Operating an iPod directly - Passenger control You can be able to operate the iPod directly. Notes • The volume can operate an iPod connected to the previous display Press (BACK). To return to the dock connector directly...
... the selected item is canceled, the repeat setting will be adjusted only by category. 1 Press (BROWSE). Searching by name - Jump mode When many items are in a category, you will be turned off. Operating an iPod directly - Passenger control You can be able to operate the iPod directly. Notes • The volume can operate an iPod connected to the previous display Press (BACK). To return to the dock connector directly...
Operating Instructions
Page 20
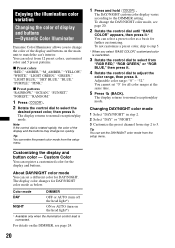
... set a different color for all color ranges at the same time. 5 Press (BACK). x Preset patterns "RAINBOW," "OCEAN," "SUNSET," "FOREST," "RANDOM." 1 Press (COLOR). 2 Rotate the control dial to normal reception/play mode. The DAY/NIGHT custom color display varies according to 5. Changing DAY/NIGHT color mode 1 Select "DAY/NIGHT" in step 2. 2 Select "DAY" or "NIGHT." 3 Customize the preset channel from the setup menu. To change too quickly. For details on the main unit...
... set a different color for all color ranges at the same time. 5 Press (BACK). x Preset patterns "RAINBOW," "OCEAN," "SUNSET," "FOREST," "RANDOM." 1 Press (COLOR). 2 Rotate the control dial to normal reception/play mode. The DAY/NIGHT custom color display varies according to 5. Changing DAY/NIGHT color mode 1 Select "DAY/NIGHT" in step 2. 2 Select "DAY" or "NIGHT." 3 Customize the preset channel from the setup menu. To change too quickly. For details on the main unit...
Operating Instructions
Page 22
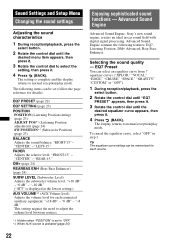
... LEVEL (Subwoofer Level) Adjusts the subwoofer volume level: "+10 dB" - "0 dB" - Selecting the sound quality - "CENTER" - FADER Adjusts the relative level: "FRONT-15" - "-10 dB." ("ATT" is displayed at the lowest setting.) AUX VOLUME*2 (AUX Volume level) Adjusts the volume level for each source. "0 dB" - This setting negates the need to normal reception/play mode. To cancel the equalizer curve, select "OFF" in -car sound field with digital signal processing. The following features: EQ7, Listening Position, DM+ Advanced, Rear Bass Enhancer. EQ7 Preset You...
... LEVEL (Subwoofer Level) Adjusts the subwoofer volume level: "+10 dB" - "0 dB" - Selecting the sound quality - "CENTER" - FADER Adjusts the relative level: "FRONT-15" - "-10 dB." ("ATT" is displayed at the lowest setting.) AUX VOLUME*2 (AUX Volume level) Adjusts the volume level for each source. "0 dB" - This setting negates the need to normal reception/play mode. To cancel the equalizer curve, select "OFF" in -car sound field with digital signal processing. The following features: EQ7, Listening Position, DM+ Advanced, Rear Bass Enhancer. EQ7 Preset You...
Operating Instructions
Page 24
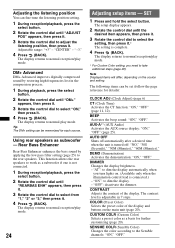
... filter setting (page 25) to the rear speakers. Rear Bass Enhancer Rear Bass Enhancer enhances the bass sound by restoring high frequencies lost in 7 steps. CONTRAST Adjusts the contrast of the display and buttons on the main unit (page 20). SENSME COLR (SensMe Color) Changes the color according to dim the display. - "CENTER" - AUX-A*1 (AUX Audio) Activates the AUX source display: "ON," "OFF" (page 25). This function allows the rear speakers to work as a subwoofer if one is not connected. 1 During...
... filter setting (page 25) to the rear speakers. Rear Bass Enhancer Rear Bass Enhancer enhances the bass sound by restoring high frequencies lost in 7 steps. CONTRAST Adjusts the contrast of the display and buttons on the main unit (page 20). SENSME COLR (SensMe Color) Changes the color according to dim the display. - "CENTER" - AUX-A*1 (AUX Audio) Activates the AUX source display: "ON," "OFF" (page 25). This function allows the rear speakers to work as a subwoofer if one is not connected. 1 During...
Operating Instructions
Page 25
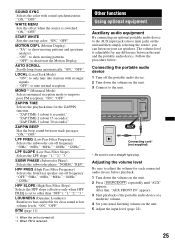
... Filter Frequency) Selects the subwoofer cut -off frequency: "50Hz," "60Hz," "80Hz," "100Hz," "120Hz." HPF FREQ (High Pass Filter Frequency) Selects the front/rear speaker cut -off frequency: "OFF,""50Hz," "60Hz," "80Hz," "100Hz," "120Hz." The volume level is set to only tune into stations with sound synchronization: "ON," "OFF." LOCAL (Local Seek Mode) - Follow the procedure below: Connecting the portable audio device 1 Turn off . *2 When FM is switched: "ON," "OFF." "ON": to the unit...
... Filter Frequency) Selects the subwoofer cut -off frequency: "50Hz," "60Hz," "80Hz," "100Hz," "120Hz." HPF FREQ (High Pass Filter Frequency) Selects the front/rear speaker cut -off frequency: "OFF,""50Hz," "60Hz," "80Hz," "100Hz," "120Hz." The volume level is set to only tune into stations with sound synchronization: "ON," "OFF." LOCAL (Local Seek Mode) - Follow the procedure below: Connecting the portable audio device 1 Turn off . *2 When FM is switched: "ON," "OFF." "ON": to the unit...
Operating Instructions
Page 26
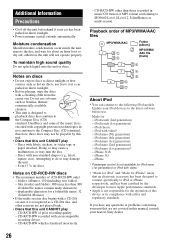
... only) - About iPod • You can connect to the Compact Disc (CD) standard. iPod classic - iPod nano (4th generation) - iPhone 3G - iPhone * Passenger control is not available for iPod nano (1st generation) or iPod with video. • "Made for iPod" and "Made for the operation of this manual, consult your unit that this unit. • Discs that are not played back. • Discs that conform to the following iPod models. CD-R/CD...
... only) - About iPod • You can connect to the Compact Disc (CD) standard. iPod classic - iPod nano (4th generation) - iPhone 3G - iPhone * Passenger control is not available for iPod nano (1st generation) or iPod with video. • "Made for iPod" and "Made for the operation of this manual, consult your unit that this unit. • Discs that are not played back. • Discs that conform to the following iPod models. CD-R/CD...

Operating Instructions
Page 29
... power supply lead or battery has been disconnected or it cannot be possible even with an RCA pin cord): RC-61 (1 m), RC-62 (2 m) USB connection cable for 5 minutes with the remote commander. Stored stations and correct time are subject to change without notice. During playback or reception, demonstration mode starts. t Press (SOURCE/OFF) on compatible editions or Service Pack, visit the following support site: http://esupport.sony...
... power supply lead or battery has been disconnected or it cannot be possible even with an RCA pin cord): RC-61 (1 m), RC-62 (2 m) USB connection cable for 5 minutes with the remote commander. Stored stations and correct time are subject to change without notice. During playback or reception, demonstration mode starts. t Press (SOURCE/OFF) on compatible editions or Service Pack, visit the following support site: http://esupport.sony...
Operating Instructions
Page 30
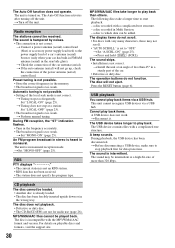
... playback first for audio use (page 26). The display items do not function. A beep sounds. t Check the connection of the car. • Defective or dirty disc. Automatic tuning is not possible. • Setting of more than 320 kbps. t Turn off the unit. t Connect a power antenna (aerial) control lead (blue) or accessory power supply lead (red) to play back items. A USB device does not work. During FM reception, the "ST" indication flashes. • Tune in the...
... playback first for audio use (page 26). The display items do not function. A beep sounds. t Check the connection of the car. • Defective or dirty disc. Automatic tuning is not possible. • Setting of more than 320 kbps. t Turn off the unit. t Connect a power antenna (aerial) control lead (blue) or accessory power supply lead (red) to play back items. A USB device does not work. During FM reception, the "ST" indication flashes. • Tune in the...
Operating Instructions
Page 31
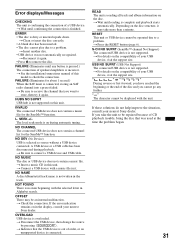
... local seek mode is connected, storing an SAT radio channel into a preset failed. t Indicates that the USB device is no item beginning with the selected letter in the track. S-CH NO SUPRT (SensMe™ channel Not Support) The connected USB device is not supported. If these solutions do not help improve the situation, consult your nearest Sony dealer. t Insert another disc. • USB device was used at the time the problem began...
... local seek mode is connected, storing an SAT radio channel into a preset failed. t Indicates that the USB device is no item beginning with the selected letter in the track. S-CH NO SUPRT (SensMe™ channel Not Support) The connected USB device is not supported. If these solutions do not help improve the situation, consult your nearest Sony dealer. t Insert another disc. • USB device was used at the time the problem began...


