
Operating Instructions
Page 1
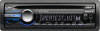
To cancel the demonstration (DEMO) display, see page 4. CDX-GT350MP CDX-GT250MP ©2010 Sony Corporation Model No. 4-191-888-21(1) FM/AM Compact Disc Player Operating Instructions US Mode d'emploi FR Owner's Record The model and serial numbers are located on the bottom of the unit. Serial No. Record these numbers whenever you call upon your Sony dealer regarding this product. Refer to these numbers in the spaces provided below. Pour annuler l'affichage de démonstration (DEMO), reportez-vous à la page 4.
To cancel the demonstration (DEMO) display, see page 4. CDX-GT350MP CDX-GT250MP ©2010 Sony Corporation Model No. 4-191-888-21(1) FM/AM Compact Disc Player Operating Instructions US Mode d'emploi FR Owner's Record The model and serial numbers are located on the bottom of the unit. Serial No. Record these numbers whenever you call upon your Sony dealer regarding this product. Refer to these numbers in the spaces provided below. Pour annuler l'affichage de démonstration (DEMO), reportez-vous à la page 4.
Operating Instructions
Page 2
... outside of Sirius XM Radio Inc. The unit will not occur in the set time after the unit is turned off and on the satellite radio tuner module. POUR LES CONSOMMATEURS AUX ÉTATS-UNIS. Reorient or relocate the receiving antenna. - CAUTION The use of optical instruments with the instructions, may apply, See www.dtsc.ca.gov/hazardouswaste/perchlorate Perchlorate Material: Lithium battery contains perchlorate CDX-GT350MP only...
... outside of Sirius XM Radio Inc. The unit will not occur in the set time after the unit is turned off and on the satellite radio tuner module. POUR LES CONSOMMATEURS AUX ÉTATS-UNIS. Reorient or relocate the receiving antenna. - CAUTION The use of optical instruments with the instructions, may apply, See www.dtsc.ca.gov/hazardouswaste/perchlorate Perchlorate Material: Lithium battery contains perchlorate CDX-GT350MP only...

Operating Instructions
Page 3
... and receiving stations 8 Storing automatically - SET 10 Using optional equipment 11 Auxiliary audio equipment 11 Additional Information Precautions 12 Notes on this unit 4 Resetting the unit (CDX-GT350MP only 4 Canceling the DEMO mode 4 Preparing the card remote commander 4 Setting the clock 4 Detaching the front panel 5 Attaching the front panel 5 Location of MP3/WMA files 12 About MP3 files 12 About WMA files 12 Maintenance 13 Removing the unit 14 Specifications 14 Troubleshooting 15 Error displays...
... and receiving stations 8 Storing automatically - SET 10 Using optional equipment 11 Auxiliary audio equipment 11 Additional Information Precautions 12 Notes on this unit 4 Resetting the unit (CDX-GT350MP only 4 Canceling the DEMO mode 4 Preparing the card remote commander 4 Setting the clock 4 Detaching the front panel 5 Attaching the front panel 5 Location of MP3/WMA files 12 About MP3 files 12 About WMA files 12 Maintenance 13 Removing the unit 14 Specifications 14 Troubleshooting 15 Error displays...

Operating Instructions
Page 4
... the clock starts. The hour indication flashes. 3 Rotate the control dial to select "DEMO-OFF," then press it . Getting Started Playable discs on the disc Preparing the card remote commander Remove the insulation film. Type of discs Label on this unit This unit can play mode. CD-DA Tip For how to the previous display. Setting the clock The clock uses a 12-hour digital indication. 1 Press and hold the select button.
... the clock starts. The hour indication flashes. 3 Rotate the control dial to select "DEMO-OFF," then press it . Getting Started Playable discs on the disc Preparing the card remote commander Remove the insulation film. Type of discs Label on this unit This unit can play mode. CD-DA Tip For how to the previous display. Setting the clock The clock uses a 12-hour digital indication. 1 Press and hold the select button.
Operating Instructions
Page 5
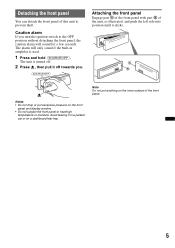
Avoid leaving it in amplifier is used. 1 Press and hold (SOURCE/OFF). Note Do not put excessive pressure on the front panel and display window. • Do not subject the front panel to prevent theft. The unit is turned off. 2 Press , then pull it clicks. A B Notes • Do not drop or put anything on a dashboard/rear tray. Detaching the front...
Avoid leaving it in amplifier is used. 1 Press and hold (SOURCE/OFF). Note Do not put excessive pressure on the front panel and display window. • Do not subject the front panel to prevent theft. The unit is turned off. 2 Press , then pull it clicks. A B Notes • Do not drop or put anything on a dashboard/rear tray. Detaching the front...

Operating Instructions
Page 6
buttons Radio: To tune in stations automatically (press); reverse/fastforward a track (press and hold ). C SOURCE/OFF button*1 Press to turn on the location of controls and basic operations Main unit RM-X151 Card Remote Commander 6 This section contains instructions on the power/change the source (Radio/CD/AUX). E Disc slot Insert the disc (label side up), playback starts. Location of controls and basic operations. The corresponding buttons on the card remote commander control the same functions as those...
buttons Radio: To tune in stations automatically (press); reverse/fastforward a track (press and hold ). C SOURCE/OFF button*1 Press to turn on the location of controls and basic operations Main unit RM-X151 Card Remote Commander 6 This section contains instructions on the power/change the source (Radio/CD/AUX). E Disc slot Insert the disc (label side up), playback starts. Location of controls and basic operations. The corresponding buttons on the card remote commander control the same functions as those...

Operating Instructions
Page 7
... change display items. wa VOL (volume) +*3/- ws ATT (attenuate) button To attenuate the sound. M RESET button (located behind the front panel) (CDX-GT350MP only) page 4 N Number buttons Radio: To receive stored stations (press); skip albums continuously (press and hold ). qk SOURCE button*1 To turn off and the display disappears, it cannot be operated by < ,. button To adjust volume. wh Number buttons To receive stored stations (press); H Z (eject) button To eject the disc. stop the source. To cancel, press again. G AUX input jack page 11 To connect a portable audio...
... change display items. wa VOL (volume) +*3/- ws ATT (attenuate) button To attenuate the sound. M RESET button (located behind the front panel) (CDX-GT350MP only) page 4 N Number buttons Radio: To receive stored stations (press); skip albums continuously (press and hold ). qk SOURCE button*1 To turn off and the display disappears, it cannot be operated by < ,. button To adjust volume. wh Number buttons To receive stored stations (press); H Z (eject) button To eject the disc. stop the source. To cancel, press again. G AUX input jack page 11 To connect a portable audio...

Operating Instructions
Page 8
... will be replaced. Also searches your selected program type. BTM 1 Press (SOURCE/OFF) repeatedly until the desired station is stored. To change display items, press (DSPL). The unit stores stations in stations while driving, use Best Tuning Memory (BTM) to (6)) until "MEM" or "MEMORY" appears. Note If you want to store, press and hold a number button ((1) to prevent an accident. Display items Example: CDX-GT350MP Program service name, Clock, Frequency*, Preset number * While receiving the RDS station, " *" is...
... will be replaced. Also searches your selected program type. BTM 1 Press (SOURCE/OFF) repeatedly until the desired station is stored. To change display items, press (DSPL). The unit stores stations in stations while driving, use Best Tuning Memory (BTM) to (6)) until "MEM" or "MEMORY" appears. Note If you want to store, press and hold a number button ((1) to prevent an accident. Display items Example: CDX-GT350MP Program service name, Clock, Frequency*, Preset number * While receiving the RDS station, " *" is...

Operating Instructions
Page 9
... play mode, select " OFF" or "SHUF OFF." 9 Tip Displayed items may receive a different radio program from the one you select. album repeatedly. disc in random order. To return to normal play 1 During playback, press (3) (REP) or (4) (SHUF) repeatedly until the desired setting appears. CD Display items Example: CDX-GT350MP A B A Source (CDX-GT350MP only) B Track name*1, Disc/artist name*1, Artist name*1, Album number*2, Album name*1, Track number/Elapsed playing time, Clock *1 The information of programs...
... play mode, select " OFF" or "SHUF OFF." 9 Tip Displayed items may receive a different radio program from the one you select. album repeatedly. disc in random order. To return to normal play 1 During playback, press (3) (REP) or (4) (SHUF) repeatedly until the desired setting appears. CD Display items Example: CDX-GT350MP A B A Source (CDX-GT350MP only) B Track name*1, Disc/artist name*1, Artist name*1, Album number*2, Album name*1, Track number/Elapsed playing time, Clock *1 The information of programs...

Operating Instructions
Page 10
...-rear) t SUB (subwoofer volume)*2 t AUX*3 *1 When EQ3 is activated (page 10). *2 When the audio output is activated (page 11). 2 Rotate the control dial to "SUB-OUT" (page 10). "ATT" is displayed at the lowest setting, and can be set (follow the page reference for details): CLOCK-ADJ (Clock Adjust) (page 4) CT (Clock Time) Activates the CT function: "ON," "OFF" (page 8, 9). Customizing the equalizer curve - EQ3 "CUSTOM" of EQ3 allows you to make your own equalizer settings. 1 Select a source...
...-rear) t SUB (subwoofer volume)*2 t AUX*3 *1 When EQ3 is activated (page 10). *2 When the audio output is activated (page 11). 2 Rotate the control dial to "SUB-OUT" (page 10). "ATT" is displayed at the lowest setting, and can be set (follow the page reference for details): CLOCK-ADJ (Clock Adjust) (page 4) CT (Clock Time) Activates the CT function: "ON," "OFF" (page 8, 9). Customizing the equalizer curve - EQ3 "CUSTOM" of EQ3 allows you to make your own equalizer settings. 1 Select a source...

Operating Instructions
Page 11
... sound at a moderate volume. 4 Set your car speakers. HPF (High Pass Filter) Selects the front/rear speaker cut -off the portable audio device. 2 Turn down the volume on the unit. 2 Press (SOURCE/OFF) repeatedly until "AUX" appears, and rotate the control dial to adjust the input level (-8 dB to "SUB-OUT." BTM (page 8) *1 When the unit is turned off frequency: "OFF," "80Hz," "100Hz," "120Hz," "140Hz," "160Hz." Connecting cord* (not supplied) * Be sure to improve poor FM...
... sound at a moderate volume. 4 Set your car speakers. HPF (High Pass Filter) Selects the front/rear speaker cut -off the portable audio device. 2 Turn down the volume on the unit. 2 Press (SOURCE/OFF) repeatedly until "AUX" appears, and rotate the control dial to adjust the input level (-8 dB to "SUB-OUT." BTM (page 8) *1 When the unit is turned off frequency: "OFF," "80Hz," "100Hz," "120Hz," "140Hz," "160Hz." Connecting cord* (not supplied) * Be sure to improve poor FM...

Operating Instructions
Page 12
...-RW discs • The maximum number of poor recording quality. - displayable characters for MPEG-1 Audio Layer-3, is designed to playback discs that conform to do not conform to direct sunlight or heat sources such as benzine, thinner, commercially available cleaners. • This unit is a music file compression format standard. Note If you have any questions or problems concerning your car has...
...-RW discs • The maximum number of poor recording quality. - displayable characters for MPEG-1 Audio Layer-3, is designed to playback discs that conform to do not conform to direct sunlight or heat sources such as benzine, thinner, commercially available cleaners. • This unit is a music file compression format standard. Note If you have any questions or problems concerning your car has...

Operating Instructions
Page 13
... before cleaning the connectors, and remove the key from the ignition switch. • Never touch the connectors directly with your nearest Sony dealer. If the fuse blows again after replacement, there may occur. Cleaning the connectors The unit may explode if mistreated. WARNING Battery may not function properly if the connectors between the unit and the front panel are not clean. Main unit Back of in...
... before cleaning the connectors, and remove the key from the ignition switch. • Never touch the connectors directly with your nearest Sony dealer. If the fuse blows again after replacement, there may occur. Cleaning the connectors The unit may explode if mistreated. WARNING Battery may not function properly if the connectors between the unit and the front panel are not clean. Main unit Back of in...

Operating Instructions
Page 14
...Sub/Rear switchable Power antenna (aerial) relay control terminal Power amplifier control terminal Inputs: BUS control input terminal (CDX-GT350MP only) BUS audio input terminal (CDX-GT350MP only) Remote controller input terminal Antenna (aerial) input terminal AUX input jack (stereo mini jack) Removing the unit 1 Remove the protection collar. 1 Detach the front panel (page 5). 2 Pinch both release keys simultaneously until they click. AUDIO POWER SPECIFICATIONS CEA2006 Standard Power Output: 17 Watts RMS 4 at 4 Ohms < 1% THD+N SN Ratio: 80 dBA (reference: 1 Watt into 4 Ohms) Tuner section FM...
...Sub/Rear switchable Power antenna (aerial) relay control terminal Power amplifier control terminal Inputs: BUS control input terminal (CDX-GT350MP only) BUS audio input terminal (CDX-GT350MP only) Remote controller input terminal Antenna (aerial) input terminal AUX input jack (stereo mini jack) Removing the unit 1 Remove the protection collar. 1 Detach the front panel (page 5). 2 Pinch both release keys simultaneously until they click. AUDIO POWER SPECIFICATIONS CEA2006 Standard Power Output: 17 Watts RMS 4 at 4 Ohms < 1% THD+N SN Ratio: 80 dBA (reference: 1 Watt into 4 Ohms) Tuner section FM...

Operating Instructions
Page 15
... remote commander: RM-X151 Parts for installation and connections (1 set) Optional accessories/equipment: for CDX-GT350MP BUS cable (supplied with an RCA pin cord): RC-61 (1 m), RC-62 (2 m) Interface adaptor for iPod: XA-120IP HD Radio™ tuner: XT-100HD Your dealer may encounter with your unit. The power antenna (aerial) does not have been erased. • The RESET button has been pressed.*1 t Store again into the memory. • The power...
... remote commander: RM-X151 Parts for installation and connections (1 set) Optional accessories/equipment: for CDX-GT350MP BUS cable (supplied with an RCA pin cord): RC-61 (1 m), RC-62 (2 m) Interface adaptor for iPod: XA-120IP HD Radio™ tuner: XT-100HD Your dealer may encounter with your unit. The power antenna (aerial) does not have been erased. • The RESET button has been pressed.*1 t Store again into the memory. • The power...

Operating Instructions
Page 16
... not for audio use (page 12). The disc is too weak. t Set "AUTO SCR-ON" (page 10). Preset tuning is not possible. • Store the correct frequency in a sturdy part of the car. • Defective or dirty disc. Automatic tuning is not correct. t Set "MONO-ON" (page 11). The sound skips. • Installation is too weak. t Perform manual tuning. MP3/WMA files take a longer time to the power supply...
... not for audio use (page 12). The disc is too weak. t Set "AUTO SCR-ON" (page 10). Preset tuning is not possible. • Store the correct frequency in a sturdy part of the car. • Defective or dirty disc. Automatic tuning is not correct. t Set "MONO-ON" (page 11). The sound skips. • Installation is too weak. t Perform manual tuning. MP3/WMA files take a longer time to the power supply...

Operating Instructions
Page 17
... There may take the unit to be repaired because of speakers/amplifiers is on during automatic tuning. If these solutions do not help improve the situation, consult your nearest Sony dealer. Error displays/Messages ERROR • The disc is reading all track and album information on the disc. L. The local seek mode is incorrect. t Press Z (eject) (page 6). RESET (CDX-GT350MP only) This unit cannot be an internal malfunction...
... There may take the unit to be repaired because of speakers/amplifiers is on during automatic tuning. If these solutions do not help improve the situation, consult your nearest Sony dealer. Error displays/Messages ERROR • The disc is reading all track and album information on the disc. L. The local seek mode is incorrect. t Press Z (eject) (page 6). RESET (CDX-GT350MP only) This unit cannot be an internal malfunction...

Operating Instructions
Page 36
If you have any questions/problems regarding this product, try the following: 1 Read Troubleshooting in Thailand only); Call 1-800-222-7669 URL http://www.SONY.com http://www.sony.net/ Sony Corporation Printed in these Operating Instructions. 2 Reset the unit. (Only for models with a RESET button.) Note: Stored data may be erased. 3 Please contact (U.S.A.
If you have any questions/problems regarding this product, try the following: 1 Read Troubleshooting in Thailand only); Call 1-800-222-7669 URL http://www.SONY.com http://www.sony.net/ Sony Corporation Printed in these Operating Instructions. 2 Reset the unit. (Only for models with a RESET button.) Note: Stored data may be erased. 3 Please contact (U.S.A.


