Operating Instructions
Page 3
... the equalizer curve - Table of Contents About this manual 4 Welcome 4 Getting Started Resetting the unit (CDX-GT320/GT32W only 5 Preparing the card remote commander (CDXGT320/GT32W only 5 Setting the clock 5 Detaching the front panel 5 Attaching the front panel 5 Location of MP3/WMA files (CDXGT320/GT32W/GT220... displays/Messages 16 3 SET 9 Using optional equipment 10 Auxiliary audio equipment 10 CD/MD changer (CDX-GT320/GT32W only 10 Card remote commander RM-X114 (for CDX-GT220/GT22W 11 Additional Information Precautions 12 Notes on discs 12 Playback order of ...
... the equalizer curve - Table of Contents About this manual 4 Welcome 4 Getting Started Resetting the unit (CDX-GT320/GT32W only 5 Preparing the card remote commander (CDXGT320/GT32W only 5 Setting the clock 5 Detaching the front panel 5 Attaching the front panel 5 Location of MP3/WMA files (CDXGT320/GT32W/GT220... displays/Messages 16 3 SET 9 Using optional equipment 10 Auxiliary audio equipment 10 CD/MD changer (CDX-GT320/GT32W only 10 Card remote commander RM-X114 (for CDX-GT220/GT22W 11 Additional Information Precautions 12 Notes on discs 12 Playback order of ...
Operating Instructions
Page 5
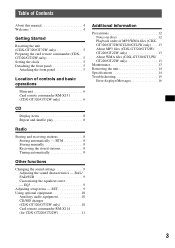
... alarm will sound for a few seconds. The unit is complete and the clock starts. Setting the clock The clock uses a 12-hour digital indication. 1 Press and hold the select button. Getting Started Resetting the unit (CDX-GT320/ GT32W only) Before operating the unit for the first time, or after...front panel and press the RESET button with part B of the front panel. 5 To display the clock, press (DSPL). RESET button Note Pressing the RESET button will erase the clock setting and some stored contents. The setup display appears. 2 Press the select button repeatedly until it in...
... alarm will sound for a few seconds. The unit is complete and the clock starts. Setting the clock The clock uses a 12-hour digital indication. 1 Press and hold the select button. Getting Started Resetting the unit (CDX-GT320/ GT32W only) Before operating the unit for the first time, or after...front panel and press the RESET button with part B of the front panel. 5 To display the clock, press (DSPL). RESET button Note Pressing the RESET button will erase the clock setting and some stored contents. The setup display appears. 2 Press the select button repeatedly until it in...
Operating Instructions
Page 8
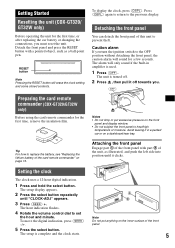
..., recording format and settings. disc in order of the station you try to prevent an accident. Storing automatically - To change display items B, press (DSPL). Display items Example: CDX-GT320 A Source (CDX-GT320/GT32W only) B Track number/Elapsed playing time, Disc/ artist name, Album number*1, Album name, Track name, Text information*2, Clock *1 Album number is displayed only...
..., recording format and settings. disc in order of the station you try to prevent an accident. Storing automatically - To change display items B, press (DSPL). Display items Example: CDX-GT320 A Source (CDX-GT320/GT32W only) B Track number/Elapsed playing time, Disc/ artist name, Album number*1, Album name, Track name, Text information*2, Clock *1 Album number is displayed only...

Operating Instructions
Page 9
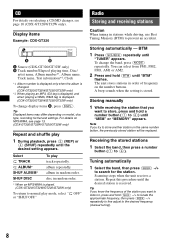
...BAL/FAD/SUB You can be set "BEEP-ON" (z) or "BEEP-OFF." SET 1 Press and hold the select button before the setting is turned off automatically after a desired time when the unit is complete. CLOCK-ADJ (Clock Adjust) (page 5) BEEP To set (follow the page reference for details...a power amplifier. "REAR-OUT": to output to a subwoofer. - M.DSPL (Motion Display) To select the Motion Display mode. CDX-GT220/GT22W/GT120/GT12W - Other functions Changing the sound settings Adjusting the sound characteristics - Note Displayed items will differ, depending on the source and...
...BAL/FAD/SUB You can be set "BEEP-ON" (z) or "BEEP-OFF." SET 1 Press and hold the select button before the setting is turned off automatically after a desired time when the unit is complete. CLOCK-ADJ (Clock Adjust) (page 5) BEEP To set (follow the page reference for details...a power amplifier. "REAR-OUT": to output to a subwoofer. - M.DSPL (Motion Display) To select the Motion Display mode. CDX-GT220/GT22W/GT120/GT12W - Other functions Changing the sound settings Adjusting the sound characteristics - Note Displayed items will differ, depending on the source and...
Marketing Specifications
Page 1
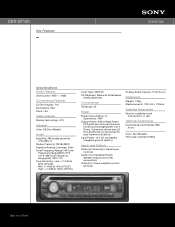
...CDX-GT120 Key Features CDXGT120 Specifications Audio Features Level Control: -8dB ∼ +18dB Convenience Features CD Text Display: Yes Illumination: Red Clock: 12H Video Features Display Technology: LCD General Color: '08 Gun Metallic Audio Sensitivity: FM:Usable sensitivity (75)(dBf): 9 Station Preset(s): FM18/AM12 Digital-to-Analog Converter: 24bit Tuner Frequency Range: FM... Analog Audio Input(s): Front Aux-In Dimensions Weight: 1.2Kg Measurements: 178 x 50 x 179mm Supplied Accessories Parts for installation and connections (1 set) Optional Accessories Card remote commander (RM-
...CDX-GT120 Key Features CDXGT120 Specifications Audio Features Level Control: -8dB ∼ +18dB Convenience Features CD Text Display: Yes Illumination: Red Clock: 12H Video Features Display Technology: LCD General Color: '08 Gun Metallic Audio Sensitivity: FM:Usable sensitivity (75)(dBf): 9 Station Preset(s): FM18/AM12 Digital-to-Analog Converter: 24bit Tuner Frequency Range: FM... Analog Audio Input(s): Front Aux-In Dimensions Weight: 1.2Kg Measurements: 178 x 50 x 179mm Supplied Accessories Parts for installation and connections (1 set) Optional Accessories Card remote commander (RM-

