Operating Instructions
Page 2
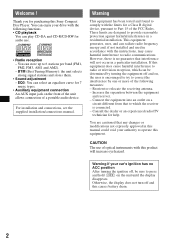
... and connections, see the supplied installation/connections manual. Increase the separation between the equipment and receiver. - Consult the dealer or an experienced radio/TV technician for 7 music types. • Auxiliary equipment connection An AUX input jack on the unit until the display disappears. Warning This... installation. You are designed to Part 15 of optical instruments with the instructions, may cause harmful interference to operate this Sony Compact Disc Player. You can be sure to correct the interference by one or more of a portable audio device. Welcome !
... and connections, see the supplied installation/connections manual. Increase the separation between the equipment and receiver. - Consult the dealer or an experienced radio/TV technician for 7 music types. • Auxiliary equipment connection An AUX input jack on the unit until the display disappears. Warning This... installation. You are designed to Part 15 of optical instruments with the instructions, may cause harmful interference to operate this Sony Compact Disc Player. You can be sure to correct the interference by one or more of a portable audio device. Welcome !
Operating Instructions
Page 3
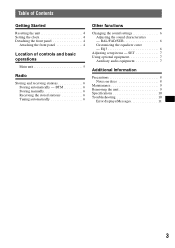
SET 7 Using optional equipment 7 Auxiliary audio equipment 7 Additional Information Precautions 8 Notes on discs 8 Maintenance 9 Removing the unit 9 Specifications 10 Troubleshooting 10 Error displays/Messages 11 3 EQ3 6 Adjusting setup items - Table ... Resetting the unit 4 Setting the clock 4 Detaching the front panel 4 Attaching the front panel 4 Location of controls and basic operations Main unit 5 Radio Storing and receiving stations 6 Storing automatically - BAL/FAD/SUB 6 Customizing the equalizer curve - BTM 6 Storing manually 6 Receiving the stored stations 6...
SET 7 Using optional equipment 7 Auxiliary audio equipment 7 Additional Information Precautions 8 Notes on discs 8 Maintenance 9 Removing the unit 9 Specifications 10 Troubleshooting 10 Error displays/Messages 11 3 EQ3 6 Adjusting setup items - Table ... Resetting the unit 4 Setting the clock 4 Detaching the front panel 4 Attaching the front panel 4 Location of controls and basic operations Main unit 5 Radio Storing and receiving stations 6 Storing automatically - BAL/FAD/SUB 6 Customizing the equalizer curve - BTM 6 Storing manually 6 Receiving the stored stations 6...

Operating Instructions
Page 5
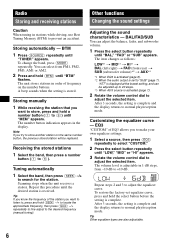
... button To eject the disc. skip tracks continuously (press, then press again within about 1 second and hold ). reverse/fastforward a track (press and hold ). L MODE button 6 To select the radio band (FM/AM). store stations (...press and hold ). G DSPL (display)/DIM (dimmer) button 4 To change the source (Radio/CD/ AUX). select setup items (press and rotate). change the display brightness (press and hold ). K BTM button 6 To start the BTM function (press and hold ). Location of controls and basic operations Main unit CDX-GT100 CDX-GT10W...
... button To eject the disc. skip tracks continuously (press, then press again within about 1 second and hold ). reverse/fastforward a track (press and hold ). L MODE button 6 To select the radio band (FM/AM). store stations (...press and hold ). G DSPL (display)/DIM (dimmer) button 4 To change the source (Radio/CD/ AUX). select setup items (press and rotate). change the display brightness (press and hold ). K BTM button 6 To start the BTM function (press and hold ). Location of controls and basic operations Main unit CDX-GT100 CDX-GT10W...
Operating Instructions
Page 6
.... The volume level is complete and the display returns to the desired frequency (manual tuning). To restore the factory-set to normal play /reception mode. Radio Storing and receiving stations Caution When tuning in stations while driving, use Best Tuning Memory (BTM) to adjust the equalizer curve. After 3 seconds, the setting...
.... The volume level is complete and the display returns to the desired frequency (manual tuning). To restore the factory-set to normal play /reception mode. Radio Storing and receiving stations Caution When tuning in stations while driving, use Best Tuning Memory (BTM) to adjust the equalizer curve. After 3 seconds, the setting...

Operating Instructions
Page 11
...disc. • The CD-Rs/CD-RWs are not for audio use (page 8). FAILURE The speaker/amplifier connection is not correct. L.SEEK +/- Depending on during automatic tuning. If these solutions do not function. If you cannot go up. Radio reception The stations cannot be received. During FM...'s antenna booster (only when your nearest Sony dealer. The sound is hampered by noises. • Connect a power antenna control lead (blue) or accessory power supply lead (red) to be repaired because of some problem. t Insert another disc. Press the RESET button (page 4). ...
...disc. • The CD-Rs/CD-RWs are not for audio use (page 8). FAILURE The speaker/amplifier connection is not correct. L.SEEK +/- Depending on during automatic tuning. If these solutions do not function. If you cannot go up. Radio reception The stations cannot be received. During FM...'s antenna booster (only when your nearest Sony dealer. The sound is hampered by noises. • Connect a power antenna control lead (blue) or accessory power supply lead (red) to be repaired because of some problem. t Insert another disc. Press the RESET button (page 4). ...


