
Operating Instructions
Page 3
.../SUB 6 Customizing the equalizer curve - EQ3 6 Adjusting setup items - SET 7 Using optional equipment 7 Auxiliary audio equipment 7 Additional Information Precautions 8 Notes on discs 8 Maintenance 9 Removing the unit 9 Specifications 10 Troubleshooting 10 Error displays/Messages 11 3 Table of Contents Getting Started Resetting the unit 4 Setting the clock 4 Detaching the front panel 4 Attaching the front panel 4 Location...
.../SUB 6 Customizing the equalizer curve - EQ3 6 Adjusting setup items - SET 7 Using optional equipment 7 Auxiliary audio equipment 7 Additional Information Precautions 8 Notes on discs 8 Maintenance 9 Removing the unit 9 Specifications 10 Troubleshooting 10 Error displays/Messages 11 3 Table of Contents Getting Started Resetting the unit 4 Setting the clock 4 Detaching the front panel 4 Attaching the front panel 4 Location...

Operating Instructions
Page 4
...for the first time, or after replacing the car battery or changing the connections, you must reset the unit. The alarm will erase the clock setting and some stored contents. Avoid leaving it in amplifier is used. 1 Press (OFF). Detaching the front panel You can detach the front... until it off towards you turn the ignition switch to prevent theft. Caution alarm If you . The unit is complete and the clock starts. Setting the clock The clock uses a 12-hour digital indication. 1 Press and hold the select button. RESET button Note Pressing the RESET button will only sound...
...for the first time, or after replacing the car battery or changing the connections, you must reset the unit. The alarm will erase the clock setting and some stored contents. Avoid leaving it in amplifier is used. 1 Press (OFF). Detaching the front panel You can detach the front... until it off towards you turn the ignition switch to prevent theft. Caution alarm If you . The unit is complete and the clock starts. Setting the clock The clock uses a 12-hour digital indication. 1 Press and hold the select button. RESET button Note Pressing the RESET button will only sound...
Operating Instructions
Page 7
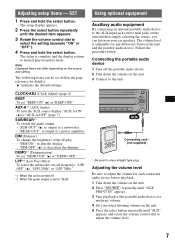
... select button repeatedly until the desired item appears. 3 Rotate the volume control dial to deactivate the dimmer. Adjusting setup items - SET 1 Press and hold the select button. CLOCK-ADJ (Clock Adjust) (page 4) BEEP To set "DEMO-ON" (z) or "DEMO-OFF." AUX-A*1 (AUX Audio) To turn the AUX source display "AUX-A-ON" (z) or "AUX-A-OFF...
... select button repeatedly until the desired item appears. 3 Rotate the volume control dial to deactivate the dimmer. Adjusting setup items - SET 1 Press and hold the select button. CLOCK-ADJ (Clock Adjust) (page 4) BEEP To set "DEMO-ON" (z) or "DEMO-OFF." AUX-A*1 (AUX Audio) To turn the AUX source display "AUX-A-ON" (z) or "AUX-A-OFF...

