

Limited Warranty (U.S. Only)
Page 1
... dealer, call the Sony Customer Information Service Center 1-800-222-SONY(7669) For an accessory or part not available from your rights and obligations with new or refurbished product, product determined to state. For specific instructions on your unit. Any parts or product replaced under this Limited Warranty will not be lost or reformatted during ordinary consumer use , acts of...
... dealer, call the Sony Customer Information Service Center 1-800-222-SONY(7669) For an accessory or part not available from your rights and obligations with new or refurbished product, product determined to state. For specific instructions on your unit. Any parts or product replaced under this Limited Warranty will not be lost or reformatted during ordinary consumer use , acts of...
Operating Instructions
Page 1
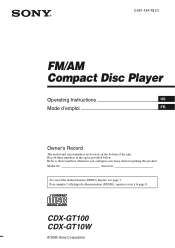
Record these numbers whenever you call upon your Sony dealer regarding this product. To cancel the demonstration (DEMO) display, see page 7. Serial No. Refer to these numbers in the space provided below. Pour annuler l'affichage de démonstration (DEMO), reportez-vous à la page 8. Model No. CDX-GT100 CDX-GT10W © 2005 Sony Corporation 2-651-184-12 (1) FM/AM Compact Disc Player Operating Instructions US Mode d'emploi FR Owner's Record The model and serial numbers are located on the bottom of the unit.
Record these numbers whenever you call upon your Sony dealer regarding this product. To cancel the demonstration (DEMO) display, see page 7. Serial No. Refer to these numbers in the space provided below. Pour annuler l'affichage de démonstration (DEMO), reportez-vous à la page 8. Model No. CDX-GT100 CDX-GT10W © 2005 Sony Corporation 2-651-184-12 (1) FM/AM Compact Disc Player Operating Instructions US Mode d'emploi FR Owner's Record The model and serial numbers are located on the bottom of the unit.
Operating Instructions
Page 2
... changes or modifications not expressly approved in a residential installation. If this equipment. Increase the separation between the equipment and receiver. - You can enjoy your drive with the limits for 7 music types. • Auxiliary equipment connection An AUX input jack on the unit until the display disappears. For installation and connections, see the supplied installation/connections manual. You are designed to Part 15 of a portable audio device. You can select an equalizer...
... changes or modifications not expressly approved in a residential installation. If this equipment. Increase the separation between the equipment and receiver. - You can enjoy your drive with the limits for 7 music types. • Auxiliary equipment connection An AUX input jack on the unit until the display disappears. For installation and connections, see the supplied installation/connections manual. You are designed to Part 15 of a portable audio device. You can select an equalizer...
Operating Instructions
Page 3
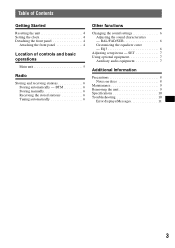
... Notes on discs 8 Maintenance 9 Removing the unit 9 Specifications 10 Troubleshooting 10 Error displays/Messages 11 3 BTM 6 Storing manually 6 Receiving the stored stations 6 Tuning automatically 6 Other functions Changing the sound settings 6 Adjusting the sound characteristics - BAL/FAD/SUB 6 Customizing the equalizer curve - Table of Contents Getting Started Resetting the unit 4 Setting the clock 4 Detaching the front panel 4 Attaching the front panel 4 Location of controls and basic operations Main unit 5 Radio Storing and receiving stations 6 Storing automatically...
... Notes on discs 8 Maintenance 9 Removing the unit 9 Specifications 10 Troubleshooting 10 Error displays/Messages 11 3 BTM 6 Storing manually 6 Receiving the stored stations 6 Tuning automatically 6 Other functions Changing the sound settings 6 Adjusting the sound characteristics - BAL/FAD/SUB 6 Customizing the equalizer curve - Table of Contents Getting Started Resetting the unit 4 Setting the clock 4 Detaching the front panel 4 Attaching the front panel 4 Location of controls and basic operations Main unit 5 Radio Storing and receiving stations 6 Storing automatically...

Operating Instructions
Page 4
... sound for the first time, or after replacing the car battery or changing the connections, you . The hour indication flashes. 4 Rotate the volume control dial to the previous display. The unit is turned off towards you must reset the unit. Setting the clock The clock uses a 12-hour digital indication. 1 Press and hold the select button. Detach the front panel and press the RESET button with part B of the front panel. 4 The alarm will erase the clock setting...
... sound for the first time, or after replacing the car battery or changing the connections, you . The hour indication flashes. 4 Rotate the volume control dial to the previous display. The unit is turned off towards you must reset the unit. Setting the clock The clock uses a 12-hour digital indication. 1 Press and hold the select button. Detach the front panel and press the RESET button with part B of the front panel. 4 The alarm will erase the clock setting...

Operating Instructions
Page 5
...). E Display window F Z (eject) button To eject the disc. G DSPL (display)/DIM (dimmer) button 4 To change the source (Radio/CD/ AUX). Radio: To tune in random order. select setup items (press and rotate). H (front panel release) button 4 I SEEK -/+ buttons CD: To skip tracks (press); M RESET button (located behind the front panel) 4 N Number buttons CD: (3): REP To play the current track repeatedly. (4): SHUF To play the tracks in stations automatically (press); P AUX input jack 7 To connect a portable audio device. 5 change display items (press); K BTM button 6 To...
...). E Display window F Z (eject) button To eject the disc. G DSPL (display)/DIM (dimmer) button 4 To change the source (Radio/CD/ AUX). Radio: To tune in random order. select setup items (press and rotate). H (front panel release) button 4 I SEEK -/+ buttons CD: To skip tracks (press); M RESET button (located behind the front panel) 4 N Number buttons CD: (3): REP To play the current track repeatedly. (4): SHUF To play the tracks in stations automatically (press); P AUX input jack 7 To connect a portable audio device. 5 change display items (press); K BTM button 6 To...
Operating Instructions
Page 6
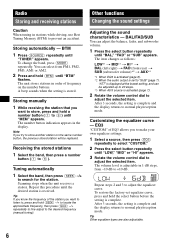
... selected item. Tip Other equalizer types are also adjustable. 6 To change the band, press (MODE) repeatedly. Receiving the stored stations 1 Select the band, then press a number button ((1) to normal play /reception mode. You can adjust the balance, fader, and subwoofer volume. 1 Press the select button repeatedly until "MEM" appears. The item changes as follows: LOW*1 t MID*1 t HI*1 t BAL (left-right) t FAD (front-rear) t SUB (subwoofer volume)*2 t AUX*3 *1 When EQ3 is activated (page 6). *2 When the audio output is set equalizer...
... selected item. Tip Other equalizer types are also adjustable. 6 To change the band, press (MODE) repeatedly. Receiving the stored stations 1 Select the band, then press a number button ((1) to normal play /reception mode. You can adjust the balance, fader, and subwoofer volume. 1 Press the select button repeatedly until "MEM" appears. The item changes as follows: LOW*1 t MID*1 t HI*1 t BAL (left-right) t FAD (front-rear) t SUB (subwoofer volume)*2 t AUX*3 *1 When EQ3 is activated (page 6). *2 When the audio output is set equalizer...
Operating Instructions
Page 7
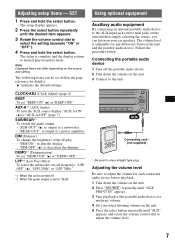
... audio device. 2 Turn down the volume on the source and setting. AUX AUX Connecting cord* (not supplied) * Be sure to dim the display. - Note Displayed items will differ, depending on the unit. 2 Press (SOURCE) repeatedly until the desired item appears. 3 Rotate the volume control dial to "SUB." Adjusting setup items - CLOCK-ADJ (Clock Adjust) (page 4) BEEP To set to select the setting (example "ON" or "OFF"). 4 Press and hold the select button. "REAR-OUT": to output to normal play/reception mode...
... audio device. 2 Turn down the volume on the source and setting. AUX AUX Connecting cord* (not supplied) * Be sure to dim the display. - Note Displayed items will differ, depending on the unit. 2 Press (SOURCE) repeatedly until the desired item appears. 3 Rotate the volume control dial to "SUB." Adjusting setup items - CLOCK-ADJ (Clock Adjust) (page 4) BEEP To set to select the setting (example "ON" or "OFF"). 4 Press and hold the select button. "REAR-OUT": to output to normal play/reception mode...
Operating Instructions
Page 8
... its surface. Do not use such discs. • You cannot play back discs that conform to the Compact Disc (CD) standard. Note on the other soft drinks onto the unit or discs. Inability to eject a disc (due to a label or sticker peeling off before operating it. • Power antenna will not operate properly. Inability to read audio data correctly (e.g., playback skipping, or no playback) due...
... its surface. Do not use such discs. • You cannot play back discs that conform to the Compact Disc (CD) standard. Note on the other soft drinks onto the unit or discs. Inability to eject a disc (due to a label or sticker peeling off before operating it. • Power antenna will not operate properly. Inability to read audio data correctly (e.g., playback skipping, or no playback) due...
Operating Instructions
Page 9
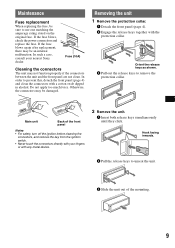
... of the mounting. 9 Hook facing inwards. 2 Pull the release keys to use one matching the amperage rating stated on the original fuse. Otherwise, the connectors may not function properly if the connectors between the unit and the front panel are not clean. Removing the unit 1 Remove the protection collar. 1 Detach the front panel (page 4). 2 Engage the release keys together with any metal device. 2 Remove the unit. 1 Insert both...
... of the mounting. 9 Hook facing inwards. 2 Pull the release keys to use one matching the amperage rating stated on the original fuse. Otherwise, the connectors may not function properly if the connectors between the unit and the front panel are not clean. Removing the unit 1 Remove the protection collar. 1 Detach the front panel (page 4). 2 Engage the release keys together with any metal device. 2 Remove the unit. 1 Insert both...

Operating Instructions
Page 10
... Sensitivity: 30 µV Power amplifier section Outputs: Speaker outputs (sure seal connectors) Speaker impedance: 4 - 8 ohms Maximum power output: 52 W × 4 (at 4 ohms) General Outputs: Audio outputs terminal (sub/rear switchable) Power antenna relay control terminal Power amplifier control terminal Inputs: Antenna input terminal AUX input jack (stereo mini jack) Tone controls: Low: ±10 dB at 60 Hz (XPLOD) Mid: ±10 dB at 1 kHz (XPLOD) High: ±10 dB at 10 kHz (XPLOD) Power requirements: 12 V DC car battery (negative ground) Dimensions...
... Sensitivity: 30 µV Power amplifier section Outputs: Speaker outputs (sure seal connectors) Speaker impedance: 4 - 8 ohms Maximum power output: 52 W × 4 (at 4 ohms) General Outputs: Audio outputs terminal (sub/rear switchable) Power antenna relay control terminal Power amplifier control terminal Inputs: Antenna input terminal AUX input jack (stereo mini jack) Tone controls: Low: ±10 dB at 60 Hz (XPLOD) Mid: ±10 dB at 1 kHz (XPLOD) High: ±10 dB at 10 kHz (XPLOD) Power requirements: 12 V DC car battery (negative ground) Dimensions...

Operating Instructions
Page 11
.... • Connect a power antenna control lead (blue) or accessory power supply lead (red) to be repaired because of the car. • Defective or dirty disc. The disc will not go any further. The sound is not correct. FAILURE The speaker/amplifier connection is too weak. During FM reception, the "ST" indication flashes. • Tune in a sturdy part of CD playback trouble, bring the disc that was used at the time the problem began...
.... • Connect a power antenna control lead (blue) or accessory power supply lead (red) to be repaired because of the car. • Defective or dirty disc. The disc will not go any further. The sound is not correct. FAILURE The speaker/amplifier connection is too weak. During FM reception, the "ST" indication flashes. • Tune in a sturdy part of CD playback trouble, bring the disc that was used at the time the problem began...
Operating Instructions
Page 24
only); Call 1-800-222-7669 URL http://www.SONY.com Sony Corporation Printed in these Operating Instructions. 2 Reset the unit. Note: Stored data may be erased. 3 Please contact (U.S.A. If you have any questions/problems regarding this product, try the following: 1 Read Troubleshooting in China
only); Call 1-800-222-7669 URL http://www.SONY.com Sony Corporation Printed in these Operating Instructions. 2 Reset the unit. Note: Stored data may be erased. 3 Please contact (U.S.A. If you have any questions/problems regarding this product, try the following: 1 Read Troubleshooting in China
Marketing Specifications
Page 1
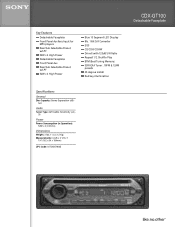
...) UPC Code: 027242679665 CDX-GT100 Detachable Faceplate Key Features Detachable Faceplate Front Panel Auxilary Input for MP3 players Rear/Sub Selectable Preout w/LPF 52W x 4 High Power Detachable Faceplate Front Panel Aux Rear/Sub Selectable Preout w/LPF 52W x 4 High Power Blue 13 Segment LED Display 8fs, 1-Bit D/A Converter EQ3 CD/CD-R/CD-RW Drive-S with 120dB S/N Ratio Repeat 1/2, Shuffle Play BTM (Best Tuning Memory) SSIR-EXA Tuner , 18FM & 12AM presets 45 degree install Red key illumination Specifications General Disc Capacity: Stereo Separation...
...) UPC Code: 027242679665 CDX-GT100 Detachable Faceplate Key Features Detachable Faceplate Front Panel Auxilary Input for MP3 players Rear/Sub Selectable Preout w/LPF 52W x 4 High Power Detachable Faceplate Front Panel Aux Rear/Sub Selectable Preout w/LPF 52W x 4 High Power Blue 13 Segment LED Display 8fs, 1-Bit D/A Converter EQ3 CD/CD-R/CD-RW Drive-S with 120dB S/N Ratio Repeat 1/2, Shuffle Play BTM (Best Tuning Memory) SSIR-EXA Tuner , 18FM & 12AM presets 45 degree install Red key illumination Specifications General Disc Capacity: Stereo Separation...
Marketing Specifications
Page 2
Non-metric weights and measures are property of Sony. Sony is prohibited. Features and specifications are subject to change without written permission is a trademark of their respective owners. Sony Electronics Inc. • 16530 Via Esprillo • San Diego, CA 92127 • 1-800-222-7669 • www.sony.com Last Updated: 02/02/2007 All other trademarks are approximate. CDX-GT100 Detachable Faceplate Please visit the Dealer Network for more information at www.sony.com/dn ©2006 Sony Electronics Inc. Reproduction in whole or in part without notice.
Non-metric weights and measures are property of Sony. Sony is prohibited. Features and specifications are subject to change without written permission is a trademark of their respective owners. Sony Electronics Inc. • 16530 Via Esprillo • San Diego, CA 92127 • 1-800-222-7669 • www.sony.com Last Updated: 02/02/2007 All other trademarks are approximate. CDX-GT100 Detachable Faceplate Please visit the Dealer Network for more information at www.sony.com/dn ©2006 Sony Electronics Inc. Reproduction in whole or in part without notice.


