
Operating Instructions
Page 3
... optional equipment 7 Auxiliary audio equipment 7 Additional Information Precautions 8 Notes on discs 8 Maintenance 9 Removing the unit 9 Specifications 10 Troubleshooting 10 Error displays/Messages 11 3 Table of Contents Getting Started Resetting the unit 4 Setting the clock 4 Detaching the front panel 4 Attaching the front panel 4 Location of controls and basic operations Main unit 5 Radio Storing and...
... optional equipment 7 Auxiliary audio equipment 7 Additional Information Precautions 8 Notes on discs 8 Maintenance 9 Removing the unit 9 Specifications 10 Troubleshooting 10 Error displays/Messages 11 3 Table of Contents Getting Started Resetting the unit 4 Setting the clock 4 Detaching the front panel 4 Attaching the front panel 4 Location of controls and basic operations Main unit 5 Radio Storing and...

Operating Instructions
Page 4
... front panel and display window. • Do not subject the front panel to heat/high temperature or moisture. The alarm will erase the clock setting and some stored contents. Detaching the front panel You can detach the front panel of the unit, as a ball-point pen. The setup... display appears. 2 Press the select button repeatedly until it off . 2 Press , then pull it clicks. Setting the clock The clock uses a 12-hour digital indication. 1 Press and hold the select button. Notes • Do not drop or put anything on a dashboard/rear tray....
... front panel and display window. • Do not subject the front panel to heat/high temperature or moisture. The alarm will erase the clock setting and some stored contents. Detaching the front panel You can detach the front panel of the unit, as a ball-point pen. The setup... display appears. 2 Press the select button repeatedly until it off . 2 Press , then pull it clicks. Setting the clock The clock uses a 12-hour digital indication. 1 Press and hold the select button. Notes • Do not drop or put anything on a dashboard/rear tray....
Operating Instructions
Page 7
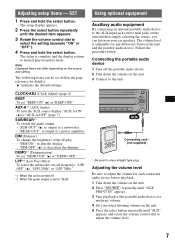
... cut-off frequency: "LPF OFF" (z), "LPF125Hz" or "LPF 78Hz." *1 When the unit is adjustable for details): "z" indicates the default settings. The setup display appears. 2 Press the select button repeatedly until "AUX FRONT IN" appears. 3 Start playback of the display. - AUX-A*1... the dimmer. "DIM-OFF" (z): to a subwoofer. - DEMO*1 (Demonstration) To set to select the setting (example "ON" or "OFF"). 4 Press and hold the select button. CLOCK-ADJ (Clock Adjust) (page 4) BEEP To set (follow the page reference for any difference between the unit and the portable audio device....
... cut-off frequency: "LPF OFF" (z), "LPF125Hz" or "LPF 78Hz." *1 When the unit is adjustable for details): "z" indicates the default settings. The setup display appears. 2 Press the select button repeatedly until "AUX FRONT IN" appears. 3 Start playback of the display. - AUX-A*1... the dimmer. "DIM-OFF" (z): to a subwoofer. - DEMO*1 (Demonstration) To set to select the setting (example "ON" or "OFF"). 4 Press and hold the select button. CLOCK-ADJ (Clock Adjust) (page 4) BEEP To set (follow the page reference for any difference between the unit and the portable audio device....

