AL-1651CS | AL-1661CS Operation Manual
Page 3
... ENVIRONMENTAL INFORMATION 5 INTRODUCTION ...6 MAIN FEATURES ...7 1 PREPARATIONS PART NAMES 9 CHECKING PACKED COMPONENTS AND ACCESSORIES 12 PREPARING THE MACHINE FOR INSTALLATION 13 INSTALLING THE TD CARTRIDGE 14 POWER ON AND OFF 16 2 LOADING PAPER PAPER ...18 LOADING THE PAPER TRAY 19 BYPASS FEED (including special paper 21 CHANGING A TRAY'S PAPER ... ONTO A SINGLE SHEET OF PAPER (2 IN 1 copy) ...35 CREATING MARGINS WHEN COPYING (Margin shift 38 5 SET UP THE SOFTWARE SOFTWARE FOR AL-1651CS/1661CS 40 BEFORE INSTALLATION 41 INSTALLING THE SOFTWARE 42 SETTING UP BUTTON MANAGER 55 1
... ENVIRONMENTAL INFORMATION 5 INTRODUCTION ...6 MAIN FEATURES ...7 1 PREPARATIONS PART NAMES 9 CHECKING PACKED COMPONENTS AND ACCESSORIES 12 PREPARING THE MACHINE FOR INSTALLATION 13 INSTALLING THE TD CARTRIDGE 14 POWER ON AND OFF 16 2 LOADING PAPER PAPER ...18 LOADING THE PAPER TRAY 19 BYPASS FEED (including special paper 21 CHANGING A TRAY'S PAPER ... ONTO A SINGLE SHEET OF PAPER (2 IN 1 copy) ...35 CREATING MARGINS WHEN COPYING (Margin shift 38 5 SET UP THE SOFTWARE SOFTWARE FOR AL-1651CS/1661CS 40 BEFORE INSTALLATION 41 INSTALLING THE SOFTWARE 42 SETTING UP BUTTON MANAGER 55 1

AL-1651CS | AL-1661CS Operation Manual
Page 4
... 69 8 TROUBLESHOOTING AND MAINTENANCE DISPLAY MESSAGES 71 TROUBLESHOOTING THE MACHINE 73 PROBLEMS DURING SETUP THE SOFTWARE 77 MISFEED REMOVAL 80 TD CARTRIDGE REPLACEMENT 85 DRUM CARTRIDGE REPLACEMENT 86 CHECKING THE TOTAL COUNT AND DRUM CARTRIDGE LIFE 87 CLEANING THE MACHINE 88 ABOUT SUPPLIES AND OPTIONS 91 9 APPENDIX SPECIFICATIONS 92 INDEX...96 SOFTWARE LICENSE 99 2
... 69 8 TROUBLESHOOTING AND MAINTENANCE DISPLAY MESSAGES 71 TROUBLESHOOTING THE MACHINE 73 PROBLEMS DURING SETUP THE SOFTWARE 77 MISFEED REMOVAL 80 TD CARTRIDGE REPLACEMENT 85 DRUM CARTRIDGE REPLACEMENT 86 CHECKING THE TOTAL COUNT AND DRUM CARTRIDGE LIFE 87 CLEANING THE MACHINE 88 ABOUT SUPPLIES AND OPTIONS 91 9 APPENDIX SPECIFICATIONS 92 INDEX...96 SOFTWARE LICENSE 99 2

AL-1651CS | AL-1661CS Operation Manual
Page 6
...smudges on copies. Store spare supplies such as follows to maintain the performance of the drum cartridge, causing smudges on copies. Do not touch the surface (green portion) of the drum cartridge. • Doing so will damage the surface (green portion) of this machine. Trademark ...trademarks and copyrights are trademarks of their respective owners. 4 Cautions on handling the machine Be careful in handling the machine as drum cartridges and TD cartridges in a dark place without removing from the package before use. • If they are exposed to direct sunlight, smudges on...
...smudges on copies. Store spare supplies such as follows to maintain the performance of the drum cartridge, causing smudges on copies. Do not touch the surface (green portion) of the drum cartridge. • Doing so will damage the surface (green portion) of this machine. Trademark ...trademarks and copyrights are trademarks of their respective owners. 4 Cautions on handling the machine Be careful in handling the machine as drum cartridges and TD cartridges in a dark place without removing from the package before use. • If they are exposed to direct sunlight, smudges on...

AL-1651CS | AL-1661CS Operation Manual
Page 11
The appearance of the AL-1651CS. 1 Chapter 1 PREPARATIONS This chapter provides basic information that you should know before using the machine. RSPF Reversing tray Original guides Document 1 feeder cover 2 Exit area Document feeder tray 5 3 6 4 7 Bypass tray Interface USB port TD cartridge Drum cartridge LAN port 8 9 10 ... 13 Fusing unit release lever 14 Transfer charger 15 Charger cleaner 9 Note The illustrations in this manual show the AL-1651CS. PART NAMES 1 The following illustration shows the part names of your machine may be different depending on the...
The appearance of the AL-1651CS. 1 Chapter 1 PREPARATIONS This chapter provides basic information that you should know before using the machine. RSPF Reversing tray Original guides Document 1 feeder cover 2 Exit area Document feeder tray 5 3 6 4 7 Bypass tray Interface USB port TD cartridge Drum cartridge LAN port 8 9 10 ... 13 Fusing unit release lever 14 Transfer charger 15 Charger cleaner 9 Note The illustrations in this manual show the AL-1651CS. PART NAMES 1 The following illustration shows the part names of your machine may be different depending on the...

AL-1651CS | AL-1661CS Operation Manual
Page 14
If anything is missing or damaged, contact our Technical Assistance Department at 1-(630)378-3590 in the USA or 905-568-7140 in machine) 12 Note If the machine does not function properly during setup or use, or if a function cannot be used, see "TROUBLESHOOTING AND MAINTENANCE" (p.71). CHECKING PACKED COMPONENTS AND ACCESSORIES Open the carton and check if the following components and accessories are included. Operation manual Software CD-ROM TD cartridge Drum cartridge (installed in Canada.
If anything is missing or damaged, contact our Technical Assistance Department at 1-(630)378-3590 in the USA or 905-568-7140 in machine) 12 Note If the machine does not function properly during setup or use, or if a function cannot be used, see "TROUBLESHOOTING AND MAINTENANCE" (p.71). CHECKING PACKED COMPONENTS AND ACCESSORIES Open the carton and check if the following components and accessories are included. Operation manual Software CD-ROM TD cartridge Drum cartridge (installed in Canada.

AL-1651CS | AL-1661CS Operation Manual
Page 15
... under the document glass. Lock Unlock 13 The scan head locking switch is locked ( ), the machine will not operate. Take out the bag containing the TD cartridge. 3 Release the scan head locking switch. Unlock the switch ( ) as shown below and then open the RSPF and remove the protective materials. PREPARING THE MACHINE...
... under the document glass. Lock Unlock 13 The scan head locking switch is locked ( ), the machine will not operate. Take out the bag containing the TD cartridge. 3 Release the scan head locking switch. Unlock the switch ( ) as shown below and then open the RSPF and remove the protective materials. PREPARING THE MACHINE...

AL-1651CS | AL-1661CS Operation Manual
Page 16
...Remove the CAUTION tape from the front cover and remove the two protective pins from the bag. Protective pins 4 Remove the TD cartridge from the fusing machine by pulling the strings upward one at a time. Remove the protective paper. Hold the tab of the front cover to remove the cover. 4 or ...5 times 14 Hold the cartridge on both sides and shake it horizontally four or five times. INSTALLING THE TD CARTRIDGE 1 Open the bypass tray, ...
...Remove the CAUTION tape from the front cover and remove the two protective pins from the bag. Protective pins 4 Remove the TD cartridge from the fusing machine by pulling the strings upward one at a time. Remove the protective paper. Hold the tab of the front cover to remove the cover. 4 or ...5 times 14 Hold the cartridge on both sides and shake it horizontally four or five times. INSTALLING THE TD CARTRIDGE 1 Open the bypass tray, ...

AL-1651CS | AL-1661CS Operation Manual
Page 17
PREPARATIONS Lock release button 1 6 Close the front cover and then the side cover by pressing the round projections near the side cover open button. 5 While pushing the lock release button, gently insert the TD cartridge until it locks into the nearest outlet. 15 If the covers are closed in the OFF position. Plug the other end of the machine is in the wrong order, the covers may be sure to close the front cover securely and then close the side cover. Note When closing the covers, be damaged. 7 Ensure that the power switch of the power cord into place.
PREPARATIONS Lock release button 1 6 Close the front cover and then the side cover by pressing the round projections near the side cover open button. 5 While pushing the lock release button, gently insert the TD cartridge until it locks into the nearest outlet. 15 If the covers are closed in the OFF position. Plug the other end of the machine is in the wrong order, the covers may be sure to close the front cover securely and then close the side cover. Note When closing the covers, be damaged. 7 Ensure that the power switch of the power cord into place.
AL-1651CS | AL-1661CS Operation Manual
Page 74
...72 Repeat the print procedure. ("****" indicates paper size) NO PC COMMUNICATION; The drum cartridge has reached the end of its life. BE NEEDED Consult your dealer to the computer. Reinstall the TD cartridge. 85 NO *** SIZE TRAY There is not installed correctly. Make sure that the settings...BE CHANGED IN 2IN1. 2 in the printer driver. CHECK CABLE. Replace it from the paper size LOAD **** PAPER INTO TRAY. The TD cartridge is no paper for printing. Print the 34 RESUME. selected when the bypass tray is already selected ,or the bypass tray is selected...
...72 Repeat the print procedure. ("****" indicates paper size) NO PC COMMUNICATION; The drum cartridge has reached the end of its life. BE NEEDED Consult your dealer to the computer. Reinstall the TD cartridge. 85 NO *** SIZE TRAY There is not installed correctly. Make sure that the settings...BE CHANGED IN 2IN1. 2 in the printer driver. CHECK CABLE. Replace it from the paper size LOAD **** PAPER INTO TRAY. The TD cartridge is no paper for printing. Print the 34 RESUME. selected when the bypass tray is already selected ,or the bypass tray is selected...

AL-1651CS | AL-1661CS Operation Manual
Page 77
...out. → When loading a large size of the specified size and weight range. → Use copy paper within the specified 18 range. The TD cartridge or drum cartridge is dirty. → Clean the long, narrow glass in a bag to prevent moisture absorption. Paper curled or damp. → Do not use ... copies. Some sheets of 22 the paper. Problem Paper misfeed. The scanner glass in the RSPF is 8 dirty. → Clean the TD cartridge or drum 89 cartridge. White or black lines appear on the bypass tray do not match the width of the paper. → Adjust the guides to match...
...out. → When loading a large size of the specified size and weight range. → Use copy paper within the specified 18 range. The TD cartridge or drum cartridge is dirty. → Clean the long, narrow glass in a bag to prevent moisture absorption. Paper curled or damp. → Do not use ... copies. Some sheets of 22 the paper. Problem Paper misfeed. The scanner glass in the RSPF is 8 dirty. → Clean the TD cartridge or drum 89 cartridge. White or black lines appear on the bypass tray do not match the width of the paper. → Adjust the guides to match...

AL-1651CS | AL-1661CS Operation Manual
Page 82
... in the illustration below. Return the required number of pages to "A: Misfeed in the bypass tray" (p.22). To open the side cover, see "INSTALLING THE TD CARTRIDGE" (p.14). 2 Check the misfeed location. If the misfed paper is seen from the RSPF, see "Loading paper in the paper feed area". (p.81) 80 To...
... in the illustration below. Return the required number of pages to "A: Misfeed in the bypass tray" (p.22). To open the side cover, see "INSTALLING THE TD CARTRIDGE" (p.14). 2 Check the misfeed location. If the misfed paper is seen from the RSPF, see "Loading paper in the paper feed area". (p.81) 80 To...

AL-1651CS | AL-1661CS Operation Manual
Page 84
... the side cover by pressing the round projections near the side cover open the front cover, see "INSTALLING THE TD CARTRIDGE" (p.14). 3 Rotate the roller rotating knob in the direction of the drum cartridge when removing the misfed paper. Caution • Do not touch the surface of the drum (green portion) of the...
... the side cover by pressing the round projections near the side cover open the front cover, see "INSTALLING THE TD CARTRIDGE" (p.14). 3 Rotate the roller rotating knob in the direction of the drum cartridge when removing the misfed paper. Caution • Do not touch the surface of the drum (green portion) of the...
AL-1651CS | AL-1661CS Operation Manual
Page 87
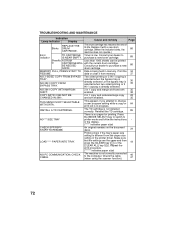
...the bypass tray, side cover, and front cover, in the bypass tray" (p.22). If copying is not possible after this operation, replace the TD cartridge. • During a long copy run of the machine, shaking it horizontally, then reinstalling it may be damaged. 85 To open the bypass tray..., see "INSTALLING THE TD CARTRIDGE" (p.14). 2 Gently pull the TD cartridge out while pressing the lock release button. Note • After the machine stops, it . The error indicator will go out...
...the bypass tray, side cover, and front cover, in the bypass tray" (p.22). If copying is not possible after this operation, replace the TD cartridge. • During a long copy run of the machine, shaking it horizontally, then reinstalling it may be damaged. 85 To open the bypass tray..., see "INSTALLING THE TD CARTRIDGE" (p.14). 2 Gently pull the TD cartridge out while pressing the lock release button. Note • After the machine stops, it . The error indicator will go out...

AL-1651CS | AL-1661CS Operation Manual
Page 88
... remove the protective cover from the cartridge. To install the TD cartridge, see "TD CARTRIDGE REPLACEMENT" (p.85)). 2 Hold the drum cartridge handle and gently pull the cartridge out. DRUM CARTRIDGE REPLACEMENT The useful life of the drum (green portion). The cover protects the drum against external light. 1 Remove the TD cartridge (see "INSTALLING THE TD CARTRIDGE" (p.14). 86 When the internal counter...
... remove the protective cover from the cartridge. To install the TD cartridge, see "TD CARTRIDGE REPLACEMENT" (p.85)). 2 Hold the drum cartridge handle and gently pull the cartridge out. DRUM CARTRIDGE REPLACEMENT The useful life of the drum (green portion). The cover protects the drum against external light. 1 Remove the TD cartridge (see "INSTALLING THE TD CARTRIDGE" (p.14). 86 When the internal counter...

AL-1651CS | AL-1661CS Operation Manual
Page 91
Toner may spill out and soil your clothes. 3 Replace the TD cartridge and drum cartridge as explained in "TD CARTRIDGE REPLACEMENT" (p.85) and "DRUM CARTRIDGE REPLACEMENT" (p.86). 2 Wipe the parts of the drum (green portion). Clean the charger using... cleaning the TD cartridge, do tilt or shake it. TROUBLESHOOTING AND MAINTENANCE TD cartridge and drum cartridge 1 Remove the TD cartridge and drum cartridge as explained in "TD CARTRIDGE REPLACEMENT" (p.85) and "DRUM CARTRIDGE REPLACEMENT" (p.86). Caution • Do not touch the surface of the TD cartridge and drum cartridge shown below ...
Toner may spill out and soil your clothes. 3 Replace the TD cartridge and drum cartridge as explained in "TD CARTRIDGE REPLACEMENT" (p.85) and "DRUM CARTRIDGE REPLACEMENT" (p.86). 2 Wipe the parts of the drum (green portion). Clean the charger using... cleaning the TD cartridge, do tilt or shake it. TROUBLESHOOTING AND MAINTENANCE TD cartridge and drum cartridge 1 Remove the TD cartridge and drum cartridge as explained in "TD CARTRIDGE REPLACEMENT" (p.85) and "DRUM CARTRIDGE REPLACEMENT" (p.86). Caution • Do not touch the surface of the TD cartridge and drum cartridge shown below ...

AL-1651CS | AL-1661CS Operation Manual
Page 93
... to use the correct part numbers as listed below. ABOUT SUPPLIES AND OPTIONS When ordering supplies, please use only genuine SHARP parts and supplies. Supply list Supply TD cartridge Drum cartridge Part number AL-110TD AL-100DR Usable life Approx. 4,000 sheets Approx. 18,000 sheets * Based on the toner package. USB interface cable USB cable...
... to use the correct part numbers as listed below. ABOUT SUPPLIES AND OPTIONS When ordering supplies, please use only genuine SHARP parts and supplies. Supply list Supply TD cartridge Drum cartridge Part number AL-110TD AL-100DR Usable life Approx. 4,000 sheets Approx. 18,000 sheets * Based on the toner package. USB interface cable USB cable...

AL-1651CS | AL-1661CS Operation Manual
Page 98
... 9, 90 Checking packed components and accessories 12 Checking the total count and drum cartridge life 86 Checking the total count and drum cartridge life 87 Cleaning the machine 88 Cleaning the TD cartridge and drum cartridge 89 [CLEAR ALL] key 11, 16 [CLEAR] key 10, 24, 80... Display messages 71 Document feeder cover 9, 83 Document feeder tray 9, 25 Document glass.... 9, 24, 31, 33, 35, 88 Drum cartridge replacement 86 Drum cartridge 9, 86, 89 Drum cartridge handle 86 E [ENTER] key 10 Envelope 18, 21 Environmental information 5 Error indicator..... 10, 71, 76, 82, 83, 86 ...
... 9, 90 Checking packed components and accessories 12 Checking the total count and drum cartridge life 86 Checking the total count and drum cartridge life 87 Cleaning the machine 88 Cleaning the TD cartridge and drum cartridge 89 [CLEAR ALL] key 11, 16 [CLEAR] key 10, 24, 80... Display messages 71 Document feeder cover 9, 83 Document feeder tray 9, 25 Document glass.... 9, 24, 31, 33, 35, 88 Drum cartridge replacement 86 Drum cartridge 9, 86, 89 Drum cartridge handle 86 E [ENTER] key 10 Envelope 18, 21 Environmental information 5 Error indicator..... 10, 71, 76, 82, 83, 86 ...

AL-1651CS | AL-1661CS Operation Manual
Page 99
... - Paper feed area 81 - PHOTO 27 - I Initial settings 16 Installation environment and usable software 41 Installing Acrobat Reader 63 Installing the software 42 Installing the TD cartridge 14 Introduction 6 IP address 48 L Labels 18, 19, 21 LAN port 9, 47 Loading paper 18 Loading paper in the fusing area 81 -
... - Paper feed area 81 - PHOTO 27 - I Initial settings 16 Installation environment and usable software 41 Installing Acrobat Reader 63 Installing the software 42 Installing the TD cartridge 14 Introduction 6 IP address 48 L Labels 18, 19, 21 LAN port 9, 47 Loading paper 18 Loading paper in the fusing area 81 -
AL-1651CS | AL-1661CS Operation Manual
Page 100
... 9 Sort copy 33 Special papers 19 Specifications 92 Standard paper 18 [START] key 11, 17, 25 Stream feeding mode 26, 65 Supply list 91 T TD cartridge 9, 14, 85, 89 TD cartridge replacement 85 Thick paper 18 Transfer charger 9, 90 Transparency film 18, 19, 21 Tray location indicator 10, 71 [TRAY SELECT] key 10, 22...
... 9 Sort copy 33 Special papers 19 Specifications 92 Standard paper 18 [START] key 11, 17, 25 Stream feeding mode 26, 65 Supply list 91 T TD cartridge 9, 14, 85, 89 TD cartridge replacement 85 Thick paper 18 Transfer charger 9, 90 Transparency film 18, 19, 21 Tray location indicator 10, 71 [TRAY SELECT] key 10, 22...

AL-1651CS | AL-1661CS Operation Manual
Page 101
...off 17 Power, turn on the machine 61 Troubleshooting and maintenance Checking the total count and drum cartridge life 87 Cleaning the machine - Drum cartridge 89 - Cabinet 88 - TD cartridge 89 - Fusing area 81 - Paper feed area 81 - INDEX BY PURPOSE Preparations Installation the ... checking 12 Paper, loading - Document glass 31 - RSPF 32 Margin shift, using 38 Sort copying, using - transport area 82 TD cartridge, replacing 85 99 Document glass 35 - RSPF 88 - Windows XP 55 Installing the software-Network connection 47 Installing the software 42 Online...
...off 17 Power, turn on the machine 61 Troubleshooting and maintenance Checking the total count and drum cartridge life 87 Cleaning the machine - Drum cartridge 89 - Cabinet 88 - TD cartridge 89 - Fusing area 81 - Paper feed area 81 - INDEX BY PURPOSE Preparations Installation the ... checking 12 Paper, loading - Document glass 31 - RSPF 32 Margin shift, using 38 Sort copying, using - transport area 82 TD cartridge, replacing 85 99 Document glass 35 - RSPF 88 - Windows XP 55 Installing the software-Network connection 47 Installing the software 42 Online...


