
AL-1651CS | AL-1661CS Operation Manual
Page 1
MODEL AL-1651CS AL-1661CS DIGITAL MULTIFUNCTIONAL SYSTEM OPERATION MANUAL Page PREPARATIONS 9 LOADING PAPER 18 MAKING COPIES 24 CONVENIENT COPY FUNCTIONS 30 SETTING UP THE SOFTWARE 40 PRINTER/SCANNER FUNCTIONS 59 USER SETTINGS 64 TROUBLESHOOTING AND MAINTENANCE 71 APPENDIX 92 AL-1651CS/AL-1661CS
MODEL AL-1651CS AL-1661CS DIGITAL MULTIFUNCTIONAL SYSTEM OPERATION MANUAL Page PREPARATIONS 9 LOADING PAPER 18 MAKING COPIES 24 CONVENIENT COPY FUNCTIONS 30 SETTING UP THE SOFTWARE 40 PRINTER/SCANNER FUNCTIONS 59 USER SETTINGS 64 TROUBLESHOOTING AND MAINTENANCE 71 APPENDIX 92 AL-1651CS/AL-1661CS

AL-1651CS | AL-1661CS Operation Manual
Page 4
... PROCEDURE FOR PRINTING 60 USING THE SCANNER MODE 61 SCANNING USING THE KEYS ON THE MACHINE 61 SCANNING FROM YOUR COMPUTER 62 OPERATION IN COPY, PRINTER, AND SCANNER MODES 62 HOW TO USE THE ONLINE MANUAL 63 7 USER SETTINGS USER PROGRAMS 64 SELECTING A SETTING FOR A USER PROGRAM 69 8 TROUBLESHOOTING AND MAINTENANCE...
... PROCEDURE FOR PRINTING 60 USING THE SCANNER MODE 61 SCANNING USING THE KEYS ON THE MACHINE 61 SCANNING FROM YOUR COMPUTER 62 OPERATION IN COPY, PRINTER, AND SCANNER MODES 62 HOW TO USE THE ONLINE MANUAL 63 7 USER SETTINGS USER PROGRAMS 64 SELECTING A SETTING FOR A USER PROGRAM 69 8 TROUBLESHOOTING AND MAINTENANCE...
AL-1651CS | AL-1661CS Operation Manual
Page 8
...screens that have the fax function) This manual explains the procedures for using the machine as a printer or a scanner. Operation Manual (for facsimile) (for models that appear in some countries. Online...these illustrations may differ slightly from the screens that appear in other computer screens show the AL-1651CS. Warning Warns that allows the machine to be different depending on the model and options ...properly followed. Using the manual This machine has been designed to the machine or one of its components may result if the contents of the caution are not properly followed...
...screens that have the fax function) This manual explains the procedures for using the machine as a printer or a scanner. Operation Manual (for facsimile) (for models that appear in some countries. Online...these illustrations may differ slightly from the screens that appear in other computer screens show the AL-1651CS. Warning Warns that allows the machine to be different depending on the model and options ...properly followed. Using the manual This machine has been designed to the machine or one of its components may result if the contents of the caution are not properly followed...
AL-1651CS | AL-1661CS Operation Manual
Page 10
Color scanner function • The accompanying scanner driver can be installed to enable use of the machine as a printer. • Network printer function A LAN port is not in use. • A universal design has been implemented in the product whereby the height of the operation panel and shape ... and auto power shut-off mode are designed to be installed and the machine connected to a computer using a USB cable to be used as a network printer. Laser printer function • Printer function The accompanying printer driver can be usable by as many people as possible. 8
Color scanner function • The accompanying scanner driver can be installed to enable use of the machine as a printer. • Network printer function A LAN port is not in use. • A universal design has been implemented in the product whereby the height of the operation panel and shape ... and auto power shut-off mode are designed to be installed and the machine connected to a computer using a USB cable to be used as a network printer. Laser printer function • Printer function The accompanying printer driver can be usable by as many people as possible. 8
AL-1651CS | AL-1661CS Operation Manual
Page 12
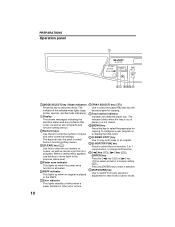
.... 14 [EXPOSURE] key Use to switch from auto exposure adjustment to select the mode. The indicator of the selected mode lights (copy, printer, scanner, and fax mode indicators). 2 Display This shows messages indicating the machine status and any problems that occur, as well as cancel ...4 [CLEAR] key ( ) Use this key to select the paper size for copying. 9 Tray location indicator Indicates the selected paper tray. PREPARATIONS Operation panel 1 AL-1651CS 6 7 8 9 10 11 1 [MODE SELECT] key / Mode indicators Press this key to move back to the previous menu level. 5 Power save indicator...
.... 14 [EXPOSURE] key Use to switch from auto exposure adjustment to select the mode. The indicator of the selected mode lights (copy, printer, scanner, and fax mode indicators). 2 Display This shows messages indicating the machine status and any problems that occur, as well as cancel ...4 [CLEAR] key ( ) Use this key to select the paper size for copying. 9 Tray location indicator Indicates the selected paper tray. PREPARATIONS Operation panel 1 AL-1651CS 6 7 8 9 10 11 1 [MODE SELECT] key / Mode indicators Press this key to move back to the previous menu level. 5 Power save indicator...
AL-1651CS | AL-1661CS Operation Manual
Page 23
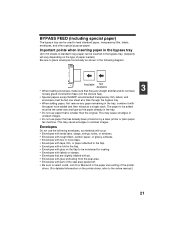
... • Envelopes with a fold in the flap. • Envelopes with glue on by a laser printer or plain paper fax machine. Envelopes Do not use paper that they are slightly inflated with air....Envelopes with glue protruding from the seal area. • Envelopes with the paper to be fed one sheet at a time through the bypass tray. • When adding paper, first remove any ...). • Special papers except SHARP recommended transparency film, labels, and envelopes must be used to 50 sheets of the printer driver. (For detailed information on the printer driver, refer to the online ...
... • Envelopes with a fold in the flap. • Envelopes with glue on by a laser printer or plain paper fax machine. Envelopes Do not use paper that they are slightly inflated with air....Envelopes with glue protruding from the seal area. • Envelopes with the paper to be fed one sheet at a time through the bypass tray. • When adding paper, first remove any ...). • Special papers except SHARP recommended transparency film, labels, and envelopes must be used to 50 sheets of the printer driver. (For detailed information on the printer driver, refer to the online ...
AL-1651CS | AL-1661CS Operation Manual
Page 35
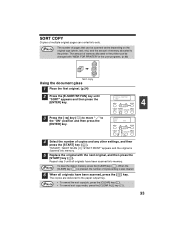
... memory allocated to the paper output tray. SPECIAL FUNCTION SORT 4 3 Press the [ ] key ( ) to move " " to the printer can be changed with the next original, and then press the [START] key ( ). The copies are delivered to the... printer. Note The number of pages that can be scanned varies depending on the original type (photo, text, etc.... (p.24) 2 Press the [E-SORT/SP.FUN] key until all originals have been scanned into sets. FOR PRINTER" in memory, press the [CLEAR] key ( ).
... memory allocated to the paper output tray. SPECIAL FUNCTION SORT 4 3 Press the [ ] key ( ) to move " " to the printer can be changed with the next original, and then press the [START] key ( ). The copies are delivered to the... printer. Note The number of pages that can be scanned varies depending on the original type (photo, text, etc.... (p.24) 2 Press the [E-SORT/SP.FUN] key until all originals have been scanned into sets. FOR PRINTER" in memory, press the [CLEAR] key ( ).

AL-1651CS | AL-1661CS Operation Manual
Page 42
... the software that accompanies the machine contains the following software: MFP driver Printer driver The printer driver enables you to use the scanner menus on the machine. • This manual refers to use the scanning function of the machine. SOFTWARE FOR AL-1651CS/1661CS The CD-ROM that is required for Windows XP. Note...
... the software that accompanies the machine contains the following software: MFP driver Printer driver The printer driver enables you to use the scanner menus on the machine. • This manual refers to use the scanning function of the machine. SOFTWARE FOR AL-1651CS/1661CS The CD-ROM that is required for Windows XP. Note...
AL-1651CS | AL-1661CS Operation Manual
Page 43
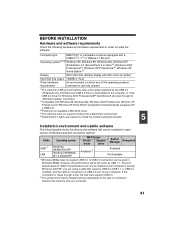
... Printing is installed will be installed for Windows 2000 Professional/XP that Microsoft provides through a hub, the hub must support USB 2.0. *2 The printer driver that supports USB 2.0 (USB 1.1 or USB 2.0 certified), and the cable is connected to install the software. BEFORE INSTALLATION Hardware and software... USB 1.1. Cable Operating system USB*1 LAN Windows 98/Me/2000/XP Windows 95/98/Me/ NT 4.0/2000/XP MFP Driver Printer Scanner driver driver Button Manager Sharpdesk Available*2 Available Not Available *1Windows 98/Me does not support USB 2.0. Computer type IBM PC...
... Printing is installed will be installed for Windows 2000 Professional/XP that Microsoft provides through a hub, the hub must support USB 2.0. *2 The printer driver that supports USB 2.0 (USB 1.1 or USB 2.0 certified), and the cable is connected to install the software. BEFORE INSTALLATION Hardware and software... USB 1.1. Cable Operating system USB*1 LAN Windows 98/Me/2000/XP Windows 95/98/Me/ NT 4.0/2000/XP MFP Driver Printer Scanner driver driver Button Manager Sharpdesk Available*2 Available Not Available *1Windows 98/Me does not support USB 2.0. Computer type IBM PC...

AL-1651CS | AL-1661CS Operation Manual
Page 47
...Yes". Close the window. This message appears when the machine's USB 2.0 mode is turned on, and then connect the USB cable (p. 46). "SHARP AL-XXXXCS" will appear in the window to your computer. 15 Make sure that the power of the scanner driver. Select "Install the software automatically (... Caution regarding "HI-SPEED USB Device" will appear. Click the OK button. For information on switching the USB 2.0 mode, see Chapter 6, "PRINTER/SCANNER FUNCTIONS". 5 16 Begin installation of the machine is not set to restart your computer screen, close it. SET UP THE SOFTWARE 14 When...
...Yes". Close the window. This message appears when the machine's USB 2.0 mode is turned on, and then connect the USB cable (p. 46). "SHARP AL-XXXXCS" will appear in the window to your computer. 15 Make sure that the power of the scanner driver. Select "Install the software automatically (... Caution regarding "HI-SPEED USB Device" will appear. Click the OK button. For information on switching the USB 2.0 mode, see Chapter 6, "PRINTER/SCANNER FUNCTIONS". 5 16 Begin installation of the machine is not set to restart your computer screen, close it. SET UP THE SOFTWARE 14 When...

AL-1651CS | AL-1661CS Operation Manual
Page 48
.... • Do not connect the USB cable before installing the MFP driver. SET UP THE SOFTWARE 17 Begin installation of the MFP driver. "SHARP AL-XXXXCS" will transfer data at the speed specified by the USB 2.0 (Hi-Speed) only if the Microsoft USB 2.0 driver is installed. •... obtain the fastest USB 2.0 data transfer speed, "USB2.0 MODE SWITCH" in the machine's user programs must be connected during installation of the printer driver. Follow the on your computer. This completes the installation of Windows to your computer. To obtain the latest driver (which may not be...
.... • Do not connect the USB cable before installing the MFP driver. SET UP THE SOFTWARE 17 Begin installation of the MFP driver. "SHARP AL-XXXXCS" will transfer data at the speed specified by the USB 2.0 (Hi-Speed) only if the Microsoft USB 2.0 driver is installed. •... obtain the fastest USB 2.0 data transfer speed, "USB2.0 MODE SWITCH" in the machine's user programs must be connected during installation of the printer driver. Follow the on your computer. This completes the installation of Windows to your computer. To obtain the latest driver (which may not be...

AL-1651CS | AL-1661CS Operation Manual
Page 49
... then double-click the CD-ROM icon. Please purchase the appropriate cable for your computer. • If you intend to use the machine as a network printer Note • Interface cables for connecting the machine to your computer. The scanner function cannot be installed on your computer with a LAN cable. • To...
... then double-click the CD-ROM icon. Please purchase the appropriate cable for your computer. • If you intend to use the machine as a network printer Note • Interface cables for connecting the machine to your computer. The scanner function cannot be installed on your computer with a LAN cable. • To...

AL-1651CS | AL-1661CS Operation Manual
Page 51
Be sure to ask your network administrator for the correct IP address, subnet mask, and default gateway to be entered. Click the printer to be configured (the machine) and click the "Next" button. Enter the Ethernet Address and click the "Initialize" button to the network will be recognized. ... the left side of the machine near the LAN port. • If the machine is selected, the IP address may at times change automatically. 9 The printer or printers connected to initialize the IP address.
Be sure to ask your network administrator for the correct IP address, subnet mask, and default gateway to be entered. Click the printer to be configured (the machine) and click the "Next" button. Enter the Ethernet Address and click the "Initialize" button to the network will be recognized. ... the left side of the machine near the LAN port. • If the machine is selected, the IP address may at times change automatically. 9 The printer or printers connected to initialize the IP address.
AL-1651CS | AL-1661CS Operation Manual
Page 52
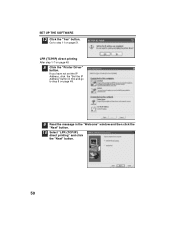
Go to step 8 on page 48. 9 Read the message in the "Welcome" window and then click the "Next" button. 10 Select "LPR (TCP/IP) direct printing" and click the "Next" button. 50 If you have not set the IP Address, click the "Set the IP Address" button in first and go to step 11 on page 48 8 Click the "Printer Driver" button. SET UP THE SOFTWARE 12 Click the "Yes" button. LPR (TCP/IP) direct printing After step 1-7 on page 51.
Go to step 8 on page 48. 9 Read the message in the "Welcome" window and then click the "Next" button. 10 Select "LPR (TCP/IP) direct printing" and click the "Next" button. 50 If you have not set the IP Address, click the "Set the IP Address" button in first and go to step 11 on page 48 8 Click the "Printer Driver" button. SET UP THE SOFTWARE 12 Click the "Yes" button. LPR (TCP/IP) direct printing After step 1-7 on page 51.

AL-1651CS | AL-1661CS Operation Manual
Page 53
Click the printer to be found, make sure the machine is powered on, make sure the network cable is connected correctly, and then click the "Search" button. 12 .... Note Any name can be detected. If any of the entries are correct and then click the "Finish" button. 11 The printer or printers connected to the network will be entered in "Printer Port Name" (maximum of 38 characters). 5 13 A window appears to the appropriate window and correct the entry. 51 Make sure...
Click the printer to be found, make sure the machine is powered on, make sure the network cable is connected correctly, and then click the "Search" button. 12 .... Note Any name can be detected. If any of the entries are correct and then click the "Finish" button. 11 The printer or printers connected to the network will be entered in "Printer Port Name" (maximum of 38 characters). 5 13 A window appears to the appropriate window and correct the entry. 51 Make sure...

AL-1651CS | AL-1661CS Operation Manual
Page 54
... SOFTWARE 14 When the model selection window appears, select the model name of your default printer and click the "Next" button. If you wish the printer to click "Continue Anyway" or "Yes". 16 When "This installation of the SHARP software is selected automatically.) 52 This completes the installation of your computer's CD-ROM...
... SOFTWARE 14 When the model selection window appears, select the model name of your default printer and click the "Next" button. If you wish the printer to click "Continue Anyway" or "Yes". 16 When "This installation of the SHARP software is selected automatically.) 52 This completes the installation of your computer's CD-ROM...

AL-1651CS | AL-1661CS Operation Manual
Page 55
SET UP THE SOFTWARE 4 The "SOFTWARE LICENCE" window will appear. Make sure that you understand the contents of the software licence, and then click the "Yes" button. 5 Click the "Printer Driver" button. 6 Read the message in the "Welcome" window and then click the "Next" button. 7 Select "Shared Printer" and click the "Next" 5 button. 53
SET UP THE SOFTWARE 4 The "SOFTWARE LICENCE" window will appear. Make sure that you understand the contents of the software licence, and then click the "Yes" button. 5 Click the "Printer Driver" button. 6 Read the message in the "Welcome" window and then click the "Next" button. 7 Select "Shared Printer" and click the "Next" 5 button. 53

AL-1651CS | AL-1661CS Operation Manual
Page 56
... After the installation, a message prompting you to be used, select the machine set as a shared printer, and click the "Next" button. You can also click the "Add Network Port" button and select the printer to restart your computer may appear. For the model name of your machine and click the "Next"... the "Yes" button to be shared (the machine) by browsing the network in the printer server. 9 When the model selection window appears, select model name of the software. 54 Note If the shared printer does not appear in the list, check the settings in the window that appears. SET UP...
... After the installation, a message prompting you to be used, select the machine set as a shared printer, and click the "Next" button. You can also click the "Add Network Port" button and select the printer to restart your computer may appear. For the model name of your machine and click the "Next"... the "Yes" button to be shared (the machine) by browsing the network in the printer server. 9 When the model selection window appears, select model name of the software. 54 Note If the shared printer does not appear in the list, check the settings in the window that appears. SET UP...

AL-1651CS | AL-1661CS Operation Manual
Page 57
Windows XP 1 Click the "start" button, click "Control Panel", click "Printers and Other Hardware", and then click "Scanners and Cameras". 2 Click the "SHARP AL-XXXXCS" icon and select "Properties" from the "File" menu. 3 In the "Properties" screen, click the "Events" tab. 4 Select "SC1:" from the machine. Follow the steps ...
Windows XP 1 Click the "start" button, click "Control Panel", click "Printers and Other Hardware", and then click "Scanners and Cameras". 2 Click the "SHARP AL-XXXXCS" icon and select "Properties" from the "File" menu. 3 In the "Properties" screen, click the "Events" tab. 4 Select "SC1:" from the machine. Follow the steps ...

AL-1651CS | AL-1661CS Operation Manual
Page 61
...the following features: • High-speed data transfer (when connected to a USB 2.0 port) • ROPM* function * ROPM is used, the printer and scanner functions can be sure to read "System requirements for USB 2.0 (Hi-Speed mode) The following system is installed, some USB 2.0 expansion...card, contact the card's manufacturer. 59 System requirements for USB 2.0 (Hi-Speed mode)" (below) to use the machine as a printer or scanner, the printer driver or scanner driver must first be installed as standard equipment. This problem can be installed using USB 2.0 (Hi-Speed mode), be...
...the following features: • High-speed data transfer (when connected to a USB 2.0 port) • ROPM* function * ROPM is used, the printer and scanner functions can be sure to read "System requirements for USB 2.0 (Hi-Speed mode) The following system is installed, some USB 2.0 expansion...card, contact the card's manufacturer. 59 System requirements for USB 2.0 (Hi-Speed mode)" (below) to use the machine as a printer or scanner, the printer driver or scanner driver must first be installed as standard equipment. This problem can be installed using USB 2.0 (Hi-Speed mode), be...


