
AL-1651CS | AL-1661CS Operation Manual
Page 1
MODEL AL-1651CS AL-1661CS DIGITAL MULTIFUNCTIONAL SYSTEM OPERATION MANUAL Page PREPARATIONS 9 LOADING PAPER 18 MAKING COPIES 24 CONVENIENT COPY FUNCTIONS 30 SETTING UP THE SOFTWARE 40 PRINTER/SCANNER FUNCTIONS 59 USER SETTINGS 64 TROUBLESHOOTING AND MAINTENANCE 71 APPENDIX 92 AL-1651CS/AL-1661CS
MODEL AL-1651CS AL-1661CS DIGITAL MULTIFUNCTIONAL SYSTEM OPERATION MANUAL Page PREPARATIONS 9 LOADING PAPER 18 MAKING COPIES 24 CONVENIENT COPY FUNCTIONS 30 SETTING UP THE SOFTWARE 40 PRINTER/SCANNER FUNCTIONS 59 USER SETTINGS 64 TROUBLESHOOTING AND MAINTENANCE 71 APPENDIX 92 AL-1651CS/AL-1661CS
AL-1651CS | AL-1661CS Operation Manual
Page 3
... 30 SORT COPY 33 COPYING MULTIPLE ORIGINALS ONTO A SINGLE SHEET OF PAPER (2 IN 1 copy) ...35 CREATING MARGINS WHEN COPYING (Margin shift 38 5 SET UP THE SOFTWARE SOFTWARE FOR AL-1651CS/1661CS 40 BEFORE INSTALLATION 41 INSTALLING THE SOFTWARE 42 SETTING UP BUTTON MANAGER 55 1
... 30 SORT COPY 33 COPYING MULTIPLE ORIGINALS ONTO A SINGLE SHEET OF PAPER (2 IN 1 copy) ...35 CREATING MARGINS WHEN COPYING (Margin shift 38 5 SET UP THE SOFTWARE SOFTWARE FOR AL-1651CS/1661CS 40 BEFORE INSTALLATION 41 INSTALLING THE SOFTWARE 42 SETTING UP BUTTON MANAGER 55 1

AL-1651CS | AL-1661CS Operation Manual
Page 4
... 7 USER SETTINGS USER PROGRAMS 64 SELECTING A SETTING FOR A USER PROGRAM 69 8 TROUBLESHOOTING AND MAINTENANCE DISPLAY MESSAGES 71 TROUBLESHOOTING THE MACHINE 73 PROBLEMS DURING SETUP THE SOFTWARE 77 MISFEED REMOVAL 80 TD CARTRIDGE REPLACEMENT 85 DRUM CARTRIDGE REPLACEMENT 86 CHECKING THE TOTAL COUNT AND DRUM CARTRIDGE LIFE 87 CLEANING THE MACHINE 88...
... 7 USER SETTINGS USER PROGRAMS 64 SELECTING A SETTING FOR A USER PROGRAM 69 8 TROUBLESHOOTING AND MAINTENANCE DISPLAY MESSAGES 71 TROUBLESHOOTING THE MACHINE 73 PROBLEMS DURING SETUP THE SOFTWARE 77 MISFEED REMOVAL 80 TD CARTRIDGE REPLACEMENT 85 DRUM CARTRIDGE REPLACEMENT 86 CHECKING THE TOTAL COUNT AND DRUM CARTRIDGE LIFE 87 CLEANING THE MACHINE 88...
AL-1651CS | AL-1661CS Operation Manual
Page 8
... explains how to install the software that damage to be sure to use of the names that appear in these illustrations may be available in some countries. Conventions used as a fax machine. Caution Cautions that allows the machine to the machine or one of its components may result...fax function) This manual explains the procedures for using the machine as follows: Operation Manual (this manual in other computer screens show the AL-1651CS. About the operation manuals The operation manuals for using the machine as a printer and scanner for models that injury may result if ...
... explains how to install the software that damage to be sure to use of the names that appear in these illustrations may be available in some countries. Conventions used as a fax machine. Caution Cautions that allows the machine to the machine or one of its components may result...fax function) This manual explains the procedures for using the machine as follows: Operation Manual (this manual in other computer screens show the AL-1651CS. About the operation manuals The operation manuals for using the machine as a printer and scanner for models that injury may result if ...

AL-1651CS | AL-1661CS Operation Manual
Page 14
If anything is missing or damaged, contact our Technical Assistance Department at 1-(630)378-3590 in the USA or 905-568-7140 in machine) 12 Note If the machine does not function properly during setup or use, or if a function cannot be used, see "TROUBLESHOOTING AND MAINTENANCE" (p.71). CHECKING PACKED COMPONENTS AND ACCESSORIES Open the carton and check if the following components and accessories are included. Operation manual Software CD-ROM TD cartridge Drum cartridge (installed in Canada.
If anything is missing or damaged, contact our Technical Assistance Department at 1-(630)378-3590 in the USA or 905-568-7140 in machine) 12 Note If the machine does not function properly during setup or use, or if a function cannot be used, see "TROUBLESHOOTING AND MAINTENANCE" (p.71). CHECKING PACKED COMPONENTS AND ACCESSORIES Open the carton and check if the following components and accessories are included. Operation manual Software CD-ROM TD cartridge Drum cartridge (installed in Canada.

AL-1651CS | AL-1661CS Operation Manual
Page 42
...you to use the scanner menus on the machine. • This manual refers to use the printer function of your model for "XXXXCS". SOFTWARE FOR AL-1651CS/1661CS The CD-ROM that accompanied the machine simply as a network printer. With other versions of Windows, some screen images may be used ...as "CD-ROM". The procedure for Windows XP. This is an integrated software environment that makes it easy to the machine by a USB cable. ...
...you to use the scanner menus on the machine. • This manual refers to use the printer function of your model for "XXXXCS". SOFTWARE FOR AL-1651CS/1661CS The CD-ROM that accompanied the machine simply as a network printer. With other versions of Windows, some screen images may be used ...as "CD-ROM". The procedure for Windows XP. This is an integrated software environment that makes it easy to the machine by a USB cable. ...
AL-1651CS | AL-1661CS Operation Manual
Page 43
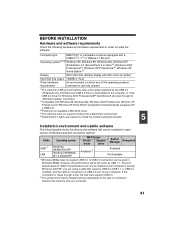
... not support printing from a Macintosh environment. *5 Administrator's rights are using the installer. 5 Installation environment and usable software The following hardware and software requirements in order to a USB 2.0 port on your computer. 41 Cable Operating system USB*1 LAN Windows 98/Me...2.0 (USB 1.1 or USB 2.0 certified), and the cable is connected to install the software. BEFORE INSTALLATION Hardware and software requirements Check the following table shows the drivers and software that can fully operate *1 The machine's USB port will transfer data at the speed specified...
... not support printing from a Macintosh environment. *5 Administrator's rights are using the installer. 5 Installation environment and usable software The following hardware and software requirements in order to a USB 2.0 port on your computer. 41 Cable Operating system USB*1 LAN Windows 98/Me...2.0 (USB 1.1 or USB 2.0 certified), and the cable is connected to install the software. BEFORE INSTALLATION Hardware and software requirements Check the following table shows the drivers and software that can fully operate *1 The machine's USB port will transfer data at the speed specified...

AL-1651CS | AL-1661CS Operation Manual
Page 44
...continue. Note The cable will be connected to use and click the "Next" button. (Normally the correct language is selected automatically.) 5 The "SOFTWARE LICENCE" window will be installed on the screen to close the window and disconnect the cable. In this happens, click the "Cancel" button to... the "Next" button. 42 Note If the language selection screen appears after solving the problem. • When installing Sharpdesk, a minimal version of the software licence, and then click the "Yes" button. 6 Read the "Readme First" in step 15. 2 Insert the CD-ROM into your computer does...
...continue. Note The cable will be connected to use and click the "Next" button. (Normally the correct language is selected automatically.) 5 The "SOFTWARE LICENCE" window will be installed on the screen to close the window and disconnect the cable. In this happens, click the "Cancel" button to... the "Next" button. 42 Note If the language selection screen appears after solving the problem. • When installing Sharpdesk, a minimal version of the software licence, and then click the "Yes" button. 6 Read the "Readme First" in step 15. 2 Insert the CD-ROM into your computer does...

AL-1651CS | AL-1661CS Operation Manual
Page 45
...button. If you selected "Custom", go to step 9. Go to step 14. 9 If you clicked the "Custom" button, select the checkboxes of the software, click the "Standard" button. Click the "Display README" button to show information on packages that are selected. 10 Check the packages on the screen. ...SET UP THE SOFTWARE 8 Read the message in step 7, installation will be 5 installed and then click the "Next" button. 7 To install all of the software packages to be displayed on the screen, and then click the "Start" button...
...button. If you selected "Custom", go to step 9. Go to step 14. 9 If you clicked the "Custom" button, select the checkboxes of the software, click the "Standard" button. Click the "Display README" button to show information on packages that are selected. 10 Check the packages on the screen. ...SET UP THE SOFTWARE 8 Read the message in step 7, installation will be 5 installed and then click the "Next" button. 7 To install all of the software packages to be displayed on the screen, and then click the "Start" button...
AL-1651CS | AL-1661CS Operation Manual
Page 46
...on -screen instructions. If "Skip" is successful. The Sharpdesk installer will overwrite Imaging for Windows. 44 SET UP THE SOFTWARE 11 The files required for installation of Sharpdesk (if "Sharpdesk" was selected). Click the "Finish" button when the message ...Continue" button as appropriate to click "Continue Anyway" or "Yes". If Imaging for Windows is complete. When "The installation of the SHARP software is selected, Sharpdesk Imaging will continue without installing Sharpdesk Imaging. Follow the on your computer, Sharpdesk Imaging will start. 13 Begin the ...
...on -screen instructions. If "Skip" is successful. The Sharpdesk installer will overwrite Imaging for Windows. 44 SET UP THE SOFTWARE 11 The files required for installation of Sharpdesk (if "Sharpdesk" was selected). Click the "Finish" button when the message ...Continue" button as appropriate to click "Continue Anyway" or "Yes". If Imaging for Windows is complete. When "The installation of the SHARP software is selected, Sharpdesk Imaging will continue without installing Sharpdesk Imaging. Follow the on your computer, Sharpdesk Imaging will start. 13 Begin the ...

AL-1651CS | AL-1661CS Operation Manual
Page 47
...turned on -screen instructions. Note • If this case, follow the instructions in the "Found New Hardware Wizard" dialog box. Select "Install the software automatically (Recommended)" and click the "Next" button. If you are running Windows 2000/XP and a warning message appears Caution regarding "HI-SPEED USB Device" ... minutes. • After the installation, a message prompting you to connect the machine to this case, click the "Yes" button to "HI-SPEED". "SHARP AL-XXXXCS" will appear. SET UP THE SOFTWARE 14 When the "Finish" screen appears, click the "Close" button.
...turned on -screen instructions. Note • If this case, follow the instructions in the "Found New Hardware Wizard" dialog box. Select "Install the software automatically (Recommended)" and click the "Next" button. If you are running Windows 2000/XP and a warning message appears Caution regarding "HI-SPEED USB Device" ... minutes. • After the installation, a message prompting you to connect the machine to this case, click the "Yes" button to "HI-SPEED". "SHARP AL-XXXXCS" will appear. SET UP THE SOFTWARE 14 When the "Finish" screen appears, click the "Close" button.

AL-1651CS | AL-1661CS Operation Manual
Page 48
...the "Found New Hardware Wizard" dialog box. A USB cable for your computer. Note • If the machine will be sure to your computer. "SHARP AL-XXXXCS" will transfer data at the speed specified by the USB 2.0 (Hi-Speed) only if the Microsoft USB 2.0 driver is running Windows 2000/XP ...and a warning message appears Caution regarding the Windows logo test or digital signature, be connected using a USB 2.0 port of your version of the software. • If you are running Windows 2000/XP. • Even when the Microsoft USB 2.0 driver is available with the machine. The USB cable...
...the "Found New Hardware Wizard" dialog box. A USB cable for your computer. Note • If the machine will be sure to your computer. "SHARP AL-XXXXCS" will transfer data at the speed specified by the USB 2.0 (Hi-Speed) only if the Microsoft USB 2.0 driver is running Windows 2000/XP ...and a warning message appears Caution regarding the Windows logo test or digital signature, be connected using a USB 2.0 port of your version of the software. • If you are running Windows 2000/XP. • Even when the Microsoft USB 2.0 driver is available with the machine. The USB cable...

AL-1651CS | AL-1661CS Operation Manual
Page 49
If this is connected with a LAN cable. • To install the software using a network connection in Windows 95, Internet Explorer version 4.01 or later must be installed on your computer. Please purchase the appropriate cable for your ... on the machine. 5 Use a network cable that is shielded. 2 Turn on the machine. 3 Insert the CD-ROM into your computer's USB port. SET UP THE SOFTWARE 1 Insert the cable into the USB port on the machine. 2 Insert the other end of the cable into your computer's CD-ROM drive. 4 Click the...
If this is connected with a LAN cable. • To install the software using a network connection in Windows 95, Internet Explorer version 4.01 or later must be installed on your computer. Please purchase the appropriate cable for your ... on the machine. 5 Use a network cable that is shielded. 2 Turn on the machine. 3 Insert the CD-ROM into your computer's USB port. SET UP THE SOFTWARE 1 Insert the cable into the USB port on the machine. 2 Insert the other end of the cable into your computer's CD-ROM drive. 4 Click the...

AL-1651CS | AL-1661CS Operation Manual
Page 50
... the steps below. Note To set , go to "LPR (TCP/IP) direct printing" (p.50). Set the IP Address This setting is selected automatically.) 6 The "SOFTWARE LICENCE" window will appear. Note If the language selection screen appears after you double click the "setup" icon, select the language that you wish to... the network and its IP address has been set the IP address of the software licence, and then click the "Yes" button. 7 Read the "Readme First" in the "Welcome" window and then click the "Next" button. If the ...
... the steps below. Note To set , go to "LPR (TCP/IP) direct printing" (p.50). Set the IP Address This setting is selected automatically.) 6 The "SOFTWARE LICENCE" window will appear. Note If the language selection screen appears after you double click the "setup" icon, select the language that you wish to... the network and its IP address has been set the IP address of the software licence, and then click the "Yes" button. 7 Read the "Readme First" in the "Welcome" window and then click the "Next" button. If the ...

AL-1651CS | AL-1661CS Operation Manual
Page 51
Click the printer to be entered. SET UP THE SOFTWARE Note • The "Ethernet Address" is indicated on the left side of the machine near the LAN port. • If the machine is used on -...
Click the printer to be entered. SET UP THE SOFTWARE Note • The "Ethernet Address" is indicated on the left side of the machine near the LAN port. • If the machine is used on -...
AL-1651CS | AL-1661CS Operation Manual
Page 52
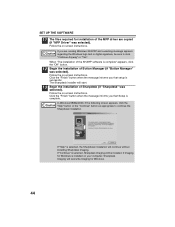
SET UP THE SOFTWARE 12 Click the "Yes" button. LPR (TCP/IP) direct printing After step 1-7 on page 48. 9 Read the message in first and go to step 11 on page 51. If you have not set the IP Address, click the "Set the IP Address" button in the "Welcome" window and then click the "Next" button. 10 Select "LPR (TCP/IP) direct printing" and click the "Next" button. 50 Go to step 8 on page 48 8 Click the "Printer Driver" button.
SET UP THE SOFTWARE 12 Click the "Yes" button. LPR (TCP/IP) direct printing After step 1-7 on page 48. 9 Read the message in first and go to step 11 on page 51. If you have not set the IP Address, click the "Set the IP Address" button in the "Welcome" window and then click the "Next" button. 10 Select "LPR (TCP/IP) direct printing" and click the "Next" button. 50 Go to step 8 on page 48 8 Click the "Printer Driver" button.

AL-1651CS | AL-1661CS Operation Manual
Page 53
... and click the "Next" button. If any of 38 characters). 5 13 A window appears to the appropriate window and correct the entry. 51 SET UP THE SOFTWARE Note If the machine's IP address cannot be found, make sure the machine is powered on, make sure the network cable is connected correctly, and...
... and click the "Next" button. If any of 38 characters). 5 13 A window appears to the appropriate window and correct the entry. 51 SET UP THE SOFTWARE Note If the machine's IP address cannot be found, make sure the machine is powered on, make sure the network cable is connected correctly, and...

AL-1651CS | AL-1661CS Operation Manual
Page 54
For the model name of your machine, see the operation manual or help file of the SHARP software is selected automatically.) 52 Note After the installation, a message prompting you wish the printer to be sure to restart your default printer and click the "... "My Computer", and then double-click the CD-ROM icon. 3 Double-click the "setup" icon ( ). SET UP THE SOFTWARE 14 When the model selection window appears, select the model name of the software. If you wish to restart your machine and click the "Next" button. This completes the installation of your computer...
For the model name of your machine, see the operation manual or help file of the SHARP software is selected automatically.) 52 Note After the installation, a message prompting you wish the printer to be sure to restart your default printer and click the "... "My Computer", and then double-click the CD-ROM icon. 3 Double-click the "setup" icon ( ). SET UP THE SOFTWARE 14 When the model selection window appears, select the model name of the software. If you wish to restart your machine and click the "Next" button. This completes the installation of your computer...

AL-1651CS | AL-1661CS Operation Manual
Page 55
Make sure that you understand the contents of the software licence, and then click the "Yes" button. 5 Click the "Printer Driver" button. 6 Read the message in the "Welcome" window and then click the "Next" button. 7 Select "Shared Printer" and click the "Next" 5 button. 53 SET UP THE SOFTWARE 4 The "SOFTWARE LICENCE" window will appear.
Make sure that you understand the contents of the software licence, and then click the "Yes" button. 5 Click the "Printer Driver" button. 6 Read the message in the "Welcome" window and then click the "Next" button. 7 Select "Shared Printer" and click the "Next" 5 button. 53 SET UP THE SOFTWARE 4 The "SOFTWARE LICENCE" window will appear.

AL-1651CS | AL-1661CS Operation Manual
Page 56
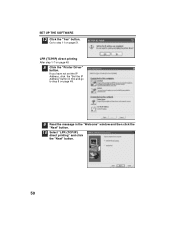
.... Note After the installation, a message prompting you to be used, select the machine set as a shared printer, and click the "Next" button. SET UP THE SOFTWARE 8 For the port to restart your machine and click the "Next" button. For the model name of your computer may appear. This completes the installation... button to be shared (the machine) by browsing the network in the printer server. 9 When the model selection window appears, select model name of the software. 54 Note If the shared printer does not appear in the list, check the settings in the window that appears.
.... Note After the installation, a message prompting you to be used, select the machine set as a shared printer, and click the "Next" button. SET UP THE SOFTWARE 8 For the port to restart your machine and click the "Next" button. For the model name of your computer may appear. This completes the installation... button to be shared (the machine) by browsing the network in the printer server. 9 When the model selection window appears, select model name of the software. 54 Note If the shared printer does not appear in the list, check the settings in the window that appears.


