
Instruction Manual, PLV-WF10
Page 1
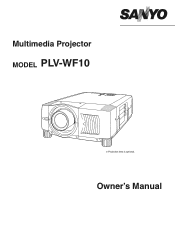
Multimedia Projector MODEL PLV-WF10 ✽ Projection lens is optional. Owner's Manual
Multimedia Projector MODEL PLV-WF10 ✽ Projection lens is optional. Owner's Manual
Instruction Manual, PLV-WF10
Page 2
...as the laser pointer function from the ventilation holes. Do not cover the ventilation slot on the top, sides and rear of your projector seems to be taken. THIS SYMBOL INDICATES THAT DANGEROUS VOLTAGE CONSTITUTING A RISK OF ELECTRIC SHOCK IS PRESENT WITHIN THIS UNIT. THIS ... INDICATES THAT THERE ARE IMPORTANT OPERATING AND MAINTENANCE INSTRUCTIONS IN THE OWNER'S MANUAL WITH THIS UNIT. 2 TO THE OWNER Before operating this projector, read this manual again, check operations and cable connections and try the solutions in not only shortening the product-life, but also malfunctions...
...as the laser pointer function from the ventilation holes. Do not cover the ventilation slot on the top, sides and rear of your projector seems to be taken. THIS SYMBOL INDICATES THAT DANGEROUS VOLTAGE CONSTITUTING A RISK OF ELECTRIC SHOCK IS PRESENT WITHIN THIS UNIT. THIS ... INDICATES THAT THERE ARE IMPORTANT OPERATING AND MAINTENANCE INSTRUCTIONS IN THE OWNER'S MANUAL WITH THIS UNIT. 2 TO THE OWNER Before operating this projector, read this manual again, check operations and cable connections and try the solutions in not only shortening the product-life, but also malfunctions...
Instruction Manual, PLV-WF10
Page 3
...shelf mounting should follow the manufacturer's instructions, and should use attachments not recommended by the manufacturer that the projector is operated. Unplug this projector, ask the service technician to perform routine safety checks to qualified service personnel under the following the operating ...in Nederland Bij dit product zijn batterijen geleverd. Voor de klanten in damage and will prevent damage due to the projector. Unplug this projector yourself as a book case unless proper ventilation is damaged or frayed. Read all warnings and instructions marked on a...
...shelf mounting should follow the manufacturer's instructions, and should use attachments not recommended by the manufacturer that the projector is operated. Unplug this projector, ask the service technician to perform routine safety checks to qualified service personnel under the following the operating ...in Nederland Bij dit product zijn batterijen geleverd. Voor de klanten in damage and will prevent damage due to the projector. Unplug this projector yourself as a book case unless proper ventilation is damaged or frayed. Read all warnings and instructions marked on a...
Instruction Manual, PLV-WF10
Page 4
... of the same colour as follows: The wire which is of the plug. CAUTION! AC POWER CORD REQUIREMENT The AC Power Cord supplied with this projector meets the requirement for use the plug with the coloured markings identifying the terminals in your socket outlet, it . AC Power Cord has a grounding-type...
... of the same colour as follows: The wire which is of the plug. CAUTION! AC POWER CORD REQUIREMENT The AC Power Cord supplied with this projector meets the requirement for use the plug with the coloured markings identifying the terminals in your socket outlet, it . AC Power Cord has a grounding-type...
Instruction Manual, PLV-WF10
Page 5
...25 PREPARATION 7 SELECTING COMPUTER SYSTEM COMPATIBLE COMPUTER SPECIFICATIONS 25 27 PC ADJUSTMENT 28 NAME OF EACH PART OF PROJECTOR 7 AUTO PC ADJUSTMENT 28 SETTING-UP PROJECTOR 8 MANUAL PC ADJUSTMENT 29 CONNECTING AC POWER CORD 8 PICTURE IMAGE ADJUSTMENT 31 LENS INSTALLATION 9 IMAGE ... ADJUSTMENT 9 PICTURE SCREEN ADJUSTMENT 33 PICTURE LEVEL AND TILT ADJUSTMENT 10 MOVING PROJECTOR 10 VIDEO INPUT 34 CONNECTING PROJECTOR 11 SELECTING INPUT SOURCE 34 TERMINALS OF PROJECTOR 11 SELECTING VIDEO SYSTEM 35 CONNECTING TO COMPUTER 14 PICTURE IMAGE ADJUSTMENT IMAGE ...
...25 PREPARATION 7 SELECTING COMPUTER SYSTEM COMPATIBLE COMPUTER SPECIFICATIONS 25 27 PC ADJUSTMENT 28 NAME OF EACH PART OF PROJECTOR 7 AUTO PC ADJUSTMENT 28 SETTING-UP PROJECTOR 8 MANUAL PC ADJUSTMENT 29 CONNECTING AC POWER CORD 8 PICTURE IMAGE ADJUSTMENT 31 LENS INSTALLATION 9 IMAGE ... ADJUSTMENT 9 PICTURE SCREEN ADJUSTMENT 33 PICTURE LEVEL AND TILT ADJUSTMENT 10 MOVING PROJECTOR 10 VIDEO INPUT 34 CONNECTING PROJECTOR 11 SELECTING INPUT SOURCE 34 TERMINALS OF PROJECTOR 11 SELECTING VIDEO SYSTEM 35 CONNECTING TO COMPUTER 14 PICTURE IMAGE ADJUSTMENT IMAGE ...
Instruction Manual, PLV-WF10
Page 6
... N Power Management Power Management function is compressed into progressive scan signals and provide fine picture quality. N Digital Visual Interface This projector is equipped with DVI 29-pin terminal for optional parts. 6 N Laser Pointer Function Remote Control Unit supplied with this problem by...computer. N Multilanguage Menu Display Operation menu is always precise. When resolution of 16.77 million colors, and matrix liquid crystal display (LCD) technology. Zoom and focus can be connected. G Component Video Component video signal, such as a S-VHS VCR output signal, can...
... N Power Management Power Management function is compressed into progressive scan signals and provide fine picture quality. N Digital Visual Interface This projector is equipped with DVI 29-pin terminal for optional parts. 6 N Laser Pointer Function Remote Control Unit supplied with this problem by...computer. N Multilanguage Menu Display Operation menu is always precise. When resolution of 16.77 million colors, and matrix liquid crystal display (LCD) technology. Zoom and focus can be connected. G Component Video Component video signal, such as a S-VHS VCR output signal, can...
Instruction Manual, PLV-WF10
Page 7
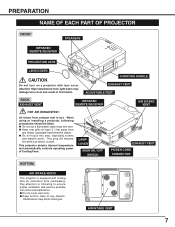
... Do not put a flammable object near this area, especially screws and metallic parts. This area will become hot while a projector is hot. When using or installing a projector, following to following precautions should be taken. G Keep rear grills at least 3' (1m) away from light beam may ...clear of fire and malfunction. LAMP COVER MAIN ON / OFF SWITCH EXHAUST VENT POWER CORD CONNECTOR BOTTOM AIR INTAKE VENTS This projector is equipped with lens cover attached. AIR INTAKE VENT 7 CARRYING HANDLE EXHAUST VENT ADJUSTABLE FEET BACK EXHAUST VENT INFRARED REMOTE RECEIVER ...
... Do not put a flammable object near this area, especially screws and metallic parts. This area will become hot while a projector is hot. When using or installing a projector, following to following precautions should be taken. G Keep rear grills at least 3' (1m) away from light beam may ...clear of fire and malfunction. LAMP COVER MAIN ON / OFF SWITCH EXHAUST VENT POWER CORD CONNECTOR BOTTOM AIR INTAKE VENTS This projector is equipped with lens cover attached. AIR INTAKE VENT 7 CARRYING HANDLE EXHAUST VENT ADJUSTABLE FEET BACK EXHAUST VENT INFRARED REMOTE RECEIVER ...

Instruction Manual, PLV-WF10
Page 8
...AC outlet must be near this equipment and must be used. If supplied AC Power Cord does not match your AC outlet, contact your projector. and Canada For Continental Europe Ground For the U.K. Consult your authorized dealer or service station if you are not sure of type of ...country where you use . Connect a projector with singlephase power systems having a grounded neutral conductor. Projector side AC Outlet side For the U.S.A. To POWER CORD CONNECTOR on . (Refer to pages 12 ~ 15 for connection.) ...
...AC outlet must be near this equipment and must be used. If supplied AC Power Cord does not match your AC outlet, contact your projector. and Canada For Continental Europe Ground For the U.K. Consult your authorized dealer or service station if you are not sure of type of ...country where you use . Connect a projector with singlephase power systems having a grounded neutral conductor. Projector side AC Outlet side For the U.S.A. To POWER CORD CONNECTOR on . (Refer to pages 12 ~ 15 for connection.) ...
Instruction Manual, PLV-WF10
Page 9
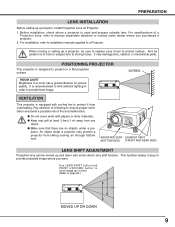
...with cooling fan to ensure proper ventilation and avoid a possible risk of a Projection Lens, refer to provide projected image where you purchased a projector. 2. AIR INTAKE VENT EXHAUST VENT (BOTTOM SIDE) (FRONT AND REAR SIDE) LENS SHIFT ADJUSTMENT Projection lens can be moved up and ... grill at least 3 feet (1 m) away from taking cooling air through bottom vent. G Make sure that there are no objects under a projector may damage lens, cabinet, or mechanical parts. This function makes it from overheating. For specifications of fire and malfunction. G Do not cover vents...
...with cooling fan to ensure proper ventilation and avoid a possible risk of a Projection Lens, refer to provide projected image where you purchased a projector. 2. AIR INTAKE VENT EXHAUST VENT (BOTTOM SIDE) (FRONT AND REAR SIDE) LENS SHIFT ADJUSTMENT Projection lens can be moved up and ... grill at least 3 feet (1 m) away from taking cooling air through bottom vent. G Make sure that there are no objects under a projector may damage lens, cabinet, or mechanical parts. This function makes it from overheating. For specifications of fire and malfunction. G Do not cover vents...
Instruction Manual, PLV-WF10
Page 10
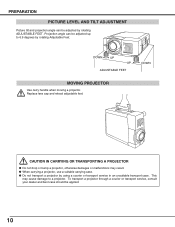
...service, consult your dealer and best case should be adjusted up to a projector. Projection angle can be adjusted by using a courier or transport service in an unsuitable transport case. G When carrying a projector, use a suitable carrying case. This may result. Replace lens cap and ...retract adjustable feet. CAUTION IN CARRYING OR TRANSPORTING A PROJECTOR G Do not drop or bump a projector, otherwise damages or malfunctions may cause damage to 6.9 degrees by rotating Adjustable Feet. PREPARATION PICTURE LEVEL AND ...
...service, consult your dealer and best case should be adjusted up to a projector. Projection angle can be adjusted by using a courier or transport service in an unsuitable transport case. G When carrying a projector, use a suitable carrying case. This may result. Replace lens cap and ...retract adjustable feet. CAUTION IN CARRYING OR TRANSPORTING A PROJECTOR G Do not drop or bump a projector, otherwise damages or malfunctions may cause damage to 6.9 degrees by rotating Adjustable Feet. PREPARATION PICTURE LEVEL AND ...
Instruction Manual, PLV-WF10
Page 11
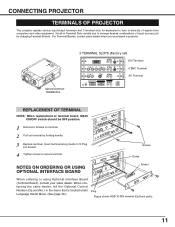
... Boards. When contacting the sales dealer, tell the Optional Control Number (Op.cont.No.) in Terminal Slots enable you purchased a projector. Insert terminal along Guide to fit Plug into Socket. 4 Tighten screws to secure terminal. INPUT/OUTPUT TERMINALS 3 TERMINAL SLOTS (Factory...USING Socket OPTIONAL INTERFACE BOARD When ordering or using Optional Interface Board (Terminal Board), contact your sales dealer. CONNECTING PROJECTOR TERMINALS OF PROJECTOR This projector applies various input/output terminals and 3 terminal slots for expansion to tune to diversity of signals from computers and...
... Boards. When contacting the sales dealer, tell the Optional Control Number (Op.cont.No.) in Terminal Slots enable you purchased a projector. Insert terminal along Guide to fit Plug into Socket. 4 Tighten screws to secure terminal. INPUT/OUTPUT TERMINALS 3 TERMINAL SLOTS (Factory...USING Socket OPTIONAL INTERFACE BOARD When ordering or using Optional Interface Board (Terminal Board), contact your sales dealer. CONNECTING PROJECTOR TERMINALS OF PROJECTOR This projector applies various input/output terminals and 3 terminal slots for expansion to tune to diversity of signals from computers and...
Instruction Manual, PLV-WF10
Page 12
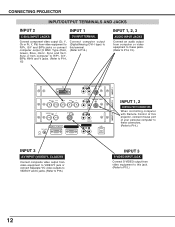
... outputs to VIDEO/Y and C jacks. (Refer to P15.) INPUT 3 S-VIDEO INPUT JACK Connect S-VIDEO output from video equipment to P15.) 12 Sync and Vert. CONNECTING PROJECTOR INPUT/OUTPUT TERMINALS AND JACKS INPUT 2 INPUT 1 5 BNC INPUT JACKS Connect component video output (Cr, Y, Cb or Pr, Y, Pb) from video equipment to this...
... outputs to VIDEO/Y and C jacks. (Refer to P15.) INPUT 3 S-VIDEO INPUT JACK Connect S-VIDEO output from video equipment to P15.) 12 Sync and Vert. CONNECTING PROJECTOR INPUT/OUTPUT TERMINALS AND JACKS INPUT 2 INPUT 1 5 BNC INPUT JACKS Connect component video output (Cr, Y, Cb or Pr, Y, Pb) from video equipment to this...

Instruction Manual, PLV-WF10
Page 13
...as Wired Remote Control, Connect Wired Remote Control Unit to be reset. Do not use RESET function excessively. CONNECTING PROJECTOR SERIAL PORT IN TERMINAL If you control a projector by computer, you must connect a cable (not provided) from SERIAL PORT IN. of computer to this micro ...(MONO) USB INPUT 3 INPUT 2 INPUT 1 USB PORT (Series B) This port is also used to control a projector with Remote Control Cable (supplied). (Refer to page 17.) RESET BUTTON This projector uses a micro processor to control computer with a pen, which will shut down and restart unit. It is used to...
...as Wired Remote Control, Connect Wired Remote Control Unit to be reset. Do not use RESET function excessively. CONNECTING PROJECTOR SERIAL PORT IN TERMINAL If you control a projector by computer, you must connect a cable (not provided) from SERIAL PORT IN. of computer to this micro ...(MONO) USB INPUT 3 INPUT 2 INPUT 1 USB PORT (Series B) This port is also used to control a projector with Remote Control Cable (supplied). (Refer to page 17.) RESET BUTTON This projector uses a micro processor to control computer with a pen, which will shut down and restart unit. It is used to...
Instruction Manual, PLV-WF10
Page 14
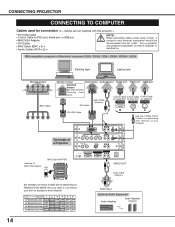
...WXGA / UXGA Desktop type Laptop type 14 Monitor Output BNC Cable ✽ Monitor Output Monitor Output Audio Output Serial port PS/2 port ADB port MAC/VGA Adapter Set slide switches following chart below depending on RESOLUTION MODE that you want to use before computer is switched on a projector...MONO) USB INPUT 3 AUDIO OUT Audio Cable (stereo) ✽ Use one of these Control Cables corresponding with terminal of both a projector and external equipment should be disconnected from AC outlet. Audio Cable (stereo) ✽ Control Cable Control Cable Control Cable for Serial ...
...WXGA / UXGA Desktop type Laptop type 14 Monitor Output BNC Cable ✽ Monitor Output Monitor Output Audio Output Serial port PS/2 port ADB port MAC/VGA Adapter Set slide switches following chart below depending on RESOLUTION MODE that you want to use before computer is switched on a projector...MONO) USB INPUT 3 AUDIO OUT Audio Cable (stereo) ✽ Use one of these Control Cables corresponding with terminal of both a projector and external equipment should be disconnected from AC outlet. Audio Cable (stereo) ✽ Control Cable Control Cable Control Cable for Serial ...
Instruction Manual, PLV-WF10
Page 15
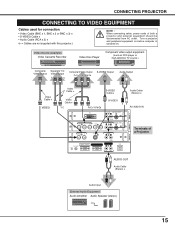
... USB INPUT 3 INPUT 2 INPUT 1 Audio Cable (Stereo) ✽ AV AUDIO IN Terminals of both a projector and external equipment should be disconnected from AC outlet. CONNECTING PROJECTOR CONNECTING TO VIDEO EQUIPMENT Cables used for connection • Video Cable (BNC x 1, BNC x 2 or BNC ...; S-VIDEO Cable ✽ • Audio Cable (RCA x 2) ✽ (✽ = Cables are not supplied with this projector.) NOTE : When connecting cable, power cords of a Projector AUDIO OUT Audio Cable (Stereo) ✽ Audio Input External Audio Equipment Audio Amplifier Audio Speaker (stereo) 15
... USB INPUT 3 INPUT 2 INPUT 1 Audio Cable (Stereo) ✽ AV AUDIO IN Terminals of both a projector and external equipment should be disconnected from AC outlet. CONNECTING PROJECTOR CONNECTING TO VIDEO EQUIPMENT Cables used for connection • Video Cable (BNC x 1, BNC x 2 or BNC ...; S-VIDEO Cable ✽ • Audio Cable (RCA x 2) ✽ (✽ = Cables are not supplied with this projector.) NOTE : When connecting cable, power cords of a Projector AUDIO OUT Audio Cable (Stereo) ✽ Audio Input External Audio Equipment Audio Amplifier Audio Speaker (stereo) 15
Instruction Manual, PLV-WF10
Page 16
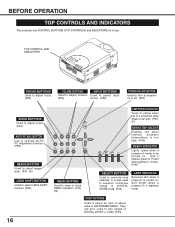
...Turns to yellow when life of a projection lamp draws to execute item selected. INDICATOR Flashes red when internal projector temperature is too high. (P43) READY INDICATOR Lights green when a projector is also used to be turned on its top. It is ready to pan image in DIGITAL ZOOM +/-... And bright when a projector is turned on or off. (P21) ZOOM BUTTONS Used to turn a projector on . BEFORE OPERATION TOP CONTROLS AND INDICATORS This projector has CONTROL BUTTONS (TOP CONTROLS) and INDICATORS on . OFF ZOOM FOCUS VOLUME INPUT ...
...Turns to yellow when life of a projection lamp draws to execute item selected. INDICATOR Flashes red when internal projector temperature is too high. (P43) READY INDICATOR Lights green when a projector is also used to be turned on its top. It is ready to pan image in DIGITAL ZOOM +/-... And bright when a projector is turned on or off. (P21) ZOOM BUTTONS Used to turn a projector on . BEFORE OPERATION TOP CONTROLS AND INDICATORS This projector has CONTROL BUTTONS (TOP CONTROLS) and INDICATORS on . OFF ZOOM FOCUS VOLUME INPUT ...
Instruction Manual, PLV-WF10
Page 17
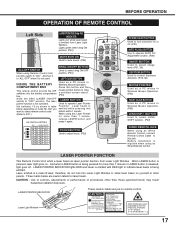
... OFF ON Code 7 OFF OFF OFF Code 8 DRAG ON/OFF BUTTON Used to "ON." therefore, do not look into the battery compartment box. And turn projector on yourself or other than 1 minute, release LASER button and press it is not used. LASER ON/OFF SW1 SW2 SW3 Code No. Battery installation...
... OFF ON Code 7 OFF OFF OFF Code 8 DRAG ON/OFF BUTTON Used to "ON." therefore, do not look into the battery compartment box. And turn projector on yourself or other than 1 minute, release LASER button and press it is not used. LASER ON/OFF SW1 SW2 SW3 Code No. Battery installation...
Instruction Manual, PLV-WF10
Page 18
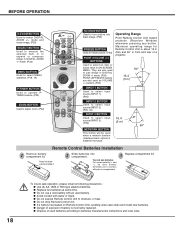
...MENU operation. (P18, 19) P-TIMER BUTTON Used to operate PTIMER function. (P23) ZOOM BUTTON Used to pan image in front and rear of a projector. 60° 16.4' (5 m) INPUT 1 BUTTON Used to select input source (INPUT 1). (P25) INPUT 2 BUTTON Used to select input source (INPUT... BEFORE OPERATION D.ZOOM BUTTON Used to batteries manufacturers instructions and local rules. buttons. (P24) Operating Range Point Remote Control Unit toward projector (Receiver Window) whenever pressing any button. Two AA size batteries For correct polarity (+ and -), be used batteries according to select ...
...MENU operation. (P18, 19) P-TIMER BUTTON Used to operate PTIMER function. (P23) ZOOM BUTTON Used to pan image in front and rear of a projector. 60° 16.4' (5 m) INPUT 1 BUTTON Used to select input source (INPUT 1). (P25) INPUT 2 BUTTON Used to select input source (INPUT... BEFORE OPERATION D.ZOOM BUTTON Used to batteries manufacturers instructions and local rules. buttons. (P24) Operating Range Point Remote Control Unit toward projector (Receiver Window) whenever pressing any button. Two AA size batteries For correct polarity (+ and -), be used batteries according to select ...
Instruction Manual, PLV-WF10
Page 19
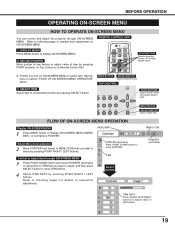
... on ON-SCREEN MENU to select item. BEFORE OPERATION OPERATING ON-SCREEN MENU HOW TO OPERATE ON-SCREEN MENU You can control and adjust this projector through ON-SCREEN MENU 3 Press POINT DOWN button and move POINTER (red frame or red arrow) to ITEM that you want to select by pressing...
... on ON-SCREEN MENU to select item. BEFORE OPERATION OPERATING ON-SCREEN MENU HOW TO OPERATE ON-SCREEN MENU You can control and adjust this projector through ON-SCREEN MENU 3 Press POINT DOWN button and move POINTER (red frame or red arrow) to ITEM that you want to select by pressing...
Instruction Manual, PLV-WF10
Page 20
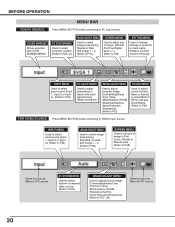
... of ONSCREEN MENU. BEFORE OPERATION FOR PC SOURCE MENU BAR Press MENU BUTTON while connecting to VIDEO input source. GUIDE WINDOW Shows selected item of projector or reset Lamp Replace Counter. (Refer to P39-42) INPUT MENU Used to select input source (Input 1, Input 2 or Input 3). (Refer to P25) PC ADJUST...
... of ONSCREEN MENU. BEFORE OPERATION FOR PC SOURCE MENU BAR Press MENU BUTTON while connecting to VIDEO input source. GUIDE WINDOW Shows selected item of projector or reset Lamp Replace Counter. (Refer to P39-42) INPUT MENU Used to select input source (Input 1, Input 2 or Input 3). (Refer to P25) PC ADJUST...


