Owners Manual
Page 3
... Rear Terminal 9 Top Control 10 Remote Control 11 Remote Control Battery Installation 12 Operating Range 12 Installation 13 Positioning the Projector 13 Adjustable Feet 13 Connecting the AC Power Cord 14 Connecting to a Computer 15 Connecting to Video Equipment 16 Connecting...Lens Cover 50 Cleaning the Projection Lens 51 Cleaning the Projector Cabinet 51 Lamp Replacement 52 Lamp Replacement Counter 53 Appendix 54 Troubleshooting 54 Menu Tree 56 Indicators and Projector Condition 58 Compatible Computer Specifications 59 Technical Specifications 60 ...
... Rear Terminal 9 Top Control 10 Remote Control 11 Remote Control Battery Installation 12 Operating Range 12 Installation 13 Positioning the Projector 13 Adjustable Feet 13 Connecting the AC Power Cord 14 Connecting to a Computer 15 Connecting to Video Equipment 16 Connecting...Lens Cover 50 Cleaning the Projection Lens 51 Cleaning the Projector Cabinet 51 Lamp Replacement 52 Lamp Replacement Counter 53 Appendix 54 Troubleshooting 54 Menu Tree 56 Indicators and Projector Condition 58 Compatible Computer Specifications 59 Technical Specifications 60 ...
Owners Manual
Page 4
...WITH THIS UNIT. Your SANYO product is designed and manufactured with a vacuum cleaner. Please help us to be built into a compartment or similarly enclosed, the minimum distances must be recycled and reused. Install the projector in a proper position. DO NOT SET THE PROJECTOR IN GREASY, WET,..., sides and rear of the projector cabinet for an extended time, unplug the projector from the projection lens. To the Owner Before operating this projector, read this manual again, check operations and cable connections and try the solutions in the "Troubleshooting" section in the end of this...
...WITH THIS UNIT. Your SANYO product is designed and manufactured with a vacuum cleaner. Please help us to be built into a compartment or similarly enclosed, the minimum distances must be recycled and reused. Install the projector in a proper position. DO NOT SET THE PROJECTOR IN GREASY, WET,..., sides and rear of the projector cabinet for an extended time, unplug the projector from the projection lens. To the Owner Before operating this projector, read this manual again, check operations and cable connections and try the solutions in the "Troubleshooting" section in the end of this...
Owners Manual
Page 26
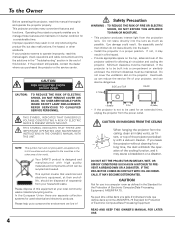
... displays it. *Mode 1 and SVGA 1 are examples. Check the connection between your computer and the projector. (See " Troubleshooting" p54) Mode 1 The preset system is shown on page 59 ) One of computers based on VGA, SVGA, XGA, SXGA, WXGA or UXGA with its Multi-scan system and Auto PC Adjustment. Selecting Computer System Manually...
... displays it. *Mode 1 and SVGA 1 are examples. Check the connection between your computer and the projector. (See " Troubleshooting" p54) Mode 1 The preset system is shown on page 59 ) One of computers based on VGA, SVGA, XGA, SXGA, WXGA or UXGA with its Multi-scan system and Auto PC Adjustment. Selecting Computer System Manually...
Owners Manual
Page 54
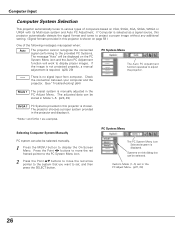
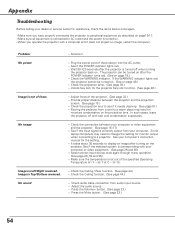
... setting. - See your computer's instruction manual for the projector Key lock function. (See page 46.) - Check the Ceiling / Rear function. (See page 44.) - Press the Mute button. (See page 23.) 54 Appendix Troubleshooting Before calling your dealer or service center for monitor output ...when connecting to a projector. Plug the power cord of the projector. (See page 22.) - See if the POWER indicator lights red. - Provide ...
... setting. - See your computer's instruction manual for the projector Key lock function. (See page 46.) - Check the Ceiling / Rear function. (See page 44.) - Press the Mute button. (See page 23.) 54 Appendix Troubleshooting Before calling your dealer or service center for monitor output ...when connecting to a projector. Plug the power cord of the projector. (See page 22.) - See if the POWER indicator lights red. - Provide ...


