Owners Manual
Page 2
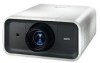
... Swedish, Russian, Chinese, Korean, and Japanese (p.48). ◆ Network-capable ◆ Simple Computer System Setting The projector has the Multi-scan system to conform to focus on the crucial information during a presentation (pp.14, 40). With the Key lock function, you can lock the .... Up to customize the screen logo (pp.49-50). The projector monitors the condition of 1.07 billion colors, and matrix liquid crystal display (LCD) technology. ◆ Functionally Rich ◆ Power Management This projector has many useful functions such as a PC wireless mouse. This...
... Swedish, Russian, Chinese, Korean, and Japanese (p.48). ◆ Network-capable ◆ Simple Computer System Setting The projector has the Multi-scan system to conform to focus on the crucial information during a presentation (pp.14, 40). With the Key lock function, you can lock the .... Up to customize the screen logo (pp.49-50). The projector monitors the condition of 1.07 billion colors, and matrix liquid crystal display (LCD) technology. ◆ Functionally Rich ◆ Power Management This projector has many useful functions such as a PC wireless mouse. This...
Owners Manual
Page 12
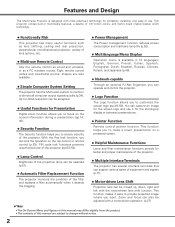
... mode (p.52). o LAMP REPLACE indicator Light orange when the projection lamp reaches its end of the projector exceeds the operating range (pp.63, 6970 ). 12 i LAMP indicator Light red during operations. - e LENS button Enter the focus, zoom, and lens shift adjustment mode (p.27). t MENU button Open or close the On-Screen Menu... Digital zoom + mode (p.40). Part Names and Functions Side Control and Indicators Side Control q w e r t y Indicators (on the top panel) u i o !0 !1 q ON/STAND-BY button Turn the projector on or off (pp.23-24).
... mode (p.52). o LAMP REPLACE indicator Light orange when the projection lamp reaches its end of the projector exceeds the operating range (pp.63, 6970 ). 12 i LAMP indicator Light red during operations. - e LENS button Enter the focus, zoom, and lens shift adjustment mode (p.27). t MENU button Open or close the On-Screen Menu... Digital zoom + mode (p.40). Part Names and Functions Side Control and Indicators Side Control q w e r t y Indicators (on the top panel) u i o !0 !1 q ON/STAND-BY button Turn the projector on or off (pp.23-24).
Owners Manual
Page 14
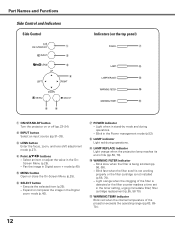
... the filter (p.29). !9 RESET/ON/ALL-OFF switch When using the remote control, set this switch to "RESET" to initialize the remote control code. @0 FOCUS buttons Adjust the focus (p.28). @1 NO SHOW button Temporarily turn off the image on the screen (p.29). @2 KEYSTONE button Correct keystone distortion (p.29). @3 LENS SHIFT button Select...
... the filter (p.29). !9 RESET/ON/ALL-OFF switch When using the remote control, set this switch to "RESET" to initialize the remote control code. @0 FOCUS buttons Adjust the focus (p.28). @1 NO SHOW button Temporarily turn off the image on the screen (p.29). @2 KEYSTONE button Correct keystone distortion (p.29). @3 LENS SHIFT button Select...
Owners Manual
Page 27
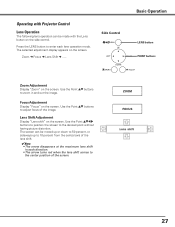
... the LENS button to enter each direction. • The arrow turns red when the lens shift comes to zoom in each lens operation mode. ZOOM FOCUS 27 Use the Point ed buttons to the center position of the image. Use the Point ed7 8 buttons to position the screen to adjust... focus of the screen. Use the Point ed buttons to the desired point without having picture distortion. Operating with Projector Control Lens Operation The following lens operation can be made with the Lens button on the...
... the LENS button to enter each direction. • The arrow turns red when the lens shift comes to zoom in each lens operation mode. ZOOM FOCUS 27 Use the Point ed buttons to the center position of the image. Use the Point ed7 8 buttons to position the screen to adjust... focus of the screen. Use the Point ed buttons to the desired point without having picture distortion. Operating with Projector Control Lens Operation The following lens operation can be made with the Lens button on the...
Owners Manual
Page 28
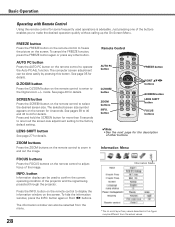
...menu. 28 Remote Control AUTO PC button D.ZOOM button ZOOM buttons INFO. button FREEZE button POINT ed7 8 buttons SCREEN button LENS SHIFT button FOCUS buttons ✔Note: • See the next page for the description of the image. FREEZE button Press the FREEZE button on the ... the desired operation quickly without calling up the On-Screen Menu. FOCUS buttons Press the FOCUS buttons on the remote control to adjust focus of other button. Just pressing one of the projector and the signal being projected through the projector. button again or Point 7 8 buttons. AUTO PC button Press...
...menu. 28 Remote Control AUTO PC button D.ZOOM button ZOOM buttons INFO. button FREEZE button POINT ed7 8 buttons SCREEN button LENS SHIFT button FOCUS buttons ✔Note: • See the next page for the description of the image. FREEZE button Press the FREEZE button on the ... the desired operation quickly without calling up the On-Screen Menu. FOCUS buttons Press the FOCUS buttons on the remote control to adjust focus of other button. Just pressing one of the projector and the signal being projected through the projector. button again or Point 7 8 buttons. AUTO PC button Press...
Owners Manual
Page 64
... page 53) ● See if the filter cartridge is inserted. (See page 57) ● Adjust the focus of the projector and computer.) 6. If a problem still persists, check the following solutions. Problem: No power. indicator. Turn on pages 20-21. 2. Some displays are ...;F-104˚F [5˚C-40˚C]). ● The end of focus. Picture is left/right reversed. indicator is corresponding with the projector. (When you turn on the screen If this happens, leave the projector off before you reconnect the projector, be sure to turn the computer and monitor off and wait ...
... page 53) ● See if the filter cartridge is inserted. (See page 57) ● Adjust the focus of the projector and computer.) 6. If a problem still persists, check the following solutions. Problem: No power. indicator. Turn on pages 20-21. 2. Some displays are ...;F-104˚F [5˚C-40˚C]). ● The end of focus. Picture is left/right reversed. indicator is corresponding with the projector. (When you turn on the screen If this happens, leave the projector off before you reconnect the projector, be sure to turn the computer and monitor off and wait ...
Owners Manual
Page 79
... C07 C08 C0D C0E C0F C10 C1C C1D C20 C21 C23 C24 C25 C28 C29 C33 C34 C35 Function Turn the projector ON Turn the projector OFF (immediately OFF) Turn the projector OFF Select Input 1 Select Input 2 Select Input 3 Select Network Video mute ON Video mute OFF Aspect 4:3 Aspect 16:9 Menu ON Menu... C52 C53 C5D C5E C5F C60 C89 C8E C8F C90 C91 Function Pointer RIGHT Pointer LEFT Pointer UP Pointer DOWN Enter Zoom DOWN Zoom UP Focus DOWN Focus UP Select Input 1 Analog RGB Select Input 1 SCART Select Input 1 DVI (PC Digital) Select Input 1 DVI (AV HDCP) Lens shift UP Lens shift DOWN...
... C07 C08 C0D C0E C0F C10 C1C C1D C20 C21 C23 C24 C25 C28 C29 C33 C34 C35 Function Turn the projector ON Turn the projector OFF (immediately OFF) Turn the projector OFF Select Input 1 Select Input 2 Select Input 3 Select Network Video mute ON Video mute OFF Aspect 4:3 Aspect 16:9 Menu ON Menu... C52 C53 C5D C5E C5F C60 C89 C8E C8F C90 C91 Function Pointer RIGHT Pointer LEFT Pointer UP Pointer DOWN Enter Zoom DOWN Zoom UP Focus DOWN Focus UP Select Input 1 Analog RGB Select Input 1 SCART Select Input 1 DVI (PC Digital) Select Input 1 DVI (AV HDCP) Lens shift UP Lens shift DOWN...


