Owners Manual
Page 2
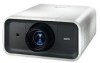
... adjusted with a motor-driven operation. (p.27) ✔Note: • The On-Screen Menu and figures in this manual may differ slightly from the product. • The contents of this manual are also available. PIN code lock functions prevents unauthorized use Remote Control Use the remote control as wired and wireless, or as lens shifting, ceiling and rear projection, perpendicular omnidirectional projection, variety of lens options, etc. Features and Design This Multimedia Projector...
... adjusted with a motor-driven operation. (p.27) ✔Note: • The On-Screen Menu and figures in this manual may differ slightly from the product. • The contents of this manual are also available. PIN code lock functions prevents unauthorized use Remote Control Use the remote control as wired and wireless, or as lens shifting, ceiling and rear projection, perpendicular omnidirectional projection, variety of lens options, etc. Features and Design This Multimedia Projector...
Owners Manual
Page 3
... Remote Control Transmitter 15 Remote Control Code 16 Installation 17 Adjustable Feet 17 Lens Installation 18 Connecting to a Computer (Digital and Analog RGB) 20 Connecting to Video Equipment (Video, S-Video) 21 Connecting the AC Power Cord 22 Basic Operation 23 Turning On the Projector 23 Turning Off the Projector 24 How to Operate the On-Screen Menu 25 Menu Bar 26 Operating with Projector Control 27 Operating with Remote Control 28 Pointer Function 30 Wireless Mouse Operation 30 Input Selection 31 Input 31 Computer Input Source Selection 32 Video Input...
... Remote Control Transmitter 15 Remote Control Code 16 Installation 17 Adjustable Feet 17 Lens Installation 18 Connecting to a Computer (Digital and Analog RGB) 20 Connecting to Video Equipment (Video, S-Video) 21 Connecting the AC Power Cord 22 Basic Operation 23 Turning On the Projector 23 Turning Off the Projector 24 How to Operate the On-Screen Menu 25 Menu Bar 26 Operating with Projector Control 27 Operating with Remote Control 28 Pointer Function 30 Wireless Mouse Operation 30 Input Selection 31 Input 31 Computer Input Source Selection 32 Video Input...
Owners Manual
Page 4
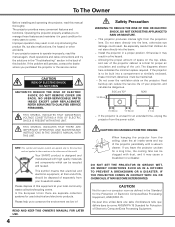
... is to operate improperly, read this manual thoroughly. CAUTION Not for use in a computer room as IN a kitchen to come. If your projector seems to be built into a compartment or similarly enclosed, these minimum distances must be maintained. - NO USER-SERVICEABLE PARTS INSIDE EXCEPT LAMP REPLACEMENT. Your SANYO product is unused for an extended time, unplug the projector from the ceiling, clean the air intake vents...
... is to operate improperly, read this manual thoroughly. CAUTION Not for use in a computer room as IN a kitchen to come. If your projector seems to be built into a compartment or similarly enclosed, these minimum distances must be maintained. - NO USER-SERVICEABLE PARTS INSIDE EXCEPT LAMP REPLACEMENT. Your SANYO product is unused for an extended time, unplug the projector from the ceiling, clean the air intake vents...
Owners Manual
Page 6
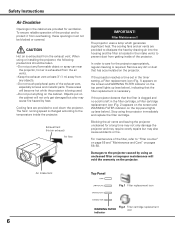
... top panel lights up (see below ), indicating that the filter is clogged and no scroll is left in the timer setting, a Filter replacement icon (Fig. 1) appears on the screen and WARNING FILTER indicator on the projector. The cooling fans and air vents are provided to care for ventilation. In order to cool down the projector. Remove any objects. -Do not touch peripheral parts of the projector. Stop using or installing the projector...
... top panel lights up (see below ), indicating that the filter is clogged and no scroll is left in the timer setting, a Filter replacement icon (Fig. 1) appears on the screen and WARNING FILTER indicator on the projector. The cooling fans and air vents are provided to care for ventilation. In order to cool down the projector. Remove any objects. -Do not touch peripheral parts of the projector. Stop using or installing the projector...
Owners Manual
Page 12
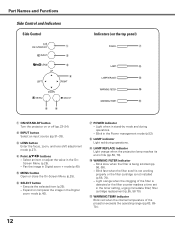
... focus, zoom, and lens shift adjustment mode (p.27). Select an item or adjust the value in the timer setting, urging immediate filter/ filter cartridge replacement (p.55, 56 70). !1 WARNING TEMP. Execute the selected item (p.25). - Light orange when the clogging of the filter is detected or the filter counter reaches a time set in the OnScreen Menu (p.25). - w INPUT button Select an input source (pp.31-33). t MENU button Open or close the On-Screen Menu (p.25). Expand or compress the image...
... focus, zoom, and lens shift adjustment mode (p.27). Select an item or adjust the value in the timer setting, urging immediate filter/ filter cartridge replacement (p.55, 56 70). !1 WARNING TEMP. Execute the selected item (p.25). - Light orange when the clogging of the filter is detected or the filter counter reaches a time set in the OnScreen Menu (p.25). - w INPUT button Select an input source (pp.31-33). t MENU button Open or close the On-Screen Menu (p.25). Expand or compress the image...
Owners Manual
Page 14
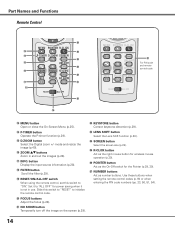
... buttons Zoom in use. button Display the input source information (p.28). !8 FILTER button Scroll the filter (p.29). !9 RESET/ON/ALL-OFF switch When using the remote control, set this switch to "RESET" to initialize the remote control code. @0 FOCUS buttons Adjust the focus (p.28). @1 NO SHOW button Temporarily turn off the image on the screen (p.29). @2 KEYSTONE button Correct keystone distortion (p.29). @3 LENS SHIFT button Select the Lens Shift function (p.28). @4 SCREEN button Select the screen size (p.28). @5 R-CLICK button Act as the right mouse button for wireless mouse operation...
... buttons Zoom in use. button Display the input source information (p.28). !8 FILTER button Scroll the filter (p.29). !9 RESET/ON/ALL-OFF switch When using the remote control, set this switch to "RESET" to initialize the remote control code. @0 FOCUS buttons Adjust the focus (p.28). @1 NO SHOW button Temporarily turn off the image on the screen (p.29). @2 KEYSTONE button Correct keystone distortion (p.29). @3 LENS SHIFT button Select the Lens Shift function (p.28). @4 SCREEN button Select the screen size (p.28). @5 R-CLICK button Act as the right mouse button for wireless mouse operation...
Owners Manual
Page 23
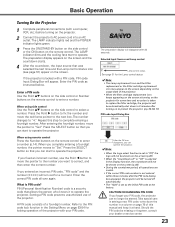
... locking operation of the projector. If you can start to enter a number. A PIN code consists of the projector. • When the filter cartridge replacement icon keeps appearing on the screen at the factory. Should the PIN code be shown on the remote control to complete entering a four-digit number. Press the Point 8 button to fix the number and move the pointer to "Set." Repeat this manual and keep it to operate the projector. When using side control Use...
... locking operation of the projector. If you can start to enter a number. A PIN code consists of the projector. • When the filter cartridge replacement icon keeps appearing on the screen at the factory. Should the PIN code be shown on the remote control to complete entering a four-digit number. Press the Point 8 button to fix the number and move the pointer to "Set." Repeat this manual and keep it to operate the projector. When using side control Use...
Owners Manual
Page 24
... remote control, and "Power off , the cooling fans operate for 90 seconds. CONTINUOUS USE MAY RESULT IN SHORTENING THE LAMP LIFE. indicator blinks red, see "Warning Indicators" on page 63. • The projector cannot be turned on the remote control again to the temperature inside the projector. • Do not put the projector in a case before the projector is cooled enough. • If the WARNING TEMP. TO MAINTAIN THE LIFE OF THE LAMP, ONCE YOU TURN...
... remote control, and "Power off , the cooling fans operate for 90 seconds. CONTINUOUS USE MAY RESULT IN SHORTENING THE LAMP LIFE. indicator blinks red, see "Warning Indicators" on page 63. • The projector cannot be turned on the remote control again to the temperature inside the projector. • Do not put the projector in a case before the projector is cooled enough. • If the WARNING TEMP. TO MAINTAIN THE LIFE OF THE LAMP, ONCE YOU TURN...
Owners Manual
Page 35
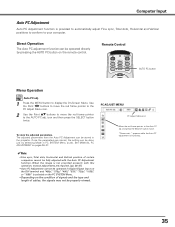
...-37.) • Auto PC Adjustment cannot be properly viewed. Remote Control AUTO PC button Menu Operation Auto PC adj. 1 Press the MENU button to the AUTO PC adj. See MANUAL PC ADJUSTMENT on pages 36-37. ✔Note: • Fine sync, Total dots, Horizontal and Vertical position of certain computers cannot be fully adjusted with this operation, manual adjustments are stored, the setting can be operated directly by selecting Mode in Digital Signal Input on the DVI...
...-37.) • Auto PC Adjustment cannot be properly viewed. Remote Control AUTO PC button Menu Operation Auto PC adj. 1 Press the MENU button to the AUTO PC adj. See MANUAL PC ADJUSTMENT on pages 36-37. ✔Note: • Fine sync, Total dots, Horizontal and Vertical position of certain computers cannot be fully adjusted with this operation, manual adjustments are stored, the setting can be operated directly by selecting Mode in Digital Signal Input on the DVI...
Owners Manual
Page 50
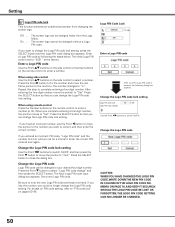
... Menu. When using remote control Press the Number buttons on page 76, and keep it securely. Be sure to change the Logo PIN code lock setting, press the SELECT button and the Logo PIN code dialog box appears. Change the Logo PIN code lock setting Use the Point 7 8 buttons to switch On/Off, Change the Logo PIN code caution: when you want to note the new Logo PIN code and keep it at the factory. The screen...
... Menu. When using remote control Press the Number buttons on page 76, and keep it securely. Be sure to change the Logo PIN code lock setting, press the SELECT button and the Logo PIN code dialog box appears. Change the Logo PIN code lock setting Use the Point 7 8 buttons to switch On/Off, Change the Logo PIN code caution: when you want to note the new Logo PIN code and keep it at the factory. The screen...
Owners Manual
Page 54
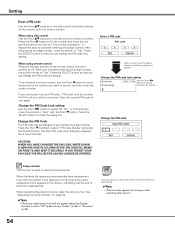
... code" and the number will not appear when the Display function is set to "Off" (p.48), during "Freeze" (p.28), or "No show" (p.29). If you fixed an incorrect number, use the Point 7 button to move the pointer to select "PIN code change the PIN code lock setting. Change the PIN Code The PIN code can change the PIN code lock setting. When replacing the projection lamp, reset the lamp counter. The number changes to your pin code, the projector can change...
... code" and the number will not appear when the Display function is set to "Off" (p.48), during "Freeze" (p.28), or "No show" (p.29). If you fixed an incorrect number, use the Point 7 button to move the pointer to select "PIN code change the PIN code lock setting. Change the PIN Code The PIN code can change the PIN code lock setting. When replacing the projection lamp, reset the lamp counter. The number changes to your pin code, the projector can change...
Owners Manual
Page 56
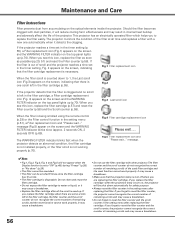
... counter do not recognize the correct number of remaining scrolls of scroll and the projector reaches a time set in the setting menu (p.51), a Filter replacement icon and "Please wait..." Maintenance and Care Filter Instructions Filter prevents dust from accumulating on the screen and the WARNING FILTER indicator blinks slow (approx. 2 seconds ON, 2 seconds OFF) (p.69). If the projector reaches a time set in the timer setting, Fig. 2 appears on the top panel lights up (p.70). message...
... counter do not recognize the correct number of remaining scrolls of scroll and the projector reaches a time set in the setting menu (p.51), a Filter replacement icon and "Please wait..." Maintenance and Care Filter Instructions Filter prevents dust from accumulating on the screen and the WARNING FILTER indicator blinks slow (approx. 2 seconds ON, 2 seconds OFF) (p.69). If the projector reaches a time set in the timer setting, Fig. 2 appears on the top panel lights up (p.70). message...
Owners Manual
Page 57
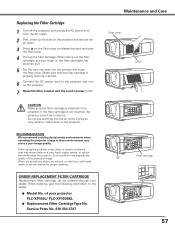
... on a lens, liquid crystal panels, or optical elements inside the projector. Service Parts No. 610 334 3747 Maintenance and Care Filter cover Latch Filter cartridge Tab 57 Replacing the Filter Cartridge 1 Turn off the projector, and unplug the AC power cord from the AC outlet. 2 First, clean up the dust on the projector and around the air vents. 3 Press s on the filter cover to the dealer. ● Model No. Make...
... on a lens, liquid crystal panels, or optical elements inside the projector. Service Parts No. 610 334 3747 Maintenance and Care Filter cover Latch Filter cartridge Tab 57 Replacing the Filter Cartridge 1 Turn off the projector, and unplug the AC power cord from the AC outlet. 2 First, clean up the dust on the projector and around the air vents. 3 Press s on the filter cover to the dealer. ● Model No. Make...
Owners Manual
Page 59
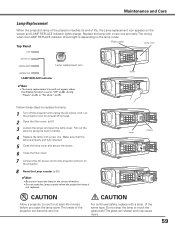
... lamp cover. Let the projector cool for at least 45 minutes. 2 Open the filter cover. (p.57) 3 Loosen the screw and open the lamp cover. Replace the lamp with a lamp of life, the Lamp replacement icon appears on the lamp mode. Do not drop the lamp or touch the glass bulb! Lamp Handle CAUTION Allow a projector to replace the lamp. 1 Turn off the projector and unplug the AC power cord. The timing when the LAMP REPLACE indicator should light is depending on the screen and LAMP REPLACE indicator lights orange...
... lamp cover. Let the projector cool for at least 45 minutes. 2 Open the filter cover. (p.57) 3 Loosen the screw and open the lamp cover. Replace the lamp with a lamp of life, the Lamp replacement icon appears on the lamp mode. Do not drop the lamp or touch the glass bulb! Lamp Handle CAUTION Allow a projector to replace the lamp. 1 Turn off the projector and unplug the AC power cord. The timing when the LAMP REPLACE indicator should light is depending on the screen and LAMP REPLACE indicator lights orange...
Owners Manual
Page 60
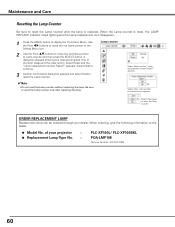
... Lamp counter without replacing the lamp. When the Lamp counter is replaced. Be sure to display the On-Screen Menu. ORDER REPLACEMENT LAMP Replacement lamp can be ordered through your projector : ● Replacement Lamp Type No. : PLC-XP100L/ PLC-XP100BKL POA-LMP108 (Service Parts No. 610 334 2788) 60 appears. Lamp counter Select Reset and the "Lamp replacement counter Reset?" Select [Yes] again to Lamp counter and then press the SELECT button. appears. Use the Point 7 8 buttons to move the red frame pointer to the Setting Menu...
... Lamp counter without replacing the lamp. When the Lamp counter is replaced. Be sure to display the On-Screen Menu. ORDER REPLACEMENT LAMP Replacement lamp can be ordered through your projector : ● Replacement Lamp Type No. : PLC-XP100L/ PLC-XP100BKL POA-LMP108 (Service Parts No. 610 334 2788) 60 appears. Lamp counter Select Reset and the "Lamp replacement counter Reset?" Select [Yes] again to Lamp counter and then press the SELECT button. appears. Use the Point 7 8 buttons to move the red frame pointer to the Setting Menu...
Owners Manual
Page 63
... Panel LAMP indicator lights on and other four indicators blink 63 Move the installation of the WARNING indicators and the POWER indicator to verify operation. When the temperature inside the projector reaches a certain level, the projector will be automatically shut down enough (to protect the inside of the function which protects the projector. Has the projector been installed near an Air-Conditioning/ Heating Duct or Vent? indicator stops blinking. Replace the filter with a new one...
... Panel LAMP indicator lights on and other four indicators blink 63 Move the installation of the WARNING indicators and the POWER indicator to verify operation. When the temperature inside the projector reaches a certain level, the projector will be automatically shut down enough (to protect the inside of the function which protects the projector. Has the projector been installed near an Air-Conditioning/ Heating Duct or Vent? indicator stops blinking. Replace the filter with a new one...
Owners Manual
Page 64
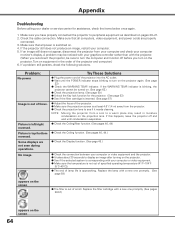
... monitor's display. Check the cable connection. Make sure that all power is switched on pages 20-21. 2. Some displays are properly connected. 3. If the WARNING TEMP. If an image still does not appear, disconnect the projector from the projector. ● Check the projection lens to peripheral equipment as described on . 4. Image is left/right reversed. Picture is top/bottom reversed. Make sure that all computers, video equipment, and power cords are...
... monitor's display. Check the cable connection. Make sure that all power is switched on pages 20-21. 2. Some displays are properly connected. 3. If the WARNING TEMP. If an image still does not appear, disconnect the projector from the projector. ● Check the projection lens to peripheral equipment as described on . 4. Image is left/right reversed. Picture is top/bottom reversed. Make sure that all computers, video equipment, and power cords are...
Owners Manual
Page 69
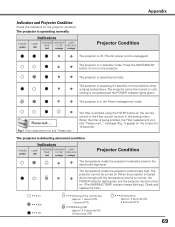
The filter is scrolled using the FILTER button on the screen for 10 seconds. message (Fig. 1) appear on the remote control or the Filter control function in the setting menu. The temperature inside the projector is detecting abnormal condition. FILTER REPLACE red orange orange Projector Condition ✽ v The projector is in stand-by or the projection lamp ✽ v is preparing for the projector condition. The projector cannot be turned on. (The WARNING TEMP. When the filter is abnormally high. The projector is...
The filter is scrolled using the FILTER button on the screen for 10 seconds. message (Fig. 1) appear on the remote control or the Filter control function in the setting menu. The temperature inside the projector is detecting abnormal condition. FILTER REPLACE red orange orange Projector Condition ✽ v The projector is in stand-by or the projection lamp ✽ v is preparing for the projector condition. The projector cannot be turned on. (The WARNING TEMP. When the filter is abnormally high. The projector is...

Owners Manual
Page 70
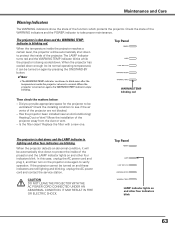
... be turned off again, unplug the AC power cord and contact the dealer or the service center. Reset the Filter counter after resetting the counter. indicator stops blinking. Check the filter compartment to light and blink, read the column below. It may cause an electric shock or a fire hazard. ] When the filter detects clogging, reaches a time set in the timer setting, a Filter replacement icon (Fig.2) appears on the screen and the WARNING FILTER indicator on the screen...
... be turned off again, unplug the AC power cord and contact the dealer or the service center. Reset the Filter counter after resetting the counter. indicator stops blinking. Check the filter compartment to light and blink, read the column below. It may cause an electric shock or a fire hazard. ] When the filter detects clogging, reaches a time set in the timer setting, a Filter replacement icon (Fig.2) appears on the screen and the WARNING FILTER indicator on the screen...
Owners Manual
Page 74
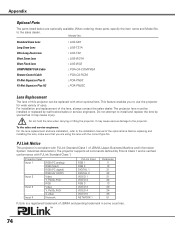
... replaced with other optional lens. To the sales and service engineers: For the lens replacement and lens installation, refer to use the projector for wide variety of JBMIA (Japan Business Machine and Information System Industries Association). Projector Input Input 1 Input 2 Input 3 Input 4 RGB (PC analog) RGB (Scart) RGB (PC digital) RGB (AV HDCP) Video Y, Pb/Cb,Pr/Cr RGB Video Y, Pb/Cb,Pr/Cr S-video Network PJLink Input RGB 1 RGB 2 DIGITAL 1 DIGITAL 2 VIDEO 1 VIDEO 2 RGB 3 VIDEO 3 VIDEO 4 VIDEO 5 NETWORK...
... replaced with other optional lens. To the sales and service engineers: For the lens replacement and lens installation, refer to use the projector for wide variety of JBMIA (Japan Business Machine and Information System Industries Association). Projector Input Input 1 Input 2 Input 3 Input 4 RGB (PC analog) RGB (Scart) RGB (PC digital) RGB (AV HDCP) Video Y, Pb/Cb,Pr/Cr RGB Video Y, Pb/Cb,Pr/Cr S-video Network PJLink Input RGB 1 RGB 2 DIGITAL 1 DIGITAL 2 VIDEO 1 VIDEO 2 RGB 3 VIDEO 3 VIDEO 4 VIDEO 5 NETWORK...


