
User Manual (user Manual) (ver.1.2) (English)
Page 1
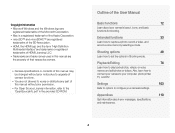
Please read this manual thoroughly. Ä Click a topic Basic troubleshooting Quick reference Contents Basic functions Extended functions Shooting options Playback/Editing Settings Appendixes Index User Manual WB210 This user manual includes detailed usage instructions for your camera.
Please read this manual thoroughly. Ä Click a topic Basic troubleshooting Quick reference Contents Basic functions Extended functions Shooting options Playback/Editing Settings Appendixes Index User Manual WB210 This user manual includes detailed usage instructions for your camera.
User Manual (user Manual) (ver.1.2) (English)
Page 5
...to reuse or distribute any part of the User Manual Basic functions 12 Learn about error messages, specifications, and maintenance. 4 Outline of this manual may be changed without prior notice due to upgrade of camera functions. • You are the property of their... respective owners. • Camera specifications or contents of this manual without prior permission. • For Open Source...
...to reuse or distribute any part of the User Manual Basic functions 12 Learn about error messages, specifications, and maintenance. 4 Outline of this manual may be changed without prior notice due to upgrade of camera functions. • You are the property of their... respective owners. • Camera specifications or contents of this manual without prior permission. • For Open Source...

User Manual (user Manual) (ver.1.2) (English)
Page 6
Icons used in this manual Abbreviation ACB AEB AF DPOF EV ISO OIS WB Definition Auto Contrast Balance Auto Exposure Bracket Auto Focus Digital Print Order Format Exposure ... information The order of options or menus you must select to perform a step, for Standardization Optical Image Stabilization White Balance 5 Annotation Abbreviations used in this manual Icon [] () “ * Function Additional information Safety warnings and precautions Camera buttons. For example, [Shutter] represents the shutter button.
Icons used in this manual Abbreviation ACB AEB AF DPOF EV ISO OIS WB Definition Auto Contrast Balance Auto Exposure Bracket Auto Focus Digital Print Order Format Exposure ... information The order of options or menus you must select to perform a step, for Standardization Optical Image Stabilization White Balance 5 Annotation Abbreviations used in this manual Icon [] () “ * Function Additional information Safety warnings and precautions Camera buttons. For example, [Shutter] represents the shutter button.
User Manual (user Manual) (ver.1.2) (English)
Page 7
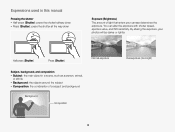
Half-press [Shutter] Press [Shutter] Normal exposure Subject, background, and composition • Subject: the main object in this manual Pressing the shutter • Half-press [Shutter]: press the shutter halfway down • Press [Shutter]: press the shutter all the way down Exposure (Brightness) The ... your photos will be darker or lighter. You can alter the exposure with shutter speed, aperture value, and ISO sensitivity. By altering the exposure, your camera determines the exposure.
Half-press [Shutter] Press [Shutter] Normal exposure Subject, background, and composition • Subject: the main object in this manual Pressing the shutter • Half-press [Shutter]: press the shutter halfway down • Press [Shutter]: press the shutter all the way down Exposure (Brightness) The ... your photos will be darker or lighter. You can alter the exposure with shutter speed, aperture value, and ISO sensitivity. By altering the exposure, your camera determines the exposure.

User Manual (user Manual) (ver.1.2) (English)
Page 11
...image quality 51 Shooting in the dark 53 Preventing red-eye 53 Using the flash 53 Adjusting the ISO sensitivity 55 Changing the camera's focus 56 Using macro 56 Using smart touch focus 57 Adjusting the focus area 58 Using face detection 59 Detecting faces 59 Capturing ... eye blinking 61 Using Smart Face Recognition 61 Registering faces as your favorites (My Star 62 Adjusting brightness and color 64 Adjusting the exposure manually (EV 64 Compensating for backlighting (ACB 65 Changing the metering option 65 Selecting a light source (White balance 66 Using burst modes 68 ...
...image quality 51 Shooting in the dark 53 Preventing red-eye 53 Using the flash 53 Adjusting the ISO sensitivity 55 Changing the camera's focus 56 Using macro 56 Using smart touch focus 57 Adjusting the focus area 58 Using face detection 59 Detecting faces 59 Capturing ... eye blinking 61 Using Smart Face Recognition 61 Registering faces as your favorites (My Star 62 Adjusting brightness and color 64 Adjusting the exposure manually (EV 64 Compensating for backlighting (ACB 65 Changing the metering option 65 Selecting a light source (White balance 66 Using burst modes 68 ...

User Manual (user Manual) (ver.1.2) (English)
Page 14
Unpacking The following items are included in your product. Optional accessories Camera AC adapter/USB cable Camera case A/V cable HDMI cable Rechargeable battery Strap User Manual CD-ROM Quick Start Manual Battery charger Memory card/ Memory card adapter The illustrations may differ slightly from the items shipped with your product box. Basic functions 13
Unpacking The following items are included in your product. Optional accessories Camera AC adapter/USB cable Camera case A/V cable HDMI cable Rechargeable battery Strap User Manual CD-ROM Quick Start Manual Battery charger Memory card/ Memory card adapter The illustrations may differ slightly from the items shipped with your product box. Basic functions 13
User Manual (user Manual) (ver.1.2) (English)
Page 25
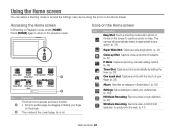
Easy Shot Super Close-up photos of subjects. (p. 37) P Mode: Capture a photo by manually setting options. (p. 39) Timer Shot: Capture a photo automatically by setting the timer. (p. 36) One touch shot: Capture a photo with the touch of the current page. ( ) ...Icons on the Home screen Icon Description Easy Shot: Touch a shooting mode button (photo or movie) on the Home screen. The camera will automatically select an appropriate scene option. (p. 34) Super Wide Shot: Capture a wide-angle photo. (p. 38) Close-up Shot: Capture close-up Shot P Mode Wide...
Easy Shot Super Close-up photos of subjects. (p. 37) P Mode: Capture a photo by manually setting options. (p. 39) Timer Shot: Capture a photo automatically by setting the timer. (p. 36) One touch shot: Capture a photo with the touch of the current page. ( ) ...Icons on the Home screen Icon Description Easy Shot: Touch a shooting mode button (photo or movie) on the Home screen. The camera will automatically select an appropriate scene option. (p. 34) Super Wide Shot: Capture a wide-angle photo. (p. 38) Close-up Shot: Capture close-up Shot P Mode Wide...
User Manual (user Manual) (ver.1.2) (English)
Page 50
...set the options in the dark 53 Preventing red-eye 53 Using the flash 53 Adjusting the ISO sensitivity 55 Changing the camera's focus 56 Using macro 56 Using smart touch focus 57 Adjusting the focus area 58 Using face detection 59 Detecting faces 59 ... Detecting eye blinking 61 Using Smart Face Recognition 61 Registering faces as your favorites (My Star 62 Adjusting brightness and color 64 Adjusting the exposure manually (EV) ...... 64 Compensating for backlighting (ACB) ...... 65 Changing the metering option 65 Selecting a light source (White balance) ... 66 Using ...
...set the options in the dark 53 Preventing red-eye 53 Using the flash 53 Adjusting the ISO sensitivity 55 Changing the camera's focus 56 Using macro 56 Using smart touch focus 57 Adjusting the focus area 58 Using face detection 59 Detecting faces 59 ... Detecting eye blinking 61 Using Smart Face Recognition 61 Registering faces as your favorites (My Star 62 Adjusting brightness and color 64 Adjusting the exposure manually (EV) ...... 64 Compensating for backlighting (ACB) ...... 65 Changing the metering option 65 Selecting a light source (White balance) ... 66 Using ...

User Manual (user Manual) (ver.1.2) (English)
Page 57
... that is less than 32 in (100-200 cm) when you use the zoom. Macro: Manually focus on a subject farther than 16 in (40 cm). Shooting options 56 Changing the camera's focus Learn how to adjust the camera's focus to capture close-up photos of subjects, such as flowers or insects. 1 In... Macro, and then touch o. Using macro Use macro to suit the subject and the shooting conditions. Focus Normal (AF) Macro • Try to hold the camera firmly to prevent blurry photos. • Turn off the flash if the distance to the subject is 2-32 in (6-80 cm) from the...
... that is less than 32 in (100-200 cm) when you use the zoom. Macro: Manually focus on a subject farther than 16 in (40 cm). Shooting options 56 Changing the camera's focus Learn how to adjust the camera's focus to capture close-up photos of subjects, such as flowers or insects. 1 In... Macro, and then touch o. Using macro Use macro to suit the subject and the shooting conditions. Focus Normal (AF) Macro • Try to hold the camera firmly to prevent blurry photos. • Turn off the flash if the distance to the subject is 2-32 in (6-80 cm) from the...

User Manual (user Manual) (ver.1.2) (English)
Page 65
You may be too bright or dark. The camera will capture 3 consecutive photos, each with a different exposure: normal, underexposed, and overexposed. (p. 68) Darker (-) Neutral (0) Brighter (+) 1 In Shooting mode, touch m “ EV. 2 Select a desired value, ... brightness and color Learn how to get a better photo. • Once you adjust the exposure, the setting will appear as shown below. Adjusting the exposure manually (EV) Depending on an appropriate exposure, select AEB (Auto Exposure Bracket).
You may be too bright or dark. The camera will capture 3 consecutive photos, each with a different exposure: normal, underexposed, and overexposed. (p. 68) Darker (-) Neutral (0) Brighter (+) 1 In Shooting mode, touch m “ EV. 2 Select a desired value, ... brightness and color Learn how to get a better photo. • Once you adjust the exposure, the setting will appear as shown below. Adjusting the exposure manually (EV) Depending on an appropriate exposure, select AEB (Auto Exposure Bracket).

User Manual (user Manual) (ver.1.2) (English)
Page 90
Editing a photo Learn how to edit photos. • The camera will save edited photos as new files. • When you rotate or resize manually are not automatically converted to save it as a start image. (p. 105) Resize 1984 X 1488 1024 X 768 Start Image 3 Touch o to save. Available..., and then select a rotate option. Rotate Rotate Right 90˚ Left 90˚ 3 Touch o to a lower resolution. Photos that you edit photos, the camera will overwrite the original file. Resizing photos Change the size of the photo. You can also select a photo to a lower resolution. The...
Editing a photo Learn how to edit photos. • The camera will save edited photos as new files. • When you rotate or resize manually are not automatically converted to save it as a start image. (p. 105) Resize 1984 X 1488 1024 X 768 Start Image 3 Touch o to save. Available..., and then select a rotate option. Rotate Rotate Right 90˚ Left 90˚ 3 Touch o to a lower resolution. Photos that you edit photos, the camera will overwrite the original file. Resizing photos Change the size of the photo. You can also select a photo to a lower resolution. The...

User Manual (user Manual) (ver.1.2) (English)
Page 95
...Editing 94 For details, see the HDMI Kit manual. 1 On the Home screen, touch . 2 Touch Connectivity “ HDMI Size. 3 Select an HDMI resolution. (p. 107) 4 Turn off , the HDTV does not turn on automatically. 7 View files using a remote control of your camera or HDTV. • If your HDTV ...Anynet+ on an HDTV using the optional HDMI cable. 6 Turn on your camera. • If you have an Anynet+ compatible Samsung HDTV, the HDTV will not necessarily result in the camra's settings menu (p. 106) to control the camera and TV with the TV's remote control. • Anynet+ lets you ...
...Editing 94 For details, see the HDMI Kit manual. 1 On the Home screen, touch . 2 Touch Connectivity “ HDMI Size. 3 Select an HDMI resolution. (p. 107) 4 Turn off , the HDTV does not turn on automatically. 7 View files using a remote control of your camera or HDTV. • If your HDTV ...Anynet+ on an HDTV using the optional HDMI cable. 6 Turn on your camera. • If you have an Anynet+ compatible Samsung HDTV, the HDTV will not necessarily result in the camra's settings menu (p. 106) to control the camera and TV with the TV's remote control. • Anynet+ lets you ...

User Manual (user Manual) (ver.1.2) (English)
Page 108
...printer with a USB cable. • Computer*: Connect your camera to a computer for transferring files. • Printer: Connect your camera to a printer for printing files. • Select Mode: Manually select the USB mode when you connect your camera to another country, touch Visit, and then touch the appropriate... (YYYY/MM/DD, MM/DD/ YYYY, DD/MM/YYYY, Off*) Settings 107 Set Intelli-studio to launch automatically when you connect your camera to a TV. Set the time zone for your location. Settings menu Item HDMI Size USB PC Software * Default Description Set the resolution ...
...printer with a USB cable. • Computer*: Connect your camera to a computer for transferring files. • Printer: Connect your camera to a printer for printing files. • Select Mode: Manually select the USB mode when you connect your camera to another country, touch Visit, and then touch the appropriate... (YYYY/MM/DD, MM/DD/ YYYY, DD/MM/YYYY, Off*) Settings 107 Set Intelli-studio to launch automatically when you connect your camera to a TV. Set the time zone for your location. Settings menu Item HDMI Size USB PC Software * Default Description Set the resolution ...

User Manual (user Manual) (ver.1.2) (English)
Page 120
... center. • Use only authentic, manufacturer-recommend battery chargers and adapters and charge the battery only by the method described in this user manual. • Do not place the battery near heating devices or expose it from high places. • Do not expose the battery to ...such as direct sunshine, fire or the like. Disposal guidelines • Dispose of the battery with all local and federal regulations. Camera maintenance Personal injury or death can ignite or explode if not charged properly. For your safety, follow these instructions for charging the battery ...
... center. • Use only authentic, manufacturer-recommend battery chargers and adapters and charge the battery only by the method described in this user manual. • Do not place the battery near heating devices or expose it from high places. • Do not expose the battery to ...such as direct sunshine, fire or the like. Disposal guidelines • Dispose of the battery with all local and federal regulations. Camera maintenance Personal injury or death can ignite or explode if not charged properly. For your safety, follow these instructions for charging the battery ...


