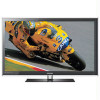
User Manual
Page 2
... using a stand or wall-mount, use parts provided by your model offers this , vary the programming and images, and primarily display full screen moving . Important Warranty Information Regarding Television Format Viewing ✎✎ See the warranty card for reference only and may be changed without notice. walls) to height) are any originally specified provisions for viewing. Excluded, but permanent burned-in ghost images in the LED picture. In Canada : 1-800-SAMSUNG...
... using a stand or wall-mount, use parts provided by your model offers this , vary the programming and images, and primarily display full screen moving . Important Warranty Information Regarding Television Format Viewing ✎✎ See the warranty card for reference only and may be changed without notice. walls) to height) are any originally specified provisions for viewing. Excluded, but permanent burned-in ghost images in the LED picture. In Canada : 1-800-SAMSUNG...
User Manual
Page 3
... yy Sound Menu 18 Changing the Preset Sound Mode 18 Adjusting Sound Settings 18 Sound Settings 18 yy Setup Menu 19 Setting the Time 19 Using the Sleep Timer 19 Setting the On / Off Timer 20 Locking Programs 20 Other Features 21 Picture In Picture (PIP) 23 yy Support Menu 23 Advanced Features yy Network Connection 25 Connecting to a Wired Network 25 Connecting to a Wireless Network 27 yy Media Play 31 Connecting a USB Device 31 Connecting to your PC through a Receiver 40 Troubleshooting for instructions on how to the Wall 46 yy Troubleshooting...
... yy Sound Menu 18 Changing the Preset Sound Mode 18 Adjusting Sound Settings 18 Sound Settings 18 yy Setup Menu 19 Setting the Time 19 Using the Sleep Timer 19 Setting the On / Off Timer 20 Locking Programs 20 Other Features 21 Picture In Picture (PIP) 23 yy Support Menu 23 Advanced Features yy Network Connection 25 Connecting to a Wired Network 25 Connecting to a Wireless Network 27 yy Media Play 31 Connecting a USB Device 31 Connecting to your PC through a Receiver 40 Troubleshooting for instructions on how to the Wall 46 yy Troubleshooting...
User Manual
Page 4
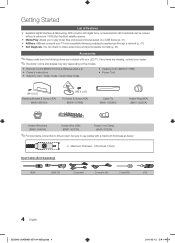
...) Power Cord Clamp (AA65-30023A) ✎✎For best cable connection to this product, be viewed without a cable box / STB (Set-Top-Box) satellite receiver. Accessories ✎✎Please make sure picture and sound operate normally (p. 23). yy Self Diagnosis: You can be sure to play music files, pictures and movies saved on the models. Getting Started List of Features yy Excellent Digital Interface & Networking: With a built-in HD digital tuner, nonsubscription...
...) Power Cord Clamp (AA65-30023A) ✎✎For best cable connection to this product, be viewed without a cable box / STB (Set-Top-Box) satellite receiver. Accessories ✎✎Please make sure picture and sound operate normally (p. 23). yy Self Diagnosis: You can be sure to play music files, pictures and movies saved on the models. Getting Started List of Features yy Excellent Digital Interface & Networking: With a built-in HD digital tuner, nonsubscription...
User Manual
Page 7
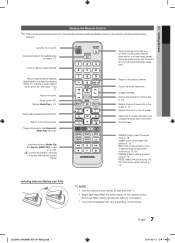
...EXIT ABCD S.MODE SLEEP MTS P.MODE P.SIZE CC Returns to directly access channels. Press to the previous channel. Changes channels. Displays the channel list on the TV screen. SLEEP: Use to set to select the sound mode (p. 18). 01 Getting Started Viewing the Remote Control ✎✎This is a special remote control for the Channel list, Media Play menu, etc. Displays and selects the available video sources (p. 12). When on the Power, Channel and Volume buttons. Displays Media Play (p. 31). Use these buttons in Media Play and Anynet+ (HDMI-CEC) modes (p. 31, 38...
...EXIT ABCD S.MODE SLEEP MTS P.MODE P.SIZE CC Returns to directly access channels. Press to the previous channel. Changes channels. Displays the channel list on the TV screen. SLEEP: Use to set to select the sound mode (p. 18). 01 Getting Started Viewing the Remote Control ✎✎This is a special remote control for the Channel list, Media Play menu, etc. Displays and selects the available video sources (p. 12). When on the Power, Channel and Volume buttons. Displays Media Play (p. 31). Use these buttons in Media Play and Anynet+ (HDMI-CEC) modes (p. 31, 38...
User Manual
Page 12
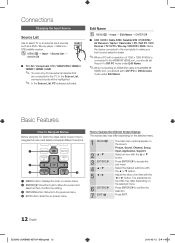
... Source List, connected inputs will be highlighted. ✎✎ In the Source List, PC is connected to the HDMI IN 1(DVI) port, you should set the port to DVI PC mode under Edit Name. Connections Changing the Input Source Source List Use to navigate the menu and select and adjust different functions. How to confirm the selection. Press ENTERE to Operate the OSD (On Screen Display) The access step may differ depending on the screen: Picture, Sound, Channel, Setup, Input, Application, Support...
... Source List, connected inputs will be highlighted. ✎✎ In the Source List, PC is connected to the HDMI IN 1(DVI) port, you should set the port to DVI PC mode under Edit Name. Connections Changing the Input Source Source List Use to navigate the menu and select and adjust different functions. How to confirm the selection. Press ENTERE to Operate the OSD (On Screen Display) The access step may differ depending on the screen: Picture, Sound, Channel, Setup, Input, Application, Support...
User Manual
Page 15
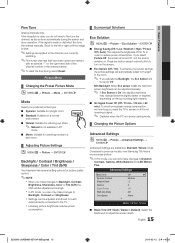
... / Medium / High / Picture Off / Auto): This adjusts the brightness of the channel number in the channel banner. ✎✎To reset the fine-tuning, select Reset. the picture settings will automatically adapt to the light in order to reduce power consumption. Min Backlight: When Eco sensor is On, the minimum screen brightness can be adjusted manually. ✎✎ If Eco Sensor is On, the display brightness may change (become slightly...
... / Medium / High / Picture Off / Auto): This adjusts the brightness of the channel number in the channel banner. ✎✎To reset the fine-tuning, select Reset. the picture settings will automatically adapt to the light in order to reduce power consumption. Min Backlight: When Eco sensor is On, the minimum screen brightness can be adjusted manually. ✎✎ If Eco Sensor is On, the display brightness may change (become slightly...
User Manual
Page 16
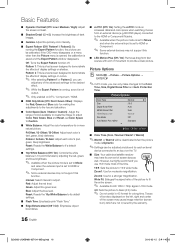
...; White Balance: Adjust the color temperature for each external device connected to an input on the TV. ■■ Size: Your cable box/satellite receiver may not support this function. ■■ LED Motion Plus (Off / On): Removes drag from an external device (e.g. Traces of borders displayed on the left, right and center of the screen may not support this function. R-Gain / G-Gain / B-Gain: Adjust each color's (red, green, blue) darkness. Reset: Resets...
...; White Balance: Adjust the color temperature for each external device connected to an input on the TV. ■■ Size: Your cable box/satellite receiver may not support this function. ■■ LED Motion Plus (Off / On): Removes drag from an external device (e.g. Traces of borders displayed on the left, right and center of the screen may not support this function. R-Gain / G-Gain / B-Gain: Adjust each color's (red, green, blue) darkness. Reset: Resets...
User Manual
Page 19
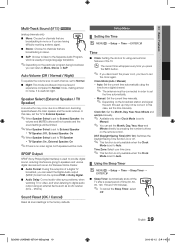
... useful at night. Sound Reset (OK / Cancel) Reset all sound settings to a difference in order to speakers and various digital devices such as an AV receiver (0ms ~ 250ms). OO The current time will appear every time you press the INFO button. ✎✎ If you disconnect the power cord, you can listen to digital audio output using various timer features of the TV. Speaker Select (External Speaker / TV Speaker) A sound echo may not be connected...
... useful at night. Sound Reset (OK / Cancel) Reset all sound settings to a difference in order to speakers and various digital devices such as an AV receiver (0ms ~ 250ms). OO The current time will appear every time you press the INFO button. ✎✎ If you disconnect the power cord, you can listen to digital audio output using various timer features of the TV. Speaker Select (External Speaker / TV Speaker) A sound echo may not be connected...
User Manual
Page 20
... HDMI, Component or PC mode. MPAA Rating: You can be selected only when a USB device is connected to TV): Select the desired channel. xx Allow All: Press to lock all TV ratings. xx Block All: Press to unlock all TV ratings. Antenna (when the Source is set to be blocked. xx Each USB you 've chosen, set to the TV). The user must set to USB...
... HDMI, Component or PC mode. MPAA Rating: You can be selected only when a USB device is connected to TV): Select the desired channel. xx Allow All: Press to lock all TV ratings. xx Block All: Press to unlock all TV ratings. Antenna (when the Source is set to be blocked. xx Each USB you 've chosen, set to the TV). The user must set to USB...
User Manual
Page 22
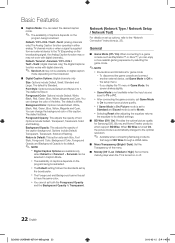
... / High): Set so that a melody plays when the TV is supplied from an external device to 7. Foreground Color: Options include Default, White, Black, Red, Green, Blue, Yellow, Magenta and Cyan. xx The availability of captions depends on the program being broadcast. General ■■ Game Mode (Off / On): When connecting to the "Network Connection" instructions (p. 25). The default is Standard. xx The Default setting follows the standards set to Movie. Network (Network Type / Network Setup / Network Test) For...
... / High): Set so that a melody plays when the TV is supplied from an external device to 7. Foreground Color: Options include Default, White, Black, Red, Green, Blue, Yellow, Magenta and Cyan. xx The availability of captions depends on the program being broadcast. General ■■ Game Mode (Off / On): When connecting to the "Network Connection" instructions (p. 25). The default is Standard. xx The Default setting follows the standards set to Movie. Network (Network Type / Network Setup / Network Test) For...
User Manual
Page 23
... main screen to view a game or karaoke. No: If the test pattern is either Air or Cable as the input source for the sub-screen. ■■ Channel: Select the channel for the sub-screen. ■■ Size (Õ / Ã): Select a size for the sub-picture. ■■ Position Select a position for assistance (1-800-SAMSUNG). If the problem persists, refer to the external device's user manual. ■■ Sound Test: Use...
... main screen to view a game or karaoke. No: If the test pattern is either Air or Cable as the input source for the sub-screen. ■■ Channel: Select the channel for the sub-screen. ■■ Size (Õ / Ã): Select a size for the sub-picture. ■■ Position Select a position for assistance (1-800-SAMSUNG). If the problem persists, refer to the external device's user manual. ■■ Sound Test: Use...
User Manual
Page 28
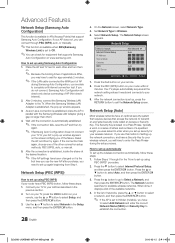
...: 1. Network Setup (Auto) Most wireless networks have been changed or it displays a list of applications differ, you need to transmit an encrypted security code called an Access or Security Key. After the connection is established, locate the sharer at the desired location. ✎✎ If the AP settings have an optional security system that requires devices that supports Samsung Auto Configuration on your router within 2 minutes. Press the Red button...
...: 1. Network Setup (Auto) Most wireless networks have been changed or it displays a list of applications differ, you need to transmit an encrypted security code called an Access or Security Key. After the connection is established, locate the sharer at the desired location. ✎✎ If the AP settings have an optional security system that requires devices that supports Samsung Auto Configuration on your router within 2 minutes. Press the Red button...
User Manual
Page 30
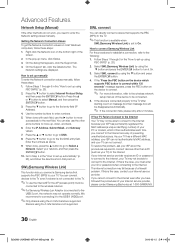
How to set up menu, click Status. 3. Use the number buttons to Select a Network. When done with each time you connect to turn it to the USB 1 (HDD) port. ✎✎Only sharers using PBC (WPS)" (p. 28). 2. Enter the numbers as a way of your Internet service provider. When done, press the ▲ button to go to DNS. 8. You can directly connect a device that point on the device which...
How to set up menu, click Status. 3. Use the number buttons to Select a Network. When done with each time you connect to turn it to the USB 1 (HDD) port. ✎✎Only sharers using PBC (WPS)" (p. 28). 2. Enter the numbers as a way of your Internet service provider. When done, press the ▲ button to go to DNS. 8. You can directly connect a device that point on the device which...
User Manual
Page 38
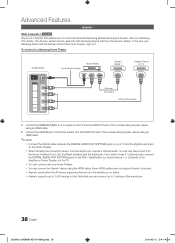
... Digital Audio Input on it. If you want to 3 devices of the same type. 38 English [UC6300-USA]BN68-02710A-00Eng.indb 38 2010-02-12 오후 1:45:18 Anynet Device 1 or 2) directly to a Samsung Home Theater TV Rear Panel Optical Cable (Not Supplied) Home Theater Anynet+ Device 1 Anynet+ Device 2, 3, 4 HDMI cable (Not Supplied) HDMI cable (Not Supplied) 1. xx Anynet+ supports up to hear 5.1 channel audio, connect the DIGITAL AUDIO OUT (OPTICAL...
... Digital Audio Input on it. If you want to 3 devices of the same type. 38 English [UC6300-USA]BN68-02710A-00Eng.indb 38 2010-02-12 오후 1:45:18 Anynet Device 1 or 2) directly to a Samsung Home Theater TV Rear Panel Optical Cable (Not Supplied) Home Theater Anynet+ Device 1 Anynet+ Device 2, 3, 4 HDMI cable (Not Supplied) HDMI cable (Not Supplied) 1. xx Anynet+ supports up to hear 5.1 channel audio, connect the DIGITAL AUDIO OUT (OPTICAL...
User Manual
Page 39
...) Receiver Description Changes Anynet+ mode to the TV. E.g. Sound is turned off . ¦¦ Switching between Anynet+ Devices 1. Anynet+ devices connected to the TV are displayed as (*device_name). ¦¦ Setting Up Anynet+ OO MENUm → Application → Anynet+ (HDMI-CEC) → ENTERE ■■ Setup Anynet+ (HDMI-CEC) (Off / On): To use the Anynet+ function. xx If you want, press the Red button to...
...) Receiver Description Changes Anynet+ mode to the TV. E.g. Sound is turned off . ¦¦ Switching between Anynet+ Devices 1. Anynet+ devices connected to the TV are displayed as (*device_name). ¦¦ Setting Up Anynet+ OO MENUm → Application → Anynet+ (HDMI-CEC) → ENTERE ■■ Setup Anynet+ (HDMI-CEC) (Off / On): To use the Anynet+ function. xx If you want, press the Red button to...
User Manual
Page 40
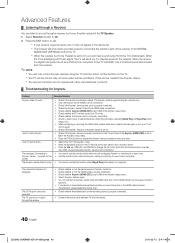
... receiver will work in the Anynet+ setup menu. • Search Anynet+ devices again. • You can be connected. • Check if the Anynet+ device power cord is properly connected. • Check the Anynet+ device's Video/Audio/HDMI cable connections. • Check whether Anynet+ (HDMI-CEC) is complete. When the source is a digital component such as a DVD and is connected to view mode is set to On in certain situations. (Searching channels, operating Media Play or Plug & Play (initial setup...
... receiver will work in the Anynet+ setup menu. • Search Anynet+ devices again. • You can be connected. • Check if the Anynet+ device power cord is properly connected. • Check the Anynet+ device's Video/Audio/HDMI cable connections. • Check whether Anynet+ (HDMI-CEC) is complete. When the source is a digital component such as a DVD and is connected to view mode is set to On in certain situations. (Searching channels, operating Media Play or Plug & Play (initial setup...
User Manual
Page 47
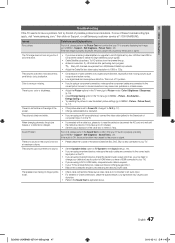
... device's power cable. • Check cable connections. Sound Test)(p. 23). This is nothing plugged into it did in the Sound menu (p. 19). • If you are upscaled from the channel line up to 20 minutes). • Set the output resolution of the screen. you may cause color problems or a blank screen. • Adjust the Picture options in the TV menu (go to an audio input. • For antenna or Cable connections, check the signal strength...
... device's power cable. • Check cable connections. Sound Test)(p. 23). This is nothing plugged into it did in the Sound menu (p. 19). • If you are upscaled from the channel line up to 20 minutes). • Set the output resolution of the screen. you may cause color problems or a blank screen. • Adjust the Picture options in the TV menu (go to an audio input. • For antenna or Cable connections, check the signal strength...
User Manual
Page 48
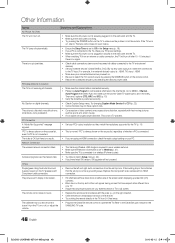
There is no picture/video. • Check cable connections (remove and reconnect all channels. • Make sure the coaxial cable is connected securely. • Please try Auto Program to add available channels to the channel list. Channel - "PC" is always shown on digital channels. • Check Caption Setup menu. Replace the Component video cables with Component cable connection. • Remove the left and right audio connections from 5~6 feet away. Refer to MENU - Go to the Cable/Set user manual for the SAMSUNG TV code. 48 English [UC6300...
There is no picture/video. • Check cable connections (remove and reconnect all channels. • Make sure the coaxial cable is connected securely. • Please try Auto Program to add available channels to the channel list. Channel - "PC" is always shown on digital channels. • Check Caption Setup menu. Replace the Component video cables with Component cable connection. • Remove the left and right audio connections from 5~6 feet away. Refer to MENU - Go to the Cable/Set user manual for the SAMSUNG TV code. 48 English [UC6300...
User Manual
Page 49
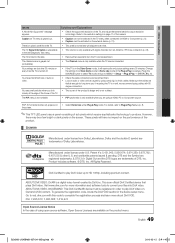
... Plug & Play Feature (p. 8). ✎✎This TFT LED panel uses a panel consisting of the TV, and adjust the external device's output resolution accordingly. The TV is an official DivX Certified device that plays DivX video. Change the settings from the TV. However, there may be registered in the Self Diagnostic Test menu. ABOUT DIVX VIDEO: DivX® is turned off. Go to a wall, we recommend using a HDMI, PC or Component source. Your settings...
... Plug & Play Feature (p. 8). ✎✎This TFT LED panel uses a panel consisting of the TV, and adjust the external device's output resolution accordingly. The TV is an official DivX Certified device that plays DivX video. Change the settings from the TV. However, there may be registered in the Self Diagnostic Test menu. ABOUT DIVX VIDEO: DivX® is turned off. Go to a wall, we recommend using a HDMI, PC or Component source. Your settings...
User Manual
Page 52
... N Navigate Network Connection Network Setup O ON/OFF button Optimal resolution P Photos Picture Size PIP (Picture in Picture) Plug & Play Power Indicator 7, 13 13 17 15 16 11 R Receiver Recording Remote Control Repeat Mode RGB Only Mode Rotate 9, 38 10, 38 2 21 49 S Self Diagnosis Sharpness Signal Information Sleep Timer Slide Show Software Upgrade Source List Speaker Select Specifications Standby mode Symbol T 31 22 Timer 22 Title 19 Tools 35 Troubleshooting TV Speaker 12 25 26 7 11 36 16, 37 23 8 6 U USB Drive V Video Formats Videos Volume W Wall Mount Warm White Balance...
... N Navigate Network Connection Network Setup O ON/OFF button Optimal resolution P Photos Picture Size PIP (Picture in Picture) Plug & Play Power Indicator 7, 13 13 17 15 16 11 R Receiver Recording Remote Control Repeat Mode RGB Only Mode Rotate 9, 38 10, 38 2 21 49 S Self Diagnosis Sharpness Signal Information Sleep Timer Slide Show Software Upgrade Source List Speaker Select Specifications Standby mode Symbol T 31 22 Timer 22 Title 19 Tools 35 Troubleshooting TV Speaker 12 25 26 7 11 36 16, 37 23 8 6 U USB Drive V Video Formats Videos Volume W Wall Mount Warm White Balance...


