User Manual
Page 2
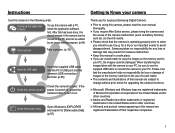
... the following order. Samsung takes no responsibility for loss or damage of the camera malfunction (such as battery, Memory card etc.) to your PC, the images could be edited by an image editing program. (p.84) Take a picture Take a picture. (p.19) Insert the USB cable Insert the supplied USB cable into the PC's USB port and the camera's USB connection terminal. (p.86) Check the camera's power. Setting up the application software To use of a card reader. å...
... the following order. Samsung takes no responsibility for loss or damage of the camera malfunction (such as battery, Memory card etc.) to your PC, the images could be edited by an image editing program. (p.84) Take a picture Take a picture. (p.19) Insert the USB cable Insert the supplied USB cable into the PC's USB port and the camera's USB connection terminal. (p.86) Check the camera's power. Setting up the application software To use of a card reader. å...
User Manual
Page 5
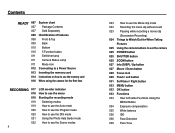
... mode 021 Using the Photo Help Guide mode 022 How to use the Scene modes 4 023 How to use the Movie clip mode 023 Recording the movie clip without sound 023 Pausing while recording a movie clip (Successive Recording) 024 Things to Watch Out for When Taking Pictures 025 Using the camera buttons to set the camera 025 POWER button 025 SHUTTER button 025 ZOOM button 027 Info (DISP) / Up button 027 Macro / Down button 029 Focus lock 029 Flash / Left button 031 Self-timer / Right button 033 MENU button 033 OK button 033 Functions...
... mode 021 Using the Photo Help Guide mode 022 How to use the Scene modes 4 023 How to use the Movie clip mode 023 Recording the movie clip without sound 023 Pausing while recording a movie clip (Successive Recording) 024 Things to Watch Out for When Taking Pictures 025 Using the camera buttons to set the camera 025 POWER button 025 SHUTTER button 025 ZOOM button 027 Info (DISP) / Up button 027 Macro / Down button 029 Focus lock 029 Flash / Left button 031 Self-timer / Right button 033 MENU button 033 OK button 033 Functions...
User Manual
Page 6
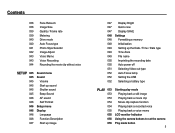
... Sound menu Sound Volume Start up sound Shutter sound Beep Sound AF sound Self Portrait Setup menu Display Language Function Description Start up image 047 Display Bright 047 Quick view 047 Display SAVE 048 Settings 048 Formatting a memory 048 Initialisation 049 Setting up the Date / Time / Date type 049 Time Zone 049 File name 050 Imprinting the recording date 050 Auto power off 051 Selecting Video out type 052 Auto Focus lamp 052 Setting the USB 052 Selecting a battery type PLAY 053 053 053 054 054 055 055 056 056 Starting play mode Playing back a still image Playing back a movie...
... Sound menu Sound Volume Start up sound Shutter sound Beep Sound AF sound Self Portrait Setup menu Display Language Function Description Start up image 047 Display Bright 047 Quick view 047 Display SAVE 048 Settings 048 Formatting a memory 048 Initialisation 049 Setting up the Date / Time / Date type 049 Time Zone 049 File name 050 Imprinting the recording date 050 Auto power off 051 Selecting Video out type 052 Auto Focus lamp 052 Setting the USB 052 Selecting a battery type PLAY 053 053 053 054 054 055 055 056 056 Starting play mode Playing back a still image Playing back a movie...
User Manual
Page 20
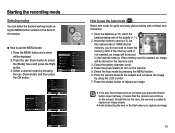
... batteries taking with minimal user interaction. 1. Auto Program DIS Photo Help Guide Scene Movie Exit Back Mode Functions Sound Display Settings Exit Auto Program DIS Photo Help Guide Scene Movie Change Auto Program DIS Photo Help Guide Scene Movie Exit Back Auto Program DIS Photo Help Guide Scene Movie Exit Back Auto Program DIS Photo Help Guide Scene Movie Change How to red when you press the shutter button down half way, it means that the camera cannot focus on the memory card. 3. If the memory card is inserted, an image will be displayed. 2. Point the camera...
... batteries taking with minimal user interaction. 1. Auto Program DIS Photo Help Guide Scene Movie Exit Back Mode Functions Sound Display Settings Exit Auto Program DIS Photo Help Guide Scene Movie Change Auto Program DIS Photo Help Guide Scene Movie Exit Back Auto Program DIS Photo Help Guide Scene Movie Exit Back Auto Program DIS Photo Help Guide Scene Movie Change How to red when you press the shutter button down half way, it means that the camera cannot focus on the memory card. 3. If the memory card is inserted, an image will be displayed. 2. Point the camera...
User Manual
Page 21
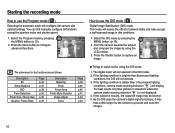
.... 5. Press the Menu button to capture an image. This mode will not operate in dim conditions. 1. The digital zoom will reduce the effect of camera shake and help you get a well-exposed image in the DIS mode. 2. You can still manually configure all functions except the aperture value and shutter speed. 1. The submenus for the functions are as follows: Description EV White Balance ISO Face Detection Photo Size / Movie Size Quality / Frame...
.... 5. Press the Menu button to capture an image. This mode will not operate in dim conditions. 1. The digital zoom will reduce the effect of camera shake and help you get a well-exposed image in the DIS mode. 2. You can still manually configure all functions except the aperture value and shutter speed. 1. The submenus for the functions are as follows: Description EV White Balance ISO Face Detection Photo Size / Movie Size Quality / Frame...
User Manual
Page 25
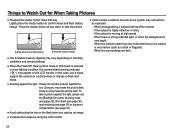
... lighting condition, the camera shake warning indicator ( Ã ) may appear on a solid surface or change to flash shot mode. å Shooting against the light : Please do not take pictures against the sun. Doing so may make the picture dark. When there is strong reflected light, or when the background is moving at high speed. - To take a picture against the light, please use a tripod, support the camera on...
... lighting condition, the camera shake warning indicator ( Ã ) may appear on a solid surface or change to flash shot mode. å Shooting against the light : Please do not take pictures against the sun. Doing so may make the picture dark. When there is strong reflected light, or when the background is moving at high speed. - To take a picture against the light, please use a tripod, support the camera on...
User Manual
Page 31
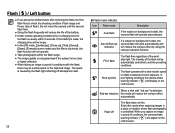
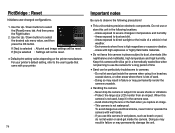
... function will not operate. å Take photographs within 5 seconds. Fill in poorly lit conditions, the camera shake warning indicator ( Ã ) will display on the LCD monitor. In poor lighting conditions the camera shake warning indicator ( Ã ) will appear on the LCD monitor. Select this mode will be a white speck in the captured image. Auto & Red eye reduction If a subject or background is detected, Red-eye reduction this mode when capturing images...
... function will not operate. å Take photographs within 5 seconds. Fill in poorly lit conditions, the camera shake warning indicator ( Ã ) will display on the LCD monitor. In poor lighting conditions the camera shake warning indicator ( Ã ) will appear on the LCD monitor. Select this mode will be a white speck in the captured image. Auto & Red eye reduction If a subject or background is detected, Red-eye reduction this mode when capturing images...
User Manual
Page 34
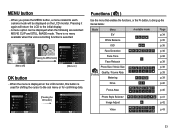
...: Mode Menu Available mode Page EV p.34 White Balance p.35 ISO p.36 Face Detection p.36 Face Tone p.38 Face Retouch p.38 Photo Size / Movie Size p.38 Quality / Frame Rate p.39 (Functions) Metering p.39 Drive p.40 Focus Area p.40 Photo Style Selector p.41 Image Adjust p.42 Voice p.43 33 When the menu is displayed on the LCD monitor, this button is selected. [Menu off] [Pressing the MENU button] Mode Functions Sound Display Settings Auto Program DIS Photo Help Guide Scene Movie Exit Change [Menu on...
...: Mode Menu Available mode Page EV p.34 White Balance p.35 ISO p.36 Face Detection p.36 Face Tone p.38 Face Retouch p.38 Photo Size / Movie Size p.38 Quality / Frame Rate p.39 (Functions) Metering p.39 Drive p.40 Focus Area p.40 Photo Style Selector p.41 Image Adjust p.42 Voice p.43 33 When the menu is displayed on the LCD monitor, this button is selected. [Menu off] [Pressing the MENU button] Mode Functions Sound Display Settings Auto Program DIS Photo Help Guide Scene Movie Exit Change [Menu on...
User Manual
Page 38
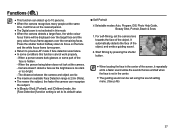
...; Self Portrait Ä Selectable modes: Auto, Program, DIS, Photo Help Guide, Beauty Shot, Portrait, Beach & Snow 1. The distance between the camera and object are emitted when the face is not activated in this function cannot work properly. - Press the shutter button halfway down to focus on the nearest person. å The Digital zoom is not in the center of the screen, it will be set the camera lens towards...
...; Self Portrait Ä Selectable modes: Auto, Program, DIS, Photo Help Guide, Beauty Shot, Portrait, Beach & Snow 1. The distance between the camera and object are emitted when the face is not activated in this function cannot work properly. - Press the shutter button halfway down to focus on the nearest person. å The Digital zoom is not in the center of the screen, it will be set the camera lens towards...
User Manual
Page 41
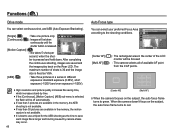
... taken continuously until the Drive Set the shooting type. Back Move [Center AF] ( ) : The rectangular area in the memory, the AEB shooting is not available. å If less than 30 pictures are saved and the images play back on the subject, the auto focus frame turns to red. Functions ( ) Drive mode You can select your preferred Focus Area according to the shooting conditions. Focus Area Set the autofocus method. shutter button...
... taken continuously until the Drive Set the shooting type. Back Move [Center AF] ( ) : The rectangular area in the memory, the AEB shooting is not available. å If less than 30 pictures are saved and the images play back on the subject, the auto focus frame turns to red. Functions ( ) Drive mode You can select your preferred Focus Area according to the shooting conditions. Focus Area Set the autofocus method. shutter button...
User Manual
Page 50
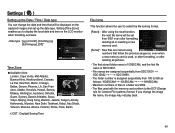
..., Rome, Paris, Berlin Ä DST : Daylight Saving Time File name This function allows the user to display the local date and time on the captured images and set from 0001 even after deleting all or inserting a new memory card. [Series]* : New files are 9999. - The folder number is SDC10001. - The files used , or after formatting, or after formatting, deleting all pictures. - Imprint Auto Power Off Back :2009/01/01 :London...
..., Rome, Paris, Berlin Ä DST : Daylight Saving Time File name This function allows the user to display the local date and time on the captured images and set from 0001 even after deleting all or inserting a new memory card. [Series]* : New files are 9999. - The folder number is SDC10001. - The files used , or after formatting, or after formatting, deleting all pictures. - Imprint Auto Power Off Back :2009/01/01 :London...
User Manual
Page 53
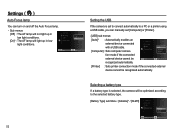
... Menu : [Alkaline]* / [Ni-MH] Video Out AF Lamp USB Battery Type :NTSC :On :Auto Alka:lAinlekaline Ni-MH Back Set 52 Video Out AF Lamp USB Battery Type :NTSC :On Auto:Auto Com:pAulktearline Printer tion mode if the connected external device cannot be Back Set recognized automatically. [Printer] : Sets printer connection mode if the connected external device cannot be optimized according to a PC or a printer using a USB cable, you can turn on and off the Auto Focus...
... Menu : [Alkaline]* / [Ni-MH] Video Out AF Lamp USB Battery Type :NTSC :On :Auto Alka:lAinlekaline Ni-MH Back Set 52 Video Out AF Lamp USB Battery Type :NTSC :On Auto:Auto Com:pAulktearline Printer tion mode if the connected external device cannot be Back Set recognized automatically. [Printer] : Sets printer connection mode if the connected external device cannot be optimized according to a PC or a printer using a USB cable, you can turn on and off the Auto Focus...
User Manual
Page 69
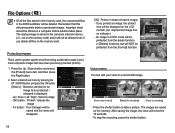
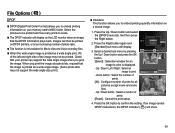
... be deleted. Delete Protect Voice memo DPOF Copy To Card Off :Off On Back Set [Voice memo menu] Start [Ready for recording] Stop [Voice is displayed. - After saving the image, the voice will record for an image to protect specific shots from the [Format] function. Select a desired sub menu by pressing the UP / DOWN button and press the OK button. [Select ] : Selection window for 10 seconds. - Fn button : Your changes will be protected / released is recording] - File Options...
... be deleted. Delete Protect Voice memo DPOF Copy To Card Off :Off On Back Set [Voice memo menu] Start [Ready for recording] Stop [Voice is displayed. - After saving the image, the voice will record for an image to protect specific shots from the [Format] function. Select a desired sub menu by pressing the UP / DOWN button and press the OK button. [Select ] : Selection window for 10 seconds. - Fn button : Your changes will be protected / released is recording] - File Options...
User Manual
Page 70
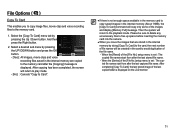
... Set 00 Quantity Set 01 Quantity Set 4. Delete Protect Voice mSeemleoct Image DPOF Select All Copy To Card Reset :Off Standard Index Size 3. Up / Down button : Select a number of photo labs. Ê This function is not available for all pictures except movie and voice files. - Press the OK button to print is displayed. - Up / Down / Left / Right : Select an image to print. - Zoom button : Select the number of prints. [All] : Configure number of prints for Movie clips and Voice recording files...
... Set 00 Quantity Set 01 Quantity Set 4. Delete Protect Voice mSeemleoct Image DPOF Select All Copy To Card Reset :Off Standard Index Size 3. Up / Down button : Select a number of photo labs. Ê This function is not available for all pictures except movie and voice files. - Press the OK button to print is displayed. - Up / Down / Left / Right : Select an image to print. - Zoom button : Select the number of prints. [All] : Configure number of prints for Movie clips and Voice recording files...
User Manual
Page 72
... Copy To Card :Off Yes No button. Back Set - [Yes] : All images, movie clips and voice recording files saved in the internal memory (About 11MB), the [Copy To Card] command will copy only some of the images and display [Memory Full] message. Then the system will be sure to delete any unnecessary files to free up space before inserting the memory card into the camera. å When you to copy image files, movie clips and voice recording files to the playback mode...
... Copy To Card :Off Yes No button. Back Set - [Yes] : All images, movie clips and voice recording files saved in the internal memory (About 11MB), the [Copy To Card] command will copy only some of the images and display [Memory Full] message. Then the system will be sure to delete any unnecessary files to free up space before inserting the memory card into the camera. å When you to copy image files, movie clips and voice recording files to the playback mode...
User Manual
Page 75
... obstructing the lens or the flash when you use or store this camera is lots of a vehicle in failure or may permanently render the camera unusable. å Handling the camera - To avoid dangerous electrical shocks, never hold or operate the camera with your printer's default setting, refer to select Date :Auto the [Reset] menu tab. If [No] is selected : Settings will be reset. Ä Default print setting varies depending on...
... obstructing the lens or the flash when you use or store this camera is lots of a vehicle in failure or may permanently render the camera unusable. å Handling the camera - To avoid dangerous electrical shocks, never hold or operate the camera with your printer's default setting, refer to select Date :Auto the [Reset] menu tab. If [No] is selected : Settings will be reset. Ä Default print setting varies depending on...
User Manual
Page 76
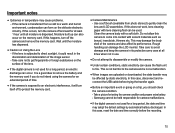
... can cause the flash unit to fire. Take care not to get fingerprints or foreign substances on the surface of the lens. å If the digital camera is not used for at all moisture is not a malfunction. å When images are uploaded or downloaded, the data transfer may adopt the default settings by static electricity. In this case, reset the date and time correctly before trying...
... can cause the flash unit to fire. Take care not to get fingerprints or foreign substances on the surface of the lens. å If the digital camera is not used for at all moisture is not a malfunction. å When images are uploaded or downloaded, the data transfer may adopt the default settings by static electricity. In this case, reset the date and time correctly before trying...
User Manual
Page 79
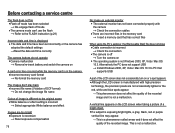
... default settings ÃReset the date and time correctly The camera buttons do not operate åCamera malfunction à Remove/re-insert battery and switch the camera on A card error has occurred while the memory card is in the camera. åIncorrect memory card format à Re-format the memory card The images don't play back åIncorrect file name (Violation of DCF format) à Do not change the image file name Colour of image is different to the original scene åWhite balance...
... default settings ÃReset the date and time correctly The camera buttons do not operate åCamera malfunction à Remove/re-insert battery and switch the camera on A card error has occurred while the memory card is in the camera. åIncorrect memory card format à Re-format the memory card The images don't play back åIncorrect file name (Violation of DCF format) à Do not change the image file name Colour of image is different to the original scene åWhite balance...
User Manual
Page 80
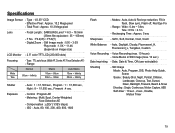
..., Flash off, Red Eye Fix - Type : 1/2.33" CCD - Date, Date & Time, Off (user selectable) Shooting - Range Normal 80cm ~ Infinity Macro 10cm ~ 80cm 50cm ~ 80cm Auto Macro 10cm ~ Infinity 50cm ~ Infinity Shutter Exposure - Compensation : ±2EV (1/3EV steps) - Still Image ·Mode : Auto, Program, DIS, Photo Help Guide, Scene ·Scene : Beauty Shot, Night, Portrait, Children, Landscape, Close-up, Text, Sunset, Dawn, Backlight, Firework, Beach & Snow ·Shooting : Single, Continuous, Motion Capture, AEB ·Self-timer...
..., Flash off, Red Eye Fix - Type : 1/2.33" CCD - Date, Date & Time, Off (user selectable) Shooting - Range Normal 80cm ~ Infinity Macro 10cm ~ 80cm 50cm ~ 80cm Auto Macro 10cm ~ Infinity 50cm ~ Infinity Shutter Exposure - Compensation : ±2EV (1/3EV steps) - Still Image ·Mode : Auto, Program, DIS, Photo Help Guide, Scene ·Scene : Beauty Shot, Night, Portrait, Children, Landscape, Close-up, Text, Sunset, Dawn, Backlight, Firework, Beach & Snow ·Shooting : Single, Continuous, Motion Capture, AEB ·Self-timer...
User Manual
Page 95
... USB cable to the computer. Case 8 The camera is not the supplied USB cable. Ã Connect the supplied USB cable. Case 1 USB cable is not connected or it is an unexpected error during file transfer. Ã Turn the camera power off the camera, remove the USB cable, plug in connecting the camera to the PC at the same time as a removable disk. Ã Stop the security programs and connect the camera to the camera. Wherever possible, connect the camera to temporarily disable...
... USB cable to the computer. Case 8 The camera is not the supplied USB cable. Ã Connect the supplied USB cable. Case 1 USB cable is not connected or it is an unexpected error during file transfer. Ã Turn the camera power off the camera, remove the USB cable, plug in connecting the camera to the PC at the same time as a removable disk. Ã Stop the security programs and connect the camera to the camera. Wherever possible, connect the camera to temporarily disable...


