
User Guide
Page 2
... Functions 188 Other Information • TroubleShooting 195 • Anti-theft Kensington Lock 207 • License 209 Contents Channel Menu • Using the Channel Menu • Memorizing Channels • Other Features Basic Features • Changing the Preset Picture Mode • Adjusting Picture ... the Time • Blocking Programs • Economical Solutions • Picture In Picture (PIP) 24 • Other Features 25 • Support Menu 26 31 38 42 43 Advanced Features 51 • 3D 139 62 • AllShare™ 151 88 • Anynet+(HDMI-CEC) 157...
... Functions 188 Other Information • TroubleShooting 195 • Anti-theft Kensington Lock 207 • License 209 Contents Channel Menu • Using the Channel Menu • Memorizing Channels • Other Features Basic Features • Changing the Preset Picture Mode • Adjusting Picture ... the Time • Blocking Programs • Economical Solutions • Picture In Picture (PIP) 24 • Other Features 25 • Support Menu 26 31 38 42 43 Advanced Features 51 • 3D 139 62 • AllShare™ 151 88 • Anynet+(HDMI-CEC) 157...
User Guide
Page 3
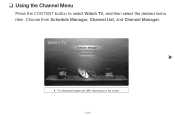
English ❑❑ Using the Channel Menu Press the CONTENT button to select Watch TV, and then select the desired menu item. Watch TV Schedule Manager Channel List Channel Manager ▶ My Contents Source ●● The displayed image may differ depending on the model. Choose from Schedule Manager, Channel List, and Channel Manager.
English ❑❑ Using the Channel Menu Press the CONTENT button to select Watch TV, and then select the desired menu item. Watch TV Schedule Manager Channel List Channel Manager ▶ My Contents Source ●● The displayed image may differ depending on the model. Choose from Schedule Manager, Channel List, and Channel Manager.
User Guide
Page 4
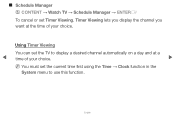
Using Timer Viewing You can set the TV to use this function. ▶ English ■■ Schedule Manager OO CONTENT → Watch TV → Schedule Manager → ENTERE To cancel or set the current time first using the Time → Clock function in the System menu to display a desired channel automatically on a day and at the time of your choice. Timer Viewing lets you display the channel you want at a time of your choice. ▶ NN You must set Timer Viewing.
Using Timer Viewing You can set the TV to use this function. ▶ English ■■ Schedule Manager OO CONTENT → Watch TV → Schedule Manager → ENTERE To cancel or set the current time first using the Time → Clock function in the System menu to display a desired channel automatically on a day and at the time of your choice. Timer Viewing lets you display the channel you want at a time of your choice. ▶ NN You must set Timer Viewing.
User Guide
Page 12
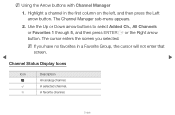
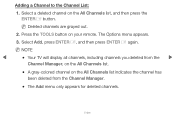
c A selected channel. The Channel Manager sub-menu appears. 2. Use the Up or Down arrow buttons to select Added Ch., All Channels or Favorites 1 through 5, and then press ENTERE or the Right arrow ...
c A selected channel. The Channel Manager sub-menu appears. 2. Use the Up or Down arrow buttons to select Added Ch., All Channels or Favorites 1 through 5, and then press ENTERE or the Right arrow ...
User Guide
Page 13
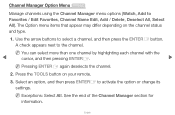
... cursor, and then pressing ENTERE. ▶ NN Pressing ENTERE again deselects the channel. 2. NN Exceptions: Select All. The Option menu items that appear may differ depending on your remote. 3. Use the arrow buttons to activate the option or change its settings. Channel Manager... Option Menu t Manage channels using the Channel Manager menu options (Watch, Add to the channel. Press the TOOLS button on the channel status and type. 1. A check appears ...
... cursor, and then pressing ENTERE. ▶ NN Pressing ENTERE again deselects the channel. 2. NN Exceptions: Select All. The Option menu items that appear may differ depending on your remote. 3. Use the arrow buttons to activate the option or change its settings. Channel Manager... Option Menu t Manage channels using the Channel Manager menu options (Watch, Add to the channel. Press the TOOLS button on the channel status and type. 1. A check appears ...
User Guide
Page 14
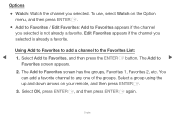
... Add to Favorites to add a channel to Favorites, and then press the ENTERE button. Select a group using the up and down arrows on the Option menu, and then press ENTERE. ●● Add to Favorites / Edit Favorites: Add to ▶ Favorites screen appears. 2. Edit Favorites appears if the channel you selected...
... Add to Favorites to add a channel to Favorites, and then press the ENTERE button. Select a group using the up and down arrows on the Option menu, and then press ENTERE. ●● Add to Favorites / Edit Favorites: Add to ▶ Favorites screen appears. 2. Edit Favorites appears if the channel you selected...
User Guide
Page 17
...has been deleted from the ▶ Channel Manager, on the All Channels list. ●● A gray-colored channel on your remote. The Options menu appears. 3. NN NOTE ●● Your TV will display all channels, including channels you deleted from the Channel Manager. ●● The Add... menu only appears for deleted channels. NN Deleted channels are grayed out. 2. Select a deleted channel on the All Channels list, and then press the ...
...has been deleted from the ▶ Channel Manager, on the All Channels list. ●● A gray-colored channel on your remote. The Options menu appears. 3. NN NOTE ●● Your TV will display all channels, including channels you deleted from the Channel Manager. ●● The Add... menu only appears for deleted channels. NN Deleted channels are grayed out. 2. Select a deleted channel on the All Channels list, and then press the ...
User Guide
Page 18
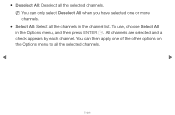
NN You can then apply one or more channels. ●● Select All: Select all the channels in the Options menu, and then press ENTERE. To use, choose Select All in the channel list. You can only select Deselect All when you have selected one of the other options on the Options menu to all the selected channels. All channels are selected and a check appears by each channel. ▶ ●● Deselect All: Deselect all the selected channels. ▶ English
NN You can then apply one or more channels. ●● Select All: Select all the channels in the Options menu, and then press ENTERE. To use, choose Select All in the channel list. You can only select Deselect All when you have selected one of the other options on the Options menu to all the selected channels. All channels are selected and a check appears by each channel. ▶ ●● Deselect All: Deselect all the selected channels. ▶ English

User Guide
Page 22
Select STD, HRC, or IRC, and then press ENTERE. 7. This process ▶ can take up to 30 minutes. English Repeat for Analog. 8. Auto Program starts. ▶ 5. If you selected Air only, Auto Program starts. 6. NN After all the available channels are stored, Auto Program removes scrambled channels. NN If you selected Cable, the Cable System screen appears. When done, the Auto Program menu then reappears. Select Digital, and then press ENTERE. Select Search or Next, and then press ENTERE.
Select STD, HRC, or IRC, and then press ENTERE. 7. This process ▶ can take up to 30 minutes. English Repeat for Analog. 8. Auto Program starts. ▶ 5. If you selected Air only, Auto Program starts. 6. NN After all the available channels are stored, Auto Program removes scrambled channels. NN If you selected Cable, the Cable System screen appears. When done, the Auto Program menu then reappears. Select Digital, and then press ENTERE. Select Search or Next, and then press ENTERE.

User Guide
Page 26
... environment. ●● Movie: Suitable for watching movies in a dark room. ●● Entertain (When connecting a PC): Suitable for watching movies and games. ▶ Picture Menu English ❑❑ Changing the Preset Picture Mode OO MENUm → Picture → Picture Mode → ENTERE ■■ Picture Mode Picture modes apply preset...
... environment. ●● Movie: Suitable for watching movies in a dark room. ●● Entertain (When connecting a PC): Suitable for watching movies and games. ▶ Picture Menu English ❑❑ Changing the Preset Picture Mode OO MENUm → Picture → Picture Mode → ENTERE ■■ Picture Mode Picture modes apply preset...
User Guide
Page 28
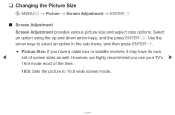
..., we highly recommend you use your TV's ▶ 16:9 mode most of the time. 16:9: Sets the picture to select an option in the sub-menu, and then press ENTERE. ●● Picture Size: If you have a cable box or satellite receiver, it may have its own set of screen sizes...
..., we highly recommend you use your TV's ▶ 16:9 mode most of the time. 16:9: Sets the picture to select an option in the sub-menu, and then press ENTERE. ●● Picture Size: If you have a cable box or satellite receiver, it may have its own set of screen sizes...

User Guide
Page 43
Click "Appearance and Themes" in the "Control Panel" window, A display dialogbox appears. 3. On your PC, click "Control Panel" on your display settings dialog box, select "60" or "60 Hz". Another display dialog box appears. 4. Otherwise, just click "OK" and exit the dialog box. ▶ ▶ English Click "Display". Click the "Settings" tab on the display dialog-box. ●● On the Settings tab, set the correct resolution. ●● If a vertical-frequency option exists on the Windows start menu. 2. 1.
Click "Appearance and Themes" in the "Control Panel" window, A display dialogbox appears. 3. On your PC, click "Control Panel" on your display settings dialog box, select "60" or "60 Hz". Another display dialog box appears. 4. Otherwise, just click "OK" and exit the dialog box. ▶ ▶ English Click "Display". Click the "Settings" tab on the display dialog-box. ●● On the Settings tab, set the correct resolution. ●● If a vertical-frequency option exists on the Windows start menu. 2. 1.

User Guide
Page 44
... Voice: Emphasizes voices over other sounds. ●● Amplify: Increase the intensity of high-frequency sound to External Speaker, Sound Mode is disabled. ▶ Sound Menu English NN If Speaker Select is set to allow a better listening experience for the hearing impaired.
... Voice: Emphasizes voices over other sounds. ●● Amplify: Increase the intensity of high-frequency sound to External Speaker, Sound Mode is disabled. ▶ Sound Menu English NN If Speaker Select is set to allow a better listening experience for the hearing impaired.
User Guide
Page 60
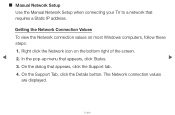
In the pop-up menu that appears, click the Support tab. 4. The Network connection values are displayed. ▶ English Right click the Network icon on most Windows computers, follow these steps: 1. On the dialog that appears, click Status. ▶ 3. On the Support Tab, click the Details button. Getting the Network Connection Values To view the Network connection values on the bottom right of the screen. 2. ■■ Manual Network Setup Use the Manual Network Setup when connecting your TV to a network that requires a Static IP address.
In the pop-up menu that appears, click the Support tab. 4. The Network connection values are displayed. ▶ English Right click the Network icon on most Windows computers, follow these steps: 1. On the dialog that appears, click Status. ▶ 3. On the Support Tab, click the Details button. Getting the Network Connection Values To view the Network connection values on the bottom right of the screen. 2. ■■ Manual Network Setup Use the Manual Network Setup when connecting your TV to a network that requires a Static IP address.

User Guide
Page 74
On the dialog that appears, click Status. ▶ 3. In the pop-up menu that appears, click the Support tab. 4. The Network connection values are displayed. ▶ English ■■ Manual Network Setup Use Manual Network Setup when connecting ...
On the dialog that appears, click Status. ▶ 3. In the pop-up menu that appears, click the Support tab. 4. The Network connection values are displayed. ▶ English ■■ Manual Network Setup Use Manual Network Setup when connecting ...

User Guide
Page 97
... functions, the PIN screen will appear and you must enter a PIN (personal identification number) before you will remember. The PIN screen closes and the Securty Menu appears. English NN The default PIN number for the first time, the PIN input screen appears.
... functions, the PIN screen will appear and you must enter a PIN (personal identification number) before you will remember. The PIN screen closes and the Securty Menu appears. English NN The default PIN number for the first time, the PIN input screen appears.

User Guide
Page 106
Rating menu is available for use. ●● Parental restriction levels differ depending on the broadcasting station. However, depending on the downloaded information. Rating change depending on... not ▶ be available for use after information is downloaded from the broadcasting station, it may take several seconds. ●● The Downloadable U.S. English Rating menu is deactivated. ●● Parental restriction information is not downloaded from the broadcasting station, Downloadable U.S. ▶ NN NOTE ●● If information is automatically ...
Rating menu is available for use. ●● Parental restriction levels differ depending on the broadcasting station. However, depending on the downloaded information. Rating change depending on... not ▶ be available for use after information is downloaded from the broadcasting station, it may take several seconds. ●● The Downloadable U.S. English Rating menu is deactivated. ●● Parental restriction information is not downloaded from the broadcasting station, Downloadable U.S. ▶ NN NOTE ●● If information is automatically ...

User Guide
Page 107
Rating menu will appear in English only. ●● Blocking one rating level will automatically block other categories that deal with more sensitive material. ●● The rating titles (For example: Humor Level..etc) and TV ratings (For example: DH, MH, H..etc) may differ depending on -screen display to another language, the Downloadable U.S. ▶ ●● Even if you set the on the broadcasting station. ▶ English
Rating menu will appear in English only. ●● Blocking one rating level will automatically block other categories that deal with more sensitive material. ●● The rating titles (For example: Humor Level..etc) and TV ratings (For example: DH, MH, H..etc) may differ depending on -screen display to another language, the Downloadable U.S. ▶ ●● Even if you set the on the broadcasting station. ▶ English

User Guide
Page 109
...;● Energy Saving (Off / Low / Medium / High / Picture Off): Lets you adjusts the brightness of the TV in order to the light in the Picture menu, the Eco Sensor will ▶ automatically adapt to reduce power consumption. NN If you select Picture Off, the screen is turned off, but the sound...
...;● Energy Saving (Off / Low / Medium / High / Picture Off): Lets you adjusts the brightness of the TV in order to the light in the Picture menu, the Eco Sensor will ▶ automatically adapt to reduce power consumption. NN If you select Picture Off, the screen is turned off, but the sound...

User Guide
Page 114
Select Menu Language, and then press the ENTERE button. 2. Choose a language, and then press the ENTERE button. NN Choose from English, Español, and Français. ▶ ▶ English ❑❑ Other Features OO MENUm → System → ENTERE ■■ Menu Language Set the menu language. 1.
Select Menu Language, and then press the ENTERE button. 2. Choose a language, and then press the ENTERE button. NN Choose from English, Español, and Français. ▶ ▶ English ❑❑ Other Features OO MENUm → System → ENTERE ■■ Menu Language Set the menu language. 1.


