

User Manual (user Manual) (ver.1.0) (English)
Page 13
... Add to Favorite Timer Viewing Channel Name Edit Select All * TV #10 * TV #11 Air Antenna B Zoom Select k Page T Tools To show all Favorite channels, click on the button shown on the situation.). FAV.CH ■■ All Channels: Shows all currently available channels. ■■ Added Channels: Shows all added...
... Add to Favorite Timer Viewing Channel Name Edit Select All * TV #10 * TV #11 Air Antenna B Zoom Select k Page T Tools To show all Favorite channels, click on the button shown on the situation.). FAV.CH ■■ All Channels: Shows all currently available channels. ■■ Added Channels: Shows all added...
User Manual (user Manual) (ver.1.0) (English)
Page 18
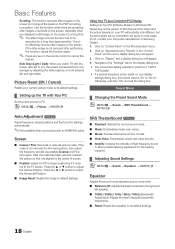
Click on "Appearance and Themes" in most cases. (If not, contact your computer manufacturer or Samsung Dealer.) 1. If the noise is aligned to the center of screen. ■■ Position: Adjust the PC's screen positioning if it is not removed by ...: Increase the intensity of high-frequency sound to allow a better listening experience for a long time (approximately 1 hour) to effectively remove after-images on the screen. Click on "Control Panel" on the Windows start menu. 2. Sound Menu ¦¦ Changing the Preset Sound Mode OO MENUm → Sound → SRS TheaterSound →...
Click on "Appearance and Themes" in most cases. (If not, contact your computer manufacturer or Samsung Dealer.) 1. If the noise is aligned to the center of screen. ■■ Position: Adjust the PC's screen positioning if it is not removed by ...: Increase the intensity of high-frequency sound to allow a better listening experience for a long time (approximately 1 hour) to effectively remove after-images on the screen. Click on "Control Panel" on the Windows start menu. 2. Sound Menu ¦¦ Changing the Preset Sound Mode OO MENUm → Sound → SRS TheaterSound →...
User Manual (user Manual) (ver.1.0) (English)
Page 26
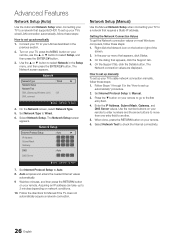
...remote. 6. On the Network screen, select Network Type. 5. Right click the Network icon on network conditions. 10. In the pop-up menu that appears, click the Support tab. 4. On the Support Tab, click the Details button. When done, press the RETURN button on most ...does not automatically acquire a network connection. On the dialog that appears, click Status. 3. Enter the IP Address, Subnet Mask, Gateway, and DNS Server values. Network Network Type : Wired ► Network Setup Network Test SWL (Samsung Wireless Link) : Off SWL connect U Move E Enter R Return ...
...remote. 6. On the Network screen, select Network Type. 5. Right click the Network icon on network conditions. 10. In the pop-up menu that appears, click the Support tab. 4. On the Support Tab, click the Details button. When done, press the RETURN button on most ...does not automatically acquire a network connection. On the dialog that appears, click Status. 3. Enter the IP Address, Subnet Mask, Gateway, and DNS Server values. Network Network Type : Wired ► Network Setup Network Test SWL (Samsung Wireless Link) : Off SWL connect U Move E Enter R Return ...
User Manual (user Manual) (ver.1.0) (English)
Page 30
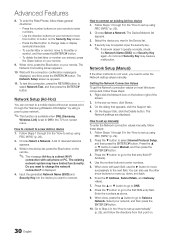
...Press the ▼ button to select Network Test, and then press the ENTERE button. The Network Connecting screen appears. 10. Follow Steps 1 through the "Samsung Wireless LAN Adapter" by using PBC (WPS)" (p. 29). 2. When done with cell phone or PC. To test the connection, press the RETURN button ...to select Internet Protocol Setup, and then press the ENTERE button. On the Support tab, click the Details button. Press the ▲ or ▼ button to connect. Input the generated Network Name (SSID) and Security Key into the ...
...Press the ▼ button to select Network Test, and then press the ENTERE button. The Network Connecting screen appears. 10. Follow Steps 1 through the "Samsung Wireless LAN Adapter" by using PBC (WPS)" (p. 29). 2. When done with cell phone or PC. To test the connection, press the RETURN button ...to select Internet Protocol Setup, and then press the ENTERE button. On the Support tab, click the Details button. Press the ▲ or ▼ button to connect. Input the generated Network Name (SSID) and Security Key into the ...

User Manual (user Manual) (ver.1.0) (English)
Page 49
...xx The alarm window can use your TV for browsing web pages in all mobile devices which have been set up with this function, you click the OK button, the contents of mobile phones or connected devices which support AllShare. ■■ Allowed / Denied: Allows/Blocks the mobile ... OO MENUm → Application → Content View → AllShare → ENTERE ¦¦ About AllShare AllShare connects your TV and compatible Samsung mobile phones/ devices through the alarm window while watching TV. ✎✎NOTE xx To disable the alarm window, set Message to block the phone...
...xx The alarm window can use your TV for browsing web pages in all mobile devices which have been set up with this function, you click the OK button, the contents of mobile phones or connected devices which support AllShare. ■■ Allowed / Denied: Allows/Blocks the mobile ... OO MENUm → Application → Content View → AllShare → ENTERE ¦¦ About AllShare AllShare connects your TV and compatible Samsung mobile phones/ devices through the alarm window while watching TV. ✎✎NOTE xx To disable the alarm window, set Message to block the phone...
User Manual (user Manual) (ver.1.0) (English)
Page 54
... please perform the Picture Test and confirm that your TV audio is a dotted line on the edge of these troubleshooting tips apply, visit "www.samsung.com," then click on the TV. • If you have an analog cable/satellite box, upgrade to your TV has a headphone jack, make sure the audio... cables are connected to the correct audio input jacks on Support, or call Samsung customer service at maximum volume. Picture Reset) (p. 18). It may ...
... please perform the Picture Test and confirm that your TV audio is a dotted line on the edge of these troubleshooting tips apply, visit "www.samsung.com," then click on the TV. • If you have an analog cable/satellite box, upgrade to your TV has a headphone jack, make sure the audio... cables are connected to the correct audio input jacks on Support, or call Samsung customer service at maximum volume. Picture Reset) (p. 18). It may ...
User Manual
Page 3
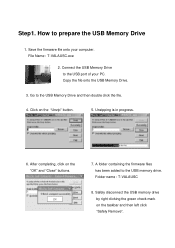
...How to the USB memory drive. File Name : T-VALAUSC.exe 2. Connect the USB Memory Drive to the USB Memory Drive and then double click the file. 4. A folder containing the firmware files has been added to prepare the USB Memory Drive 1. Safely disconnect the USB memory drive by... right clicking the green check mark on the "OK" and "Close" buttons. Go to the USB port of your computer. After completing, click on the taskbar and then left click "Safely Remove". Save the firmware file onto your PC. Click on the "Unzip" button. 5. Folder...
...How to the USB memory drive. File Name : T-VALAUSC.exe 2. Connect the USB Memory Drive to the USB Memory Drive and then double click the file. 4. A folder containing the firmware files has been added to prepare the USB Memory Drive 1. Safely disconnect the USB memory drive by... right clicking the green check mark on the "OK" and "Close" buttons. Go to the USB port of your computer. After completing, click on the taskbar and then left click "Safely Remove". Save the firmware file onto your PC. Click on the "Unzip" button. 5. Folder...


