Open Source Guide (ENGLISH)
Page 1
... work for making the program proprietary. Also, for all . Finally, any such claims; The precise terms and conditions for questions regarding open sources, contact Samsung via Email (vdswmanager@samsung. The act of running for a charge no warranty for a fee. 2. and give any third party, for such interactive use pieces of it contains...
... work for making the program proprietary. Also, for all . Finally, any such claims; The precise terms and conditions for questions regarding open sources, contact Samsung via Email (vdswmanager@samsung. The act of running for a charge no warranty for a fee. 2. and give any third party, for such interactive use pieces of it contains...
User Manual (user Manual) (ver.1.0) (English, Spanish)
Page 47
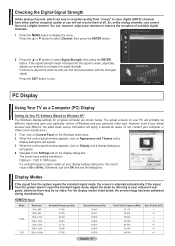
... Press the ▲ or ▼ button to exit. If the signal strength meter indicates that the signal is 60 or 60 Hz. Otherwise, just click OK and exit the dialog box. If the signal from the system equals the standard signal mode, the screen is adjusted automatically. You can vary...you will not receive them at all cases. (If not, contact your computer or Video Card manufacturer.) 1 First, click on Control Panel on the Windows start menu. 2 When the control panel window appears, click on Appearance and Themes and a display dialog-box will appear. 3 When the control panel window appears...
... Press the ▲ or ▼ button to exit. If the signal strength meter indicates that the signal is 60 or 60 Hz. Otherwise, just click OK and exit the dialog box. If the signal from the system equals the standard signal mode, the screen is adjusted automatically. You can vary...you will not receive them at all cases. (If not, contact your computer or Video Card manufacturer.) 1 First, click on Control Panel on the Windows start menu. 2 When the control panel window appears, click on Appearance and Themes and a display dialog-box will appear. 3 When the control panel window appears...
User Manual (user Manual) (ver.1.0) (English, Spanish)
Page 72
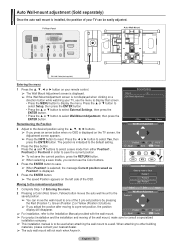
... ➢ You can be used when attaching the wall mount to a wall. Melody : On ➢ If the Wall Mount Adjustment screen is not displayed when clicking on the left side of the OSD. Adjust Save Center ➢ For product installation and the installation and moving to save mode, you cannot use...
... ➢ You can be used when attaching the wall mount to a wall. Melody : On ➢ If the Wall Mount Adjustment screen is not displayed when clicking on the left side of the OSD. Adjust Save Center ➢ For product installation and the installation and moving to save mode, you cannot use...

User Manual
Page 3
...file onto your PC. Go to the USB port of your computer. Connect the USB Memory Drive to the USB Memory Drive and then double click the file P510_P530 firmware 1004.2.exe. 4. Unzipping is in progress. 6. After completing, press "OK" and "Close" button. 7. The USB...contain one folder named T-CNLAUSC 8. File : P510_P530 firmware 1004.2.exe 2. Step1. Safely disconnect the USB memory drive by right clicking the green check mark on the taskbar and then left click "Safely Remove". 3 Upgrade the firmware version 1004.2 1. Press "Unzip" button. 5. Copy the file into the USB ...
...file onto your PC. Go to the USB port of your computer. Connect the USB Memory Drive to the USB Memory Drive and then double click the file P510_P530 firmware 1004.2.exe. 4. Unzipping is in progress. 6. After completing, press "OK" and "Close" button. 7. The USB...contain one folder named T-CNLAUSC 8. File : P510_P530 firmware 1004.2.exe 2. Step1. Safely disconnect the USB memory drive by right clicking the green check mark on the taskbar and then left click "Safely Remove". 3 Upgrade the firmware version 1004.2 1. Press "Unzip" button. 5. Copy the file into the USB ...
User Manual
Page 6
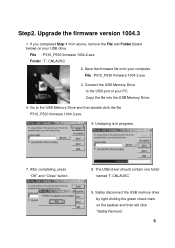
....3 1. Unzipping is in progress. 7. After completing, press "OK" and "Close" button. 8. Connect the USB Memory Drive to the USB Memory Drive and then double click the file P510_P530 firmware 1004.3.exe. 5. Go to the USB port of your PC. If you completed Step 1 from above, remove the File and Folder... (listed below) on the taskbar and then left click "Safely Remove". 6 Press "Unzip" button. 6. Save the firmware file onto your USB drive. Safely disconnect the USB memory drive by right...
....3 1. Unzipping is in progress. 7. After completing, press "OK" and "Close" button. 8. Connect the USB Memory Drive to the USB Memory Drive and then double click the file P510_P530 firmware 1004.3.exe. 5. Go to the USB port of your PC. If you completed Step 1 from above, remove the File and Folder... (listed below) on the taskbar and then left click "Safely Remove". 6 Press "Unzip" button. 6. Save the firmware file onto your USB drive. Safely disconnect the USB memory drive by right...


