Safety Guide (ENGLISH)
Page 7
...that this TV can change the power consumption, possibly beyond the limits required for ENERGYSTAR qualification. - As an ENERGY STAR Partner, Samsung has determined that manufacturer's instructions for replacement of the polarized or grounding-type plug. If the provided plug does not fit into ...long periods of time. 14) Refer all instructions. 5) Do not use attachments/accessories specified by the manufacturer. 12) Use only with cart, stand, tripod, bracket, or table specified by the manufacturer, or sold with the manufacturer's instructions. 8) Do not install near any way, such as...
...that this TV can change the power consumption, possibly beyond the limits required for ENERGYSTAR qualification. - As an ENERGY STAR Partner, Samsung has determined that manufacturer's instructions for replacement of the polarized or grounding-type plug. If the provided plug does not fit into ...long periods of time. 14) Refer all instructions. 5) Do not use attachments/accessories specified by the manufacturer. 12) Use only with cart, stand, tripod, bracket, or table specified by the manufacturer, or sold with the manufacturer's instructions. 8) Do not install near any way, such as...
Quick Guide (ENGLISH)
Page 3
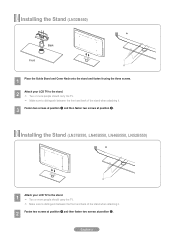
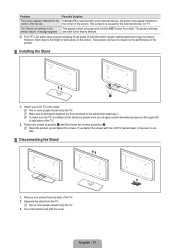
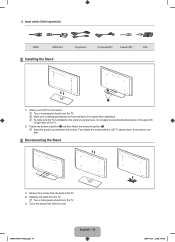
...using the three screws. 2 2 1 1 2 Attach your LCD TV to the stand. ➣ Two or more people should carry the TV. ➣ Make sure to distinguish between the front and back of the stand when attaching it . 2 Fasten two screws at position 1 and then fasten two ...screws at position 2. Installing the Stand (LN37B550, LN40B550, LN46B550, LN52B550) 2 2 1 1 1 Attach your LCD TV to the stand. ➣ Two or more people should carry the TV...
...using the three screws. 2 2 1 1 2 Attach your LCD TV to the stand. ➣ Two or more people should carry the TV. ➣ Make sure to distinguish between the front and back of the stand when attaching it . 2 Fasten two screws at position 1 and then fasten two ...screws at position 2. Installing the Stand (LN37B550, LN40B550, LN46B550, LN52B550) 2 2 1 1 1 Attach your LCD TV to the stand. ➣ Two or more people should carry the TV...

User Manual (ENGLISH)
Page 3
... 33 ■ Recording 34 ■ Listening through a Receiver (Home theater 35 ■ Troubleshooting for Anynet 35 Appendix ■ Troubleshooting 36 ■ Installing the Stand 37 ■ Disconnecting the Stand 37 ■ Wall Mount Kit Specifications (VESA 38 ■ Using the Anti-Theft Kensington Lock 38 ■ Securing the TV to the Wall...
... 33 ■ Recording 34 ■ Listening through a Receiver (Home theater 35 ■ Troubleshooting for Anynet 35 Appendix ■ Troubleshooting 36 ■ Installing the Stand 37 ■ Disconnecting the Stand 37 ■ Wall Mount Kit Specifications (VESA 38 ■ Using the Anti-Theft Kensington Lock 38 ■ Securing the TV to the Wall...
User Manual (ENGLISH)
Page 5
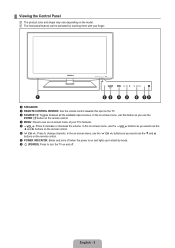
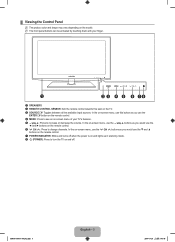
... ◄ and ► buttons on the remote control. 6 z: Press to turn the TV on and off when the power is on and lights up in stand-by touching them with your TV's features. 5 y: Press to see an on-screen menu of your finger. 1 2 3 4 5 6 78 1 SPEAKERS 2 REMOTE CONTROL SENSOR: Aim the remote...
... ◄ and ► buttons on the remote control. 6 z: Press to turn the TV on and off when the power is on and lights up in stand-by touching them with your TV's features. 5 y: Press to see an on-screen menu of your finger. 1 2 3 4 5 6 78 1 SPEAKERS 2 REMOTE CONTROL SENSOR: Aim the remote...
User Manual (ENGLISH)
Page 39
...To make sure the TV is installed on the screen. If you press and hold the EXIT button for a while. Separate the stand from the back of the screen. N Stand the product up and fasten the screws. Cover the bottom hole with the cover. the corner of sub pixels (6 220 800) ... This appears when you fasten the screws with the LCD TV placed down, it . The 'Resets all settings to one side. ¦ Disconnecting the Stand 1. Fasten two screws at position 1 and then fasten two screws at a proper level, do not apply excess downward pressure to distinguish between the front...
...To make sure the TV is installed on the screen. If you press and hold the EXIT button for a while. Separate the stand from the back of the screen. N Stand the product up and fasten the screws. Cover the bottom hole with the cover. the corner of sub pixels (6 220 800) ... This appears when you fasten the screws with the LCD TV placed down, it . The 'Resets all settings to one side. ¦ Disconnecting the Stand 1. Fasten two screws at position 1 and then fasten two screws at a proper level, do not apply excess downward pressure to distinguish between the front...

User Manual (ENGLISH)
Page 42
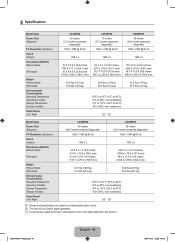
... Resolution (Optimum) Sound (Output) Dimensions (WxDxH) Without Stand With stand Weight Without Stand With Stand Environmental Considerations Operating Temperature Operating Humidity Storage Temperature Storage Humidity Stand Swivel Left / Right LN32B550 32 inches (31.5 inches ...(Diagonal) PC Resolution (Optimum) Sound (Output) Dimensions (WxDxH) Without Stand With stand Weight Without Stand With Stand Environmental Considerations Operating Temperature Operating Humidity Storage Temperature Storage Humidity Stand Swivel Left / Right LN46B550 46 inches (45.9 inches measured diagonally) 1920...
... Resolution (Optimum) Sound (Output) Dimensions (WxDxH) Without Stand With stand Weight Without Stand With Stand Environmental Considerations Operating Temperature Operating Humidity Storage Temperature Storage Humidity Stand Swivel Left / Right LN32B550 32 inches (31.5 inches ...(Diagonal) PC Resolution (Optimum) Sound (Output) Dimensions (WxDxH) Without Stand With stand Weight Without Stand With Stand Environmental Considerations Operating Temperature Operating Humidity Storage Temperature Storage Humidity Stand Swivel Left / Right LN46B550 46 inches (45.9 inches measured diagonally) 1920...
User Manual (user Manual) (ver.1.0) (English, Spanish)
Page 3
... 33 ■ Recording 34 ■ Listening through a Receiver (Home theater 35 ■ Troubleshooting for Anynet 35 Appendix ■ Troubleshooting 36 ■ Installing the Stand 39 ■ Disconnecting the Stand 39 ■ Wall Mount Kit Specifications (VESA 40 ■ Using the Anti-Theft Kensington Lock 41 ■ Securing the Installation Space 41 ■...
... 33 ■ Recording 34 ■ Listening through a Receiver (Home theater 35 ■ Troubleshooting for Anynet 35 Appendix ■ Troubleshooting 36 ■ Installing the Stand 39 ■ Disconnecting the Stand 39 ■ Wall Mount Kit Specifications (VESA 40 ■ Using the Anti-Theft Kensington Lock 41 ■ Securing the Installation Space 41 ■...
User Manual (user Manual) (ver.1.0) (English, Spanish)
Page 5
... use the ▼ and ▲ buttons on the remote control. 7 POWER INDICATOR: Blinks and turns off when the power is on and lights up in stand-by mode. 8 P (POWER): Press to turn the TV on and off. ¦ Viewing the Control Panel N The product color and shape may vary depending on...
... use the ▼ and ▲ buttons on the remote control. 7 POWER INDICATOR: Blinks and turns off when the power is on and lights up in stand-by mode. 8 P (POWER): Press to turn the TV on and off. ¦ Viewing the Control Panel N The product color and shape may vary depending on...
User Manual (user Manual) (ver.1.0) (English, Spanish)
Page 40
...window located on TV menu is only available with digital channels with an HDMI connection. TV is not a defect. Your settings are flexible enough for SAMSUNG TV code. 'Not Supported Mode' message. ● Check the supported resolution of the product's design and is tilted to MENU → Setup ... rolling horizontal bars and buzzing noise from the TV speakers with Component cable connection. ● Remove the left side. ● Remove the stand base from the set -top-box has a grounding issue. If can not be selected in the Self Diagnostic connection (Air or Cable). ...
...window located on TV menu is only available with digital channels with an HDMI connection. TV is not a defect. Your settings are flexible enough for SAMSUNG TV code. 'Not Supported Mode' message. ● Check the supported resolution of the product's design and is tilted to MENU → Setup ... rolling horizontal bars and buzzing noise from the TV speakers with Component cable connection. ● Remove the left side. ● Remove the stand base from the set -top-box has a grounding issue. If can not be selected in the Self Diagnostic connection (Air or Cable). ...
User Manual (user Manual) (ver.1.0) (English, Spanish)
Page 41
... position 1 and then fasten two screws at a proper level, do not apply excess downward pressure to the upper left of right sides of the TV. 2. N Stand the product up and fasten the screws. If you fasten the screws with the cover. Cover the bottom hole with the LCD TV placed down..., it . N Two or more people should carry the TV. Separate the stand from the back of the stand when attaching it may lean to the stand. Attach your LCD TV to one side. ¦ Disconnecting the Stand 1. BN68-01883C-00L02.indb 39 English - 39 2009-07-28 ¿ÀÈÄ...
... position 1 and then fasten two screws at a proper level, do not apply excess downward pressure to the upper left of right sides of the TV. 2. N Stand the product up and fasten the screws. If you fasten the screws with the cover. Cover the bottom hole with the LCD TV placed down..., it . N Two or more people should carry the TV. Separate the stand from the back of the stand when attaching it may lean to the stand. Attach your LCD TV to one side. ¦ Disconnecting the Stand 1. BN68-01883C-00L02.indb 39 English - 39 2009-07-28 ¿ÀÈÄ...
User Manual (user Manual) (ver.1.0) (English, Spanish)
Page 43
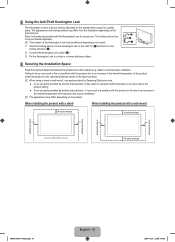
...(3.9 inches) BN68-01883C-00L02.indb 41 English - 41 2009-07-28 ¿ÀÈÄ 3:46:03 When installing the product with a stand When installing the product with the product due to an increase in the internal temperature of the product. Connect the Kensington Lock cable (3). 3. N The...; Using the Anti-Theft Kensington Lock The Kensington Lock is a device used to physically fix the system when using a stand or wall-mount, use parts provided by Samsung Electronics only. If you use parts provided by another manufacturer, it may result in a problem with the product...
...(3.9 inches) BN68-01883C-00L02.indb 41 English - 41 2009-07-28 ¿ÀÈÄ 3:46:03 When installing the product with a stand When installing the product with the product due to an increase in the internal temperature of the product. Connect the Kensington Lock cable (3). 3. N The...; Using the Anti-Theft Kensington Lock The Kensington Lock is a device used to physically fix the system when using a stand or wall-mount, use parts provided by Samsung Electronics only. If you use parts provided by another manufacturer, it may result in a problem with the product...
User Manual (user Manual) (ver.1.0) (English, Spanish)
Page 45
... Resolution (Optimum) Sound (Output) Dimensions (WxDxH) Without Stand With stand Weight Without Stand With Stand Environmental Considerations Operating Temperature Operating Humidity Storage Temperature Storage Humidity Stand Swivel Left / Right LN32B550 32 inches (31.5 inches ... (Diagonal) PC Resolution (Optimum) Sound (Output) Dimensions (WxDxH) Without Stand With stand Weight Without Stand With Stand Environmental Considerations Operating Temperature Operating Humidity Storage Temperature Storage Humidity Stand Swivel Left / Right LN46B550 46 inches (45.9 inches measured diagonally) 1920...
... Resolution (Optimum) Sound (Output) Dimensions (WxDxH) Without Stand With stand Weight Without Stand With Stand Environmental Considerations Operating Temperature Operating Humidity Storage Temperature Storage Humidity Stand Swivel Left / Right LN32B550 32 inches (31.5 inches ... (Diagonal) PC Resolution (Optimum) Sound (Output) Dimensions (WxDxH) Without Stand With stand Weight Without Stand With Stand Environmental Considerations Operating Temperature Operating Humidity Storage Temperature Storage Humidity Stand Swivel Left / Right LN46B550 46 inches (45.9 inches measured diagonally) 1920...


